
More Building Science


This is the second post in a 2-part series on the physics of moving air through ducts. If you missed it, click here for The Best Velocity for Moving air Through Ducts, Part 1.
The first thing to know about the velocity of air moving through ducts is that the slower you get the air moving, the better it is for air flow. That was the main point of my last article. It asked the question, is low velocity bad for air flow in ducts? And the answer was that, in terms of air flow, you really can’t get the air moving through the ducts too slowly.
But that’s not the end of the story. If it were, you’d always try to get the lowest velocity possible by using the biggest ducts that fit the space without blowing the budget. There’s another relevant fact, however, and ignoring it can lead to trouble.
Second Law troubles
In moving air through a duct system, we want good airflow, but remember that the object isn’t just to move air throughout the house. It’s to move heated air in winter and cooled air in summer. When that conditioned air is moving through the ducts, the second law of thermodynamics comes into play because we have a temperature difference between the inside and outside of the ducts.
The second law of thermodynamics says that when you have objects at different temperatures, heat flows from the warmer to the cooler object. In winter, the warm air in our ducts can lose heat to the surroundings. In summer, the cool air gains heat from the surroundings.
And the amount of heat that flows between the duct and its surroundings depends on three things:
- Surface area of the ducts
- Temperature difference between the ducts
- Insulation level (as given by U, the heat transfer coefficient, or R, the resistance to heat flow)
The equation that ties these things together is:
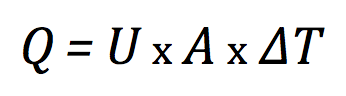
Q here is the rate of heat flow and the units we use for it here in the US are British thermal units per hour (BTU/hr).
Heat transfer into moving air
As the conditioned air moves through a duct, it gains or loses heat in proportion to those three factors. But that just tells you how many BTUs go into or out of the duct in an hour. The other factor is how much air is involved in picking up each BTU. The factor that governs this is velocity:
The slower the air moves in a duct, the more BTUs each cubic foot gains or loses.
And it’s not just time of contact that’s responsible. To get the air moving slower, we need bigger ducts so there’s more surface area, too. The upshot of all this is that when you’re sizing ducts, you have to consider the space those ducts are in.
If you put ducts in conditioned space, you can move the air as slowly as you’d like. When you put the ducts in an unconditioned attic, you want to move the air at a higher velocity, pushing it up near the maximum recommended by ACCA Manual D, 900 feet per minute (fpm) for supply ducts and 700 fpm for return ducts.
Mike MacFarland’s duct sizing tool
My friend Mike MacFarland in Redding, California is a home performance and HVAC wizard. He knows the principles and has studied the research and he installs some of the best duct systems in the country. He uses the following ranges of velocity for ducts in different types of space:
600 to 750 fpm — Exposed ducts in unconditioned attics
400 to 600 fpm — Deeply buried ducts in unconditioned attics
Less than 400 fpm — Ducts in conditioned space
He put this into a chart that allows you to find the duct diameter that gives you the right velocity and air flow rate (cfm). The full chart covers duct sizes ranging from 4 inches to 18 inches and air flow rates from 0 to 1,200 cfm. (You can download the full chart by clicking on the image below or the link at the bottom of this article.) Here’s the bottom part of the chart, covering air flow rates up to 300 cfm:
![Mike MacFarland's duct sizing tool [Photo credit: Mike MacFarland, Energy Docs]](https://images.greenbuildingadvisor.com/app/uploads/2019/06/25142511/duct-sizing-tool-mike-macfarland-0-300-cfm-700x340.png)
The takeaway here is that low velocity is great for air flow but sometimes bad for heat transfer. By selecting duct sizes that yield velocities appropriate for the conditions, you get the best of both worlds.
Download Mike MacFarland’s Duct Sizing Tool
Allison Bailes of Decatur, Georgia, is a speaker, writer, building science consultant, and the author of the Energy Vanguard Blog. You can follow him on Twitter at @EnergyVanguard.
Weekly Newsletter
Get building science and energy efficiency advice, plus special offers, in your inbox.


6 Comments
Thank you for this informative article! It's very hard to find this sort of information if you're not in HVAC school, I have discovered.
I'm in the process of designing a heat system for my old-house remodel using Mitsubishi heat pumps. My plan requires a short linear duct upstairs so I can heat multiple rooms with a single air handling unit (SEZ-KD15NA4). Both the air handler and the duct will be in the conditioned space: the unit will be in a closet and the duct will be in a soffit.
I read your great 2016 article series on duct design. The one thing I couldn't piece out from it, was how to connect the BTU requirements for each room to the number of CFM needed. "MANUAL S". Does your next article explain this one?
Another rule of thumb popped up, which is 400 CFM = 12,000 BTU.
However, after reading this it seems like it might be ok to use this rule of thumb in order to get the proportions, and then simply scale the ducts as big as one can aesthetically stand, keeping them in proportion to each other. Bigger ducts would keep the static pressure low as well as the velocity. Correct?
Thanks again,
-Mike
It seems like you might be conflating 400 cfm (volume rate) and 400 fpm (velocity). You only get 400 fpm out of a 400 cfm flow when the cross section of the is 1 square foot.
The 400 cfm/12,000 BTU rule of thumb is for latent load handling on cooling equipment. On single speed air conditioners if you cut that ratio in half the evaporator coil is prone to icing up, if doubled the latent cooling goes way down, delivering cool-but-clammy conditions indoors.
But sure, a bigger duct yields lower velocity, which reduces the static pressure induced by the duct.
So, my approach to duct sizing might actually work in this case? Nice big grilles might be a good idea too?
Big grilles on the return registers is fine, but you may need to taper down to a smaller size/greater velocity and use smaller supply grilles to get sufficient throw for good mixing.
Thank you!!
> If you put ducts in conditioned space, you can move the air as slowly as you’d like.
But with low velocities and variable air flow, your balance (room to room Btus) becomes increasingly variable - leaving that distant room under/over conditioned. How much, I don't know.
Re #2 - CFM/ton and poor latent performance is a real problem for most ducted mini-splits at less than full output.
Log in or create an account to post a comment.
Sign up Log in