
Image Credit: Stu Turner I used SketchUp and Google Earth to model the exact shading at any time of day and any day of the year.
Image Credit: Stu Turner I installed a continuous horizontal layer of 6-inch-thick Type II EPS (R-25) under the slab.
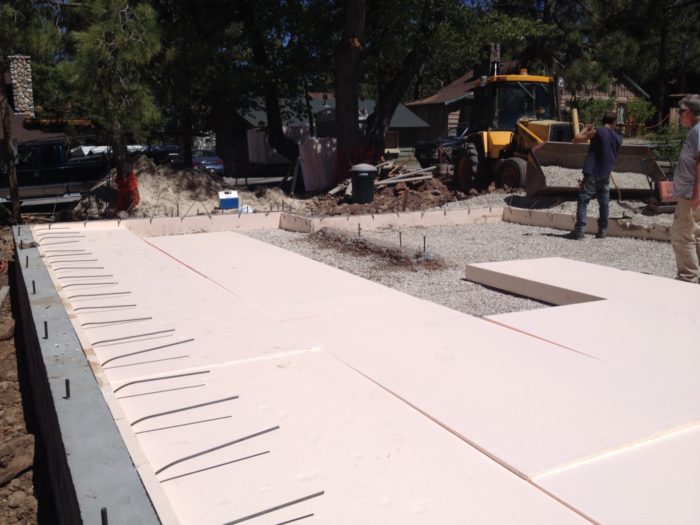
Image Credit: Stu Turner After the 2-inch vertical insulation was installed on the inside of the frost walls (to a depth of 24 inches), the gravel base was compacted. Then the horizontal EPS panels (6 inches thick) were installed in a brick pattern. Holes around plumbing penetrations were sealed with spray foam.
Image Credit: Stu Turner I found the tops of the concrete frost walls to be pretty rough, and even though I was planning on using a sill gasket from Conservation Technologies, I decided to use an angle grinder to smooth and flatten the concrete under my sill plates as much as possible.
Image Credit: Stu Turner I used a flexible EPDM gasket for the sill seal.
Image Credit: Stu Turner The flanges of the Pella 350 windows were taped to the Hydrogap housewrap.
Image Credit: Stu Turner Fire codes required me to use a non-combustible siding material, so I went with James Hardie fiber-cement for most of my siding.
Image Credit: Stu Turner The open-cell spray foam being installed, with a trimmed bay next to an untrimmed bay. The installers filled alternating stud bays to allow for easier trimming.
Image Credit: Stu Turner Roxul brand rock wool insulation was installed in the inner wall stud bays. Untrimmed spray foam insulates the rim joist above.
Image Credit: Stu Turner I used 6-mil polyethylene as the ceiling air barrier. Seams were sealed with acoustical sealant.
Image Credit: Stu Turner Ceiling electric boxes were capped with special EPS covers from Energy Block. The covers were spray foamed into place.
Image Credit: Stu Turner The house has two Mitsubishi Mr. Slim ductless minisplit heat pumps. The outdoor units are model #MUZ-FH15NA.
Image Credit: Stu Turner The 5-kW photovoltaic array consists of 18 Solar World panels. This photo was taken by a small drone.
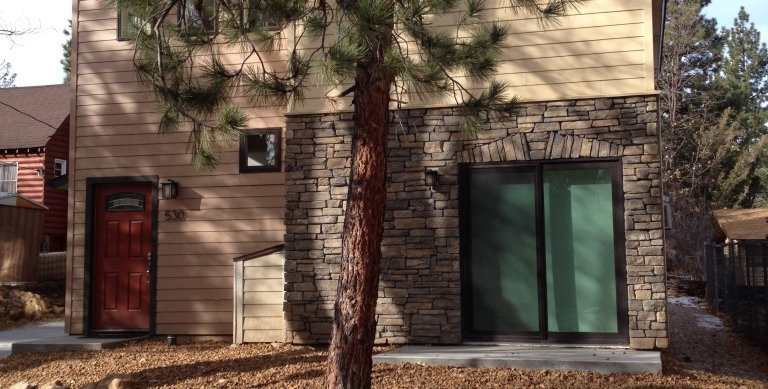
Image Credit: Stu Turner This photo shows two of the home's four exterior doors.
Image Credit: Stu Turner The home's south elevation includes nine windows.
Image Credit: Stu Turner The two-story entry is flooded with natural light.
Image Credit: Stu Turner The house is heated by two ductless minisplits. One of the indoor minisplit units is visible above the refrigerator.
Image Credit: Stu Turner Floor plans. The garage door faces east.
Image Credit: Stu Turner
A high-performance design for the mountains above Los Angeles
A few years into the housing bust, I started shopping around for a cabin to use as a getaway and vacation rental. I live in San Diego and I set my sights on the resort town of Big Bear Lake, in the San Bernardino mountains northeast of Los Angeles. Just 2½ hours away, it was a place where my family and I had spent many weekends skiing, snowboarding, mountain biking, and fishing.
During a leisurely on-and-off property search, I found several deals, but was generally underwhelmed by the quality of the housing stock from an energy perspective. Even the newer homes were of “barely legal” code minimum construction, and winter heating bills north of $500 per month were not unusual.
This was shocking to me, perhaps because my own mild coastal climate has a meager 1,200 heating degree days (HDD) and 1,000 cooling degree days (CDD) per year. I typically use my furnace intermittently for a few months a year, and I don’t even own an air conditioner. Or maybe my expectations were just too high because my only exposure to cold climate construction came from reading Green Building Advisor!
Eventually, I started exploring the idea of building a house, but I soon learned that the going rate for new custom home construction (about $250 per square foot) was out of my price range. Things changed when I discovered several GBA articles about cost-effective, energy-efficient construction – most notably PostGreen’s 100K house, Eric Thomas’s house in Seattle, and Carter Scott’s work in Massachusetts. These case studies inspired me to pursue the project as owner/builder.
Outdoor temperatures can drop below zero
In the summer of 2013, I found a great deal on a bank-owned 50 ft. x 100 ft. lot with decent southern exposure, and set about designing the house. At this point my goal was to create a “Pretty Good House” that hopefully approached net zero energy use.
At an elevation of 6,800 feet, Big Bear has an alpine climate with 6,600 HDD and a Manual J design temperature of -7°F. Yet it also boasts over 300 sunny days a year, and is even home to a solar observatory constructed by CalTech in 1969.
I eventually settled on a simple rectangular two-story shape, sandwiched between a huge oak in the front of the property and a small stand of pines in the rear. The design featured 2,200 square feet of conditioned space, with 3 bedrooms, a loft, 2½ bathrooms, and an attached one-car garage.
After performing some heat load calculations, I was confident that two minisplits could meet the heating demand, assuming a “pretty good” level of insulation and decent air sealing. With the help of a local architectural engineer, I soon had a minimal set of plans approved by the city.
“I never heard of that”
One of my biggest challenges (in addition to my own lack of time, experience, and money) was finding subcontractors and materials to implement the energy-efficient aspects of the design. For example, after weeks of calling around, I was unable to locate a company that could blow dense-packed cellulose into the framed walls. I guess in the land of R-13 walls, there isn’t much demand for these installations.
Finding a dealer of high-density below-grade EPS was an arduous task. But after working with a manufacturer’s rep, I was able to find a local building supply company that special ordered it for me.
My framing sub was excellent and open-minded. I tracked down Rob after reading about his involvement in the construction of a local SIP house. But his crew had never heard of building gaskets, Zip sheathing, blower door tests, double-stud walls, or textured housewrap. In Southern California, this would have been the case with any contractor, except for a few specialty builders.
So at every step of the design process I had to balance what I wanted to do with what materials and services were readily available.
Stemwalls and a slab on grade
My foundation consists of 3-foot-deep frost walls and a 4-inch slab on grade. The slab was insulated with a 6-inch layer of horizontal Type II EPS on a 6-inch-deep gravel bed, with 2 inches of vertical EPS at the perimeter between the frost walls and the slab. A layer of polyethylene was laid over the EPS before the slab was poured.
Even though my foundation contractor had never built an insulated slab before, the process was straightforward and he had no trouble pulling it off. However, I decided to take an angle grinder and smooth down the tops of the frost walls, so that my sill gaskets (from Conservation Technologies) would have a relatively smooth surface to rest on.
Double stud walls
My exterior walls were of double stud construction – an outer load-bearing 2×4 wall supporting TJI floor joists, and an inner 2×4 wall. The 2-inch gap between the two rows of studs created a 9-inch-thick wall.
Although most of the precipitation in this climate is in the form of snow rather than rain, I wanted to design my walls so that they could dry out to the exterior and interior. The walls were sheathed with OSB. James Hardie Plank siding was installed over a textured housewrap (Benjamin Obdyke’s HydroGap).
To create an air barrier, I installed 3.5 inches of open-cell spray foam on the interior side of the wall sheathing. Building gaskets and caulk completed the air barrier.
Between the two rows of studs we installed a 2-inch layer of continuous rock wool (CertainTeed Thermafiber). This was followed by 3.5 inches of rock wool in the inner wall stud bays (Roxul Comfort Batt). CertainTeed MemBrain (a “smart” vapor retarder) was installed on the interior side of the studs prior to drywall.
The roof was built with scissor trusses featuring 24-inch raised “energy” heels, 4/12 top chords, and 2/12 bottom chords.
The ceiling air barrier was a continuous sheet of taped polyethylene installed on the underside of the bottom chord of the roof trusses. The polyethylene extended to the top plate of the outer wall, where it was sealed with staples and acoustical sealant. I had only a handful of second-floor ceiling penetrations.
The ceiling is insulated with 18 inches of loose-fill cellulose.
Triple-glazed windows
After agonizing over windows for months, I finally settled on Pella 350 vinyl windows with triple-pane air-filled glazing. The whole-window U-factors ranged from 0.26 to 0.18. To help capture passive heat in the winter, the windows on the south elevation had a SHGC of 0.50.
I used a mixture of fixed, awning, and sliding windows. My entry doors were Masonite brand with U-factors ranging from 0.15 to 0.23.
Exhaust-only ventilation
The house has an exhaust-only ventilation system using an inline fan system purchased from Conservation Technologies. The fan has a maximum power draw of 38 watts (4.5 cfm/watt at 0.25 static pressure).
The exhaust air is pulled from three bathroom grilles that operate at a constant flow rate of 16 cfm each. However, each grille is equipped with a motion and humidity sensor that can signal the fan and boost airflow to 50 cfm at each location.
Two minisplits for heating
I calculated that my steady-state heat loss at -7°F (the Manual J outdoor design temperature) is about 20,000 BTU/h. So if it ever did get that cold (it never came close this season), my two 12,000 BTU/h Mitsubishi Mr. Slim minisplit units could keep up without much of a problem. Both are Hyper Heat units (indoor MSZ-FH15NA, outdoor MUZ-FH15NA) which can operate at full capacity down to 5°F, and drop to 80% of their rated capacity at -13°F.
The downstairs unit is on a RedLink thermostat than can be controlled with a smartphone app, and that unit alone should be able to heat the entire house most of the year. I plan to use the upstairs unit seasonally, during the worst months of winter.
I also installed an 18,000 BTU/h direct-vent gas fireplace as a backup heat source. The local electric utility, Bear Valley Electric, is known to suffer occasional outages in the winter, and the fireplace has a battery backup ignition system.
Sealed-combustion appliances
I took several measures to achieve better indoor air quality than a code-minimum house. Both of the home’s combustion appliances (a tankless water heater and a fireplace) are sealed-combustion units, with all of the combustion air coming from the exterior.
My clothes dryer and other appliances, including the induction cooktop, are all electric. All paints and adhesives are low-VOC, and all furniture and cabinets are formaldehyde-free, which is a requirement of California’s “CalGreen” code. I also used no carpeting: the upstairs flooring is wood laminate and downstairs flooring is tile.
A 5-kW photovoltaic system
My solar array is composed of eighteen 280-watt American-made SolarWorld PV modules, for a total system size of 5.04 kW. The PV array is connected to the electrical grid, and the local utility offers net metering.
My hopes of achieving net zero energy use dwindled after a shading analysis downgraded my system’s expected performance to about 5,500 kWh per year. I expect that my minisplits will use 3,700 kWh per year, and everything else will come in at around 3,000 kWh. And that is not even including my natural gas usage. So the PV system will reduce, but not eliminate, the home’s energy bills.
However, because the house is not fully occupied — it is a vacation rental — my net metering calculations show a huge surplus. In each of the last 6 months I have only had to pay the minimum electrical bill ($6), and I still have 1,800 kWh “in the bank”. March 2016 was a particularly encouraging month. With the thermostat set at 69°F for the entire month, my total electrical usage was 477 kWh, and the PV system generated 467 kWh. My gas bill averages $20. So while the house would most likely not operate at net zero under normal occupancy, I did end up with a rental property with very low utility bills.
About $107 per square foot before PV
I’m pleased with the house. It looks great and has stayed toasty during the worst months of winter. So far, all of my rental guests have enjoyed the house and found it comfortable.
I was able to keep construction costs down by being the general contractor and micromanaging all of the energy-efficient details surrounding the construction. I also did a lot of the interior finish work myself, about 6 weeks of labor in total over a period of a year or so.
Not including my own labor or the PV system, I spent about $107 per square foot in hard costs for the house and garage.
Weekly Newsletter
Get building science and energy efficiency advice, plus special offers, in your inbox.
Lessons Learned
Exhaust fans. Although I think the constant pressure exhaust-only fan from Conservation Technologies is a very elegant system, if I did it over again, I would go with something simpler like Panasonic WhisperQuiet exhaust fans in each bathroom. The Conservation Technologies fan required a lot of ducting and is not as quiet as I had hoped. Although it is rated at only 55 decibels, I had to really work on isolating the fan from the mounting and the ducting to get the noise to where it was barely noticeable through an insulated wall. But I think a bigger issue with the fan is that it is such a specialized product, what happens when it needs to be serviced or replaced? If I had used standard bath fans, that would not be an issue. I doubt any HVAC companies in Big Bear would touch my “crazy” inline Swedish fan system.
Mysterious air leaks. My air leakage rate (1.8 ach50) came in a lot higher than I had hoped for. At some point I would love to do some follow-up testing to try to figure out where the leakage points are. I don’t think that the air leakage has impacted my performance very much, since I am using an exhaust-only ventilation system that (hopefully) results in a negatively pressured interior with very little infiltration. I suspect that there are leaks at my sliding windows and my sliding glass door, as these are generally more leaky than awning windows. Another factor is the number of exterior doors; I have four but I probably could have made the house work with two.
I should have specified Zip sheathing. Another thing I would have changed is my air barrier and insulation choices. Seeing all the trimmed-off foam being packed up in trash bags and hauled away seemed like a sickening waste. I would have been better off using Zip sheathing as my air barrier, and some kind of cellulose (I have since found a contractor who installs damp-spray cellulose) or 100% rock wool as my wall insulation.
I should have included energy monitoring equipment. I wish I had invested in a simple energy monitoring system. I am looking to install one before next winter, so I can at least track the energy use of my minisplits.
Minisplits are fairly quiet, but have some noticeable sound. The minisplit indoor units are extremely quiet and unassuming. The outside fan coils are also very quiet, if you are standing right next to them. But because my exterior units were hung on the exterior wall, I do notice some sound vibrations through the wall when the exterior units are really working. So I can see the wisdom of mounting the exterior units on a concrete pad not attached to the house.
Stu Turner, M.S. Architecture, is an occasional environmental science T.A. at the NewSchool of Architecture + Design. He is also a member of the residential committee of the San Diego chapter of the USGBC.
General Specs and Team
| Location: | Big Bear Lake, CA |
|---|---|
| Bedrooms: | 3 |
| Bathrooms: | 2.5 |
| Living Space: | 2258 |
| Cost: | 107 |
| Additional Notes: | Cost per square foot excludes the PV system and all soft costs, and includes the 286-square-foot garage. |
Construction
Foundation: Perimeter frost walls and slab on grade.
Foundation insulation: Horizontal layer of 6-in. EPS under slab (R-25), with 2 in. of vertical EPS (R-8) at slab perimeter.
Above-grade walls: Double-stud walls (total thickness, 9 in.) with OSB sheathing.
Above-grade wall insulation: 3.5 inches of open-cell spray foam and 5.5 inches of mineral wool (totaling R-34)
Siding: Fiber-cement and stone veneer.
Roof construction: Raised-heel scissors trusses, OSB sheathing, asphalt shingles.
Roof insulation: 18 in. (R-60) of blown-in cellulose.
Windows: Pella 350 windows with triple glazing; U-factors range from 0.18 to 0.26.
Domestic hot water: Navien 199,000 BTU gas-fired condensing tankless water heater (Energy Star, 0.97 EF).
Mechanical ventilation: Exhaust-only system complying with ASHRAE 62.2.
Space heating: Two 12,000 BTU/h Mitsubishi Mr. Slim Hyperheat ductless minisplits.
Fire safety: Residential fire sprinkler system, all windows have tempered glass, non-ember admitting attic vents, fire-resistant exterior materials.
Energy
100% LED lighting (except for 2 accent fixtures)
Energy Specs
Blower door test results: 1.8 ach50
HERS Index: 53 (without PV), based on California’s 2008 Title 24 Energy Code (in effect until July 2014).
Water Efficiency
Low-flow water fixtures, 1.28 GPF toilets, no outside irrigation system (100% native landscaping + gravel).
Indoor Air Quality
All paints and adhesives are low-VOC.
All furniture and cabinets are formaldehyde-free.
No carpeting; the upstairs flooring is wood laminate and downstairs flooring is tile.
Alternate Energy Utilization
Photovoltaic system rated at 5 kW.


8 Comments
Various comments
Bracket mounting mini-split compressor units on a 2x4 wall is probably several STC points louder than on a 2x6 wall, and a fiber cavity fill on that exterior wall is probably a few STC points lower than open cell foam. It's still a bit surprising that it's loud enough to be annoying.
Big Bear Lake CA gets ~65", (more 5' )of annual snowfall on average, and that's just the average, with no drift depth issues factored in. That's comparable to the ~64" annual average in my city, where at least two years out of the past 20 broke 10 feet. Mounting them on a concrete pad at ground level is not an option for those less adept with a snow shovel. In my area I've been recommending keeping the bottom of the mini-split at least four feet above grade, which seems to work, even in the 10' snowfall years. However, the settled snowpack was deep enough by the end of winter in 2015 was deep enough that revising that upward by another foot wouldn't be insane. A 4-5 footer is a pretty tall stand to mount on a pre-fabbed condenser pad. Bracket mounting on the wall was still probably the right thing to do.
The whole-assembly-R of the slab is nearly as high as the exterior walls after factoring in the thermal bridging of the framing. Taking some of that sub-slab foam and applying it to the thermally bridging concrete stemwalls may have been a more effective use of the material. As drawn there appears to be a ~R2 thermal bridging between the interior and stemwall at the cantilevered interior studwall's bottom plate, maybe R3 from interior to the great outdoors. IAttempting to scale from undimensioned drawing is rife with error, but that's the way the detail drawing appears:
https://www.greenbuildingadvisor.com/sites/default/files/images/Turner%20-%20Wall%20section%202.jpg
Was pouring the stemwall an insulated concrete form ever considered?
Air Leaks
I second your comment about the Pella sliding windows and the sliding glass doors are leaking air. Just by design it is next to impossible to properly air seal a sliding window or door. Whether it's a slider or straight-up slider (aka single hung/double hung), they will leak and it gets worse over time since the seals wear out and the windows get out of square with time. That's why European tilt & turn windows do a way better job sealing. The engineering design provides a much tighter seal vs sliders. There's a house here with Pella 350 windows and all the sliding windows and doors leak air.
Take a smoke stick to the windows and you will see for yourself.
RE: Various comments
Hi Dana, thanks for taking the time to comment. Regarding the minisplits, I am actually very happy with their overall sound performance, I would call it "noticeable" but not "annoying". They are rarely even noticeable, and are MUCH quieter than my forced air furnace back in San Diego. When the weather was in the teens back in January, I could hear the outdoor units cycling on, as a deep vibration changing frequencies. It was only noticeable from the kitchen, dining area, and master bedroom. I guess my point was just that sound could be a consideration when they are wall mounted, and if you are in a climate with very little snow accumulation, a pad would seem to be a better sound isolation strategy. You are correct about Big Bear - my HVAC contractor would not install them any lower than 5 feet off the ground. I went with 6 feet just to play it extra safe. I firmly believe my installation was the correct one for the climate, and if I did it again I would keep them on the wall.
And you are very observant to notice the ~R2-R3 thermal bridging at the sill plates. That is indeed a weak point in the envelope. I had not considered using ICFs - perhaps I should have, I do know the plates had to bear 100% on concrete according to my Engineer, but not sure if that would have been an issue with ICFs. But I did spend some time trying to work out a detail where the foam was on the exterior of the stem walls. However, I was worried about infestation by Carpenter ants on the property and couldn't seem to come up with an elegant solution on incorporating the foam there. So this was just one of the many unfortunate compromises I ended up making.
Cantilevering 2x6s off the ICF is sometimes allowed
With the seismic code aspects in CA it might not be allowed, but in other locations hanging 2" of a load bearing 2x6 16" o.c. studwall plate off the edge of the concrete is sometimes allowed, since it's structurally comparable to a 2x4 wall at the edge. With 2" of framing cantilevered and 1/2" of sheathing it aligns nicely with a 2.5" + 2.5" ICF from a continuous drain-plane perspective. A short bit of copper Z-flashing tape-sealed to the ZIP to bring bulk water coming down a half inch or so beyond the foam would work. The leaching copper also reduces ant risks.
A copper clad plastic sill gasket extending over the ICF foam usually works for carpenter ant deterrence without making another thermal bridge, though nothing is perfect. In severe termite infestation areas full-on copper flashing may be required. Copper is toxic to the gut flora termites and ants need for digesting wood, and it doesn't take a lot of leaching to make a difference, but there's nothing quite like a full metal barrier AND a bit of copper leaching onto the foam.
From total heat load and comfort point of view I doubt the thermal bridge is very noticeable, even at -7F.
I'm glad to read that even when you can hear it the mini split compressor is below annoyance levels. I'm also glad to read that the installer won't put them any lower than 5' above grade. In my area there is often push-back on wall mounting them from installers concerned about the noise. I see many more of them installed at grade as if it only needed to work as an air conditioner, rather than above local historical snowpack depths. I also see signs of folks digging them back up in the AM after every nor'easter.
Nice house- I hope you really enjoy it!
non-ember admitting attic vents
Can you provide a source and or detail drawing for non-ember admitting attic vents ?
Robert
You may find this discussion useful:
https://www.greenbuildingadvisor.com/community/forum/mechanicals/43986/positive-pressurized-attic-space-fire-protection-and-summer-coolin
Brandguard Vents
Hi Robert, I used vents from a local company called Brandguard. However, I believe they are available nationwide. See: https://www.brandguardvents.com/
Thanks for the information, Robert. Could you share the rental listing in case I ever make it up to Big Bear, I plan to build soon in Santa Monica and would like a chance to experience a high performance house if I ever make it up to Big Bear.
Log in or create an account to post a comment.
Sign up Log in