Crawl space encapsulation help
* Updating this as I go, in case it will help anyone.
I just want to make sure I understand all this correctly so that I can do a professional looking job, or make sure it get done correctly should it be out of my skill set. This way if I ever sell my home I don’t have any problems with Home Inspections.
Here is my info and plan of action followed by a few questions:
INFO:
Project area : 1000 sq Feet, 15-16 inches between ground and floor joist. ( 2 hollow blocks)
HVAC Supply Duct vents in crawl.
CODE: IBC, IRC ……. (2006) (looks like not much changed in this area compared to 2018)
Climate zone 4A
CrawlSpace Wall: R-10 Continous, R-13 Cavity.
N1102.2.11 (R402.2.11)
” Crawl space walls insulation shall be permanently fastened to the wall and Shall extend downward from the floor to the finished grade elevation and then vertically or horizontally for not less than an additional 24 inches.”
Plan Material:
Insulation:
EPS (DOW)
DOW ESR-2142 report says it can be installed without ignition / thermal barrier. I can’t find it reasonable priced no local store within 100 Mile carry it.
Alternate: Mineral wool batts.
Rockwool or Owens corning Thermafiber
vapor barrier/retarder:
StegoCrawl 10mil, With stego glues, tapes, etc.
(this is pricey, but seems to be “the best”)
Fasteners:
RodenHouse has many different types
PMF plasti-grips, Look nice but costly.
I found this nice PDF by Rockwool for permanently fastening Mineral wool.
https://cdn01.rockwool.com/siteassets/o2-rockwool/documentation/technical-guides/commercial-roofing/fasteners_technicalguide.pdf?f=20180523084208
Plan of install:
lay the vapor retarder all the way up to the end of the wall ( not just 6″ up. then install the Mineral wool.
Address details of rim joist, sill plate, before or after vapor retarder depending on moisture content. If its too high give it a chance to dry with vapor retarder and dehumidifier installed.
Address Detail of: top of block foundation wall before Vapor retarder is installed.
Rim joist and sill plate Details:
Use a 2 part foam or cut and cobble for rim/sill if they are a candidate for sealing.
Whats this about candidate for sealing? I was reading about wood rot problems. If the moisture content was to high and you sealed it in Or sealed / insulated without knowing why the moisture content was so high.
Seems there was 2 cause for concern:
1. capillary action due to missing capillary break between foundation wall and sill plate.
2. improper exterior setup ( siding, drainage plane, air barrier, flashing) allowing the sill to get wet. once insulated it will not dry.
before sealing up you seems you need to check:
1. Moisture content
2. The way the exterior sheathing + siding are installed ( to see if there will be or is a moisture problem / drying problem of sill/rim)
3. make sure there is a capillary break between the sill plate and block foundation.
While I Know the steps I still need to fill the details Like What is okay moisture content, What is okay way of sheathing + siding setup and is the thick hard black looking felt paper a capillary break.
Questions:
Questions About mineral wool Batts:
1. Is mineral wool batts okay code complaint application? They will be protected and in the conditioned space via the Vapor barrier.
Seems this is a legit approach, but there is concerns about moisture transport via air motion.
so while it looks like an good alternative to foam, it realistically still needs an air barrier and may cost more from fasteners and install vs Foam board.
2. Can you rip / split Meneral wool batts in two along its Thickness? AKA take a R23 5.5” thick and make 2 R11 ~ 2.6” thick.
Not worth the effort and issues involved, seems it may be hard to cut even setup with a jig.
3. How is rockwool (roxul) batts vs Owens Corning Thermafiber batts? (owens is 70% recycled).
Thinking greener, but don’t know how it is in terms of the quality and longevity. Like how poly vapor retarder degrades over time if the recycled content is to high.
4. permanently fasten batts. I would like to refrain from filling my foundation full of holes / nails ( structural integrity, thermal bridging, expansion and contraction of fasteners working lose are the concerns).
Has anyone seen or came by a code legal system that lets you “permanently fasten” by:
(these ideas are assuming I am installing the batts in a continuous fashion similar to foam board, because in my application the standard width of the mineral foam will cover my crawl space wall with one batt.)
4A: drop lumber from the joist and make a frame to press like a clamp to hold batts in place?
4B: Think strapping but with the strapping attached to Floor joists.
4C: Friction fit between Vapor retarder (floor) and floor joist (or running board perpendicular to floor joists.)
4D: Friction fit between vapor retarder (floor) and floor joist, but install a 2×4 perpendicular to floor joists say 3.5″ out for r-15 to creat a L-channel.
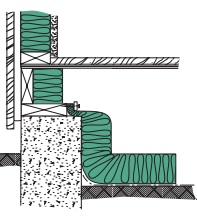
4E: (see image)
Knauf and NAIMA
I was reading an install by Knauf and then NAIMA where they run the batts in a continuous fashion similar to friction fit between stud bays, but there are no studs. Batts are longer than the wall and are fold in an L at the floor. The batts are pressed tight to each other, then fastened using nailer strip into the sill plate compressing the bats, then using weights or 2×4’s placed on top of the floor portion of the batts. Taped can be used on the floor (vapor retarder) and batt edge.
That lead to this Idea:
I will be installing a “board” at the top of my vapor retarder to give me a lip to mastic or caulk. I could install a 2×4 there then Install in a method like NAIMA, but use fastener and washers through the batts into the 2×4 that holds / gives a sealing joint to the vapor barrier.
Questions About the install:
5. What is the deal with an additional 24” of insulation? (They don’t state it on basement walls. Maybe its assumed basement walls will be over 24” past grade then?)
6. I am retrofitting and I am going to have to go Horizontally with that 24″.
I interpreter the code to say the vertical insulation on the wall needs permanently fastened, but it does not state the additional 24″ needs fastened.
Am I reading that right?
7. How would you address the 24” of horizontal insulation? ( I have my reservations about using some type of fastener that will puncture the vapor retarder.)
8. All that I have read and seen in videos people omit the 24″ additional insulation. when retrofitting? any clue why? ( I just got prime and have to finish reading the papers here.)
Thank you all for your time and expertise.
(p.s. If you know of better or cheaper but okay products let me know)
Don’t feel you need to give 100% answers. guidance, search terms or reading links are all good.
(edited to clean up)
GBA Detail Library
A collection of one thousand construction details organized by climate and house part


Replies
Hey Chris,
I am sure that you will soon get some helpful responses from experienced GBA members. In the meantime, have you read this? Building an Unvented Crawlspace
It's really hard to split an R23 batt into two co-equal 2.75" batts with enough precision to claim R10 min. Ideally there would also be an interior side air barrier, but the density of rock wool (or HD fiberglass) is sufficient to not lose much performance as long as they're stacked tight and there is at least an exterior air barrier. R15 high density fiberglass batts might cheaper than split R23 rock wool.
Reclaimed 2" roofing polyiso (about R11- R12) is usually even cheaper, and can be strapped directly with1x4 furring through-screwed to the foundation with 3.5-4" masonry screws, with half-inch wallboard mounted to the furring (doesn't need to be painted) to meet the thermal barrier requirements. Running this search on your local craigslist may turn up local foam reclaimers, or even remainders being dumped by contractors, etc:
https://baltimore.craigslist.org/search/sss?query=rigid+insulation
https://eugene.craigslist.org/search/sss?query=rigid+insulation
Just make sure that before the foam board goes up floor vapor barrier is lapped up at least a half-foot higher than the foam board, and seal it in place with a bead of polyurethane caulk between the vapor barrier & foundation. Sealing the loose edge to the foundation with duct mastic for redundancy is a good idea too. That way the vapor barrier is trapped to the foundation with the foam board.
The 24" prescriptive means the insulation had to extend as to be either down to at least 24" below grade, or if the crawlspace floor isn't that deep, it has to extend down to the floor then horizontally 24". (Many crawlspace floors are essentially at grade.) Basement walls usually go down more than 24" below grade.
Puncturing the vapor barrier isn't going to change the amount of vapor diffusion by very much. But if vapor barrier is the primary air barrier, it could be an issue. Detailing the foundation wall, foundation sill & band joist as the primary air barrier would be preferred.
Dana, would you mind explaining this, " Ideally there would also be an interior side air barrier". (are you saying to add an extra one like drywall on top of the insulation to help with heat loss / gains.)
( I edited my first post to make stuff cleaner more clear. I think)
My plan is to cover floor and the inside wall of my crawl space with stegocrawl then install insulation.
I have used rockwool before, and it cut nice with bread knife, but I did not try to rip it. I would set up a jig with 2x4's and spacers if needed on each side of the wool and use a stiff old hand saw or longer serrated knife. In theory It seems it would work.
I would only be cutting about 30 batts. It would save me about $165. Again I have never tried to split them in two half like that tho. This is only for 24" OC batts. There is no savings for 16" OC.
the reason I was asking about the 24" horizontal I seen no info on it on all the reading and videos I seen for retro fitting crawlspaces. First I seen of it was when I started finale planning reading the codes.
Do you think by code the Horizontals need fastened? If so do you think the geotextile fabric (wire) staples or (plastic) stakes would work or is there something better?
I don't mind paying for the extra r-15 vs splitting the r-23 if its worth it, but I read a post/blog from energy vanguard on diminishing returns of adding more insulation. I was not sure if the extra cost was justified if I could cut R-23 well enough.
Thanks for everything. Sorry for grammer, using a phone.
>"(are you saying to add an extra one like drywall on top of the insulation to help with heat loss / gains.)"
Yes, but it's not just heat loss/gain. The MOISTURE transport via air motion and diffusion through high density batts is more than order of magnitude bigger than through wallboard with a coat of standard latex primer. Thermally perfectly fitted high density batts will still perform close to spec without air barriers an all 6 sides of the batt (but not low or mid-density batts.)
>"Do you think by code the Horizontals need fastened? If so do you think the geotextile fabric (wire) staples or (plastic) stakes would work or is there something better?"
Traditionally batt-insulated crawlspace floor/wing insulation has been staked in place with wire staple. That makes a hole in the vapor barrier, which has almost no effect on the total ground moisture transfer. Even if there is a lot of leakage at the top of a multi-story building the stack effect pressures causing some amount of draw of soil gases through the tiny air leaks, including water vapor it's not usually enough to make a difference in crawlspace radon or humidity (and certainly inconsequential from an energy point of view). But for the perfectionists, it DOES create a number of small breaches in the pressure boundary of the house (likely well under one square inch of leak.)
Follow the advice here, including "allow the foundation wall assembly to dry inwards".
https://www.buildingscience.com/documents/information-sheets/crawlspace-insulation
Dana, Thanks for all the info. You have sparked me into doing more reading. I just learned about block walls and how easy air and water flow through them.
When you talk about the air barrier, are you concerned with condition air flow condensing on the interior side of the vapor retarder and wetting batts etc.. or are you concerned with air flow from through block wall etc. I know enough to over look half of the equation as it would seem.
I just need to decide on an a professional looking code complaint fastening method. "permanently fastened" is causing me an problem as you can see. do you have any thought on this? ( i edited the top a bit in that area.)
I was wanting to try to stay away from drywall, or some type of sealant topcoat etc.. on top of the batts, so I could inspect them for rodents etc.., But if it going to matter with air and all I can do it.
I think I almost have most this worked out, will try to keep the top updated if anyone ever comes along that it would help.
It seems I don't technically need termite inspection strip and i'm not using foam another concern with termites. is it still a good idea to keep a space? I will how to work it in to my install if so.
Jon R, Thanks for the link I gave it a quick read, I will be going over more focused latter this week.
>"When you talk about the air barrier, are you concerned with condition air flow condensing on the interior side of the vapor retarder and wetting batts etc.. or are you concerned with air flow from through block wall etc. I know enough to over look half of the equation as it would seem."
Different parts of the wall will experience moisture drives differently, and air tightness of both the CMU and interior side are key to controlling moisture flows. Below grade the moisture drive is always from the foundation wall toward the interior. Above grade there is a continuous moisture drive from the interior in winter, but exterior moisture drives can come & go with rain/snow events, and summertime outdoor humidity. The more air-tight the assembly is on both sides, the better control there will be. It's key to keep the moisture out of any moisture susceptible materials, particularly the structural wood.
The vapor retardency of latex paint on wallboard isn't very tight, but vapor diffusion through even UNpainted wallboard is small compared to air leakage. Using exterior grade fiberglass faced gypsum board (eg GP DensGlass) would be fine, and is much more moisture tolerant than paper faced wallboard (painted or otherwise).
Dana It seems, all the ups that come from mineral wool, comes with it own new set of install issues vs whats normal. The research time, cost, and labor my of set any savings on mineral wool vs foam.
I was under the impression Mineral wool was termite resistant, lacked the need for an additional barrier, was greener and more air tight.
This post has changed gears, and it seems mineral wool is able to be done, but there is more to it than foam. If I find more info before I do my install I will update here.
Thanks for everything everyone.