Drying Roof to the Interior vs. to the Exterior
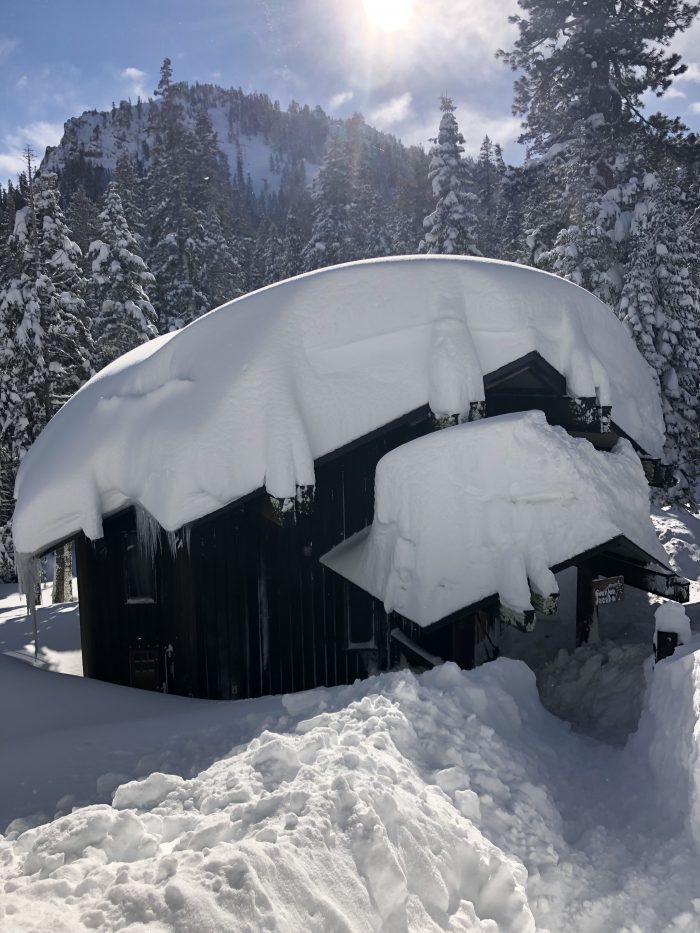
We have an R4 roof in Zone 7 (snow country). The existing roof is 4″x8″ T&G fir, underlayment, and composite shingles.
We are trying to decide if a PERSIST/REMOTE strategy will work best in our situation or not. Proponents of PERSIST/REMOTE advocate that it will work anywhere. But it will it work with any roof/eave design? My questions:
1. Can you dry a roof to the inside through 4 inches of solid wood? Currently the 4x8s are both the interior ceiling finish AND the sheathing for our composite shingle roof. No insulation aside from the R4 4x8s. We want to add insulation above the 4x8s – either 6-8″ of polyiso, or 3.5″ of fluffy stuff and 4.5″ of polyiso. I have no idea if the permeability of 4″ of solid wood is adequate for drying to the interior. Where to put the water barrier depends on the next question as well.
2. Can you dry an unvented roof to the exterior in winter through 6-8 feet of snow on the roof? If we put the water barrier directly on top of the 4x8s (i.e. PERSIST/REMOTE), the roof needs to dry to the exterior. Same layering as in the first question (polyiso/fluffy). Our roof is covered in 4-8 feet of snow for 3-4 months of the year. There’s no venting because: (1) we’re in “severe” fire hazard country (WUI) and prefer to minimize the risk of fire brands getting into the roof, even with screened vents, and (2) we’re not sure that even if there were vents, that the vents will “vent” when covered in 6-8 feet of snow.
3. When using rigid foam like polyiso, must there be a layer of fluffy stuff, and must the fluffy stuff be on the drying side? We have some self-imposed constraints: (1) for aesthetics, we don’t want the eaves to be too thick – they have a 4-foot overhang to minimize solar gain; (2) we can’t chop off the eaves, then build up the roof with insulation, and add thinner eaves back because the eaves will look strange with a 12″ (or more) gap between the eaves and the 8×24 support beams below (post-and-beam construction, exposed beams on the outside); (3) we love the look of the 8×24 beams with the 4x8s as a ceiling and don’t want to add insulation to the interior side of the 4x8s.
GBA Detail Library
A collection of one thousand construction details organized by climate and house part


Replies
Wow. Big timbers and big snow.
Is that place currently heated, and if so, do you have any issues with ice damming? That's a lot of snow, which has some r value.
You say 'drying' a lot where you should probably be saying 'prevent wetting,' unless you're just assuming a leaky roof.
That's a tough looking structure to insulate, but a beautiful looking spot.
Any plans for wall insulation?
Tyler, yes it's heated (13 gallons of propane per day). Ice dams are about 8" thick, and fall in 3' x 20' sheets to the deck. Thank goodness that deck is strong.
I can't figure out where to put the air barrier.
Do I put the air barrier right on top of the 4x8 T&G, with all the insulation exterior to the air barrier? In this case, the insulation gets "wet" because of relative humidity in the outdoors, not because of a water leak, WRB failure, or poor flashing. The moisture from humidity that collects in the insulation needs to escape the same way it gone in, through the WRB to the exterior.
Or do I put the air barrier on top of the insulation? In this case, the insulation gets wet from water vapor (relative humidity) from the interior. The only way the moisture in the insulation will get out is the same way it got in - from the interior side.
I'm guessing that perhaps one way to answer this question is to figure out which direction the water in the insulation (from RH) can escape. Through the 4x8s? Or through the WRB? Or both? I'm assuming that water vapor can find its way through the WRB (but obviously not through the air barrier).
The existing walls are R11 and very "air" leaky with nothing more than board and batten on the exterior, and decorative plywood paneling on the interior. We plan to add a second wall to the exterior (double stud walls), and hope to get the walls to R-35 or R-39 with continuous insulation and a very tight air barrier - and interlocking air systems and ERVs.
Eric
Just saw your other post with details.
A few thoughts:
-You may make fluffy stuff work, but solid foam simplifies the vapor and air profile.
-you want whatever you lay directly over your t&g to form an air barrier, and with the amount of exterior R you are discussing, the 4 inches of solid wood isn't a problem.
- the tough part is detailing the overhang and the amount of snow causing icedams. Without venting, you may find you still get icedams, so use a good wrb at the eaves at least.
You could still taper the foam over the tails with some finagling if you don't mind losing sight of the ends of them.
I was wondering if fluffy stuff is needed to allow warmer air to vaporize any moisture (condensation) on the inside of the insulation? I like what you said about solid foam simplifying the vapor/air profile.
Thinking about physics, I'm guessing the optimal way to deliver energy to drive a phase change (liquid to gas, hence drying) would be via conduction (solid foam insulation in direct contact with the air barrier and interior 4x8s, like you said) rather than convection (solid insulation in contact with fluffy stuff). I just don't know if you really need fluffy stuff for any specific reason.
You make a great point that R-4 should deliver plenty of heat from the house to "dry" the insulation on the other side of the air barrier. It's certainly enough energy to melt snow and form an 8" thick ice dam! Is it enough energy to drive the moisture back out through the air barrier (while there's 4-8 feet on top)?
Devil is in the details for sure. Your feedback has me leaning toward an air barrier on top of the T&G, and then layering 8" of solid foam on top of that, along with sheathing and then properly detailed WRB, and finally roofing.
Eric
Eric,
If you are using a metal roof and don't want thick eaves, you can just install the roof top insulation over the heated area, not the overhangs, as these architects usually do:
https://www.osburnclarke.com
Malcolm, that's a brilliant suggestion! I don't know if my wife will go for the look of the step, but that certainly solves the problem - lots of insulation where we need it, and still keep the nice looking eaves.
Eric
Deleted
Tyler and Malcolm - thank you for all of your feedback! Your feedback and suggestions have me moving towards a PERSIST-style roof.
Do you - or anyone else on GBA - see anything wrong with, or ways to improve, this stack (from outside to in):
* 4-8 feet of ice and snow, temps as low as -5F
* Roofing (composite shingle, driven by aesthetics)
* Underlayment
* WRB
* Sheathing (taped and sealed)
* 8" solid foam (2" overlapping layers x4)
* Air barrier (fully adhered)
* 4x8 T&G fir
* conditioned space (heating only, no cooling needed)
Maybe we can get close to R-45 with this - not quite to the minimum R-49 (IRC) or the higher Passivhaus levels - but so much better than R-4. Unless, of course, we adopt Malcolm's suggestion, where roof thickness and R-value are only limited by budget and detailing.
I've been focused entirely on the stack. Any short list of recommendations on brands of air barriers, solid foam, sheathing, or WRB that do especially well in snow country, are easy to obtain, or are easier to detail?
Eric
Eric,
I don't know much about building in areas that experience that much snow, but your plan looks good to me. A couple of small things:
- I'm not sure taping and sealing your sheathing adds much.
- Your underlayment is your WRB.
Malcolm, do you think the taping and sealing are not so necessary because a fully adhered air barrier is already in place, and the WRB provides sufficient protection for the solid foam?
Eric
Eric,
Yes.
>"* 8" solid foam (2" overlapping layers x4)"
----------
>"Maybe we can get close to R-45 with this - not quite to the minimum R-49 (IRC) ..."
The R49 prescriptive is only for insulation penetrated partially or fully by structural elements. With continuous insulation you could/should be going for code compliance on a U-factor basis. Code max U-factor for a roof in zone 7 is U0.026, which is a "whole assembly R" of R38.5, that takes into account the R-value of the wood, the insulation, roofing, and air films.
The interior & exterior air films add up to about R1, the 3.5" of roof decking is good for R4.2, so even before looking at the air films you only need (R38.5 -R1 -R4.2=) R33.3. The underlayment for the metal roofing is probably good for R0.3, so you would only need R33 of foam to meet code.
If Type-II (or denser) EPS that would be R33/R4.2 per inch = 7.9" minimum.
If Type VIII roofing EPS (often available for cheap as reclaimed good from commercial building re-roofing or demolition) it's R33/R4.15 per inch = 8" minimum
If 2lbs density roofing polyiso that would be R33/R5.7 per inch = 5.8" minimum.
If 1lbs density foil faced polyiso you're looking at R33/R6 per inch = 5.5" minimum.
If doing a composite, 3" roofing polyiso on the roof deck (R17) and 4" of EPS up top gets you there with 7" of foam. Putting the EPS on the upper layer gives it a slight performance boost during colder weather too, since it's true R-value is north of R4.5/inch when the mean temp through the EPS is colder than 40F.
It's reasonable in this assembly to put down a layer of fully adhered membrane (eg Grace Ice & Water Shield) on the 4x8" t & g to make it air and water tight, then stack the foam. If you're concerned about water-logging the insulation, use EPS rather than polyiso, but if the nailer deck and roofing are done correctly that won't really be an issue.
Dana - thanks, those are super great suggestions. There are some significant cost and aesthetic wins between R-49 and R-38.5. :-)
I really like your suggestion of the 3" polyiso with 4" EPS up top. Not only does the EPS R-value improve in cold weather, it takes into account that polyiso performance degrades in cold weather (R-4.5 at 0 deg F worst case, see attached graph). Keeping the polyiso on the interior side helps the polyiso perform better. On the very coldest day, the 7" of foam and sheathing might deliver a conservative worst-case net R-value of 32. Add the 4" dimensional decking for R-36, plus air layers and that gets us to R-37. When the polyiso layer is north of 20F, we're right at R-38.5 or better (depending on the polyiso maker). That's really finessing the insulation!
Eric
Deleted
Here's the answer from Lstibuerk:
https://www.youtube.com/watch?v=Ld8pzIu45F8
Attached is a screenshot of the recommended roof insulation for deep snow. Per Lstibuerk, you can only avoid ice dams with a vented roof - he explains why, in detail, in the video. He also explains why ridge vents work, even when deep under snow, and why you need to insulate the eave, too. I also learned that it's better to alternate solid foam layers horizontal/vertical rather than staggering. Great video!
You found the ticket. Here's the 'paper' version of that subject: https://www.buildingscience.com/documents/insights/bsi-046-dam-ice-dam
I think the point about the foam staggering is that you want both vertical and horizontal joints offset. It doesn't really matter how you accomplish that.
One might argue your air-tight membrane above your 'sheathing' could be accomplished with an adhered membrane OR with taped and staggered foam. Doing both is somewhat redundant, but whether or not y0u do both is a judgement call since redundancy isn't bad; it just costs more. There is a question about longevity of taped foam as an air barrier—if it was your only one— but it sounds like you are using a membrane so no worries there. With a solid membrane, I'm not sure how much value the taping of foam really brings you.
You'll want to give some serious thought to the mechanics of attaching that much foam and with detailing your overhangs.
Also, you want to connect your air-tight layer as best you can to the layer on the wall resembling an air-tight layer. Continuity.
I wonder if you could take an opposite approach with your overhangs and extend the foam layer a bit BEYOND the tails. Sort of like photo 8 in the link, but on the eaves as well. It would break up the sense of thickness some.
Tyler, that article just saved me a ton of effort - I was actually looking for photograph 8 for a different detail (air inlet at the fascia) and couldn't remember where I saw it.
You're right, turns out that photo 8 is a two-fer - I like your observation of extending the foam beyond the tails. I'll have to play around with the eave design.
Eric
Deleted