Exposed Fastener Metal Roof better than Standing Seam for Drying?
jen_fh
| Posted in GBA Pro Help on
Hi all,
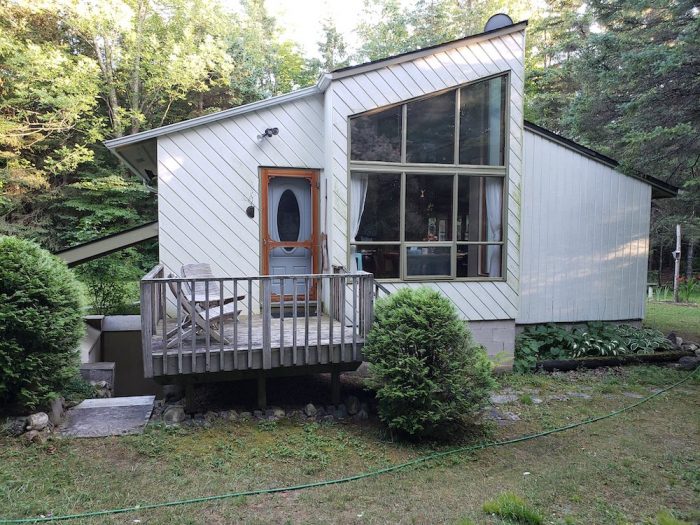
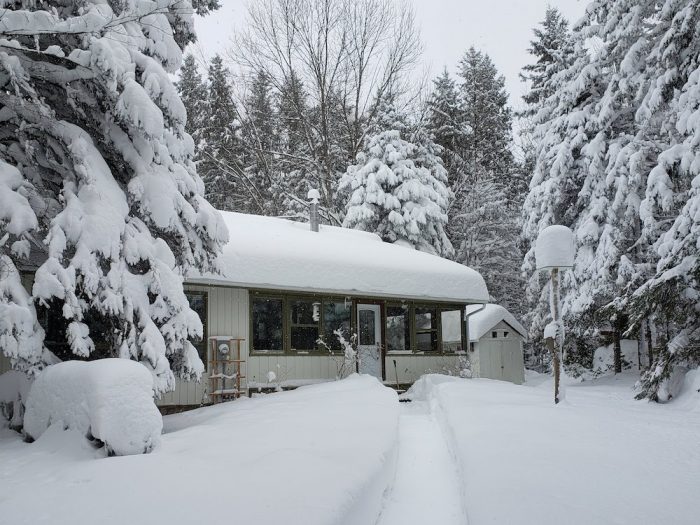
We have a low-slope (4:12) offset peak roof in our 1970s house in a Zone 6 area of Ontario that regularly gets lots of snow. (See pictures to illustrate both of these points.)
We’ve had ice damming in the past and are replacing the poorly flashed shingle roof as one step in a gut reno that will also involve proper air-sealing and improved insulation. Our roof includes some cathedral areas and an attic in one quadrant of the house. This question is focussed on the cathedral ceiling.
The cathedral trusses provide 14″ depth. They were originally “vented”, although not effectively — eave vents but no ridge vents on either side, just a couple passive vents on one side of the peaks — and insulated with 8″ batts and no real attempt at air sealing.
I considered adding ridge venting and building in eave-to-ridge baffles, but the roofing contractor is concerned that with this slope and the offset peaks, deep snow accumulating on the low side of the offset peak will lead to water entry through the “low peak” vent, regardless of how well it’s flashed, simply because snow will build up against the adjacent wall. I see his point.
Because of this, I’m leaning towards a hot roof with the minimum required spray foam and some fluffy insulation (likely 5″ closed cell, followed by 9″ rockwool or cellulose).
I’d welcome any insight any of the above, but the main question I have today is this:
My plan was to go with standing seam because as the “best” metal roof option, and I’d like to do everything I can to prevent ice damming, which has been a real headache for us.
But I’m hesitating on the issue of drying potential, since we’ll have closed cell spray foam underneath the sheathing. I know this topic has been discussed a lot here and there are mixed opinions on how much of an issue it is. At the risk of oversimplifying, I understand that it’s always best to allow drying potential since all roofs get wet, but on the other hand, if the sheathing is dry when we replace the roof and it’s detailed well, the risk of bulk water intrusion is minimal, and many houses are being built this way.
I think I’ve read all the posts, but have not seen this specific question raised. Here in rural Ontario, a lot of houses have exposed fastener metal roofs applied over strapping — a less expensive option than standing seam. I’ll pay for the standing seam if it’s preferable, but now I’m not sure it is. Is exposed fastener over breathable underlayment and strapping better from a drying perspective in a case like mine where the options are limited?
If so, does anyone have opinions on whether this drying potential outweighs the increased risk of bulk-water intrusion over time with an exposed fastener roof?
Many thanks! Jen
GBA Detail Library
A collection of one thousand construction details organized by climate and house part
Search and download construction details


Replies
Jen_fh,
Other issues aside, the choice isn't between exposed fasteners on strapping and a standing seam on a solid substrate. The two standing seam panel manufacturers I regularly use both allow installation over strapping.
Would it be possible to install the roof over some kind of plastic mesh product instead of strapping?
andyfrog,
You can add a mesh underlay to a plywood roof deck, but to what end?
jen_fh,
This is a good resource that pretty much covers your problem, no need for spray foam but you do have to add a bit of height:
https://buildingscience.com/documents/building-science-insights-newsletters/bsi-097-de-icing-ice-dams
I would go with standing seam any day over exposed fastener. No chance of leaks down the road.
Keep in mind that metal roofs will always produce some snow melt, I have to run heat cables in my downspouts during the day on sunny days when it is bellow -15C and snow on the roof.
A relatively simple roof like yours is a good candidate for snap-lock metal roofing. It looks like (and is) standing seam, just not mechanically double-locked like traditional standing seam. Snap-locked roofs have hidden fasteners just like traditional standing seam, and they come in different gauges--the heavier ones can be installed over furring.
Exposed-fastener metal roofs work fine as long as the screws are installed perfectly and there isn't a problem with the neoprene gaskets. Getting the screws installed perfectly is somewhat challenging, though.
I'm not sure about Canadian codes or climate zones, but according to this map, southern Ontario is in the equivalent of US Climate Zone 6: https://www.greenbuildingadvisor.com/article/climate-zone-map-including-canada. In an unvented roof in CZ6, at least 50% of the total R-value needs to be in the foam layer to avoid condensation.
Because this is for long-term durability, I use a conservative, aged value for the foam--about R-5.5/in. That's what foam will eventually be once the blowing agents filling the cells have dissipated. That means 5" of foam is about R-28. 9" of mineral wool is about R-36; 9" of cellulose is about R-32. You'll either need more foam or less "fluffy" insulation to have a safe, durable assembly.
Thank you, Malcolm, Akos, Michael for your helpful thoughts.
Malcolm, great point -- thanks for catching my assumption that standing seam isn't an option over strapping. I'm looking into whether the manufacturer will allow this for the product my roofer uses. I'm curious in general, though, whether this is a recommended approach? It seems uncommon, at least around here, so I'm wondering if there's a downside I'm missing.
From discussions with the roofer it sounds like he would do this over horizontal strapping at 12" spacing. If I'm thinking this through right, that wouldn't provide a lot of airflow, with horizontal runs blocked by flashing at the sides, but would still offer some drying potential if water gets through. (I'll call this Option 1)
If that level of drying potential is of sufficient value to warrant doing it, that puts my original idea back on the table, with modifications: Would it not be equally effective to build interior ventilation channels under the existing roof sheathing in each 2' rafter bay (using either 2x2s and ply, or building from rigid foam, both per GBA/FHB articles), and simply not worry about adding venting at the top? The channels would be vented at the eaves only and I understand the concept of balanced airflow for a vented roof, but this should provide at least as much drying potential as Option 1. Any thoughts on this from any of you? (Option 2)
Akos, thanks very much for the article -- it's right on point and one I had missed. I like the proposed approach of building ventilation over the sheathing (Option 3), and this would probably be my first choice, but I admit I'm a bit daunted by the project. This is a DIY job and while I would happily pay someone to do this, in my experience, it's hard as a homeowner to find contractors for smaller jobs that involve something they don't normally do. I understand why and don't fault anyone for it, but it remains a hard fact I have to account for in this project.
A couple questions, if I did tackle this myself: (1) Would I strip the existing sheathing to bare ply, or should there be some form of WRB or underlayment under the 2x4s of the newly framed "overroof"? (2) The detail at Figure 6 is helpful, but the higher side of my roof doesn't have any kind of overhang, which I assume would be important to preventing water intrusion through wall vent. Is there any reason I couldn't extend the overroof an extra 2 feet to create an overhang for the overroof alone?
Michael, thank you for the calculations on the insulation. I'm aware of the principle and ratios but was relying for now on someone else's calculation, not taking into effect the aged r-value. I appreciate your insights.
Another thought: Am I overcomplicating this? With 14 clear inches in my trusses, I could get R-52 to R-54 mineral wool inside an unvented assembly, which is less than the R-60 I'd like, but not by much. With a smart vapour barrier (required here) and drywall inside, this roof assembly would have some inward drying potential (Option 4). My biggest concern with this would be air-sealing to the exterior. The house was built with fibreboard that is deteriorating/chewed through in places. I can do my best with caulking but admit I was relying a bit on the sprayfoam to keep out air and insects that might find their way in from outside.
Thanks again the help!
In cold climates, there is no reliably safe way to do an unvented roof with only fluffy insulation. Some salespeople for variable permeance membranes claim otherwise, but if you look at their long list of requirements, you'll see that it's nearly impossible to meet. I avoid foam whenever possible but if you don't want to vent your roof, you need to use foam or another type of exterior insulation.
One way you could vent the roof is called over-venting, using a robust gap between the rafters and the metal roofing. Ideally this is done with a vapor-open, waterproof membrane over the rafters, then vertical furring along the rafters, then sheathing, then roofing. It's called a sarking membrane system if you want to search GBA for more information. That would allow you to use fluffy insulation without conventional venting. (Whenever I mention it, someone comments that it's hard-to-impossible to install a membrane directly over the rafters. I've done it; it's a little more challenging than putting sheathing on but far easier than those who haven't done it claim.)
We have have used a vented over-roof assembly for many years and feel very comfortable with it.
Typically we have used continuous cardboard baffles that fit between every truss cavity and extend from our soffit space all the way to our ridge vent. We have then used dense packed fibreglass BIBS to completely fill the cavity’s.
Recently we have started using Mento Plus which is a robust membrane that can handle the pressure of dense pack. We have applied this membrane over the top of our rafters/scissor trusses followed by 2”x2” battens attached to the to the top of the truss. This does two things, firstly it creates a continuous air space from eave to ridge and secondly it secures the Mento Plus in place. At this point, plywood sheathing could be installed over the 2”x2” or alternatively cross strapping could be used if exposed fastener steel is the roofing choice.
I couldn’t find a photo that shows the cardboard baffle system I described but the example that I attached is similar. Second photo is the membrane/cross strap assembly.
jen_fh,
I'm in the midst of building a roof very similar to what you are describing. The rafters are strapped at 12" oc, it is clad in snap-lock panels, and the underside has a vent channel with batt insulation below.
The advantages I can think of are:
- Cross ventilation aids drying
- No sheathing means no condensing surface to worry about.
The disadvantages are:
-Your roof is no longer a shear diaphragm, so the house structure is weaker.
- The snap-lock panels are now load-bearing, rather than relying on the strength of the sheathing below.
If you go with an un-vented roof assembly (I would choose one from this list: https://www.greenbuildingadvisor.com/article/five-cathedral-ceilings-that-work), then I don't see much advantage to using strapping over sheathing.
If you want/need strapping, and do not want horizontal strapping (if lack of vertical airflow is a concern), the strapping can be installed on a diagonal. That way you get both vertical airflow and drainage, as well as horizontal attachment points for the panel fasteners/clips.
Jen,
Are you doing an interior reno as well or hoping to fix all this from the outside? Depending on which side you tackle the project from, some options tends to be much easier.
Overall, I would aim for a simple vented assembly with batts or loose fill (you can do loose fill at your slopes even for cathedral ceiling) with an air tight ceiling bellow it.
Thanks, everyone -- great info and interesting details about the over-venting. I'll do some more reading on this. Thanks, also, Malcolm, for the reminder about the "Five Cathedral Ceilings that Work" article (and that the simplest option, spray foam to 50%+ R-value, is generally considered a roof that works, despite not providing drying potential).
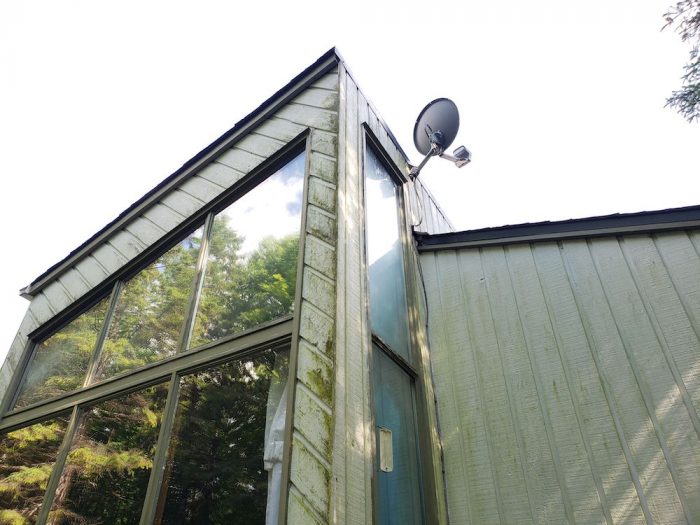
Akos, yes -- I've already fully gutted the house. This is a full building envelope project. I know air-sealing is a big part of getting this right. The roof sheathing looks pretty good from the inside, but we'll see when the shingles come off. (The fiberboard wall sheathing that you'll see in one of these photo is not in good shape and will be replaced.)
Keep in mind that in snow country a spray foam roof still needs venting above to avoid snow melt. With that in mind, I would still aim for a standard vented assembly with batts and save the cost of SPF. Looks like there are transitions from cathedral to flat ceiling with attic, these areas along the interior partitions is where you have to figure out air barrier continuity. There has been discussion about this in a previous thread:
https://www.greenbuildingadvisor.com/question/help-air-barrier-trapped-by-ceiling-and-interior-walls-how-to-fix-impossible-to-install
I would plan on getting a blower door test done once your main air barrier is up before any insulation goes in and fix any major leaks.
A vented assembly over a well sealed building with lots of fluffy insulation is a trouble free roof with no ice issues.
P.S. This is a bit of scope creep, but I would be tempted to add some clerestory windows into that step in the roof. Since you are re-roofing, also extend the overhang a bit over the step, it would avoid the water issues I can see in the sheathing there.
An additional problem with exposed fastener metal roofs is that the panel will expand from the heat of the sun and then contract again when it cools down. This process can "pull" the fasteners right out of the sheathing.
One resource you might look through is the Metal Roofing Learning Channel on Youtube.
https://www.youtube.com/@WesternStatesMetalRoofing
rockies63,
Yes, and so can freeze/thaw cycles, shrinkage of the strapping, and even wind at the eaves, although the most common problem I've seen is over-driven gasketed fasteners.
Hi everyone -- Thanks, and sorry for the delay... it takes me some time to process all this information.
I'm going to stick with standing seam (snaplock) directly on the roof decking.
I would like to vent, even if imperfectly.
I'm currently leaning towards building in 2" ventilation under the sheathing on both sides of the roof, and simply accepting the fact that there will be no ridge vents (only soffit vents) on the lower side of the roof. My reasoning is that the main purpose of the vent channel is to create drying potential. Lack of eave-to-ridge airflow will slow the drying, but not eliminate it entirely. It's imperfect but seems safer than sandwiching the roof decking between foam and a standing seam metal roof. I'll insulate and airseal as if I were building a hot roof, but then add this extra insurance of an air gap. Any thoughts?
My alternative solution is to borrow from Akos's article about the chalet, where they built a venting wall, but connect that wall to vent channels running below the current sheathing (to avoid having to build an overroof), and cantiliver an overhang onto the top roof to protect the wall vent. I drew it in the attached image (the purple lines indicate "new"). I think this is a good solution to the problem, but my roofer doesn't have capacity to do it and I'm not sure I can find a framing carpenter in time. (Less important, but it would also look slightly awkward. If you look at the original photos, the lower roof terminates beside a window, so the venting wall would have to stop there, and would stick out a bit.)
I would be interested in views on either of the above solutions.
Akos, unless I'm wrong, I don't think I have enough room for fluffy insulation if I vent under the sheathing. I'd like to get to R-50 and or even R-60 if I can. I have 14 inches of space. If I build in a 2" ventilation channel using a 1" R-5 foam board, I have only 11" left. I can't create any additional space at the bottom of the trusses because they hit right at the top of the windows. (I also agree on the clerestory windows -- I'm so tempted, but not sure it's in scope at this point, and it would get in the way of the vent wall if I go that route. And thanks for the link about attic-to-cathedral transitions. I have several questions on that topic but will leave it for another thread.)
One more thing: it's only HFO spray foam here in Canada, and I learned from the BS & Beer episode about foam (Michael Maines, hi -- you were in that one!) that the R-value is a bit higher than for HFC. However, I can't find any data on aged R-value of HFO foam. Anyone have a source? I don't want to rely on the insulation contractor's estimate of R-value.
Thanks again to all of you for your insights.
Jen
Jen,
The section you have drawn will yield a really well performing roof. Adding overhangs will also help the walls immensely. The one suggestion I would make is that rather than vent the lower roof high on the face of the new wall you are proposing, I would connect it to the roof above and let it vent through the soffits of the new overhang.
Thanks, Malcolm -- much appreciated!
You could do R30 + R15 mineral wool, for a total nominal thickness of 10.75 inches (7.25 + 3.5). That would put you at R50 nominal (R30 + R15 + R5).
The best you could theoretically do with high perf fiberglass is two layers of R21 at 11 inches total, or a single layer of R38 at 10.25 inches.
The foam board for the vent channel is still slightly more R per inch than either mineral wool or high performance fiberglass, so reducing the foam thickness (to add minor cavity depth for fluffy insulation) isn't going to be an improvement, etc.
Reducing the vent channel depth (and adding back that thickness of foam board) is the only other knob that can be turned, but that would be less conservative on the vent channel depth for your roof slope.
Deleted
Thanks, Chris, for the detailed calculations -- I was stumped on why I wasn't getting the same calculations as you all seemed to be getting. Turns out it's a Canada thing.
In Canada, Rockwool 3.5" is advertised as R-value of 14, and 7.25" as R28, so my own calculation came out to R47. Rockwool's North America-wide product sheet (https://p-cdn.rockwool.com/syssiteassets/o2-rockwool/documentation/epd/rockwool-stone-wool-environmental-product-declaration-epd.pdf) shows a range of R values (Technical Data table, page 3), and the low end seems to be used for Canada, while the high end is used for US. The same differential appears for Johns Mansville (compare TempControl batts in the US product sheet page 10 here: https://www.jm.com/content/dam/jm/global/en/building-insulation/Files/BI%20Toolbox/HIG-1224-Product-Selector-Guide.pdf to the same product on the Canadian sheet page 10 here: https://www.jm.com/content/dam/jm/global/en/building-insulation/Files/BI%20Toolbox/JM-Canada-Product-Selector-Guide-English.pdf.
I'm thinking it's probably a regulatory issue but the products are likely the same. Anyone ever noticed/explored this?
No need to build a vented wall for the lower roof, you can use a standard vented end wall detail such as P31 here:
https://www.ascbp.com/files/installation/BR108_SkylineInstall.pdf
Your metal roof supplier will have a similar detail.
No need for two vent channels. Pick one and build it. If you go top vent, make sure to use a breathable underlayment for the existing roof and I would add some larger holes for a large area diffusion vent near the peak on each side similar to fig11 here:
https://buildingscience.com/documents/building-science-insights-newsletters/bsi-119-conditioned-unconditioned
This would let you install full height fluffy into the trusses and no need for any rigid foam baffles. In this case I would also tape the seams of the existing roof deck and make it the main air barrier. The key to making this assembly work is high permeability to the vent channel, decent warm side vapor retarder and getting it air tight.
The energy use difference between an R40 and an R60 roof is in the neighborhood of tens of dollars per year. Instead of chasing R value, the important detail to get right is air sealing, this is where your real heating cost is saved and what will prevent ice dams. Even if you have to go down to 11" of fluffy to vent bellow the deck, I would not loose any sleep over it.
Akos,
That end-wall vent detail is the one I have always used but the roofer is worried about snow build up against the wall. I think one of the New England builders here (Mike Maines?) has also said that detail tends to leak. Not working where that is an issue, I don't know whether it's a real worry or not.
Just wanted to emphasize Akos' statement: R values are misleading. U (W / m^2*K) is more meaningful to measure energy loss and is the inverse of R. When R=50, U= o.02; R-60 is U=0.0167. That's a difference of 0.003 W/m^2 per degree C. This is surely an unmeasurable difference in a house with the glazing in your pictures. If you're at R=50, you'll benefit more by spending your money on larger eaves that protect the tops of your windows and siding, on air sealing, better windows, and more durable construction materials. Once you're in the R50-60 range, there are more important things to consider.
Thanks again to everyone for the help.
I'm going to go ahead and add the roof overhang in the drawing I posted above, subject to Malcolm's suggestion that I omit the wall vent and vent the wall by connecting it to the upper roof. I'll also likely go with fluffy insulation under the venting.
One last question: I included a soffit vent for the top roof overhang in my drawing. But is a ridge vent on the overhanging top roof just as good or better?
jen_fh,
A vent on the top side at the peak gives you slightly better venting, but at the expense of being more vulnerable to leaks and being blocked by snow.
Thanks, Malcolm -- much appreciated!