

Image Credit: Energy Vanguard
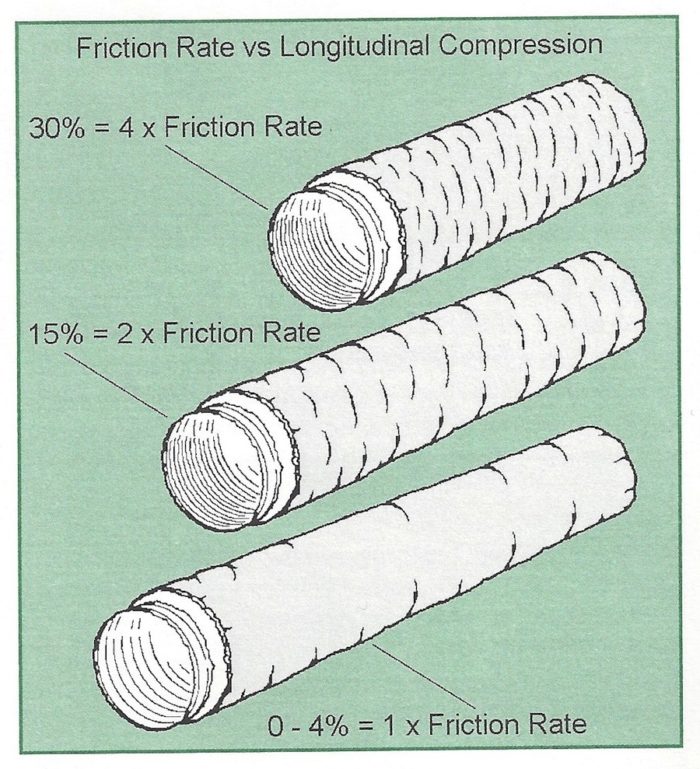
Image Credit: Energy Vanguard A diagram from the ADC standards showing how friction rate is affected when flex duct is not pulled tight.
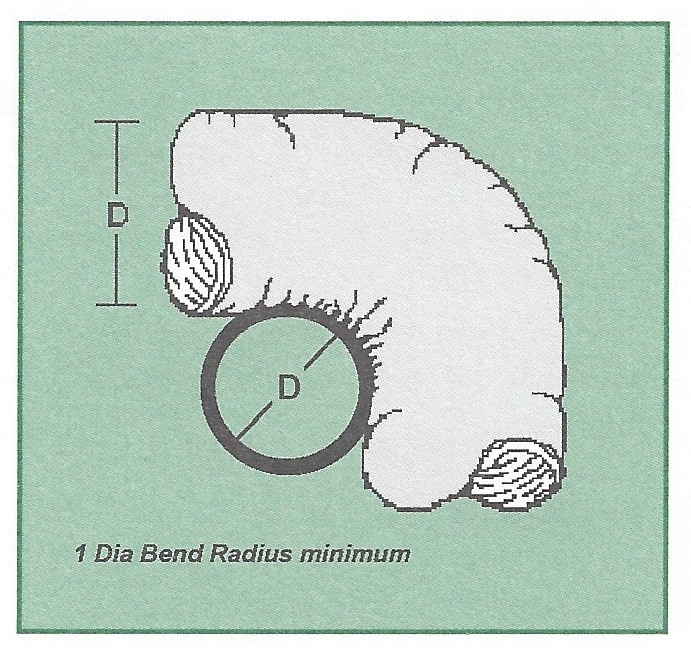
Image Credit: Air Diffusion Council The recommended way to turn a flex duct, according to the ADC's flex duct installation standards.
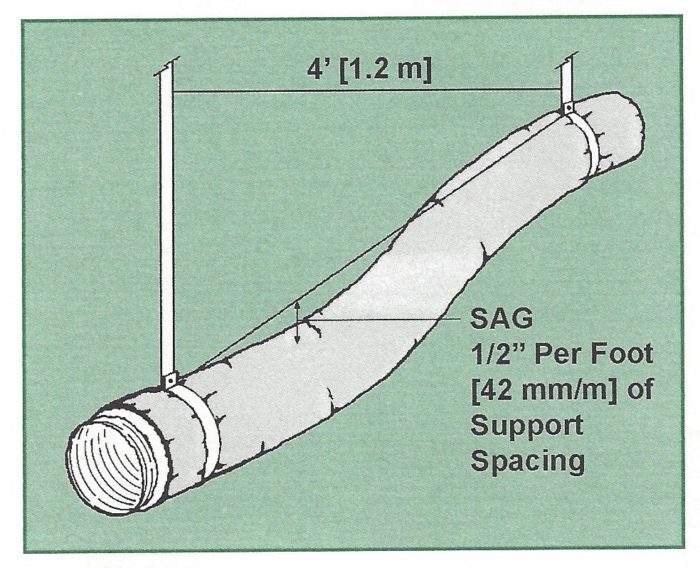
Image Credit: Air Diffusion Council The ADC flex duct installation standards recommend no more than 1/2" of sag per lineal foot of flex duct between supports that are no more than 4' apart.
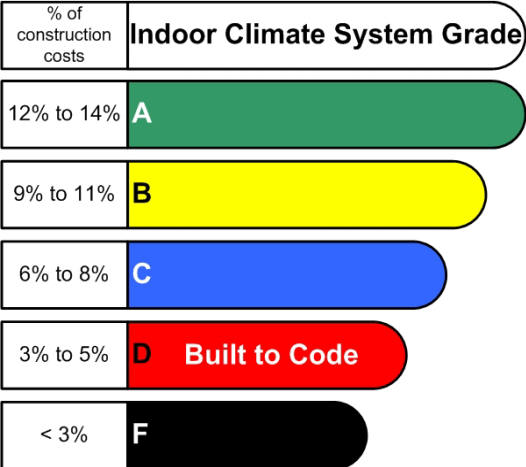
Image Credit: Air Diffusion Council Robert Bean, an ASHRAE member in Canada, recently put together this chart showing what you can expect of your HVAC system at different price points.
Image Credit: Robert Bean
More Building Science


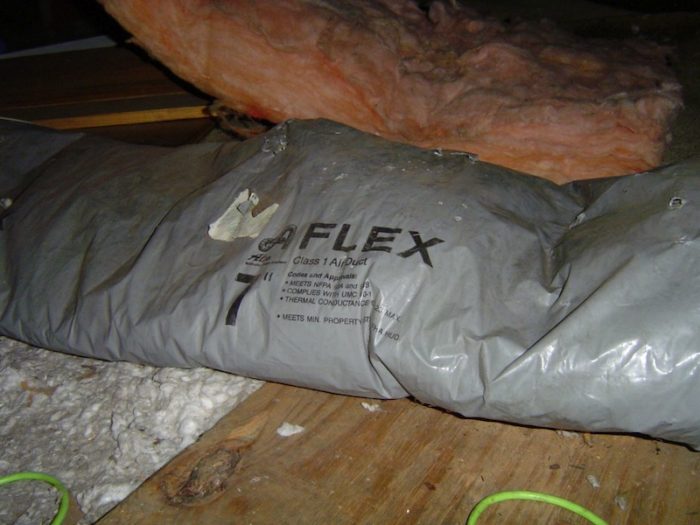
I’ve written a lot about duct problems (especially those in flex duct) because they’re so abundant. A couple of years ago, I even wrote an article in the Energy Vanguard Blog about whether or not flex duct should be banned. My answer was no — but that we need better quality control.
After I updated and reposted the article recently here at Green Building Advisor, Jack Lagershausen, the executive director of the Air Diffusion Council, sent me a letter.
Unlike a certain, very large company that threatened me a while back, the Air Diffusion Council was smart about it. He admitted that the problems I wrote about are “far too common,” and sent me a complimentary copy of the Council’s installation guide, Flexible Duct Performance and Installation Standards.
Today, with the hope that some readers will act on this information, I’ll give you a bit of an overview of this guide, and will encourage HVAC companies looking to do a better job of installing flex duct to invest the $15 and get a copy. Then use it to train your installers.
A few tidbits from the ADC standards
The 25-page guide begins with a description of the classifications and characteristics of flex duct, then discusses how they’re tested, listed, reported, and certified. Chapter 4 is where the meat of the manual is — the installation details — and that’s the part I’ll talk about here.
Basically, what the Council tells you is not to do all those things I’ve shown in my articles, and how to install flex ducts more or less properly. They also refer to standards from other organizations (ACCA, ASHRAE, ASTM…) because this is an installation guide, not a complete reference work. For duct sizing, they refer you to ACCA’s Manual D, for example.
Pull the inner liner tight
One interesting bit of info that many installers need to understand is that flex ducts need to have the inner liner pulled tight. If it’s not tight, the friction rate jumps significantly, and that means the air flow takes a hit. The diagram below shows that if a flex duct has even 15% longitudinal compression, the friction rate doubles. With 30% longitudinal compression, the friction rate quadruples.
An interesting side note to this part of their standard is that when Manual D was being revised for the third edition, the ACCA Manual D group wanted to include information about how poorly installed flex duct affected friction rates, using data from Texas A&M’s research on the topic. According to David Butler, “the ADC lobbied heavily to keep this data out of the book.” ACCA overrode their lobbying, however, and included the data as Appendix 17.
Don’t make sharp bends
Another problem that I see frequently is bends that are too sharp. The ADC standards say, “Keep bends greater than or equal to one (1) duct diameter bend radius.”
The language is a bit clunky, but the diagram below shows what they mean. If you can put an equal size duct inside the turn, as shown below, they say you’re OK. (You can see my thoughts on this below.)
Use proper supports to prevent sagging
Another biggie that I see all the time is sagging ducts. The official recommendation from the ADC is that flex ducts should sag no more than 1/2 inch per foot of length between supports.
The supports need to be at the manufacturer’s recommended spacing, but no longer than 4 feet. The straps that hold up the flex duct need to be no less than 1.5 inch wide.
How to make connections
The ADC standards give a lot of other details about installation, including one of the most important aspects: the connections. The skinny on that is to make sure you get a good, solid connection between the inner liner and the connector, seal it with mastic or tape, and then bring the insulation and outer jacket over the connection and seal it, too.
One more little note about those connections: The first method they show is to connect the inner liner mechanically with a metal clamp. These are the ones you see holding the rubber hoses onto their connectors in engines, with a screw that you turn to make them tighter. I’ve never seen one of these in the field, except on a couple of my own small retrofit installations. They also show how to attach the inner liner with sheet metal screws, but I wouldn’t do that with flex.
Interestingly, the fastener that’s used most often, plastic zip ties, is only mentioned in the footnotes: “Nonmetallic clamps shall be listed and labeled in accordance with standard UL 181B and marked ‘181B-C’.”
How to get even better performance with flex duct
The ADC standards provide good guidance for most duct installers. If someone follows them perfectly and the system is commissioned properly, it will probably work fine. The problem, though, is quality control, and one way to help with that is to make it a little harder to do sloppy work. Mike MacFarland, a home performance contractor in California, wrote what may be the best advice ever given in a comment here in the Energy Vanguard Blog:
The trick to getting these installations right is to use rigid ductwork for all “deviations from straight,” then pull the ductwork taut between the two ends which now point towards each other. The big advantage over a full rigid installation is sound control — the installations are quieter than fully rigid ones.
There you have it. Use flex duct for the straight runs and hardpipe everywhere else. If you really can’t bring yourself to buy those sheet metal elbows, at least follow the Air Diffusion Council standards.
A word about cost
The main reason we see so many bad installations is expense. It costs more use the right methods. It costs more to train employees to do it right. It costs more to use materials that are harder to mess up. It costs more to do proper design and commissioning.
The truth is that there are costs associated with doing it wrong, too. It’s just that the homeowner usually bears those costs. My friend Robert Bean recently posted an article about the cost of HVAC systems, which he prefers to call indoor climate systems. The chart below is from that article and gives you a feel for how much bang you’re getting for your buck. Of course, Robert’s Canadian, so you’ll have to convert using the current exchange rate if you’re not in the Great White North. ;~)
You really should go read his article because Mr. Bean is one of the most knowledgeable HVAC guys around. Check out the rest of his website, too. There’s a wealth of information there.
The bottom line in all this is that you get what you pay for.
Allison Bailes of Decatur, Georgia, is a speaker, writer, energy consultant, RESNET-certified trainer, and the author of the Energy Vanguard Blog. You can follow him on Twitter at @EnergyVanguard.
Weekly Newsletter
Get building science and energy efficiency advice, plus special offers, in your inbox.


One Comment
flex duct installation
We install a lot of HVAC systems on Martha's Vineyard, ranging from mini-splits to fully ducted. On the ducted projects, we use flex for the branch runs to the supply boxes. We keep those flex runs short - on the order of 5 to 15 feet. It is critical to remove the flex from its box, extend it to its full length of 25', and ensure that the inside and outside shells are fully extended together. As the flex is fully compressed in the box and shipped cross-country, invariably the inner shell gets bunched up and misaligned with the outer shell. If the installer doesn't fully extend the flex assembly first, it is common to get too much inner shell in the first half of the flex, leading to air flow issues. Connecting the inner shell to the supply box and the supply takeoff using the large zip ties is essential, then foil taping the inner shell, then pulling the outer shell over the supply take off and taping this with foil tape. This process takes a bit more time but the consistent air flow results are worth it. In my house, I used no flex (a bit nuts - turning vanes on all rectangular changes of direction, rigid duct to all supply boxes) and it is noisier than systems we install with flex - with no substantial loss in air flow at supply outlets.
Brian Nelson, M.S.M.E. Nelson Mechanical Design, http://www.nmdgreen.com
Log in or create an account to post a comment.
Sign up Log in