
Image Credit: Matt Bath
Image Credit: Matt Bath A layer of gravel provides a capillary break between the concrete slab and the ground below. The 2x12s at the center of the photo keep the gravel out of an area where a deeper area of concrete will support an interior wall. A layer of mineral wool tops the gravel capillary break. The 2-inch-thick Comfortboard 80 (manufactured by Rockwood) extends in 2 feet horizontally from the sides toward the center of the slab. The same type of insulation covers the inside face of the stem wall. The surface of the newly poured concrete slab is leveled with a screed and later finished with a float.
More Guest Blogs


Editor’s note: This is one in a series of blogs detailing the construction of a net-zero energy house in Point Roberts, Washington, by an owner/builder with relatively little building experience. You’ll find Matt Bath’s full blog, Saving Sustainably, here. If you want to follow project costs, you can keep an eye on a budget worksheet here.
After a couple weeks of frustration, I was rewarded with my second successful inspection today, giving me a green light to pour the concrete slab that will complete the foundation. It is hard to believe that at the next inspection, the house will be completely framed!
The frustrations I experienced over the last two weeks resulted from once again underestimating the fantastic power of concrete. I should have removed the stakes and forms for the stem walls as soon as 24 hours had passed, but I was nervous and decided to wait an extra day. When I finally got the nerve to pull the stakes they didn’t budge a millimeter. I had purchased a fancy stake puller called a JackJaw that my mentor had used to remove his form stakes, but I had decided to go for the $225 unit instead of the $450 one. The result was the rapid destruction of the tool.
Thankfully, JackJaw has outstanding customer service and offered to accept the unit back at a full price credit towards the more expensive one. After a week of waiting, it finally arrived, and though it was many times more powerful it was still a battle to get the stakes out. They had been setting in a layer of concrete about 16 inches thick in footings beneath the stem walls for more than a week.
With advice from customer service, I used a sledge to pound each stake in a few inches and then used the JackJaw to pull it up until it wouldn’t move any farther, then repeated the process. It was an agonizingly slow process, and I still have four stakes in the ground as I’m typing this, but that’s about 92 stakes less than I had in the ground a week ago.
With the stakes out, you might think it would be quite easy to pull off the form boards. The smooth plywood forms were still greasy from the last time they had been used so they didn’t adhere to the concrete. All the screws and stakes holding them together had been removed. Unfortunately, because of the way the concrete had curled up and around the bottom of the form boards, removing them was just as excruciatingly time-consuming as pulling out the stakes. Like running a marathon, it didn’t seem like a lot of fun while I was in the middle of it, but looking back on it the experience was much more rewarding this way and I surely have some additional muscle tone to show for it.
Adding mineral wool insulation
With the forms removed, I placed 2-inch thick Comfortboard 80 on the interior vertical face of the stem walls. Many people are puzzled by a layer of insulation sandwiched inside two pours of concrete, but it will serve two important purposes. It will protect the slab from frost heaves during the winter, and work in unison with the walls and roof to reduce the heating and cooling loads required to maintain a comfortable temperature in the house all year long.
Mineral wool insulation doesn’t have the disadvantages that some types of rigid foams have. It really is an incredible product. You can soak it down with a hose all you want, peel back the outer layer, and the inside will be bone dry.
I cut a 45-degree angle on the top edge of the insulation. This will allow for maximum insulation while also giving the slab a firm connection to the concrete.
More insulation will follow, but in the meantime, I capped off the entire DWV (drain, waste, vent) system and filled it with water. I added a 10-foot section of ABS pipe to one of the vents so I could show the required “10 foot head of pressure” for the inspector. The force of gravity on the column of water held in that pipe applies a force to the entire system; the code recognizes this test to show there are no leaks in the system.
A gravel capillary break
Capillary forces are very powerful. Have you ever been to a redwood forest and wondered how water gets from the roots to the leaves at the very top of the tree? The answer is capillary force, and surprisingly, it works even more efficiently in concrete than it does in trees! Scientists believe concrete has such powerful capillary force that it theoretically has the ability to drive water 6 miles upward against the force of gravity. Wood maxes out at about 400 feet, which is why you don’t see any trees taller than that.
In an effort to curb these powerful forces, building codes require that a layer of gravel and a vapor barrier be placed underneath a concrete slab. The gravel allows any standing water to drain away, and the vapor barrier takes care of any water vapor.
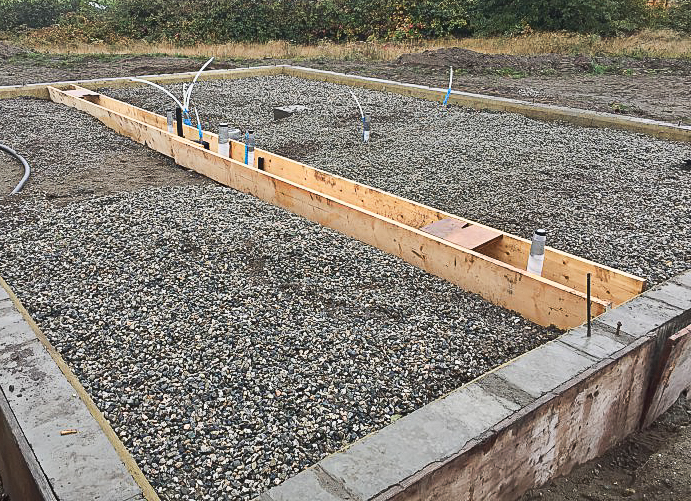
I added a gravel layer inside my stem walls (see Image #2 below). The long 2x12s you see in the photo act as barriers to prevent the gravel from falling into the “shovel footing” at the center of the slab. That is necessary to support the bearing wall that will soon be framed directly above it. Once all the gravel has been added and compacted, the boards will be removed and a 12-inch-wide and 8-inch-deep ditch will be left behind. It is much easier to create the ditch this way rather than by shoveling the gravel out.
When we pour the concrete for the slab, the concrete will flow into this ditch and the slab will be 8 inches thicker along that line, giving added support to the bearing wall. The entire roof of the house is supported on only two exterior walls, so none of the interior second-story walls have any weight to carry. I could have supported the weight of the floor joists between the first and second stories in the same way, but I would have had to use special engineered I-joists. Instead, it was much easier to use two lengths of 2×12 joists and have them meet on top of one of the first story interior walls. This wall is the bearing wall.
More insulation caps the gravel
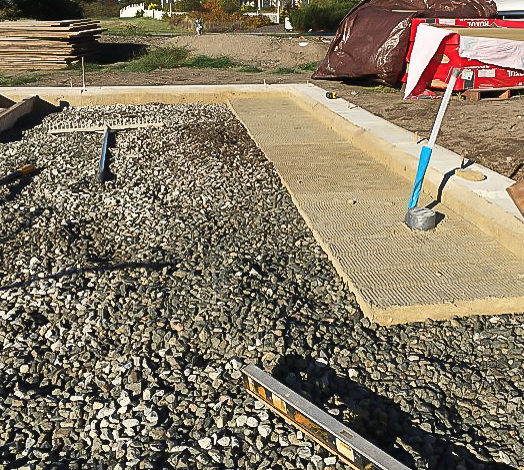
After all of the gravel had been added, I leveled it out and installed the horizontal layer of mineral wool, as you can see in Image #3 below. The 2-inch-thick insulation extends inward from the stem walls a total of 2 feet. (The center of the slab is not insulated.) Keep in mind that the more insulation added now, the lower the heating bill will be in the future. Investing an extra $300 now will quickly pay off in a year or two, and then I will reap the benefits every year after that for the life of the house.
Once the insulation was added, I ran a plate compactor around everywhere to ensure the gravel was well compacted. Then I pulled out the long 2x12s to create the shovel footing.
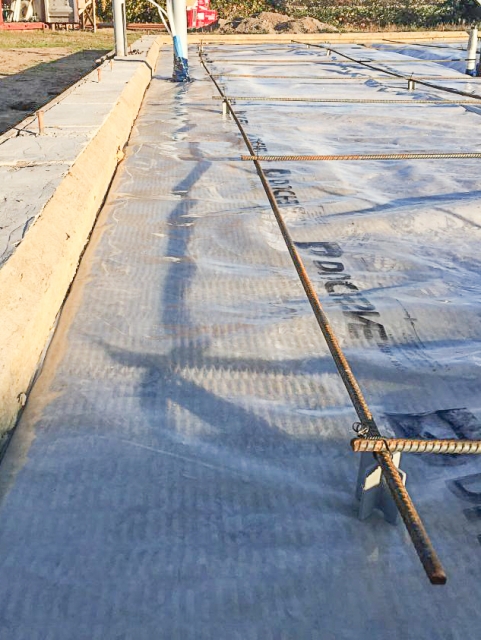
The last steps before the pour were to add the vapor barrier and the rebar. The 15-mil vapor barrier comes in a large roll so it was simply a matter of rolling it out and cutting it to fit. Wherever a pipe penetrated the plastic I used vapor barrier Tuck Tape to seal the hole. I tucked all the edges of the barrier in between the two layers of insulation.
I lined up the rebar in a neat, 4-foot grid and set it on 2-inch-high chairs so it would end up right in the middle of the 4-inch slab (see photo at left).
And now the slab
A freshly poured slab is an incredibly beautiful thing. When the concrete first comes out of a truck it looks like a messy slop of oatmeal with blueberries in it (the blueberries being the gravel). The crew used a long, straight 2×4 as a screed and ran it back and forth to level the slop.
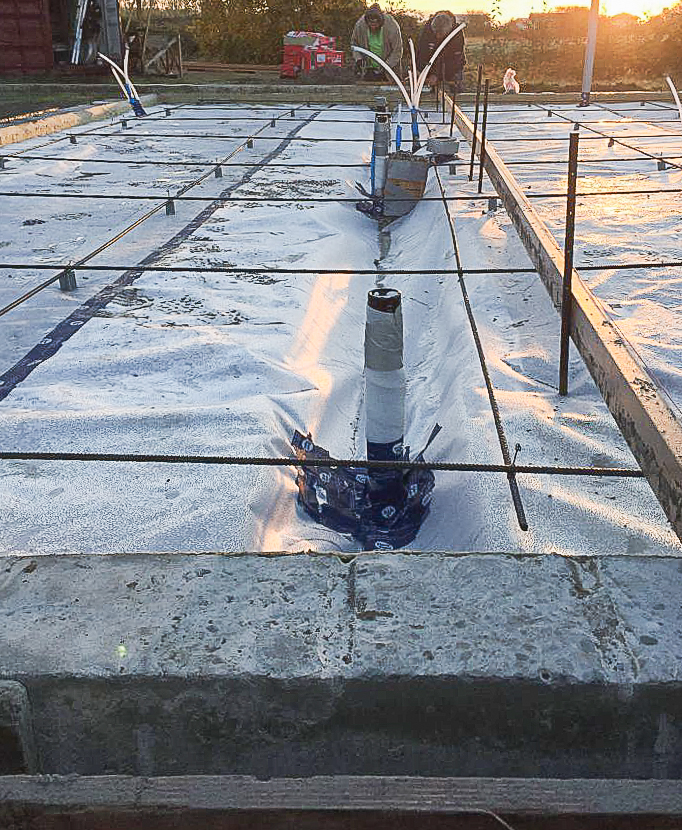
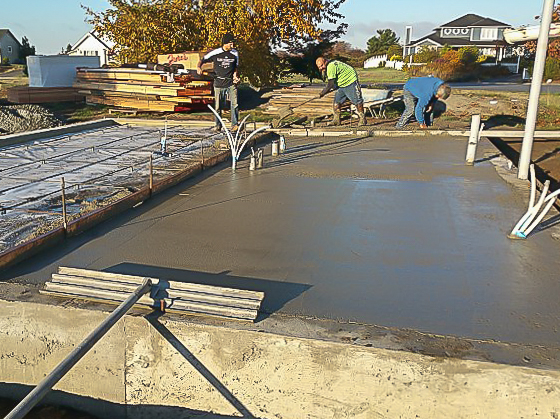
After about 20 to 30 minutes, the slop has started to gel a bit, and the gravel sinks down just a little. At this time, a long pole with a metal “float” attached is run across the surface (see Image #4 below). The float pushes the gravel further down and brings this very creamy part of the concrete up to the top. It is at this stage when the concrete really starts to take on a new personality, like an awkward teenager emerging from acne-filled puberty.
Another 30 to 45 minutes go by, and the concrete really starts to harden, but when you run a float over the top you can still get a tiny layer of cream to appear. You continue working this cream back and forth over the top, smoothing and smoothing until it, too, begins to harden. At this time, a strong force over a small area of concrete will create an indentation, but by kneeling on pieces of plywood, the pressure is applied over a larger surface area and the concrete doesn’t move. Using these “kneeboards,” you can get over to the center of the slab and work that as well without marring the surface.
I must admit that I had another learning experience during this pour as well: We ended up running out of concrete with a tiny corner of the slab left to go. I made a quick trip to the hardware store and snagged 13 bags of concrete. We mixed it up and finished the job. All said and done, you can’t tell the difference, and hopefully there will be no negative side effects down the road.
After the concrete hardened, I went out and sprayed it down with a fine mist every 15 minutes or so. While excess water added to the concrete before it has set will reduce its strength, when water is added after setting it slows the curing process and prevents cracking that can occur when the concrete sets too quickly.
Weekly Newsletter
Get building science and energy efficiency advice, plus special offers, in your inbox.


16 Comments
Hopefully I'm not the only one that enjoys looking at
insulated slabs.
Air barrier/vapor retarder
I am wondering how you plan on tying the vapor barrier under the slab to the vapor barrier in the walls? It would seem from the photos that there is no way to connect them other than assume that the slab is air tight.
Vapor Barrier
David, thank you for the question. I learned on this site that vapor barriers don't have to be continuous to be effective. https://www.greenbuildingadvisor.com/blogs/dept/musings/polyethylene-under-concrete-slabs
As far as the air barrier is concerned, there is a very thin layer of concrete that connects the slab to the footing and this should be adequate. That having said I will be conducting a blower door test as soon as I install just the ceiling drywall so everything will still be fully accessible and I can make any repairs to the air barrier as needed.
Interestingly enough....
My garage uses the same approach that you describe although my house does not. The house is continuous from under the slab to the interior osb. The garage stud walls just sit on top of a sill gasket and there was no special sealing to the slab. The garage ach came it at 0.93. No drafts were detectable at the slab/foundation interface. I was afraid not tying together the air barrier for the house because I wanted to get
Better then the passive house requirement. It seems that the wall/foundation connection will probably be fine without the barrier continuity.
Response to David Goodyear (Comments #2 and #4)
David,
In Comment #2, you implied that Matt was making a mistake to assume that a concrete slab is airtight.
Then, in Comment #4, you provided an anecdote that reinforces the idea that concrete slabs are airtight.
Here's my take: In most cases, a concrete slab is airtight. The slab is your air barrier. As always, you have to think through the transitions -- but many types of sill seal (or sill seal plus tape, or sill seal plus caulk) work well.
Martin
It may have come across in the wrong way. I wasn’t assuming he was making a mistake. I was probing for information more than anything. I used two different techniques during my own build but had less confidence in the air tightness of the garage. my garage slab worked out fine but on the ph builders course I was told not to assume the slab was air tight and they showed cases where slab cracks compromised air tightness because there was no redundancy. I was afraid of the slab cracking in the house so just followed the designers details of tying the vaporbarrier to the air barrier in the walls. I had chewed up so much time getting the vapour barrier details right on the house that I was laying the vapour barrier for the garage on the same day of the pour and left the detail as Matt describes in interest of time. My only worry was really cracks in the slab. My experience is that it is but I do wonder what will happen as the slab shrinks and cracks.
Response to David Goodyear
David,
All good points. Most slabs have a vapor barrier beneath them -- at a minimum, 6 mil poly -- and this vapor barrier tends to mitigate any air leakage problems through future cracks. Very wide cracks, which are rare, can always be caulked. But your points are all valid.
As I often say, "Your details will depend on your airtightness goal and your budget."
Compressive strength of ComfortBoard 80 rock wool
Using rock wool panels with concrete is an interesting solution, vs standard XPS foam board. I was wondering about compressive strength, however. Foamular 250 is recommended for residential underslab applications, which provides 25 psi of compressive strength. So I checked the RockWool site. Here are the numbers for RockWool 80:
439psf (21kPa) @ 10% compression = 3 psi
1065psf (50kPa) @ 25% compression = 7.4 psi
This is significantly lower than 25 psi. So let's look at the load with Matt's 4" slab. Concrete typically weighs ~150 lb per cubic foot, so a square foot of 4" concrete slab weighs ~50 lbs for a pressure of .35 psi. In short, no problem with a 4" slab and ComfortBoard 80.
RE global warming impact compared to XPS foam board, I could not find any studies that analyzed CO2 emissions from the mining process and blast furnaces used to create rock wool vs energy used to create foam board - plus GWP from the blowing agent.
Mark
Horizontal slab insulation
What do you estimate the average winter time temperature of the gravel, at the surface where it contacts your slabl? Just wondering what the annual btu loss difference between your arrangement and covering all of the gravel with the rockwool?
Mark
The loading is nowhere near the capacity of the sub-slab rock wool, but just for clarity your example should include all dead-loads and live-loads. That is, in addition to the slab, interior partitions, stairs, appliances, furniture, belongings and the occupants themselves.
One unknown is the dynamic between the slab and the insulation in a seismic event there the loading changes dramatically. Matt is building in an earthquake zone.
sub-slab mineral wool
If I understand this correctly, Roxul Comfortboard 80 shouldn't be used for more than 50 psf (what 4" of concrete alone weighs). See 5.7:
http://www.icc-es.org/Reports/pdf_files/load_file.cfm?file_type=pdf&file_name=ESR-3773.pdf
Jon
That's a long way off the values cited by Martin in this blog:
https://www.greenbuildingadvisor.com/articles/dept/musings/sub-slab-mineral-wool
Earthquake?!?!
Now you tell me!! ;) Thomas to answer your question the climate is actually relatively mild here. It rarely gets below 20F. I suppose I may lose some heat there but keep in mind that there is 2' vertical Roxul as well, and the soil is quite gravelly, so the thermal conductivity is lower.
FORM BOARDS
Why did you put the form boards stakes on the inside with the concrete? I haven't seen alt of pours and it has been a loooong time since I've seen a pour, but I always remember the stakes on the outside so concrete setting on them isn't an issue
Matt, some thoughts if you do this again.
1) Use Rockwool CB-110 under your slab. A little more expensive, but a higher compressive strength. Both are approved by Rockwool under slabs, but I'd personally error on the side of the 110.
2) Regarding the stakes getting stuck in the concrete... I'm assuming maybe you're referring to the middle of the stakes, where they extend a little beyond the bottom of the form board... where concrete may escape and surround them? If so, there is an excellent product called Fastfoot by Fab-Form out of Canada that prevents this issue.
FastFoot is a sturdy but lightweight fabric that is used to line the inside of the forms... and the forms can simply be 2x4's rather than larger 2x boards, unless you want more than 3.5" of flat edges on the walls as the fabric tends to bow out a bit beyond the form. In such case, you can just use a larger 2x board for whatever size you require.
Fastfoot keeps all the concrete where it should be (in the forms) and prevents rising damp too. It also keep the concrete from drying out to quickly, or getting to wet at the bottom, and It makes it a breeze to remove steel stakes and the form boards because no concrete even touches them. This allows the form boards go either be used again for future forms, or to build a structure as they will be good as new when removed, other than a few screw holes.
3) In the future you may want to consider using a product called GatorBar in place of your steel rebar. Much lighter, easier to cut and will never corrode causing pre-mature failure of your concrete footings or slabs. It currently does need special engineering thought to be used in vertical/structural applications, which I'm doing on my current build, but I absolutely love working with the stuff. They currently only make it in No 3 (which is used in horizontal applications where No 4 steel is used due to it's strength advantage), and they are coming out with No 4 size in early to mid 2020.
Good job learning all this stuff as you go Matt. It's hard enough to build a "typical" house with little building experience, but to build a Net Zero home while trying to reduce your environmental impact, that's a whole other world of difficulty!
We are using Mono Slab EZ Forms for our slab on grade build. The benefit is that you leave the forms in place and in my area, climate zone 6, we need horizontal insulation board to achieve a passive solar house with exceptional thermal retention. Because of the exceptional insulation, we can make pour shallower footers saving loads on concrete. These forms provide so many benefits. Check them out. https://monoslabezform.com/
Log in or create an account to post a comment.
Sign up Log in