How to flash window trim below window
Hi guys, I have been reading a lot about flashing and according to Hammer and Hand, these are the locations that need flashing:
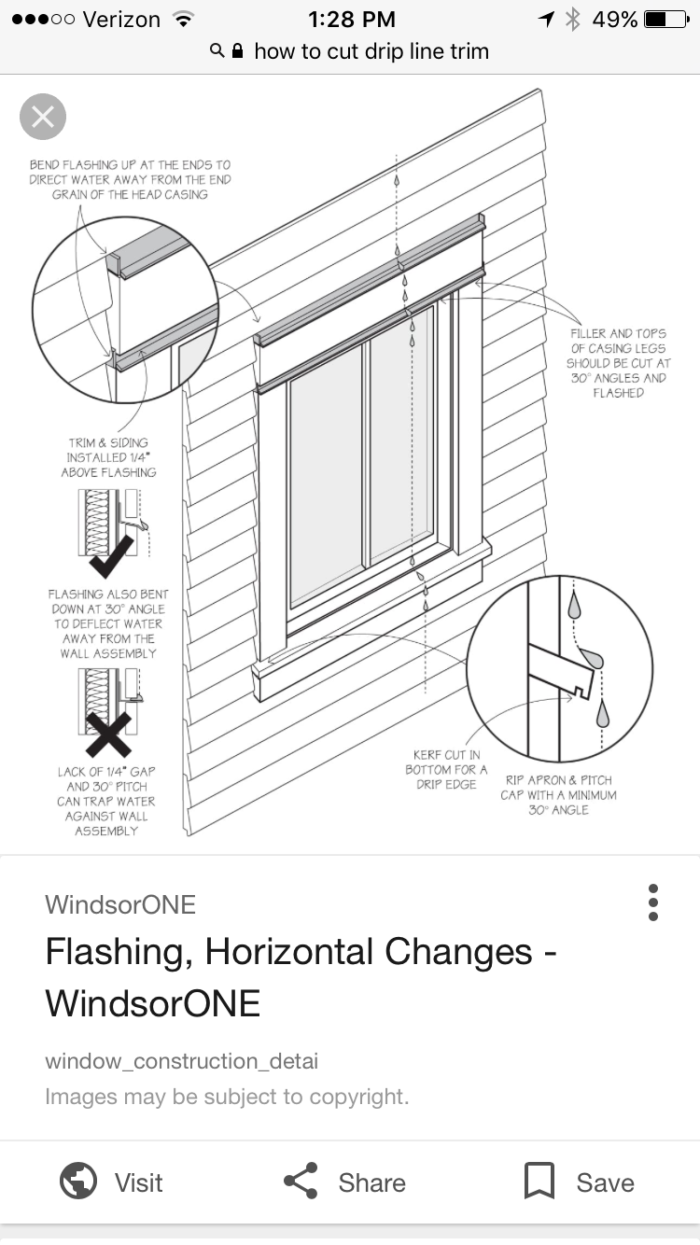
Flashings should be installed:
1. At all horizontal joints between different exterior finishes unless the upper finish overlaps the lower finish.
2. At every offset in cladding, changes in cladding substrate, and at all penetrations (horizontal transitions between siding, stone, brick, tile, or stucco).
3. Where stresses can be concentrated (such as at the rim joist/foundation joint).
4. Where drainage is compromised (such as a change from wall cladding to parging).
5. The top and bottom of windows, doors, and all penetrations (vents, lights, hose bibs, electrical outlets, electrical meters, etc).
Now, I am trying to figure out the best way to properly flash the trim underneath a window. These seems like one of the most important things to flash in a house but also more difficult.
Is the best way to do it- to have and angled/sloped piece of trim and then notch a line in the bottom to prevent water from wrapping around? Please see my picture attached.
If that is the best option, I assume I should caulk the seam between bottom of window and top of this piece of trim?
Does anyone use metal flashing here?
Thanks!
GBA Detail Library
A collection of one thousand construction details organized by climate and house part


Replies
Michaelba,
If you are installing a window in a new house, the first step is to flash the rough opening. Your rough sill will get a sill pan (either a manufactured sill pan or a site-built sill pan), and this sill pan will direct water to the exterior surface of your water-resistive barrier (WRB).
For more information on flashing window rough openings, see this GBA video series: Window Sills That Won’t Rot.
The sloped component of your window is called a sill. Unless you are building your own windows -- that's very rare these days -- the sill comes with the window. A traditional sill is made of wood; it is sloped, and it includes a kerf on the underside to prevent rainwater from wrapping around the sill and entering the wall.
..
Hi Martin. Thanks for the response!
I did do the sill pan flashing already. I am not on the exterior trim. I guess it's important to note that my trim is thicker than how far my window comes out. I have just a regular milgard window like in the picture. My window comes out 1" thick and the trim is 1.5" thick.
So would the best thing to do here- is give the top (of the trim under the window) a slope and then caulk between the top of trim and bottom of window?
My tim is on bevel siding like the second picture but obviously thicker trim that extends past window sill.
This is a better image what I am talking about
Michaelba,
Trim under the sill is optional. I'm not a fan of "picture frame" trim.
With a traditional window, the sill is proud of the siding. A narrow piece of trim is sometimes installed under the sill, but you don't want the horizontal trim to extend further from the drip edge of the sill.
If your window is inset for some reason -- the classic example is an "innie" window -- you can create a sill (out of metal flashing, a durable species of wood, or solid PVC trim) to convey the rain water to a point beyond the siding plane. This would be sloped, just like the sill provided by the window manufacturer. Ideally, this is figured out before the window is installed.
Hey Martin,
My trim is thicker (horizontal) so essentially is the same as innie window. How would I place this metal flashing? There is no where to duck it under the window flange with it already installed.
What about the other option I suggested? I can slope the top of the trim down and then just caulk the seam between bottom of window and top of this trim piece.
Michaelba,
Are any of the photos that you posted photos of your window? Or did you find those photos on the web?
If the window is already installed, and the drip line of the window sill is inset from the siding plane, you have a problem. At a minimum, you need to find a way to slip metal flashing under the window sill. This metal flashing needs to be sloped, and needs to be terminated beyond the plane of your siding. The tricky detail is where the metal flashing meets the vertical jamb extensions or the trim at the exterior corners of the window -- water can enter the wall at these cracks, and caulk is not a good solution.
Martin, none of these are. I'm not by my home to take a picture for a week or so. The most recent picture is almost identical to mine though. So is the window in the photo done incorrectly? Because I see no metal flashing and is just sloped as mine is.
Do you have any examples of this being done? I would love to try and put some metal flashing there but I don't see a way to do it with a back dam on the flashing.
I also should have mentioned I have 1/2" rainscreen behind my trim. I know that best practice is always to keep water out but I also have read that water is expected to get behind the siding/trim. Wouldn't this space give me enough to dry and not worry about it too much?
Michaelba,
You're right that if you have sill pan flashing that directs water to the exterior of your WRB, and you have a rainscreen gap, that the risks of damage from water entry are greatly reduced. Still, as a matter of principle, you want to aim for good water management details.
Q. "Is the window in the photo done incorrectly?"
A. It's hard to tell from the photo. Ideally, this type of wood sill would extend under the window (and would therefore require an oversized rough opening). The photo seems to show that the wood sill is simply butted up against the window. That means that there can be water entry at the crack between the window and the sill.
.
Michaelba,
Below is a photo of a very nice job of using metal flashing to create a sill for an innie window. Of course, (a) soldered copper is expensive, and (b) the designer of this house figured out all the details before the building was framed.
.
Michaelba,
Below is another innie window detail. Note that the exterior sill is under the window -- there is an overlap that takes advantage of gravity.
.
Michaelba,
Here is another innie window detail that shows how the exterior sill is under the window, and how there is a lap that takes advantage of gravity.
.
Hey Martin,
Thanks for the photos. I posted a long response but I guess it didn't go through. I really appreciate you digging up some photos!!
In case I didn't make it clear, I do not have a innie window. So the z flashing on response #9 is impossible I think. The only way it would be possible is if I slide the back dam of flashing up behind the bottom of the window flange (which I don't think would be good)? Because the trim goes right up to the window, there is no space for the back dam to go.
I have an outie window and the depth is 1 1/2". Meaning the window comes out 1 1/2" past the sheathing. I then have 1/2" furring strips and placed my 2x6 trim over that. So that puts my trim at 2" thick and 1/2" past the window.
Also- sorry if I didn't make this clear but your response #10 picture is exactly how I have my trim. Essentially the same idea as the sill. What I did was- give a ~20 degree slope on the trim below the window. Because the window is 1 1/2" proud of the sheathing and I have 1/2" furring strips, the window has a 1" overlap over my sloped trim. Does that make sense? Looks exactly the same as the photo in response #8 but the trim is overlapped by an inch.
I drew a quick picture for you to better explain.
To me, this looks the same as #10
Although I do see they recommend to caulk the crack between window and trim. Are you agreeing with that are saying I should avoid that (now that I hopefully cleared things up)?
Michaelba,
As long as your window overlaps the sill (and is on top of the sill), you should be fine.
Perfect. Just curious, did you think I had an innie window and the trim drip did not overlap my siding?
And is your vote to caulk or to not caulk the crack between window and trim?
Michaelba,
You wrote, "My trim is thicker (horizontal) so essentially is the same as innie window." I still haven't seen a picture, so I'm going from your description.
Any time that the sill that is provided by the manufacturer -- that is, the window -- is inset from the plane of the siding, you need to address the issues we have been discussing. You need a solution, whether you have an innie window or an outie window. It's still essential to direct the water out, to a plane beyond the siding plane. It looks like you are doing that.
The caulk is optional, since I assume that your air barrier is elsewhere. Once you caulk, you'll have a maintenance task in the future (renewing the caulk when it fails).
Think like a drip.
Sounds good Martin.
Hey one other question came up while getting to my next step.
Given that I have furring strips, should the drip cap above the window trim (that is on top of the window) go directly against the wall (housewrap) or over the furring strips? Important to note 3/8" cedar plywood will be above the trim
I see pros and cons of each.
If I were to place over the furring strips, the benefit is that the back dam will be directly behind the 3/8 cedar plywood siding, which would make sure no water drains below it behind the trim.
If I placed the drip cap back dam directly against the wall/housewrap, it would help protect from any water that got behind the siding from higher up in the wall, but the back dam would not be touching the back of the cedar plywood.
What do you recommend ?
Michaelba,
The drip cap above the head trim is designed to handle the water that dribbles down the siding, so the Z-flashing can go on the exterior side of the furring strips. Any water that gets past the flashing is handled by your rainscreen gap, which has its own flashing and drainage routes.
Got it thanks!