
Image Credit: Daniel Morrison
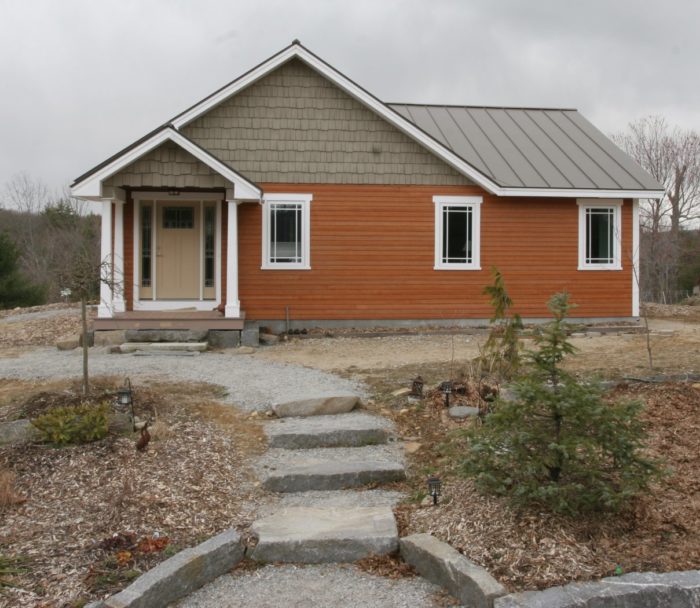
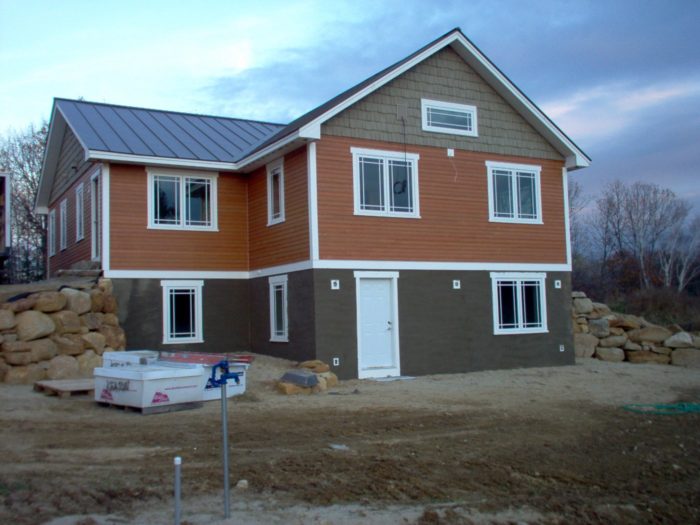
Image Credit: Daniel Morrison Siding bands break up an otherwise monotonous elevation. The home's lowest floor has an exterior door on the north side. The walls of both floors were built with insulated concrete forms; the EPS foam is protected by a layer of stucco on the lowest floor and by fiber-cement siding on the upper floor. The shingle-sided gable walls were stick-framed. Click here to see a video tour of this home.
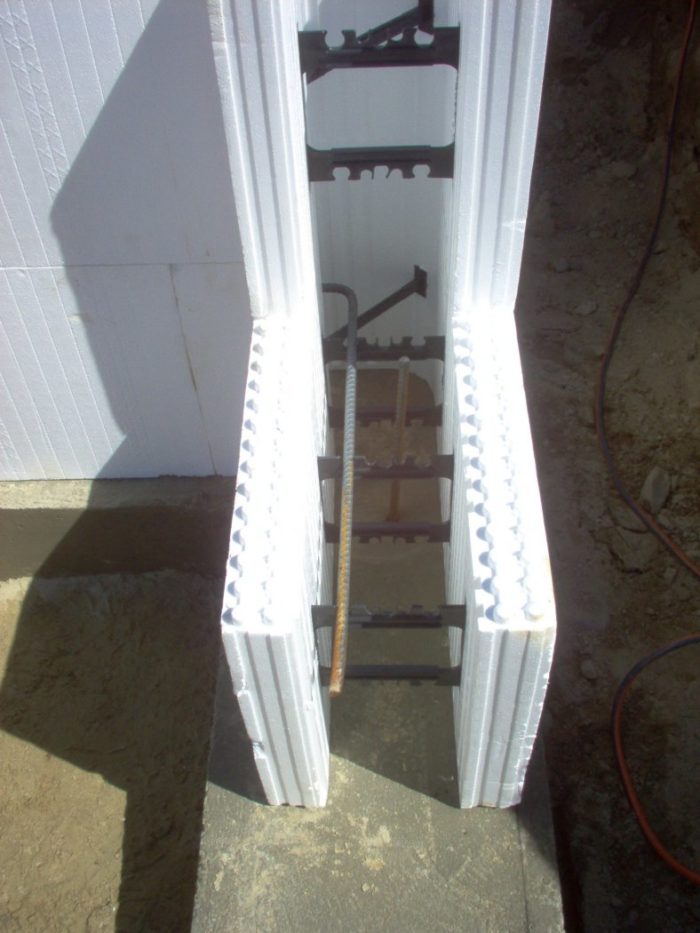
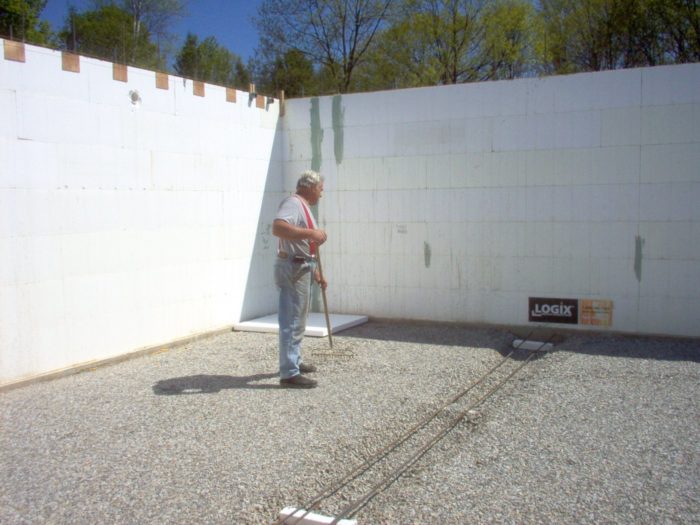
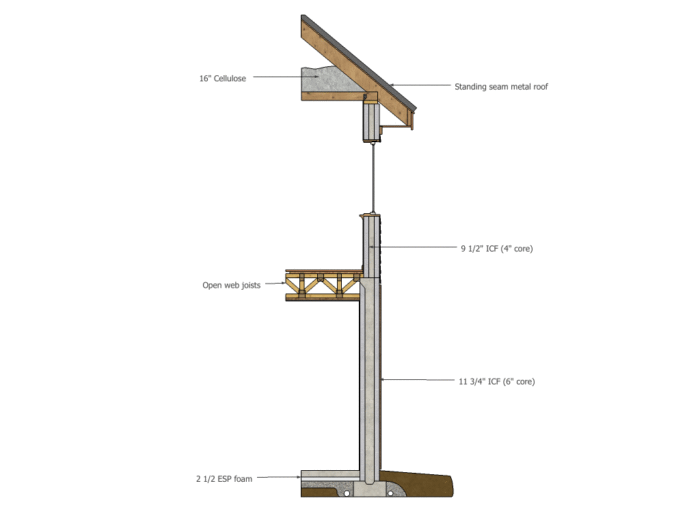
Image Credit: Rouleen Williams Foam concrete forms. The insulated concrete forms were manufactured by Logix; plastic webs are used to connect the two sides of the expanded polystyrene (EPS) forms. The lower floor uses 11 3/4-in.-wide blocks (creating a 6-in.-wide concrete wall). The EPS forms become a permanent part of the house; the thermal resistance of the resulting wall is R-24. Click here to see a video tour of this home.
Image Credit: Rouleen Williams Crushed stone helps keep the slab dry. The crushed stone was leveled with a rake to prepare for the installation of a continuous horizontal layer of 2 1/2-in.-thick rigid EPS foam. Click here to see a video tour of this home.
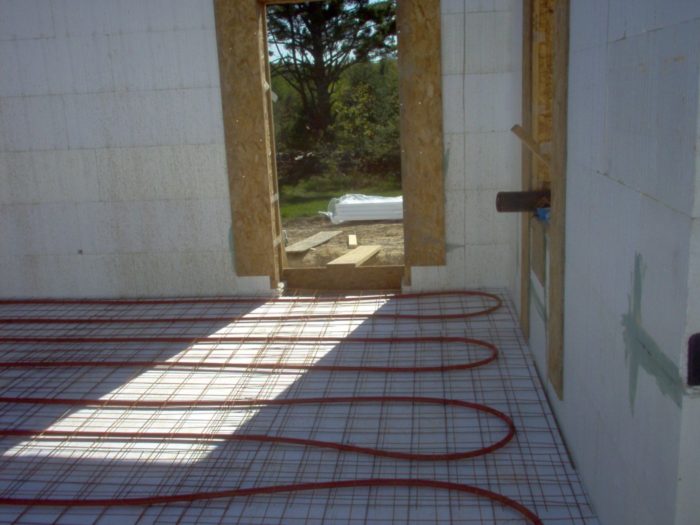
Image Credit: Rouleen Williams Two layers of 4-in. reinforcing mesh. The PEX tubing used to distribute heat is sandwiched between two layers of steel reinforcing mesh. Click here to see a video tour of this home.
Image Credit: Rouleen Williams Two types of ICF. The walls of the walk-out basement are built with thicker ICFs than the walls of the upper story. The difference in concrete thickness provides a lip from which the top chord of the open-web floor joists are hung. Click here to see a video tour of this home.
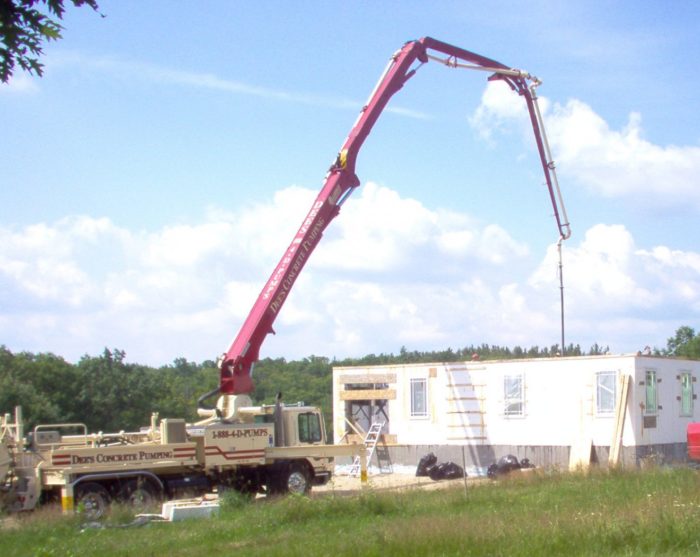
Image Credit: Toshi Woudenberg The pumper truck has a long arm. A concrete pumper is essential when placing concrete in insulated concrete forms. Click here to see a video tour of this home.
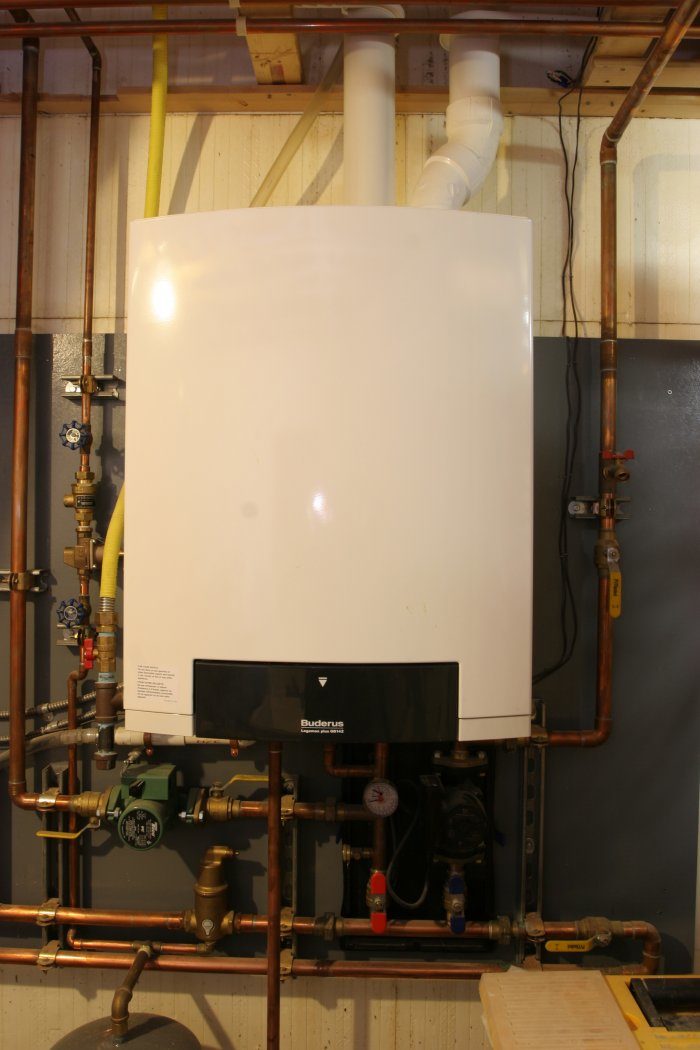
Image Credit: Rouleen Williams A wall-hung boiler. This compact propane-fired boiler from Buderus supplies all of the home's space heat and domestic hot water. Above the boiler are two PVC pipes: one supplies outdoor combustion air, while the other is the flue that removes exhaust gases. The green circulator can be seen below the boiler. Click here to see a video tour of this home.
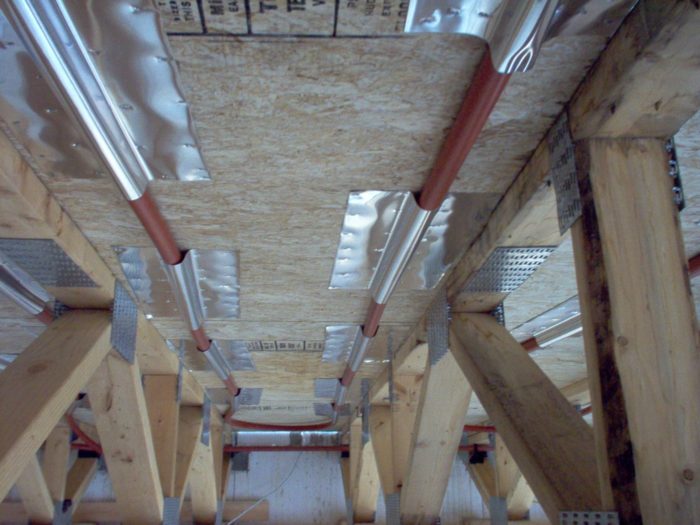
Image Credit: Daniel Morrison Open-web floor trusses simplify plumbing. There's no need to drill holes through the joists when a house is framed with open-web floor trusses, so threading PEX tubing through the floor framing is relatively easy. Aluminum heat-transfer plates hold the PEX against the subfloor. Click here to see a video tour of this home.
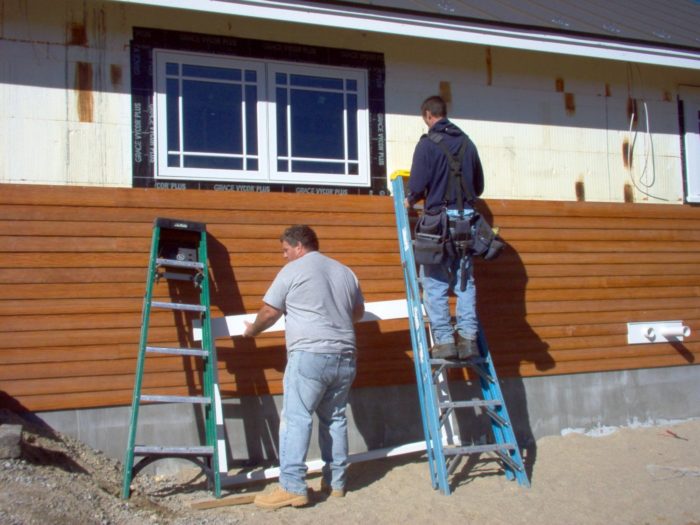
Image Credit: Rouleen Williams Fastening siding to foam is tricky. Logix ICF blocks have webbing embedded in the foam to hold fasteners. The fiber-cement siding was installed with stainless-steel screws that catch the webbing. Click here to see a video tour of this home.
Image Credit: Rouleen Williams Flared jambs. The drywall-finished flared window jambs allow more light to enter the interior than 90° jambs. Click here to see a video tour of this home.
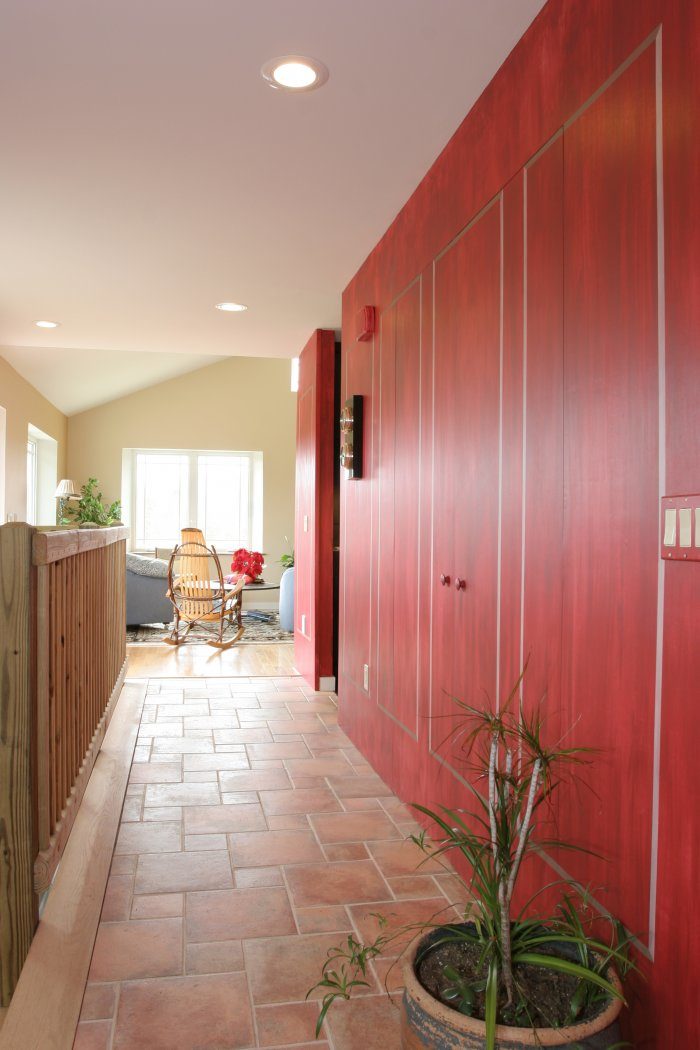
Image Credit: Daniel Morrison Inconspicuous doors. The entry hall includes several doors that blend into the wall's red-stained paneling. Click here to see a video tour of this home.
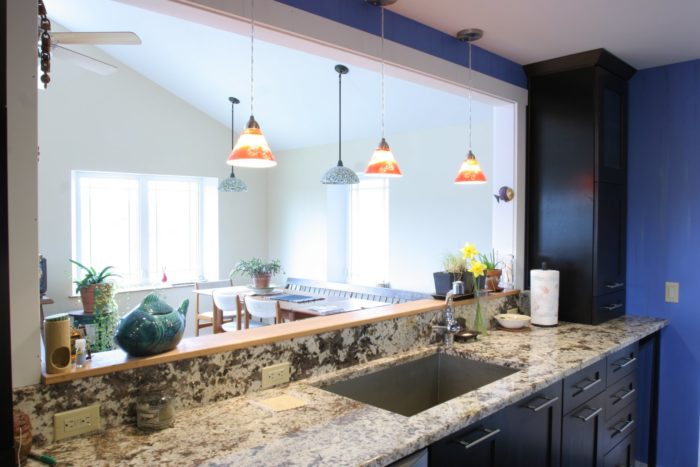
Image Credit: Daniel Morrison A view from the sink. Anyone working at the kitchen sink can enjoy the view of the distant hills through the dining-room windows. Click here to see a video tour of this home.
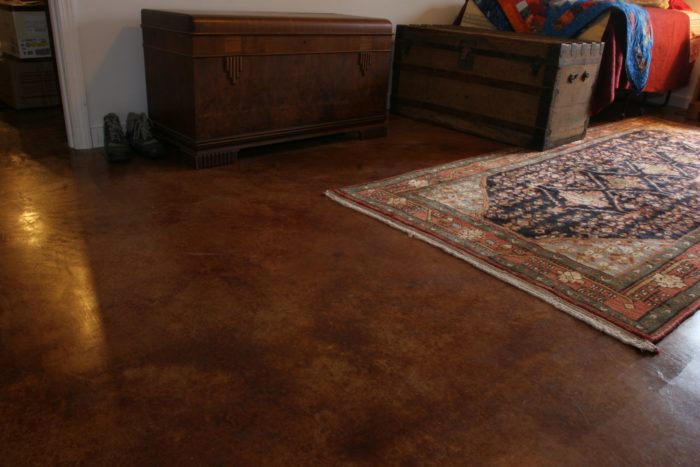
Image Credit: Daniel Morrison Stained concrete. The concrete floor in the basement is finished with a reddish-brown acid stain. Click here to see a video tour of this home.
Image Credit: Daniel Morrison
An owner-builder finds that insulating concrete forms (ICFs) work well for DIY walls
By Rouleen Williams
My plans to build a dream home took years to bear fruit. I took the first step in 1988, when I bought an 18-acre property in Salisbury, N.H. The lot slopes to the southwest, with a spectacular western view over a beaver pond to Mt. Kearsarge.
It took me 19 years to save enough to qualify for a construction loan. In many ways it was good that the process took so long, because the home I finally built is much better than the one I first envisioned.
I was issued a certificate of occupancy for my new energy-efficient home on March 28, 2008, exactly one year after construction began. Every time I walk in the door I feel grateful to those who supported me or helped me during the home’s design and construction.
Designing and dreaming
I spent several years drawing plans and choosing where to site the house. My influences included Craftsman architecture, sustainable building practices, and small house designs. I love the Craftsman style because it is comfortable and inviting. Above all, I wanted a house that looked like it belonged on the site.
A chance encounter
At first, I thought I wanted to build the shell with structural insulated panels (SIPs). One day I noticed that the truck parked beside my car had “SIP” painted on the door. I introduced myself to the driver, who explained that she and her husband were working with a local builder, Al Rossetto. She showed me Rossetto’s Fine Homebuilding article and gave me his phone number. I called Al, drove to see his home in Lancaster, and my project was launched.
Al is a knowledgeable and experienced construction consultant who only works with owner-builders. He convinced me that I could act as my own general contractor. He put me in touch with all of his subcontractors so that I had an idea of the price of the various steps in the process. Al agreed with my plan to use sustainable practices and products, and supported my goal of using mostly local contractors.
ICFs, not SIPs
Most of the homes that Al has worked on have a foundation built with insulating concrete forms (ICFs) and above-grade walls built with SIPs. I took such a liking to ICFs that I abandoned my original plan to use SIPs. I ended up using ICFs for the above-grade walls as well as for the foundation.
Building with ICFs reminded me of building with Legos. Although ICF construction is fairly straightforward, we had a few problems when strong winds blew some of the lightweight blocks away.
Floor joists
To facilitate the home’s open floor plan, we framed the floors with trusses capable of spanning the full width of the house. As a result, my large basement is free of center posts. Trusses also worked well for the attic, where there is no living space, only insulation.
In-floor radiant heat distribution
A propane-fired Buderus boiler ($6,000) provides space heating for my house. The heat is distributed through PEX tubing embedded in the basement slab and stapled to the underside of the subfloor.
We laid out the PEX tubing for the lower floor in one very long day. The tubing and reinforcement mesh resembled a large sandwich. We laid out 2 1/2-in.-thick EPS insulation over the crushed stone base, then put down a layer of 4-in. reinforcing mesh. Next, we installed the loops of PEX tubing, and finally another layer of the 4-in. grid wire. The tubing was held inside the frame with wire ties. During the concrete pour, we used pieces of tubing to lift the whole sandwich, suspending it above the insulation base so that the concrete would flow under it, with the tubing and mesh floating in the center of the slab.
Under the main floor I installed staple-up PEX tubing. Although this was certainly hard work, anyone could accomplish it. Threading the tubing (which comes in a 300-ft. roll) is like weaving. We first unrolled the PEX tubing outdoors. We laid one end where it would attach to the heating system and brought the other end back to make a loop in each truss bay, taking care not to kink the tubing. It’s a challenge to work over your head in a tight space between the trusses, trying to keep the PEX tubing against the subfloor above while avoiding the vents and other plumbing pipes. Some staplers tend to jam; one that worked well for us was a Duo-Fast electric stapler that shot 5/16-in. #5010c staples.
Flooring choices
To avoid damaging the radiant tubing, I chose flooring that could be installed without nails or screws: ceramic tile, floating engineered hardwood, and cork. In the kitchen and laundry room, where water might be an issue, I used glued-down cork. The basement concrete floor is finished with an acid stain.
Plumbing and electrical
I used PEX tubing for the domestic water system—red tubing for hot water, blue for cold.
My home’s electrical wiring is tucked into channels melted into the ICF foam using a tool similar to one used for the craft of wood burning. A wire loop the size of an electrical box is attached to the tool; when placed against the foam wall, it neatly cuts out a rectangle to receive a plastic outlet box. Even though the electricians were initially skeptical of the tool, it worked well. Cutting channels for wiring was done with an electric drill equipped with a bit the same diameter as the Romex wiring.
To provide electricity in emergencies, my house is equipped with a whole-house propane-fired generator, which cost $3,000.
Mechanical ventilation
I always try to save where I can, so I opted not to have air conditioning. I really enjoy living with the windows open and using cross ventilation to bring the outdoors in. On days when the windows are kept closed, fresh-air ventilation is provided by a Venmar energy-recovery ventilator (ERV).
Because my house started out with a lot of indoor humidity, especially in the basement, I thought that I might have to alter the ventilation system. When I asked Al about the situation, he said that there should be no excess humidity. It turned out one of the ventilation grilles in the downstairs closet had been improperly installed. Since that problem was rectified, the indoor air quality has been wonderful.
Insulation and air sealing
Before the house was insulated, I spent a lot of time on air-sealing details. Air-sealing work is much more important to the person who will ultimately pay the utility bill than it is to any contractor. All of the air-sealing work was done by me and my friends and relatives; as a result, I have a very tight house.
Every penetration of the building envelope was sealed with expanding foam: around every ceiling penetration, around every electrical box, around the recessed cans, and every place where wires went through the ceiling and floor.
I would go up to the attic when the sun was on the east side to look for pinholes of light through every truss channel. I worked my way around the attic sealing every spot with spray foam. I did this for several days, with the sun shining on the house from different angles, until I was satisfied that there were no air leaks.
We insulated the ceiling with 16 in. of cellulose (R-60).
Low-maintenance materials
I wanted my house to be as maintenance-free as possible, so I chose 26-gauge steel roofing and CertainTeed fiber-cement siding. The siding comes stained in a mahogany color, in 16-ft.-long 4-in. wide planks that look like cedar. The planks are fragile until they are attached to the wall, so the long pieces had to be moved carefully.
The siding was installed with special fasteners that penetrated into the ICFs just deep enough to catch the webbing (1/2 in. under the foam). After much trial and error, we settled on 1 1/2-in. self-starting, square-drive stainless-steel screws purchased from a company in Wisconsin. These screws were so expensive that I had the framers empty their aprons each day so that I could maintain the inventory. Twice I had to order more screws, shipped by overnight delivery, to have enough to keep the crew working.
Interior framing
I used conventional wood framing for the interior partitions. I love having the flexibility to move a wall—for example, a wall that didn’t allow enough access to the closet in the master bedroom. Since none of the interior partitions are bearing walls, the change was easy to make.
We finished the walls with conventional drywall. Drywall screws had to be positioned carefully in order to catch the webbing in the ICFs. (Fastening anything to ICF walls is always a bit tricky.)
Building is empowering
By building my own house, I learned that ordinary people can become green builders. Al Rossetto provided a step-by-step program that made it possible for me to have the house of my dreams. I ended up with an airtight house with a fresh-air ventilation system, and I did a good deal of the building myself. I did not know that was possible, but with the encouragement of Mr. Rossetto, it became a reality.
Weekly Newsletter
Get building science and energy efficiency advice, plus special offers, in your inbox.
Lessons Learned
The contractors were unfamiliar with ICFs. After the walls were half-built, rebar and metal strapping protruded from the tops of the concrete. The framers, who didn't realize these were critical wall components, wanted to cut off the protruding pieces of metal to get them out of their way when they were setting floor trusses.
The plumbers put a few unnecessary holes through the ICF foundation, and the electricians hacked away the ICF foam to expose the concrete that they were used to working with. After a few training sessions, however, the contractors all learned to work with this unfamiliar product. I can't say they embraced it—but the end result turned out fine.
Click here to see a video tour of this home.
General Specs and Team
| Location: | Salisbury, NH |
|---|---|
| Bedrooms: | 2 |
| Bathrooms: | 2 |
| Living Space: | 2600 |
| Cost: | 80 |
Design: Rouleen Williams, Al Rossetto, and Online Design Construction consultant: Al Rossetto Framing contractor: D&D Construction
Construction
Sub-slab insulation: 2.5-in. EPS (R-10)
Wall construction: R-24 Logix ICFs (total wall thickness 11 3/4 in. downstairs, 9 1/2 in. upstairs); great room gable is stick-framed with 2x4s filled with cavity insulation plus a continuous interior layer of 1-in. polyisocyanurate.
Windows: Koltech triple-glazed
Ceiling insulation: 16-in. cellulose (R-60)
Roofing: 26-ga. steel roofing
Siding: CertainTeed fiber-cement lap siding
Energy
Space heat: Propane-fired Buderus boiler; hydronic in-floor radiant heat distribution
Water heater: Indirect Superstor tank
Energy Specs
Appliances: Energy Star
Water Efficiency
Domestic water pipes: PEX tubing
Indoor Air Quality
Mechanical ventilation: Venmar ERV
Certification
5 Star + Energy Star rated


11 Comments
Energy performance
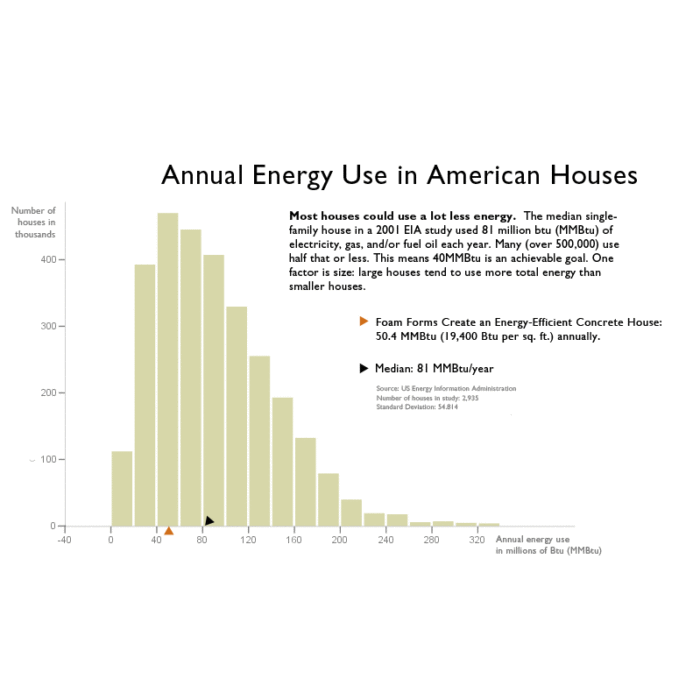
This home should be quite efficient, it is tight, well insulated, and the design is compact with a favorable surface to volume ratio. I would like to hear how this house performs over the winter.
Two questions
Sounds like a great project and a comfortable home! I have two questions - what was the R-value of your above-grade ICF walls and how did you get a bank to let you contract this yourself? Most banks around my parts won't lend to owner-builders, and even exclude some of the lower volume builders.
Wall R-value
Michael,
Although the basement walls were made with ICFs that are thicker than the ICFs used to make the walls of the upper floor, all of the ICFs have the same EPS thickness, and therefore have the same R-value (R-24).
how much did this cost?
I want ICFs also, plus all green features. But I am limited by a $100 sq ft budget.
I too have thought of having a project manager instead of a general contractor who takes 20%. I need to start this project by April, 2010.
Any ideas?
Thanks very much.
Cost info
Rita,
Thanks for your question. Excluding the cost of the land, Rouleen Williams has spent $80 a square foot on the house. Her basement is not yet finished. I have added the cost figure to the specification box.
project manager or gc
I didn't think I could do this until builder/mentor Alan Rosetto put me on the path. I am so grateful because I never could have had a house like this without personal involvement
Have you seen the underground
Have you seen the underground house in Maryland? search "Livingwithmotherearth "
Question about cost
Hello Rouleen & Martin, I am in the process of designing a small 28x28 cottage on land I own
in Manchester Center, VT I have look at ICF and SIP . You say it cost $80 per sq. ft to construct this home? does that inlcude the inside flooring siding and roofing & heating and plumbing?
Thanks for any info! your hosue loks great ! Andy in VT
Rouleen Williams Home
I really like this house for its many reasons. What are the dimensions of the building? and the height from ground to peak.
thank you we are looking to build a very similar home. Thank you Rouleen you have done a wonderful job on your home with your builders support.
Ali
Response to Ali Ross
Ali,
The footprint is 37' x 43' and the height (ground to peak) is 25' on the rear elevation.
Rouleen's home
Hi Rouleen:
What is the floor plan layout like Rouleen as far as distribution of different spaces. What's where? I just LOVE your house and the way it sits on its little hill. We are looking at building a similar size home here in Canada. Anyplace I could see a floor plan? Thank you so much, you are inspiring!
Ali
Log in or create an account to post a comment.
Sign up Log in