
Image Credit: Robert Opaluch
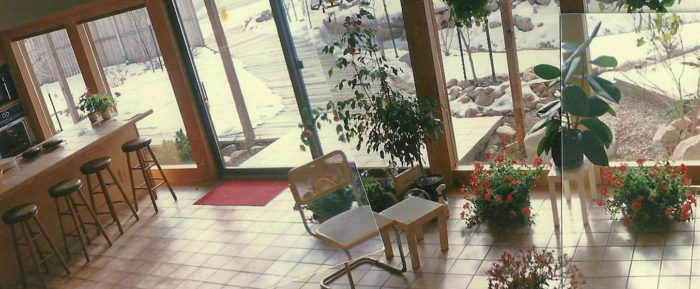
Image Credit: Robert Opaluch The south-facing glazing on the first floor includes an 8-foot-wide Andersen sliding glass patio door. Flanking each side of this sliding door are two site-built 4’ x 6’ fixed double-glazed windows.
Image Credit: Robert Opaluch During the winter, when the sun remains lower on the horizon, sunlight reaches deep into the home, reaching a maximum penetration of over 13 feet on the winter solstice (December 21).
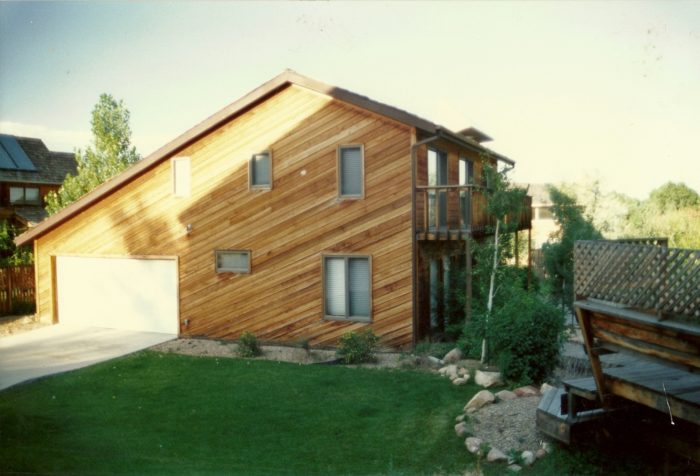
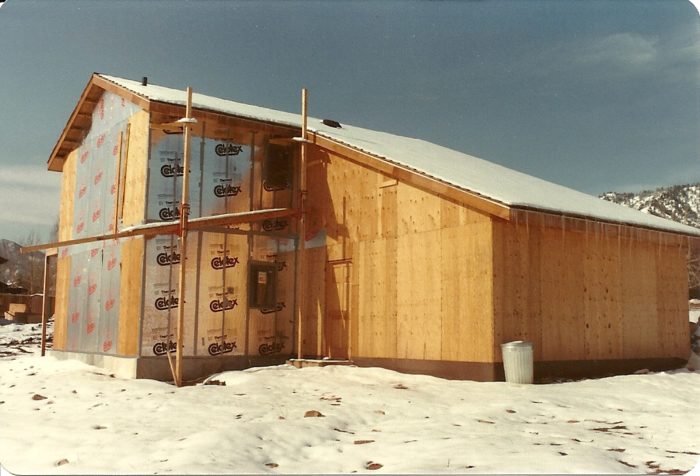
Image Credit: Robert Opaluch This photo shows the northeast corner of the house. The north wall was sheathed with 1-inch-thick foil-faced polyisocyanurate. The east wall was sheathed with full sheets of ½-inch plywood at the corners and ½-inch foil-faced polyisocyanurate elsewhere.
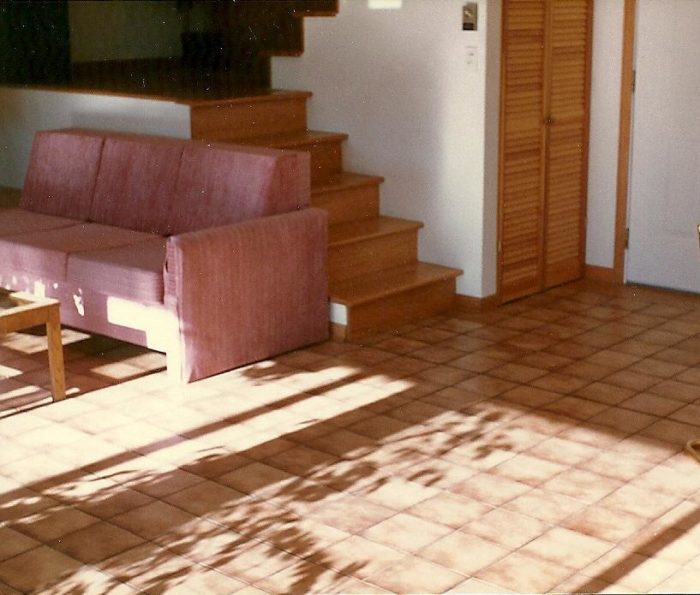
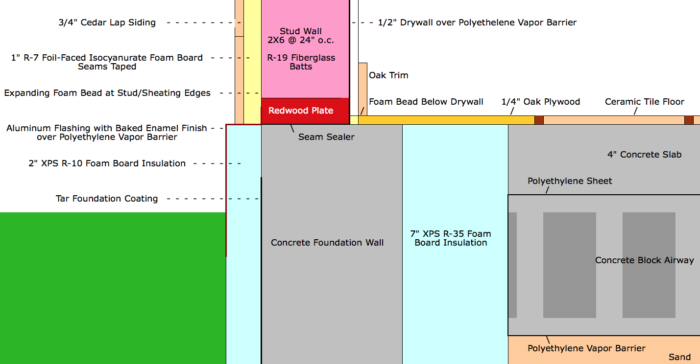
Image Credit: Robert Opaluch Vertical XPS insulation was installed on the interior of the foundation wall. The floor tile which covers the slab does not extend all the way to the concrete foundation wall. Oak plywood spans about 10 inches from the tile near the outside edge of the slab, over the top of the XPS insulation, to the portion of the top of the foundation wall not covered by the exterior wall. No horizontal insulation was installed below the slab and the concrete blocks under the slab.
Image Credit: Robert Opaluch
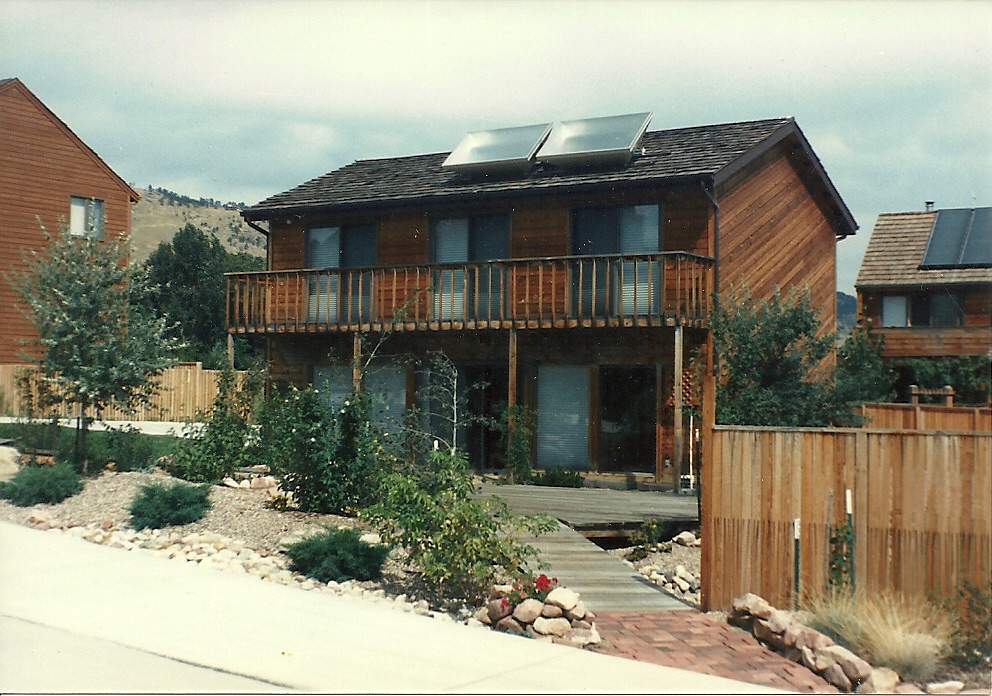
The design of this two-story home in Boulder, Colorado, adhered to timeless passive solar principles
Back in the early 1980s, I built a 1,480-square-foot passive solar home in Boulder, Colorado. There have been substantial improvements in active solar equipment since then. But today’s passive solar design principles are quite similar to the principles preached in the early 1980s. Solar energy provides almost all the winter heating and hot water for this home. The cost savings I achieved by eliminating a central heating system were invested in thermal mass, additional insulation, and better glazing, so no additional construction costs were incurred compared to conventional construction.
Solar heat with electric backup
Construction began in mid-1982, and I moved in a year later. During the following two years, I worked full-time while completing interior work and landscaping.
Most of the home’s winter heating requirements are met by the home’s south-facing windows. The solar heat is stored in the high-mass floor (a tile-covered concrete slab) and is retained by a superinsulated building envelope. Two passive solar (batch-type) hot water tanks provided almost all the home’s domestic hot water. Electric radiant heat and a small electric hot water tank serve as backup.
Conductive heat loss, air infiltration, and solar gain calculations were done for each separate room as part of the design process. Winter heating bills were approximately $25/month (in 2014 dollars) in a cold (5,600 heating degree day) but sunny winter climate. Utility costs are so low that the cost of a heat pump or central heating system can’t be justified.
Temperatures stay in a comfortable range
The main living area’s south-facing window wall, helped by the high-mass floor and the superinsulation, resulted in a typical winter day indoor temperature fluctuation of 68°F to 78°F. After an overcast day, temperatures dropped to 65°F by the following morning, without using backup heat. Very rarely, after two or more successive overcast winter days, temperatures dropped to 63°F. The lowest recorded indoor temperature was 59°F; this temperature occurred once in five years, after multiple overcast days with no backup heat used.
During the coldest period experienced in five years, outdoor temperatures stayed below 0°F for five days, dropping at night to -15°F. Yet indoor temperatures in the main living area on the first floor climbed into the low 70s and dropped to about 65°F by early mornings, with no backup heat used.
Upstairs in the bedrooms, backup heat was used overnight only on the coldest nights in occupied bedrooms. Typical winter day indoor temperature fluctuations were from 65°F to 82°F. Each of the the three upstairs bedrooms has a south-facing sliding glass door leading to a common deck that shades the windows below during the summer.
A simple design
The home is a 20’ x 40’ two-story home with an attached garage on the north side, resembling a Colonial or saltbox design. The home’s foundation consists of concrete grade beams at the perimeter surrounding a slab on grade. The roof is framed with trusses. The cedar siding and cedar shingle roofing conformed to the style required by the neighborhood Architectural Control Committee.
The main living area on the first floor has an open floor plan with a kitchen, family room, and dining areas. The stairway is U-shaped. There is a doorway to the garage, and a short hallway with a laundry area and half bath.
Upstairs are three bedrooms facing south, one study facing north, and a full bathroom. The east side was designed for a later addition. An addition could add an airlock entrance, a formal living room, and a dining room, and could expand the master bedroom and add another bathroom.
Passive solar features
Active solar systems use collectors, pumps, fans, controllers, or other equipment that use and store energy to operate.
Direct-gain passive solar heating has three necessary components:
- Significant south-facing glazing to capture winter sunlight. Each habitable room or space needs south-facing windows or skylights that measure about 25% of the floor area. The windows must get unobstructed sunlight from at least 10:00 a.m. to 2:00 p.m. during winter months.
- Superinsulation and tight construction to minimize heat losses. South-facing glazing alone cannot capture enough heat to keep a building comfortable in a cold climate if it the building is poorly insulated or leaky.
- Thermal mass to soak up solar heat during the day and then radiate that warmth back at night when the sun no longer shines.
Examples of thermal mass include concrete floor slabs, brick walls, large water tanks or tubes, stonework or tile that is inside the building’s thermal envelope (to retain stored heat). Air, wood and cloth do not hold enough heat to keep a home comfortable for an extended period of time. Thermal mass is necessary to reduce indoor temperature fluctuations. Otherwise temperatures in the afternoon become too hot, and temperatures before the sun rises become too cool. Thermal mass absorbs heat when air temperatures rise above the temperature of the thermal mass, and give off heat when the surrounding air temperatures fall below the temperature of the thermal mass.
South-facing glass
The south-facing glazing on the first floor includes an 8-foot-wide Andersen sliding glass patio door with a frame of vinyl-clad wood. The double-pane glazing is rated at about R-2. Flanking each side of this sliding door are two site-built 4’ x 6’ fixed double-glazed windows, also rated at about R-2. (See Image #3 for a view of the first-floor window wall.)
This glazing provides about 140 square feet of south-facing glass for the 640-square-foot first-floor area. That ratio is a little less than the recommended rule of thumb (providing south-facing glass equal to 25% of the floor area). Typical conductive heat loss, infiltration and solar gain calculations were used to estimate the required glazing area.
Three windows (a 4’ x 5’ double-casement window and a 3’ x 2’ awning window) face west, toward the mountains, while a single window (a 3’ x 2’ casement) faces north for cross-ventilation purposes.
Each of three second-floor bedrooms had a similar Andersen 6-foot-wide patio door facing south, providing access to a common 4-foot-deep balcony that spans the south side of the home. The ratio of south-facing glass to floor area for the bedrooms is about 20% for the two larger bedrooms and 27% for the smallest bedroom. The bedroom on the south-west corner of the house also has two small casement windows facing west toward the mountains.
The second-floor deck shades the first-floor glazing during the summer months, when the sun is mostly overhead at midday. The bedroom patio doors were shaded by a roof overhang. During the winter, when the sun remains lower on the horizon, the second-floor deck and roof overhang do not shade the south-facing windows at all. Sunlight reaches deep into the home, reaching a maximum penetration of over 13 feet on the winter solstice (December 21).
From late November through January, a substantial amount of sunlight can shine through the south-facing window wall onto the tiled slab floor (the thermal mass) from 10:00 a.m. to 2:00 p.m., storing heat. From late May through July, almost no sunlight shines through the south-facing glazing.
Batch-style solar thermal collectors with integral tanks
Two batch-style solar hot water collectors with integral tanks were installed on the roof.
• The tanks are insulated except for the glazing area.
• The tank inside each unit is covered with a nickel selective-surface that minimizes radiation of heat at night.
• The tanks were plumbed in series to minimize the chance that the incoming cold water would mix with the hottest water.
• A temperature/pressure relief valve located on the roof releases hot water if the water temperature reaches the boiling point, which was never observed.
• A tempering valve indoors was installed to assure that any excessively hot water is mixed automatically with cold water to prevent scalding.
These two solar hot water tanks provided sufficient hot water year ’round for two residents, except on winter mornings, when the water is only lukewarm. By afternoon (and through the evening), the solar-heated water is hot again, without using any backup water heating. A small backup electric hot water heater could be turned on to boost the temperature of the solar hot water tank output on winter mornings if desired.
Ceiling insulation
The attic over most of the home was insulated to R-60 with fiberglass batts. A ridge vent and an attic fan controlled by a thermostat were used to ventilate the attic during the hottest summer days. The fan seemed to help reduce summer heat in the upstairs bedrooms, but no measurements were made to verify this result.
The access hatch to the attic was a drywall rectangle attached to a stack of polyisocyanurate foam board to increase its insulation value. Folded polyethylene sheeting was used to inhibit airflow through the hatch edges.
The second-floor study located over the southern half of the garage area had an unvented insulated sloped roof; the polyisocyanurate insulation was rated at R-27. This room had an operable skylight facing north. The room gained considerable heat during summer; an exterior cover on the skylight helped reduce the solar gains. This room remained unused except for storage.
Floor and foundation insulation
The most critical component to insulate was the tiled concrete slab floor in the main living area; the slab’s thermal mass was an important part of the passive solar design. The foundation’s grade beams had 2-inch XPS foam board (R-10) outside the wall; the above-grade portion of the insulation was protected by aluminum flashing.
Additional vertical XPS foam layers were installed between the grade beams and the slab; these insulation layers ranged from R-35 to R-50. The slab is protected from the outdoors by a total of R-45 (and in some inaccessible places to R-60).
Superinsulation and air sealing details for the walls
All exterior walls were insulated with R-19 fiberglass batts between the 2×6 studs (installed 24 inches on center). The siding consists of ¾-inch cedar shiplap.
• The north and west walls were sheathed with 1-inch-thick foil-faced polyisocyanurate. Diagonal steel bracing was used to prevent racking.
• Since the south wall had more glazing than opaque wall area, and since the south wall was often heated by solar radiation, the wall was sheathed with plywood.
• The east wall was designed for a future addition. It was sheathed with full sheets of ½-inch plywood at the corners and ½-inch foil-faced polyisocyanurate elsewhere.
• Wall corners and intersections were insulated with XPS foam board cut to fit between the studs.
• Window and door headers were all doubled 2x12s with a 2x nailer to finish out the interior bottom of the header; the rest of the interior area of the headers was insulated with 2-inch-thick foil-faced polyisocyanurate.
• Sheathing seams were taped with duct tape to create an air barrier.
• Each insulation bay in the walls had a bead of canned spray foam along the edge of the studs and plates where they met the sheathing to limit air leakage.
• A layer of polyethylene was installed on the interior side of all exterior walls, followed by drywall installed with attention to air sealing.
• Electrical boxes were place on interior walls whenever possible. On exterior walls, electrical boxes had a foam gasket and child safety plugs on any unused outlets to limit air leakage.
• Plumbing was kept out of exterior walls.
Plumbing: reducing heat loss and wasted water
The plumbing system was designed and installed to minimize heat losses and wasted water.
• Almost all of the home’s plumbing was located in compact 10-foot-wide, two-story, vertically stacked plumbing partitions. Shorter piping lengths for the hot water supply pipes minimized installation costs and reduced wasted water and the time spent waiting for hot water to reach sinks or appliances. The first-floor partition divides the kitchen from the bath and laundry on the first floor. The second floor bathroom is directly above the half bath and laundry area. All fixtures were located close to these plumbing partitions. The small backup electric water heater was hung from the joists above the clothes washer. A tempering valve to prevent scalding from the solar-heated water and other valves were located near the ceiling above the clothes dryer.
• Hot water pipes and the backup hot water tank were insulated.
• The pipes leading to the roof-mounted solar collectors were wrapped with thermostatically controlled heat tape and were heavily insulated.
• The holes where pipes penetrated the top plate of the plumbing wall were sealed with foam.
Soundproofing and extra thermal mass
Interior non-load bearing partitions were soundproofed.
• Partitions were insulated with fiberglass batts
• Double layers of drywall on some partitions added additional thermal mass as well as noise reduction
• The gap between the drywall installed on partition walls and the subfloor was caulked to reduce sound transmission
• Interior doors are sold-core pine
Pounding on the walls and blasting music can hardly be heard on the other side of these soundproofed walls. The second floor was insulated to reduce sound transmission as well. Although insulation was used for soundproofing, it did isolate all upstairs rooms from one another to enable some rooms to remain unheated. In practice, however, this had no use, because of the abundant passive solar heat. There was no easy way to measure the contribution of the extra thermal mass from installing two layers of drywall on some of the walls.
Window shades and insulated shutters
All windows in the home had pleated window shades and home-made insulated shutters.
Most shutters in the home were typically only used during snowstorms or heavily overcast periods. Bedroom shutters also help keep the bedroom dark.
Garage insulation and doors
In addition to the sliding patio doors, the home had three other exterior doors. An R-5 insulated steel door led from the home to the garage. The garage had a weatherstripped wood door leading to the outdoors, and a 16-foot-wide overhead garage door insulated with an inch of polyisocyanurate.
The 2×4 garage walls were sheathed with plywood and finished with cedar siding. On the interior of the garage, the studs were insulated with R-11 fiberglass batts and finished with drywall.
The garage foundation wall was insulated on the exterior with XPS for a few feet from its intersection with the house foundation to reduce heat loss from the house.
Thermal mass
Bedrooms had a double layer of drywall on some partitions for a little extra thermal mass, but the extra drywall is inadequate to keep temperature fluctuations low enough for comfort. Bedrooms would get into the low 80s during typical sunny afternoons, and drop to about 65 degrees by dawn. On the coldest nights, we would use backup-electric radiant heat in the ceiling during the night. On most winter nights, we would air out the bedroom to cool it off before going to bed.
This direct-gain passive solar home has a 4-inch concrete slab finished with ceramic tile as the main thermal mass on the first floor. Underneath the slab is a layer of concrete blocks, turned on their side to create air channels through the block that run in the north-south direction below the slab. A thermostatically-controlled blower can pull warm air from the first floor ceiling, down through an interior wall to reach the layer of concrete block. Air is driven through the concrete block channels and back into the first floor at two floor vents at the southwest and southeast corners of the floor.
This system was recommended by a consultant to increase the ability to store heat extracted from the warm air during sunny winter afternoons. In practice, this extra heat storage seems unnecessary. Running the blower also added the odor of concrete to the home air, and increased the possibility of radon gas contamination in the home’s air. A radon test after the home had been completed was negative. However, the block may provide more thermal mass and temperature stabilization than the concrete slab floor alone.
The design includes a thermal break between the concrete slab and the foundation wall. Vertical XPS insulation was installed on the interior of the foundation wall, up to the top of the foundation (equal to the top of the slab). The floor tile which covers the slab does not extend all the way to the concrete foundation wall. Oak plywood spans about 10 inches from the tile near the outside edge of the slab, over the top of the XPS insulation, to the portion of the top of the foundation wall not covered by the exterior wall. (See Image #6 for wall, foundation, and slab construction details.)
No horizontal insulation was installed below the slab and the concrete blocks under the slab. The distance from the slab down below the concrete grade beam and back up to the ground surface was the distance that would put any cooling or heat from the ground to be out of phase with the current season. It would take six months for the summer heat or winter cold to reach the slab. So heat would arrive in winter, and cooling in summer. In addition, the sand and dirt provided insulation and thermal storage itself. Ground temperatures of about 50 degrees could be brought to 70 degrees. In practice, there appeared to be no noticeable problem with a lack of insulation below the slab.
To prevent the tile floor and concrete slab from cracking, and to prevent moisture uptake, a number of precautions were taken:
• The disturbed earth was tamped down with rented tamping equipment
• The slab area was left to settle for months before the concrete slab was poured
• A few inches of sand was installed above the earth
• A polyethylene vapor barrier was installed over the sand
• Concrete blocks placed sideways were installed over the sand for additional thermal mass, and to provide channels under the slab to circulate warm air for additional heat storage
• ¾” plywood was placed over open air channels along the north and south edges of the concrete block layer (to prevent poured concrete from filling the air channels)
• Polyethylene sheeting was installed over the concrete block and plywood-covered areas before the slab was poured
• The 4-inch concrete slabs which covered most of the first floor area (approximately 17’6” x 29’6”, inside the foundation walls and interior foam board insulation) was divided into three sections. One section covered most of the 13’6” x 22’ main open living area; another section covered the kitchen, bath and laundry, and a third section was under the U-shaped stairs and part of the dining area. If cracks did appear, they would occur under the kitchen breakfast bar, the stairway, or the dinette table area, rather than randomly in the middle of the floor area. No cracks appeared.
• Drain tile was installed at the base of the concrete grade beams, on the exterior. The drain leads to two dry wells.
Free air conditioning from the thermal mass
A number of people who visited this home on a winter afternoon have remarked, “If the house is this warm in the winter, it must get really hot in the summer!” Some who visited in the summer at midday said, “If it’s this cool inside the house in the summer, it must be freezing in the winter!”
How could a home’s interior temperature work counter to the seasons? That’s the beauty of a well-designed passive solar home.
• During the winter, the sun remains low on the horizon during midday, streaming light and providing significant heat through the large south-facing windows.
• During the summer when it gets hot outdoors, the noon sun is overhead, beating on the roof, not the south-facing side of the house. (This house has R-60 attic insulation, plus an attic fan and ridge vent to air out the attic. So it stays relatively cool inside during hot summer days.)
• During the morning, the sun beats on the east side of the house. (This house has no east-facing windows and well-insulated walls.)
• In the afternoon, the sun beats on the west side of the house. So this house remains cool in summer until the sun hits those west-facing windows. (Better plant deciduous trees to shade those west-facing windows during summer!)
The added bonus that keeps the downstairs area feeling like it is air-conditioned is the thermal mass of the tiled concrete slab floor. At night, by opening up the small second-story window in the hallway, cool air floats down the stairs and settles on the slab, cooling it off. During the hot day with windows closed, the slab keeps the room cool as it soaks up the heat to keep the indoors cool until late afternoon. When the sun beats mercilessly through the west-facing windows, the indoor temperatures climb into the high 70s. That’s not “air conditioned,” but it is still better than the 90 degrees outdoors.
The user experience
What’s it like to live in a home that provides very warm temperatures on cold winter afternoons? What’s it like to have bright sunlight streaming in during the dead of winter? And shade and cool temperatures at midday in summer when outdoor temperatures climb into the 90s? And to get this … for free?
Most people would want some or all of these features — especially those who do not like the cold or dark winters (like me) or who have Seasonal Affective Disorder (SAD). Is there anyone who would prefer higher utility costs? It is irrational that we don’t use superinsulation and passive-solar design principles in more homes today. By eliminating your central heating system and putting that money into insulation and better windows, you get so much in return. Just orienting your home toward the winter sun makes a big difference.
Aside from savings on utility costs and on thermal comfort, there are other potential advantages to building a passive solar, net-zero-energy, Passivhaus, or superinsulated and tight home:
• Homes like this have the potential to be sustainable, improve air quality, and reduce greenhouse gas emissions contributing to global warming.
• Homes that do not rely on fuel oil or electricity as the main source of heat and hot water are more resilient. You face lower risks of supply disruption and utility cost escalation.
• A passive solar or solar tempered home helps people keep in touch with the seasons and daily cycle of light and dark, warm and cold.
• I designed and built this home myself, which was a lot of work and financial stress, but one of the greatest accomplishments of my life.
Weekly Newsletter
Get building science and energy efficiency advice, plus special offers, in your inbox.
Lessons Learned
What would I do differently next time? In my most recent design for a superinsulated home designed for a cloudy, cold climate, some specifications were different:
• Use even higher insulation levels (R-80+ ceiling, R-40+ walls and floor, R-5 windows)
• Eliminate leaky sliding glass doors and only use triple-pane, low-e, argon-filled casement and fixed windows
• Reduce the west-facing glazing to almost none, which is easy with a long east-west axis footprint
• Use updated air and moisture sealing products and techniques
• Install an HRV
• Don’t use as much thermal mass for a cloudy climate, especially the concrete block active hot air storage system
Recommendations based on this experience:
• Choose a lot based on location, location, and location — and also solar access and maybe south-facing views
• Orient the home and most of the windows to face south, with a longer east-west axis
• Make the time and investment for massive insulation, tight building materials and practices, and the best quality materials
• Use kitchen layout standards for sufficient space on the sides of the refrigerator, cooktop, sink, and ovens
• Install lots of electrical outlets and convenience features
• Learn to do what you don’t know from experts, books, the Internet, and educational events
• Take the risk and build your own house
Bob Opaluch has had a lifelong interest in energy-efficient homebuilding, passive solar design, and designing and building furniture. He designed and built the passive solar home in Boulder, renovated a house in Massachusetts, and designed and built dozens of furniture pieces for friends and family. He recently led a course in Sustainable Architecture for Lifelong Learning Collaborative, an adult ed organization in Providence, R.I. Bob has degrees in philosophy and applied mathematics from Brown University, and MA and PhD degrees in psychology from UCLA. He was a psychology professor for five years, and a usability and design engineer for 20 years. Bob is a divorced single parent. His son started college this year.
General Specs and Team
| Location: | Boulder, CO |
|---|---|
| Bedrooms: | 3 |
| Bathrooms: | 1.5 |
| Living Space: | 1480 |
Construction
Foundation: Perimeter concrete grade beams surrounding a slab on grade
Vertical insulation at perimeter of foundation: R-45 XPS
Wall construction: 2x6 studs, 24" o.c.
Wall insulation: R-19 fiberglass batts plus either ½-inch or 1-inch polyisocyanurate on the exterior
Siding: Diagonal 3/4-inch shiplap cedar boards
Ceiling insulation: R-60 fiberglass batts
Windows: Double-glazed sliders, casements, and awnings
Roof framing: Roof trusses (unconditioned attic)
Roofing: Cedar shingles
Domestic hot water: Two batch-type solar thermal collectors with electric resistance backup
Space heating: Passive solar design with electric resistance backup
Energy Specs
5600 heating degree day climate
Water Efficiency
Plumbing core was designed to keep pipe runs short
Alternate Energy Utilization
Renewable energy equipment: Two passive (batch-type) solar thermal collectors


20 Comments
Timeless
Great article, think of all the fossil energy saved during the lifetime of this home versus a conventional house. It is amazing how poorly we still build today considering all of the quality information that came out of the superinsulation movement in the late 1970's and early 80's.
Another thing to do differently...
Foil faced iso on the exterior with polyethylene on the interior makes for an assembly that isn't very resilient to bulk-water penetration into the wall cavities, which requires the assembly to be buld to near near-perfection on day 1 as well as retain that perfection on day 100,000. The walls have no inherent drying path.
Also, grid tied photovoltaic solar is likely to hit the buck-fifty-a-watt range all-in cost without subsidy before 2025, possibly before 2020, which means on a lifecycle basis it will be cheaper per kwh than residential-retail fixed rate anywhere in the US. In a house with very low heating/cooling power use, it would be downright cheap & easy to hit net-zero energy with PV when that happens. Arguablay all new construction should be planning for it, even if it isn't installed on day-1.
Looking forward, I suspect vacuum insulated glass will be come cheaper than low-E argon triple panes, and will outperform triple panes on both SHGC and U-factor (I'm still waiting, but they're allegedly going to become available this calendar year), making them a slam-dunk for passive solar applications.
Another thing to do differently...
Dana I agree that two layers that trap water vapor inside a wall is a design error, even in such a dry climate. Stud bays with electrical outlets would end up with mold and maybe deteriorated fiberglass from frozen water or wood rot. Back then the options for sealing outlet boxes weren't great and the polyethylene layer should be deleted. Also I hear that isocyanurate R-value isn't as high as rated in cold temperatures. Now I would use 2"+ of XPS insulation board with higher effective R-value. And more insulation throughout, which would mean less glazing too.
I hope those vacuum insulated glass window panes are reasonably affordable, They would be ideal high-R glazing.
Also agree the goal is net zero energy homes, not just eliminating most of the heating and hot water bills. I bet that PV beats grid power cost on the sunny Rocky Mountain front range today but don't have the numbers. Noted on another article on this site, PV panel prices have dropped 45% in the last year or so, and 60% in the last two years. With present incentives PV probably cost-justified today in sunny southern USA climates.
Dana
Sorry if this has already been discussed, but could you flesh out what is involved in planning for future PV on a new build that at present isn't putting it in?
Still building poorly insulated, energy inefficient homes
Doug, I think its sad that the USA still builds homes that require high energy bills for heating and cooling. It is pretty simple to design a super insulated home that would require minimal heating and cooling. It is pretty simple to build a passive solar direct gain hot water pre-heating tank that would save at least half the hot water heating bill. And soon it will be sad that people don't install PV to meet most of their needs for electricity. We can "mortgage" the cost of PV or insulation. We can eliminate the central heating system and use the savings to buy insulation and better windows so very little hewing is needed. We can orient the house and move most glazing to face south (usually at little or no cost). So why aren't these being done? Ignorance? Not doing the heat-loss, solar gain and savings calculations? Maybe because builders incur the costs and buyers see no reason to pay for those costs? Outdated building codes?
At about a buck-fifty a watt...
...grid tied PV has a lifecycle cost below the residential retail rate in much of the US. In high-priced electricity states like Hawaii it's competitive without subsidy, and in the New England states it's cost-competitive with the various tax credits and other subsidies avaiable, at the current ~$4.50 watt pre-subsidy pricing.
To figure out what price point (subsidized or otherwise) the levelized cost of PV beats your local residential retail rate you can play around with this NREL calculator tool:
http://www.nrel.gov/analysis/tech_lcoe.html
To know what to plug in for capacity factor (the average annual output divided by the nominal peak output) in that calculator, note that PV varies from about 10% to 25% for non tracking arrays across the lower 48 US. In New England it averages about ~18-20%- a bit lower in the foggiest coastal areas, but it's in the low to mid 20s in the clear air of the southwest. Even Seattle garners about 14%, but that's better than out on the more foggy coast. See: http://costing.irena.org/media/3557/fig-69.png
Using that calculator plugging $1500/kwh and a 3% discount rate, with an 18% capacity factor,even if I add $100 in annual cost to cover repairing/replacement of the inverter at age 20, using my current ~16 cent electricity price and a tiny 1% utility price inflation PV still beats the grid price in a 40 year analysis. If I dial that back to 20 years and $50 in operation/maintance (throw away the system at age 20) it still beats the grid price at 1% inflation. At 3% grid inflation it's a slam-dunk at either 20 or 40 years.
Most home owners don't have 40 year capitalization plans the way utility companies do, so it's often calculated on a 25 year basis, but even then it's hard to get homeowners with a sub-decade anticipated tenancy to bite. But there is sufficient arbitrage in the pricing that it's profitable for third party ownership of residential rooftop arrays to support an ENORMOUS and rapidly growing business, where that model is allowed by regulators, especially where there are hefty state and local subsidies can accrue to the third party PV business. The way is typically works is that the solar company gives the homeowner a fixed rate for power for 20 -25 years at a rate below the present residential retail rate, with an option for buy-out on the system at the end of the period. The third party collects any subsidies like production credits, etc, and sometimes a separate power purchase /sale agreement with the local utility, usually selling at the spot-market wholesale electricity clearing price, but it varies. Since PV output has a high overlap with the grid peak loads, that power could be sold to the utility at several times the fixed residential retail rate, but these details vary by quite a bit depending on the regulatory environment.
But in a decade the third party model may be moot, since new PV will be dirt-cheap probably under a buck a watt all-in cost, and the net-metering issues will become more complicated. At some price point on local grid storage there will be strong financial incentive for whole neighborhoods to set up their own micro-grids that are inherently islanded from the major grid, only purchasing power from the grid operator when needed, and selling power back to the grid operator when it's financially advantageous. The folks at RMI have analyzed those crossover points in some detail, and it's coming sooner than you might think.
http://blog.rmi.org/blog_2014_02_25_will_the_electricity_grid_become_optional
http://www.rmi.org/cms/Download.aspx?id=10994&file=RMIGridDefectionFull_2014-05.pdf
When designing a new house with future PV in mind the primary thing to look at is the orientation and shading factor of roof pitches. Orienting a gable southward with the roof pitches facing east and west would cut the total power reaped by quite a bit. Cutting up a wide south facing pitches with dormers would also severely limit the amount of roof area for photon-farming too. A high-R house can typically become Net Zero Energy in New England with ~ 5kilowatts of PV, and in Colorado it would be less. At roughly 10 watts per square foot (the real number varies considerably depending on the PV type & vendor) a 5 kw array takes about a 15' x 35' section of unbroken unobstructed south facing roof. That's not very tiny, but it can still fit on the house if you design, site, & orient the house for it.
It's hard to know what the ultimate price of vacuum insulated glass will be. It seems like it should be manufacturable in volume at nearly the same or even lower cost of low-E argon double panes, but the initial production years will probably be somewhat more expensive than current technology triple-panes at a high gross margin to recover their R & D and manufacturing setup costs, since the performance will command the price until there is more competition. Multiple glass vendors have been figuring it out for several years now, but the rollout for the initial residential windows using that technology is slated for some time this year. If you want to sign up for what's likely to be sticker-shock (maybe in a good way? :-) ), you can have Ply Gem put you on their potential early-adopter list here:
http://www.plygem-vig.com/
Nice resources, thanks!
Dana, your information is great and maybe you should be writing or co-authoring articles on PV solar affordability and vacuum-insulated glazing.
For the house I've been designing for southern New England, its a colonial style two-story facing south with 12:12 pitch roof over 20'X40' structure, so south facing half of the roof is about 15'X41', meeting your suggested area requirement.
Malcolm Taylor may have been wondering about any pre-wiring or rooftop structural requirements if PV is not installed immediately. I would also suggest putting permanent anchors for roofers near the peak of the roof for future work safety. But I don't know what products, how many, etc. Also plan for battery power and locations for batteries, inverter, a controller etc.
I hear utilities in AZ are trying to rein in homeowners selling power back to utilities, so that arrangement may be getting less lucrative. For resilience, one may wish to have at least some battery backup for brief or longer outages anyway.
The vacuum insulated glass sounds great. Its difficult for me to imagine how glass could be structurally sound with a vacuum over a a couple feet long and wide, but maybe the vacuum won't be extreme enough to stress the panes too much. Materials scientists consider glass a liquid and I hear it does sag in large stained glass windows. Maybe there will be some support within the panes like gel, muntins or occasional glass bridges between the panes? Do you know more about their design? I filled out plygem's form and got an initial reply, thanks for the tip. Price-wise their thermally efficient competition would be Canadian windows or very pricey German Passivhaus-certified windows. If vacuum insulated glass windows get over R-12 (VIPs are much higher), I bet they could charge ~$2,000 per window similar to German products or dominate the energy efficiency market with $800 windows.
I wonder if this conversation ought to be repeated in another blog so others interested in PV affordability or in emerging window technology could notice it and join.
great article and comments
Hi Rob. Hi Dana.
Rob, thanks for such a clear and thoughtful description of the design of your passive solar house. It's amazing to me how little you would need to change more than 30 years later. By the way, I got a laugh out of your use of duct tape for air sealing. I guess there were no building tapes available back then.
Dana, thanks for the link to the Levelized Cost of Energy calculator. That's very useful. Here's how my 5kW installation in MA works out: https://www.dropbox.com/s/9l8mugl8kbabc8y/LCOE.pdf
I used a Period of 20 years because that's how long my inverter will most likely last. It's also about how long I will last, if I'm lucky. The Discount Rate is the nominal rate suggested in the document the calculator links to on this line.
My Capital Cost per kW is: $4/watt (2012 Solarize Massachusetts price) - $0.85/watt (Commonwealth Solar II rebate) - $0.945/watt (30% Federal Tax Credit) - $0.20/watt (MA Tax Credit) x 1000 = $2005/kW. And that doesn't even count SREC money, which is too uncertain to include.
My Capacity Factor is lower than Dana suggests for this area (Central MA) but it's based on my actual production. It's lower because my roof doesn't face directly south and my roof pitch isn't optimal. But it is what it is.
I did include $20/kW/yr for replacing the inverter. My current marginal Electricity Price is $0.168/kWh, the highest it's been since I started keeping records in 2003 but I still used only 0.32% for the Cost Escalation Rate because that's the long-term (25-year) increase for the Northeast given in the (map) link to the right. [Oops, just noticed that should be -0.32%; however, the calculator ignores minus signs so I can't correct it; oh well, it doesn't make much difference in the outcome.]
Bottom line, I'm paying $0.132/kWh while the LCOE of electricity from National Grid is $0.173, a savings of 24%. This is in the same ballpark as a Power Purchase Agreement from a commercial developer that my town is considering right now.
David
PV a profitable investment
I did not realize that PV costs have come down this much. David's PV electrical costs are substantially lower than retail. Seems to me there needs to be more information disseminated on PV cost becoming cheaper than retail electric rates for various US regions. David and Dana maybe you need to author or co-author an article on this topic. Or if you are aware of an article that summarizes PV vs. electric rates in various US regions, please post!
Wonderful Article
Hi Robert,
I really enjoyed reading your article on the build from 1982. Your approach to writing the article gave an unfiltered look into what worked and what didn't for the build. A very transparent and objective analysis of the project. I find sometimes that articles tend to focus only on the positive points of a project and leave out areas that could have been improved. This was a very educational and inspiring article for me. I would like to look into building a home that utilizes passive solar gains much like this one, in a Canadian winter climate. I gained a lot of insight and ideas from your article. Thank you.
Erik
Response to Robert Opaluch
Robert,
I agree that it would be great if GBA revisited the fast-changing world of PV payback and PV cost-effectiveness. In the meantime, you might want to read PV Systems Have Gotten Dirt Cheap.
PV Systems Have Gotten Dirt Cheap
Martin, yes I read that article. I really liked how it clearly notes how to compute savings, and notes the surprising rapid PV price decrease. I'm forwarding the link to the article to others. It does need updated numbers. David and Dana gave examples that are more shocking than just two years ago. When I see David’s numbers of PV 25% cheaper than retail electric in MA, that’s the knockout punch example that would shock even critics of PV. (Okay, maybe just cause them to decry incentives.) It can galvanize people to look into buying PV for their house. I know friends who considered PV but didn’t buy, weren’t sure it was worth the investment. I'd like to know for various regions when PV beats retail electric rates without incentives, then taking incentives into account.
Climate is an important factor. Ideally an updated article might compare numbers for some US regions that are ideal for PV like Arizona, Hawaii, CA, Florida, with the Northeast, Midwest, and with Washington State (where cheap hydroelectric power and cloudiness beat PV).
Another issue is about energy storage. Peak demand sometimes is correlated with PV peak output (e.g., hot summer climates need AC right when sun is most intense). Other times the match is not good (nighttime, wintertime). Even when correlated nicely, some storage or buy-back from utilities is needed. This issue is what critics of PV emphasize. They say PV doesn’t work because you need lights and heating at night when the sun doesn’t shine. They don't look at the numbers or take into account that PV doesn't have to supply 100% of the entire retail electrical supply.
I know the costs of batteries are also going down. Lots of emerging technologies may become promising shortly (like Axion's commercial PowerCube energy storage or Tesla’s proposed massive battery factory). Might be good to address the issue of batteries and costs in some other article. I hear that electric utilities believe they are being overrun by PV power buybacks in AZ so they want to reduce reimbursement rates.
Comments about my Passive Solar Home
Good article, and I feel everyone's pain regarding the lack of even a little attention given to solar by builders today.
Our passive solar house in the Pacific Northwest has 4000 square feet under roof, 1800 living, and is 100 feet long east west. About 70% of the Marvin windows are south facing, those being special in that they have less silver for more gain. If I remember, there was no additional cost for that option. No windows are on the west and we do have some windows on the north for bedroom code and comfort, but these are small. The home was an existing passive solar design from the late 70's in that it was slab on grade, bermed in on the north, east, and west about 36 inches, and had some weird room with rocks in it to collect heat and blow it throughout the house. The owner before me removed the rocks and blower. He also compromised some the insulation and berm on the east. Seeing the potential of this house, we purchased it and de-bermed it enough to install perimeter wing insulation around the entire house and re-bermed it. We also added a shop and garage, also inside of the wing insulation and insulated it well too. So the entire house perimeter has 12 feet of plastic out from the house, then 8 feet of 2" thick foam, and then plastic again over just the foam. Both of these layers continue up and over 2" thick foam against the concrete and up to the wood or whatever siding is there. Then flashing was installed over the foam and plastic. The siding goes over this flashing upper lip. This way there is no exposed concrete anywhere. There is no insulation under the slabs. This is described in Hait's book, Passive Annual Heat Storage. The results after 5 years are impressive. We only have a wood stove for heat, and it only is used when someone is cold, which is usually when we have a few days of overcast and it is cold. The inside temperature is heavily moderated by the thermal mass, with the concrete structure staying in the mid to high 60's. The air temperature fluctuates from low 60's to hi 70's, depending on the sun, season, outside temperature, etc. In the winter when the outside temp is in the the 30's it is quite warm on any sunny day. In the summer, little sun comes in so we have no need for AC. Yes, it all really works and quite well at that. It is so cool when guest arrive on a cold evening, walk in, and are sure we have a heater on.
Now, some observations. Besides correct glazing properly located and good insulation, the perimeter wing insulation / watershed umbrella, seem to be the major factor for heat retention. It is so nice not to have cold floors around the edges of the house. Remember, the garage and shop have wing insulation so there are no thermal leaks anywhere. It stays 55 to 65 in the garage and 60 to 70 in the shop, winter/summer respectively.
What I would change. More south glass, possibly thicker wing insulation close to the house, especially in colder climates than the PNW. Possibly triple glazing as we do get some condensate on a few corners of some of the windows when it is really cold out. More south glass is so easy compared to any other heat source.
Actual numbers
Hello Robert,
I am a student in Salt Lake City and I am currently studying both active and passive energy systems. I really enjoyed your article and would like to present it to my fellow students with your permission. Would that be alright with you? Also I was wondering if you might have a hard number on the cost difference between your home as is versus the cost with a central heating system?
Thank you for sharing your experience, it is inspiring,
Aaron
Actual numbers
Aaron,
It is fine with me if you would like to present any of the information from this article. Actually I am honored that you and your fellow students are interested enough to review and discuss this house design.
For costs I'll have to do a little more homework to answer more accurately. I'll be pretty busy the next few days but here's the beginning of an answer.
I do not have a cost estimate for a central heating system and distribution system. You have choices of gas or oil, a cheaper system or a more efficient one, one heating zone or four or more zones, baseboard or radiant floor, heat only or heat plus hot water plus air conditioning. I would guess you are in the range of at least $3,000 and probably closer to $10,000, or possibly around $15,000 for the deluxe version for a larger home than this one. You might call a heating contractor to get a price range estimate. You could look up the cost of the furnace or boiler, but the distribution system is probably a bigger cost. You would have to pay to hook up gas and meter or install an oil tank and lines, chimney, electrical connections, thermostats and wiring too. (Then yearly maintenance and fuel bills.)
The slab and tile floor is cheaper than a basement (which is a slab plus higher walls plus floor joists and subfloor plus finish floor). The perimeter insulation would add about $1,000. Not much foundation wall insulation is required in typical construction. The blower and block active air heat storage option I would not recommend but is not all that expensive for the parts, and another day or two of labor.
Moving most windows to the south side costs nothing. Large fixed glass window cost very little since they were site installed. Andersen slides were more pricey, $600 x 3 upstairs and $800 downstairs. You could look up current prices but probably $850 and $1100. Standard windows would be more like $300 instead. Add some for larger blinds, which cost me around $200, maybe $300 today vs. $100 for standard windows.
For the exterior walls, the additional cost was isocyanurate board insulation. With the garage covering the north side, and none on the south, it would only add $400 above typical construction plus some additional labor. 2X6 walls with fiberglass insulation was the minimum required in Boulder at the time so that's the same for both this house and typical new construction.
For ceilings, extra fiberglass is pretty cheap. R-30 was probably the minimum requirement in Boulder, so doubling that would be about $300. You might add the attic fan/thermostat/switch and wiring but that was all pretty cheap too, around $100.
The commercial passive solar hot water batch heating tanks cost a lot. I can't find anything for sale with a quick Internet search. Seems like only info on how to build your own. I know that 70% federal plus Colorado incentives paid for most of it. I'd have to guess something like $1,350 before incentives or $400 net. Add $200 for tempering valve, pressure release valve, copper pipe and heavy insulation, and heat tape and an outlet in the attic.
I put electric radiant heating panels behind the ceiling drywall in the first floor and bedrooms, and a simple electrical wall heater in the study. Those are cheap by comparison (and turned out to be unnecessary for the first floor). But I'd guess something like $800.
Anyway these rough estimates give you an idea that the extras cancel out the central heating system cost more or less. With a super insulated (not passive solar) house I designed recently, the additional cost for extremely high insulation levels and Canadian fiberglass windows run a few thousand more than a central heating system. Heating cost is estimated at $27/month for southern New England.
HRV
Great article, but other than the mention of a "do different next time" HRV, what about air quality in such a well-sealed house, without (apparently) any attention to fresh air?
Considering the increasing concerns regarding radon and indoor air pollution, shouldn't this have been addressed? Perhaps it has been but I don't see it in the story of subsequent comments.
HRV and air quality
Some things have changed a lot in the last 30 years. HRV's, residential air quality building codes and low-VOC product availability is one area that's very different.
Related to air quality pro and con, I did the following:
-- Avoided particle board products. Used plywood for all sheathing and almost all cabinets (I built almost all the cabinets too).
-- Avoided oil paints and most VOC products but I wasn't careful about all sources. I did use adhesives to glue down (and screw down) T&G ply subfloor to eliminate any possible squeaky floor. I had carpet installed in the upstairs rooms. The house wasn't VOC free but formaldehyde and VOCs were reduced.
-- I seemed to not like the smell of drywall while installing, so probably there's some negative air quality issue in the paper. No problem noticed after painting.
-- Avoided any fossil fuel heating and appliances for other reasons, but that addresses backdraft issues and CO2.
-- Attached garage could be a source of brief introduction of C02 or other air pollution.
-- Radon test done and passed. Polyethylyne vapor barrier under the slab also served to block radon gas from the ground, but it wasn't intended for that, so didn't cover the interior of the foundation wall and XPS. The slab itself and concrete block channels might add to radon possibilities, but it also could be used to remove radon by airing out the channels rather than using them for additional heat storage.
-- The house had the usual kitchen and bath exhaust fans (cheap ceiling light/fan units in baths and JennAire cooktop downdraft fan).
-- I had an electric dryer exhaust duct with an option to filter and return warm exhaust air to the laundry area corridor, connected to the downstairs living area. Now I would create an HRV-like channel not return the air directly (due to residual lint in the exhaust).
-- When living there, I would air out the house once daily for 5-10 minutes. Since air has minimal thermal capacity, it had minimal effect on indoor temperatures except for 10-15 minutes when air would reheat from the structure's warmth. From what I remember, there were no small residential HRVs or standards for residential indoor air quality other than building code prescription that "operable windows at least 5% of floor area in habitable rooms." In fact I thought at first that HRVs were an expensive option when you could just open windows and operate bath and kitchen exhaust fans for fresh air. Now I'm better educated.
Venmar
You were a bit ahead of your time :-) I installed my first "air-exchanger" in Canada in 1991, but upon relocating to New England found it difficult to source units. I ended up with a "whole house" attic fan retrofit (the house was so leaky an HRV wouldn't have made any sense). Even in the mid-2000s in Maine, HRVs were an oddity.
http://www.venmar.ca/about-us.html#!prettyPhoto
Actual numbers
Thank you for your response Robert, those numbers will be perfect in helping to make a case for my topic. I am glad to have a case study that is both something that qualifies for my presentation topic and is something that I hope to implement for myself someday. Now all I need is a surrogate for the public speaking.
Thank you again Robert
Aaron
Passive solar house from the 80's
Thank you for a fantastic article! What a pleasure to read about how a house actually performed OVER TIME :) I am in the design stage of a passive solar or possibly Passivhaus - lots promises out there, but what really performs ? What is worth the extra money and what isn't? Your article was a pleasure - especially your " if I had it to do over " section lol
Log in or create an account to post a comment.
Sign up Log in