Image Credit: Picton Brothers
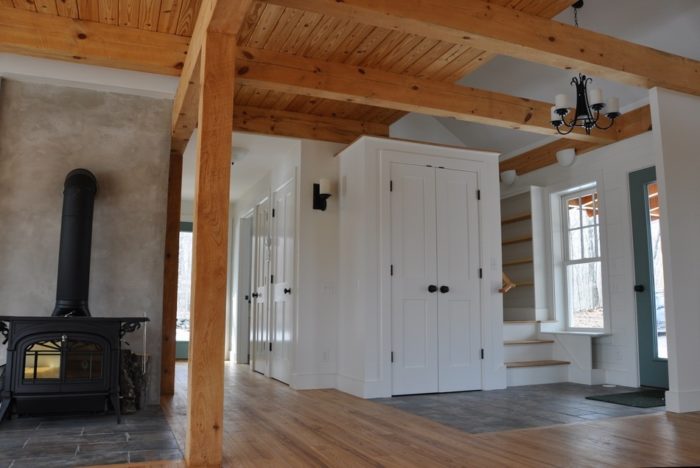
Image Credit: Picton Brothers ANTIQUE-STYLE FIXTURES AND DETAILS look right at home with a modern, open floor plan, showing that good design is truly timeless. The real stars are the materials themselves: reclaimed tiles cover the hearth and entryway; the wood floors and heavy timbers were milled locally; and low-VOC paint and natural oils protect them all at a small environmental cost.
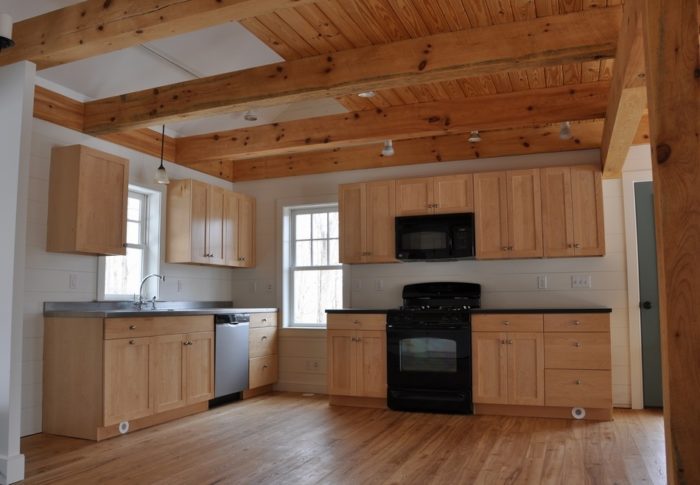
Image Credit: Picton Brothers HEALTHY WOOD THAT'S GOOD FOR THE ENVIRONMENT. Cabinetry and trim in the house came from Citilog, a company that responsibly harvests local trees and uses no-VOC adhesives and finishes in its products. Ash flooring and pine timbers came from local mills. The countertops aren't wood, but they are made of Fireslate reclaimed from a kitchen renovation.
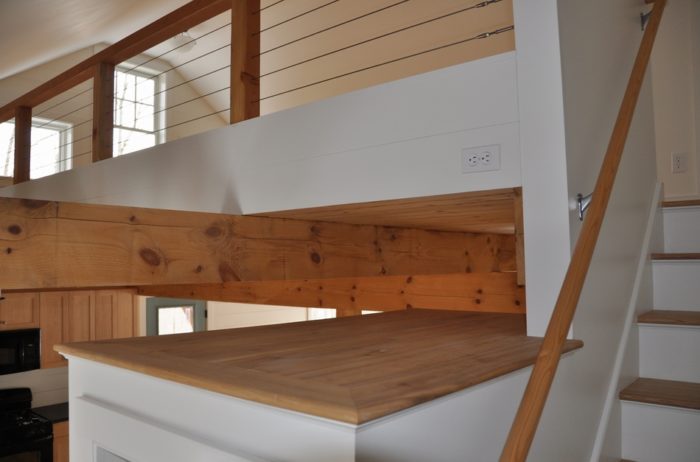
Image Credit: Picton Brothers IN A COMPACT HOME, an open plan creates a sense of more space. It also makes rooms brighter and lets air move more freely. The "roof" of this closet doubles as an prominent display space that could showcase some prized possession of the future homeowners.
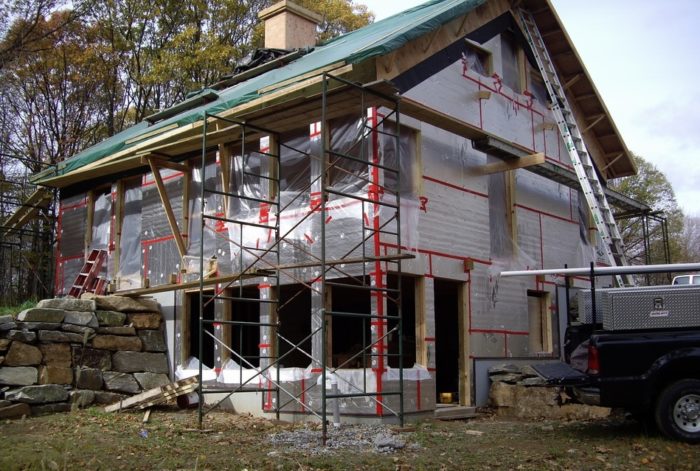
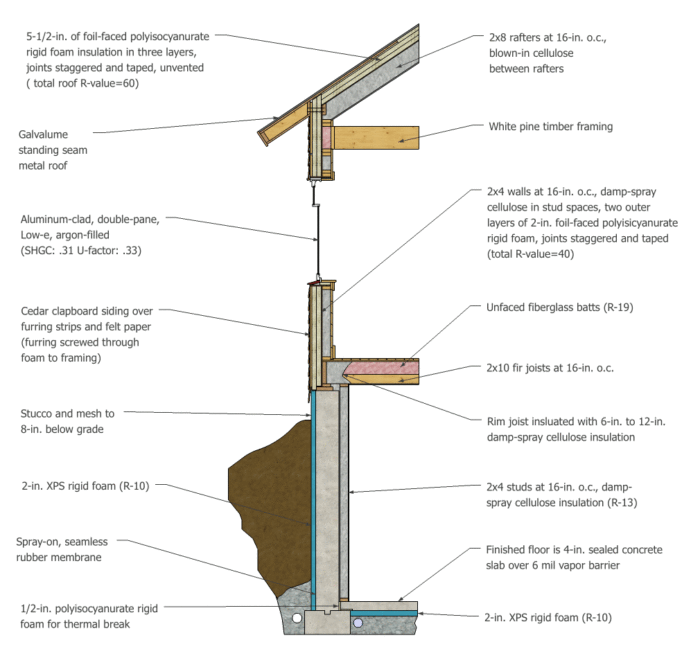
Image Credit: Picton Brothers GREAT THERMAL BREAK. Putting 4 to 5-1/2 inches of polyisocyanurate foam on the outside of the house accomplished a few things: The continuous layer of foam prevents the thermal bridging that happens when insulation only fills wall cavities; thinner cavity insulation needs allowed properly sized studs and rafters, amounting to a more than 25% reduction in framing materials; staggered and taped seams on the exterior rigid foam allowed for effective and efficient air sealing.
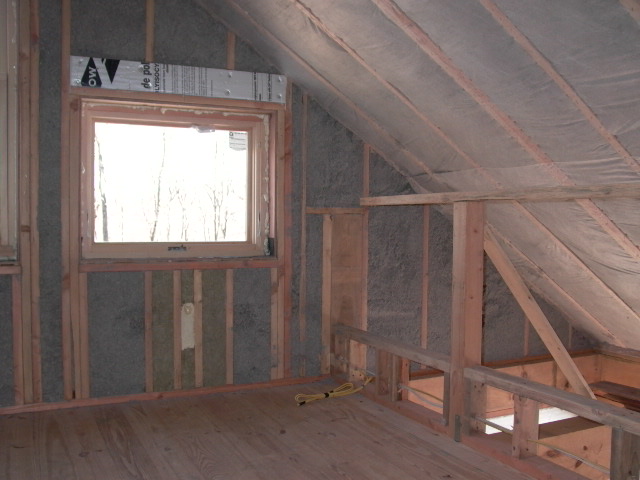
Image Credit: Picton Brothers EVERY INSULATION TYPE HAS ITS PLACE. Damp-spray cellulose was an economical choice for these 2x4 wall cavities. Dry cellulose blown in behind netting made more sense for the overhead spaces. Mark and Jim even paid good attention to the windows, with tight-fitting pieces of foil-faced rigid foam fitted to the headers and minimally expanding spray-foam around the jambs.
Image Credit: Picton Brothers R-40 WALLS, R-60 ROOF. Several inches of polyisocyanurate sheathing and cellulose cavity insulation work well together. Foam sheathing is a good way to get high R-values with relatively simple framing. It also keeps condensation and infiltration issues to a minimum — a plus when using moisture-absorbent cellulose in the walls. The Picton Brothers paid attention to the details, from taped and staggered seams on the foam sheathing to strips of rigid foam that thermally separate the slab from the footing.
Image Credit: Toshi Woudenberg YET TO BE TESTED. With a HERS score of 30, solar hot water, and a 2-kW photovoltaic system, this LEED Platinum home in Connecticut is expected to perform quite well. Usage of 40 MMBtu/year is the current estimate, but we'll have to wait until the home is occupied to know for sure. Check back in April 2010 to find out.
#Making Sustainable Construction Their Highest Priority Is a Rewarding Experience for Two Brothers
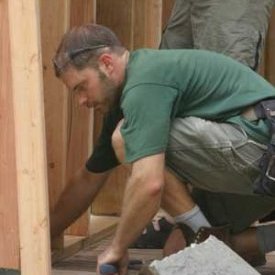
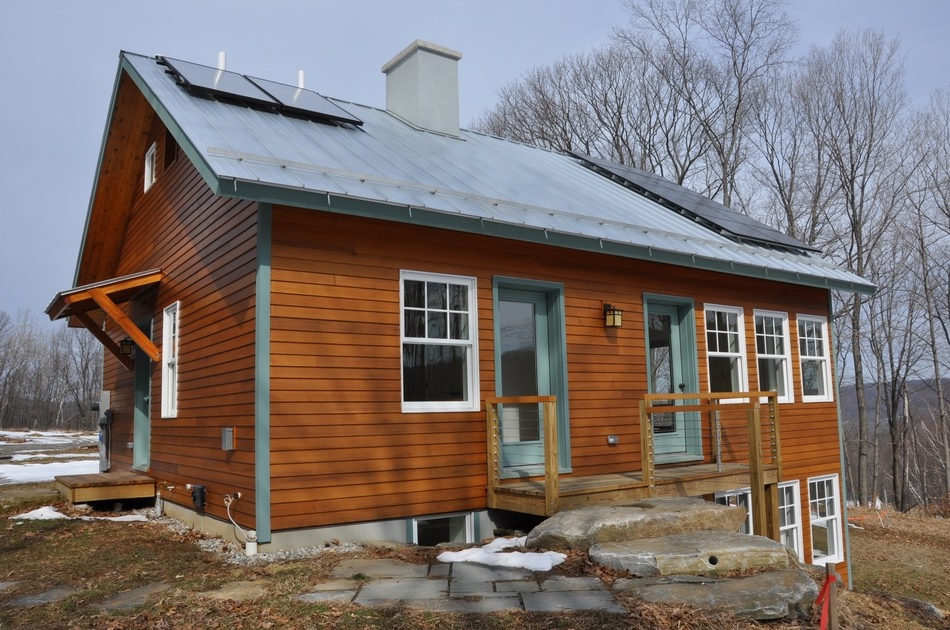
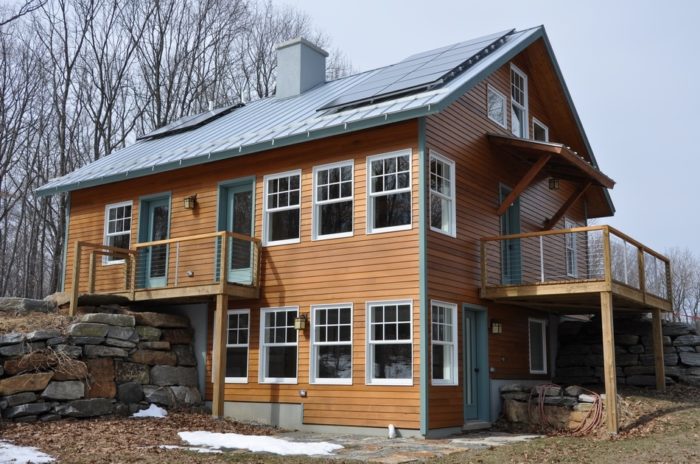
At first glance, it could easily be mistaken for a well-appointed renovation of an early Connecticut farmhouse, but this new home in the Litchfield Hills is actually the first LEED Platinum home in the state. Traditional proportions, cedar clapboards, a partial timber frame, and a standing-seam metal roof are nods to the region’s architectural vernacular, though an open design, superinsulated envelope, and both passive and active solar features truly make this a 21st-century home.
Green and quality go hand-in-hand
This was the first venture into green building for brothers Mark and Jim Picton, but they have been building custom homes in the area for more than 30 years. As they worked through the LEED checklist, Mark and Jim quickly realized that much of it was already familiar to them as builders of high-quality homes. Attention to detail and thinking ahead accounted for many of the points they earned; they left space for the addition of future mechanical equipment — including more PV panels; they put extreme care into sealing the building envelope against air and moisture; they located the boiler and other equipment centrally and planned hot water pipes to be as short as possible.
When GreenBuildingAdvisor.com last featured the house, it was on track to attain LEED Gold. A continuous effort to make the best home possible propelled the project to Platinum status before its completion.
Other than the solar hot-water and electric systems, there aren’t any high-tech gadgets to differentiate this from a less-sustainable home — just good design. Mark and Jim felt that designing a compact home with a functional layout was the logical first place to start.
They wrapped the hillside around two sides of the lower level to temper a good portion of the conditioned space and allow access to most of the home from ground level. The whole shell is insulated to about double the code-required R-values (R-40 in the walls and R-60 in the roof), and the thermally isolated concrete floor on the lower level absorbs passive solar heat.
Dealing with materials
Resource efficiency was a main goal for this project — in fact, awareness of the excessive waste common in custom-built homes was a big factor in their initial decision to build a green home. Recycling became a core responsibility of the crew; they recycled all packing material (about 3 yards), reused as much scrap material as possible, and policed the subcontractors to keep them honest.
Sourcing materials was an equally important priority. In an area with several sawmills and a healthy amount of woodland, finding locally cut ash for the floors and pine for the timber frame was relatively easy. Tracking down recycled-content wallboard was a bit more elusive, but a local (and conscientious) lumberyard was able to track some down.
By putting the bulk of the insulation on the outside, Mark and Jim were able to use thinner studs and rafters and cut the volume of framing lumber by more than 25%. For the kitchen and bathroom surfaces, they used Fireslate, a material typically used for counters in science labs, reclaimed from a kitchen renovation. They tiled the entryway, hearth, and bathrooms with reclaimed ceramic floor tiles.
A comfortable home
Ultimately, Mark and Jim strove to create a place that is a joy to live in. Inside, simple details and warm, natural wood surfaces lend a farmhouse feel, while a bank of southern windows, a cathedral ceiling, and a loft create a bright and contemporary space. Several small decks made of reclaimed cedar siding and mahogany pallets allow direct access to the outdoors from nearly every corner. The minimal landscaping involved reseeding disturbed ground with meadow grasses and clover that blend seamlessly into the surroundings.
The true test of the Pictons’ success will be finding a family that enjoys the place as much as they do; the house will go on the market this spring.
Weekly Newsletter
Get building science and energy efficiency advice, plus special offers, in your inbox.
Lessons Learned
Integrated design is a term heard more and more as green home building gains recognition. The Picton brothers will be the first to tell you how valuable the concept really is. With a reputation for building great homes and decades of experience under their belts, they still took over a year to build a relatively simple, 1,850-square-foot house. Granted, they decided part way through to beef up the insulation and shoot for LEED certification, but that just emphasizes the value of design before building.
Mark chalks it up to a valuable experience: “It took too long, but we learned a lot.” Next time around they will bring consultants or at least knowledgeable subcontractors in during the design phase. Saving time and materials by making all of the parts of the house fit together efficiently is reason enough, but calculating the relationship between additional insulation and reduced demand for conditioning equipment could really pay off.
Savings in one place can make more work elsewhere
Though they are happy with the resource and energy efficiency that came along with the thick layer of polyisocyanurate foam outside the framing, it didn’t come without challenges. Fastening furring to framing through four inches of foam is tricky enough, but the real hitch is prepping for all of the things that penetrate the envelope. Enough time and effort went into blocking for hose bibs, exterior lights, exhaust ducts, and plumbing vents that the brothers may consider alternative wall systems on the next project.
On to bigger and better things
This home was very likely just the beginning of Picton Brothers’ future in sustainable construction. They are aware that a project that connects homes with infrastructure and social networks could do even more good — perhaps redevelopment in a town center where, as Mark puts it, “it really makes sense.”
General Specs and Team
| Location: | New Milford, CT |
|---|---|
| Bedrooms: | 3 |
| Bathrooms: | 2 |
| Living Space: | 1850 |
Builder/designer: Jim and Mark Picton, Picton Brothers, LLC, Washington Depot, CT
Engineer: CCA, LLC, Brookfield, CT
Energy consultant: Mark Rosenbaum
LEED provider: Center for Ecological Technology, Pittsfield, MA
Construction
Foundation: 2-in. XPS foam under 4-in. concrete slab (R-10); Poured concrete floor; 2-inch XPS rigid foam outside, 2x4 walls with damp-spray cellulose inside (total R-value, 23)
Walls: 2x4s at 16 in. o.c.; damp-spray cellulose in stud spaces; two outer layers of 2-in. XPS rigid foam (total R-value, 40)
Roof: 2x8 rafters at 16 in. o.c.; blown-in cellulose suspended by netting between rafters; 5-1/2-in. XPS rigid foam in three layers; unvented (total R-value, 60)
Windows: double-pane, low-e, argon-filled (SHGC: .31, U-factor: .33)
Energy
- High-efficiency space and domestic water heating
- Window placement for passive solar tempering
- Flourescent CFLs installed in almost all fixtures
- Energy Star appliances
- Active solar hot water
Energy Specs
Heating/cooling: Gas boiler (80,000 Btu), high-velocity forced air
; noncatalytic wood stove as backup, sealed-combustion air supply (Vermont Castings Encore)
Water heating: solar hot water from two flat-plate collectors (Schuco) in 80-gallon storage tank (approx. $7,000); 40-gallon indirect-fired from gas boiler (backup
HERS rating: 30
Water Efficiency
- Efficient routing of hot-water pipes
- Low-flow faucets and toilets
- Very low-flow showerheads
- Drought-resistant turf
Indoor Air Quality
- Low-VOC finishes
- Formaldehyde-free wood composites
- Whole-house heat-exchange ventilation system
Green Materials and Resource Efficiency
- Sealed concrete slab used as finished floor
- Wallboard contains recycled gypsum
- Job-site recycling and waste-reduction plan
- Recycled-cellulose insulation
- Cabinets and trim made of reclaimed lumber
- Roof contains recycled steel and is recyclable
- Locally milled ash flooring and pine paneling
- Exterior decking from locally salvaged cedar (formerly used as siding) and mahogany pallet material
- Salvaged Fireslate counters and tiling
Alternate Energy Utilization
Photovoltaic: 2 kW; Cost: $9,500
Certification
Energy Star: 5+ stars
LEED for Homes: platinum


12 Comments
Alternative Wall Systems
Great Project...These guys did their homework.
The builders admit that the wall design "sandwich" was rather challenging to construct.
I am curious what they are considering as an alternate wall construction for "the next project".
What about the roof construction? Was the roof challenging to construct? Would you change anything about the roof design next time?
Alternative Wall Systems
Thanks for the comment. We will always take another look at SIPS; structural or non structural insulated panels,for both walls and roof, as the roof was equally challenging. However,we don't love (I guess we hate) OSB for fastening materials to. We would also consider different arrangements of foam and cellulose, maybe some foam on the inside of framing, but with very careful thought to the air/vapor barrier issues. The upside as well as the downside to making our own insulation package was that it allowed us many opportunities for attention to the details of envelope design.
windows and outsulation
Mark, I really do like this project..
thanks for the feedback... How did you fasten your windows?
Did you use flangeless windows? Can you describe or perhaps post a photo that shows the furring strips and the framing just before the window went in? Do you have more photos posted somewhere?
windows and outsulation
John, You're on to something here. The windows did have flanges that we screwed through to fasten them. We had to wrap each window opening with 1x3 furring, screwed through the foam to framing, to have something solid to base the windows on and fasten them to. The rough openings were extended out through the foam insulation with plywood jambs, screwed to the edge of the furring strips, so nothing is wiggly about the window installation. We have some more photos on our website, pictonbrothers.com. I forget but I think they include the rainskin stage; let me know.
Wall systems
Mark, Did you consider other types of wall systems like a Larsen Truss and if you did, why did you select the method you used? I like the concept of the complete envelope formed by the exterior application of the insulation over the Larsen Truss design because the lumber use seems to be the same but the envelope seems to have only screws and jamb extensions as bridges.
Cost
Mark, I have one other question. What was the construction cost or what would be the selling price of the home not including the land? How does it compare to a similarly sized conventional house?
framing
Mark,
I am curious about the wall framing. Did you consider 2 x 6 framed at 24"o.c?
Larsen Trusses, 2x6
Kevin,
My brother Jim did consider the Larsen Truss idea as a possibility. But since they do still have the thermal bridging problem to an extent that depends on how they are built,I agree with you that they still would need an insulation design which provides a thermal break. And you still need a bearing wall, assuming the trusses do not provide bearing. We picked 2x4 framing because it is simple and familiar, 16" o.c. provides good surface fastening, the assembly seemed simpler, and with 4" of rigid foam on the outside for R ~40, it still adds up to only an 8" thick wall with the sheathing, to maximize usable built footprint. The inner surface of the foil faced foam is the vapor barrier that warm interior air will hit if it ever gets through the cellulose, which is pretty good at stopping air transmission. If the air gets to that vapor barrier, there is still more R value outside it than inside, so it won't be at the dew point of that warm inside air and cause condensation.
There are all kinds of possibilities, including 2x6 at 24 o.c. as TIM EBERHARDT points out, but you have to pay close attention to the vapor barrier and dew point issues. We chose an extra 2" of foam instead of the extra 2" of framing depth, but it created jamb extension and fastening challenges. You don't really have to have R40 walls if the house is built right and tight, so maybe 2x6 with Hi-R foam on the inside with the taped foil as a vapor barrier, and cellulose between the studs? Jim may weigh in on this also.
I have to decline to comment on the cost, except to say that it was more than we'd like it to be, it could be less, but that the house is hardly comparable to a conventional house. Sorry.
Mark
Home Remodeling
I'll admit, I was dubious at first. No offense to the builders but the exterior of the house looks fairly plain and boxy and the metal roof doesn't do you any aesthetic favors either BUT I take all my doubts back when looking at the elegant and well-thought out use of interior spaces. I was pleasantly surprised how light and airy the house feels on the inside. I never would have guessed from the exterior shots how much natural light you'd have inside. Add this impressive interior stylishness to the incredible efficency of the house and you can color me extremely impressed! Bravo!
Tapestry House
I really like the loft display nook next to the staircase. Excellent choice to leave that area open, airy and full of light rather than take the conventionally boring approach and just continuing the wall up. Well designed gentlemen.
Steve -The Tapestry House
Thermal bridges
I'm assuming you screw the exterior wall XPS to the studs with long screws. What would the thermal loss through the screws be in comparison to Larsen Truss thermal bridges? Or did you use adhesive?
I am glad you used 16" oc it
I am glad you used 16" oc it is a much sturdier construction and overall better.
Log in or create an account to post a comment.
Sign up Log in