GET THESE FIVE TRICKY SPOTS RIGHT, AND YOU’LL GET A SUPERINSULATED, ENERGY-EFFICIENT HOME
An experienced builder explains the ins and outs of airtight exterior insulation
BY DAVID JOYCE
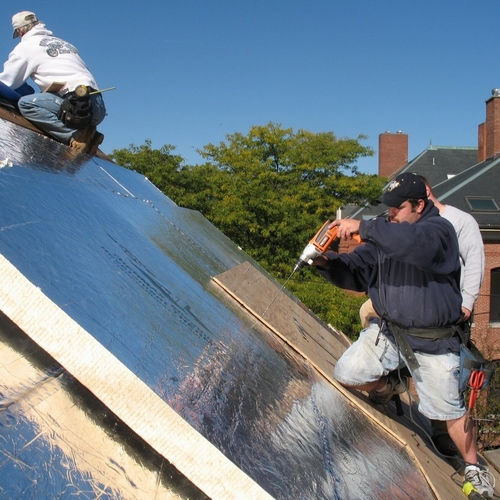
Installing rigid foam on the outside of a house is a great way to double the R-value and eliminate air leaks. Large sheets of foam insulation, screwed and sealed to the walls or roof, can cover or replace conventional sheathing and create a continuous barrier to heat loss or gain—something you don’t get with cavity insulation alone. We wrapped the house in this video with 4 inches of polyisocyanurate in two staggered 2-inch layers. This thickness strikes a balance between ease of installation and maximum R-value. If the foam is any thicker, it’s hard to hit studs when driving screws. Plus, combined with 5-1/2 inches of cellulose in the stud bays, 4 inches of rigid foam brings the wall up to a respectable R-40.
Superinsulating With Rigid Foam
How to Install Exterior Rigid Foam
Related Articles:
How to Install Rigid Foam Sheathing
Other Video Series:
3. Prepping Openings for Windows and Doors
6. Get the Most From Green Building Advisor
Foam sheathing needs to be tight and sturdy
No matter what type of house you’re insulating, how well the rigid foam is connected to the rest of the wall makes all the difference in performance and durability. Strong screws should extend from wood strapping on the outer surface through the foam sheathing and into the framing below. The foam boards should fit tight, and all edges and seams must be well sealed to keep out air and water. The key is to identify all gaps and choose the best way to seal them; a few key details should cover most of the bases for a job well done.
1. Use bug screens and flashing below the foam
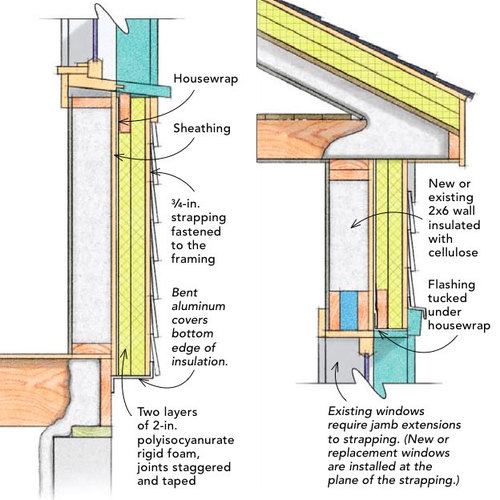
Many builders protect foam sheathing from insects by wrapping the bottom edge with strips of window screen. We take a belt-and-suspenders approach to air-sealing by backing up the screen with a sheet-metal drip edge. This directs water away from the foundation surface and adds extra protection from bugs and wind. My crew and I bend aluminum or galvanized steel sheeting so that it extends up behind the foam and out past the bottom edge far enough to nail to the bottom of the wood strapping. Then we nail a strip of window screen several inches wider than the flashing to the vertical part of the drip edge, leaving enough length to wrap under the foam and over the bottom of the strapping that holds the foam in place.
2. Build plywood boxes to span deep window openings
To compensate for the thick foam, we extend all rough openings with site-built boxes made of 3/8-inch plywood. The boxes are not structural; their main purpose is to provide a straight, solid surface to air-seal to and to align the windows. Strips of plywood nailed to all four surfaces of the rough opening extend from the inner edge out to where the outer edge of the foam will be. Don’t forget to leave room for the plywood when framing rough openings.
3. Fasten the foam with plywood scraps before the strapping goes on
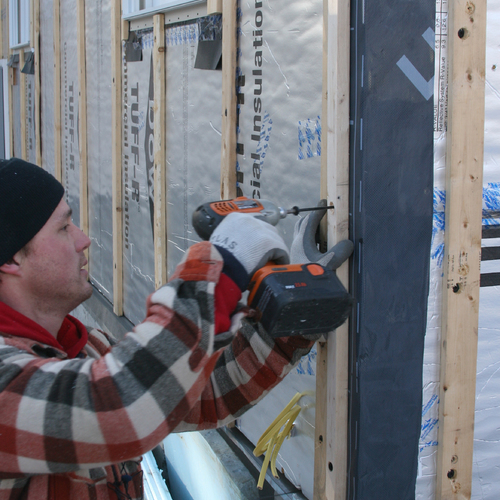
It’s virtually impossible to install the strapping that supports the foam sheathing as the foam is going up. Instead we drive long screws through a couple of small scraps of plywood to temporarily support each piece of foam. The screws go through the foam into the framing below, which comes in handy when laying out the permanent strapping. Solid-wood strapping screwed through the foam into every stud will pull the sheathing tight to the framing and provide a solid nailing surface for siding and trim. The 3/4-inch space this leaves behind the clapboards does two things: it leaves plenty of room for any water that gets in to escape; and it allows the foil facing on the surface of the polyisocyanurate foam to act as a radiant barrier, boosting the insulating value of the wall.
4. Stagger all layers of foam, caulk all outer edges, tape all seams
Another belt-and-suspenders approach of ours is using two layers of 2-inch foam rather than one 4-inch layer of foam. We offset the pieces so that nowhere is there a continuous seam penetrating straight through to the framing. Even the corners are “woven” together with alternating pieces. We install one layer at a time, taping or caulking all gaps as we go. We use construction adhesive or silicone sealant where the foam laps wall plates and outside corners. Housewrap tape goes over all seams and inside corners, and where foam meets windows and doors.
5. Use the right tape for the job
Different tapes stick well to different materials. Some are designed for a single purpose, while others are good multitaskers. After trying several kinds of tape, we’ve been happy with Dow Weathermate for most foam seams; it sticks to everything and always stays put. For wider gaps and outside corners, we use strips of ice-and-water or peel-and-stick window flashing.
—David Joyce is a partner at Synergy Companies Construction. The home in this video was designed by Building Science Corporation in partnership with the U.S. Department of Energy’s Building America Program.
Weekly Newsletter
Get building science and energy efficiency advice, plus special offers, in your inbox.


21 Comments
Great Video!
Thanks for the helpful video and information. This is definitely the RIGHT way to install rigid foam insulation. I should point out that your method also allows for a thermal break between the exterior siding and the interior sheetrock. We used this on a LEED Platinum home in Austin, Texas but didn't go as far with double-layering the rigid foam and using the rain-screen strapping. I'll know better next time.
strapping 4 inch foam
looking for 6 inch screws for this application. any suggestions Thx.
Timberlok screws
Paul,
I believe the guys at Synergy are using Timberlok
screws. I'm sure there are other types of long screws out there, but Timberloks are very strong, are easy to install, and are available at most building supply stores.
Boxing window openings
Can 1/2" OSB be substituted for framing window openings? It is about half the cost of plywood in my area.
Insulation
My house has this rigid insulation two layers of 2" offset - installed 30 years ago. Birds and other critters have gotten into it. Also water damage. What do I do now? The house loses more heat at night than it should so there is obviously a problem.
Response to Mum
Mum,
Q. "What do I do now?"
A. Repair it. Barring that option, remove it and replace it.
foam leaking
I have a bilevel house about 6years old.I have one room not finished in the lower level or basement.I looked under fiberglass insulation in the interior walls and some plastic screws holding the board leak in the winter.And I have a damp spot in the are and blackend the wood board.I looked under one of the plastic siding outside and it looks like the siding is attached right to the foam.How can I fix it now?
Response to Darrell
Darrell,
We need more information to answer your questions.
1. "I looked under fiberglass insulation in the interior walls and some plastic screws holding the board leak in the winter." Why do you have fiberglass insulation in your interior walls? Why is the fiberglass insulation exposed instead of covered? What is "the board"? What are the plastic screws?
2. "And I have a damp spot in the area and blackened the wood board." What area? What is "the wood board"?
3. "I looked under one of the plastic siding outside and it looks like the siding is attached right to the foam." Are you talking about vinyl siding? If so, that's not unusual.
4. "How can I fix it now?" How can you fix what? What is broken?
Installation Questions
Really great video. My house has the 1/2" or so cellulose/tar sheathing from the 70's, brick on the first floor and siding on the second. It only has 4" studs and I was thinking of adding 2" of foam outside and replacing the bad vinyl siding job that split the good cedar siding, when I reroofed.
Do you use any J or Z flashing up top?
I have a Cape Cod with three dormers. I am thinking I would have to extend the roof deck since the sides are pretty much flush with the roof. Would you add J flashing here?
Do you use any flashing under the eaves?
How is the screen attatched to the z flashing?
How is the screen finished off at the bottom of the foam? Is it wrapped up around the outside of the foam before siding?
How much of a gap is left between the z flashing and the foam?
I have offset roofs for the house and garage. How much space would you leave between the foam and shingle step flashing/roof deck?
I assume I will have to pull the windows and adjust to match the foam/stringer/siding.
retrofit installation
When retrofitting an existing home with cellulose/tar sheathing, would it be best to add the foam in two layers, as described in the video, to meet the min R value for moisture control in my zone or will one layer suffice? Properly taped and sealed at the outer edges.
In a two layer system, can you use unfaced foam for the first layer? Foil faced is 15-20% more expensive.
Even if you meet the minimum R value for your zone for sorption protection, is moisture drainage a potential issue at the bottom of the foam when sealed with caulk/adhesive?
Is there any problems you see with caulking the bottom at angles, much like a w with a couple of inch gap at the bottom of the v portion of the w. So it would look something like / / / . Only shallower angles.
Response to Steve Wilson
Steve,
Q. "When retrofitting an existing home with cellulose/tar sheathing, would it be best to add the foam in two layers, as described in the video, to meet the min R value for moisture control in my zone or will one layer suffice?"
A. Two layers is better, but one layer will work. In all cases, pay attention to air sealing the perimeter of each sheet of rigid foam.
Q. "In a two layer system, can you use unfaced foam for the first layer?"
A. Yes.
Q. "Even if you meet the minimum R value for your zone for sorption protection, is moisture drainage a potential issue at the bottom of the foam when sealed with caulk/adhesive?"
A. No. The important drainage area is at the bottom of the air gap between the rigid foam and the siding.
Q. "Is there any problems you see with caulking the bottom at angles, much like a w with a couple of inch gap at the bottom of the v portion of the w?"
A. This suggested caulk pattern won't be as airtight as a pattern that provides a seal around the perimeter of each sheet of foam.
corner boards
How does the strapping work at corners (i.e. how do you connect corner boards)? Do you have an image/detail of this? Thanks-
Response to Joshua Riley
Joshua,
There is no single answer to your question. Whether or not you decide to use wider vertical strapping at the corners depends o the thickness of the rigid foam, the type of siding you are installing, and whether your siding extends to the corner or you have vertical trim boards at the corner of your house.
Some builders switch from 1x4 furring strips to 1x6s or 1x8s at the outside corners; others don't.
Here are some links to photos found on the Web to give you some ideas about how other builders do it:
http://web.me.com/jgreening/Site/HG_H_Shed_Project/Entries/2010/1/5_siding_1_files/P1090069.jpg
http://www.cor-a-vent.com/userfiles/image/Flywheelers%202%20pic.jpg?1269442604741
http://i373.photobucket.com/albums/oo171/mcyr/DSCN0798.jpg
http://aconcordcarpenter.com/wp-content/uploads/image-import/_0vuJZhliRZA/TFxKa6XUUiI/AAAAAAAAKUY/HAu2vzESWrg/s1600/500_RainScreenWallSystem.jpg
Foam Insulation for a Post/Beam 1771 Saltbox
I'm restoring a saltbox built in CT in 1771. This house was built using traditional posts and beams, with 1 inch thick oak random width VERTICAL planks for the exterior sheathing. That was topped by clapboard siding. The plank sheathing was installed with no attention to air movement - there are vertical gaps between most planks, but in some areas there are gaps as wide as 6 inches! So I am looking for guidance on the best approach to insulating and siding this house. Windows appear to be the 2nd generation in the house, and the vertical planks have rough openings up to 4 inches per side too wide for the current windows, thus windows are only held in by the exterior trim nailed into the plank sheathing.
I have been planning all along to use foam panels to insulate and air seal the house, since it is incredibly poor from an air infiltration perspective. I have been planning on adding a stud wall to the interior between the posts to provide 16 inch on center framing for electrical, plumbing, fiberglass cavity insulation, window mounting and interior finishes. I also need the stud plates to repair the bottoms of the vertical planks which have rotted to heights above the sills in some areas.
Thus, here are my questions:
1. Am I better off putting a layer of foam on BOTH sides of the plank sheathing and air sealing on the inside panel with foam to the posts and beams before installing the stud wall? Or is it easier and just as good to put BOTH layers of foam on the outside? Again, I want to make this house warm and tight which was not a priority in 1771.
2. should I use 2X4 or 2X6 studs with the exterior foam? Is it worth it for the extra R-value in a deeper cavity when there will be foam on the exterior? If using 2 layers of foam ([email protected]=R13) PLUS R-13 Fiberglass( 3-1/2") that is R-26 - isn't that enough for CT winters when most heat is lost through the ceiling? I also need to consider the stud wall thickness since we do want the posts and beams to be partially exposed...And if the tapered posts are not at least 6" deep at the base then we may be forced to use 2X4's...
3. Given that I plan on using the fiberglass in the wall cavity, should I use 2 one-inch layers of foam or only one? (again is the cost of 2 layers worth it in the walls?)
4. Given the situation with the 1" thick plank sheathing, I think that I should add a layer of 1/2" plywood or OSB to provide structural rigidity (and reduce air movement) to the building - even though I plan to trim clean and reattach the bottom of the planks to the stud plate or additional studs installed on the flat, I feel that the plywood is the best to provide rigidity as well as a good base. What order is best for installation of these items? Planks then 2 layers of foam then plywood? That's 3-1/2' thick BEFORE penetrating the studs...and will make installing plywood on the whole house difficult since air driven nails are not available in longer lengths...Or should I skip the plywood since the reattached planks should be strong enough? Then I could use 5 inch TImberlock screws through the 3-3/4" plank/foam/furring.. With the current condition of the planks, the house still appears straight, no sagging or racking. So perhaps the post/beams are rigid enough and adding plywood is not necessary..What would you suggest?
5. At what wall thickness are the plywood boxes required for the windows? Your walls in the article were 5-1/4" excluding the studs. It doesn't seem like much work or cost for the added protection.
6. I have log rafters for the roof on 4 foot centers. What would you recommend for foam panel/cold roof insulation on the exterior since I plan on re-roofing anyway and can also add fiberglass between the log rafters?
7. Is there a need for housewrap on top of the foam or since the air barrier is already there, is this overkill? Is there a problem if it IS installed on top of the foam panels/plywood?I am also retrofitting a mountain cabin which had no sheathing (only plastic & Vinyl siding) and already applied foam panels onto studs, followed by OSB sheathing then housewrap.. Siding has not been installed yet so it can come off if a problem.
8. Lastly, the "ell" on the back of the house is 1 story with a cathedral ceiling. Same log rafter arrangement. To leave the rafters exposed and provide a wainscot ceiling effect, I was planning on removing everything down to the rafters (shingles, plywood, 1/2" horizontal planks) and then installing T&G 1" beadboards ,then add foam layers, furring, plywood/OSB nail base and then shingles...Does this sound correct? What about venting or does the rain plane cover that? There obviously is no fiberglass in this ceiling so what should the foam thickness/R-value be?
Sorry for so many questions, but I can only do this once and prefer it to be the CORRECT way...
Thank You in advance...
Key details
David, it would be nice to see a few rough drawings of your key details. Even though you have carefully described them, some of us probably do better with visuals.
Response to Gary Everett
Gary,
You have posted your questions in two locations on the GBA website. I have answered your questions on the Q&A page:
https://www.greenbuildingadvisor.com/community/forum/energy-efficiency-and-durability/25311/foam-insulation-post-and-beam-1771-saltbox
House Wrap
In other Green Bdg articles I've seen, it calls for house wrap over sheathing, then foam, furring and then siding. Is this a redundant effort ??
Response to Robert Williams
Robert,
There are three ways to do it:
1. Install housewrap under the foam.
2. Install housewrap over the foam.
3. Skip the housewrap, and detail the foam as the water-resistive barrier (WRB).
It's your choice.
Read more here:
Where Does the Housewrap Go?
Using Rigid Foam As a Water-Resistive Barrier
All About Water-Resistive Barriers
Rigid foam over log home
I'm in the process of renovating a kit log cabin home, built in the early 90's. My wife and I are not a big fan of the "Lincoln Log" look, so I'm looking into covering over the exterior of the milled logs with a conventional siding. In order to boost the energy efficiency of the wall system, I'm strongly leaning towards installing rigid foam on the exterior.
Currently, I'm planning on:
1. installing the rigid foam directly over the logs (since it's a kit home and the logs are milled, the exterior surface is largely in plane and free from excessive bumps, warping and inconsistencies);
2. then installing furring strips;
3. and then the siding.
The windows/doors all need to be replace, so I'll look at installing them with nailing flanges/flashing outside of the foam.
Is this method acceptable, or do I need to first install OSB/plywood over the logs and then housewrap before applying the rigid foam?
Thanks for the great content!
Response to Jon Ackley-Jelinek
Jon,
As you probably know, the two weaknesses of most log homes are the low R-value of the walls and the fact that the walls leak a lot of air.
It's very important that you establish an exterior air barrier on your log home. You can do this with plywood, with housewrap, or with the rigid foam layer. No matter which approach you take, you have to aim for an airtight installation.
I don't know how bumpy or out-of-plumb your walls are. But if they really are both plumb and co-planar, you are lucky. In that case, you may be able to achieve an air barrier with a layer of rigid foam. I would advise that you use polyisocyanurate. Here is the controversy: rigid foam may shrink, so some builders are wary of depending on the rigid foam to be your air barrier.
In any case, the foam needs to be thick enough to keep the interior of the foam above the dew point in your climate, and the seams need to be carefully taped with a high quality compatible tape.
If you are leery of the dimensional stability of the rigid foam, you should establish your exterior air barrier with taped housewrap or taped plywood before proceeding to install the rigid foam.
Your final question is: what material will you use as your WRB? Your WRB may be the same as your air barrier, but in some cases you will have different materials for these two layers. Study up on GBA -- there are plenty of articles on these questions.
Thank you for the quick reply
Thank you for the quick reply Martin! Sounds like I'll be smart to install plywood and housewrap first, then the polyiso. I greatly appreciate the assistance and am looking forward to moving ahead with this project!
Log in or create an account to post a comment.
Sign up Log in