
Image Credit: South Mountain Company
More Musings of an Energy Nerd


UPDATED on March 8, 2016
In the early 1970s, residential builders knew almost nothing about air tightness. The first residential air barriers were installed in Saskatchewan in the late 1970s, when pioneering Canadian builders began sealing the seams of interior polyethylene sheeting with Tremco acoustical sealant. The Canadian builders (and their American imitators) went to a lot of trouble to weave the interior poly around framing members at rim-joist areas and partition intersections.
A few years later, Joseph Lstiburek perfected and promoted the Airtight Drywall Approach (ADA) to air barriers. The ADA system required gaskets or caulk between drywall and wall plates on exterior walls; any electrical box in an exterior wall needed a special flange to allow it to be caulked to the drywall.
These days, some builders approach air sealing like all-out war, and try to make everything as airtight as possible. These are the builders who caulk their sheathing to the studs, and then install housewrap with taped seams, and then caulk their drywall to the studs for good measure. Before the blower-door contractor shows up, they run around the house like a chicken with its head cut off, squirting spray foam into every hole and crack. This approach — let’s call it “if one air barrier is good, three air barriers are even better” — works, except when it doesn’t. (Sometimes it makes more sense to have just one air barrier that is well defined rather than to wage an all-out but somewhat random war against air leakage.)
An exterior air barrier at the wall and roof sheathing
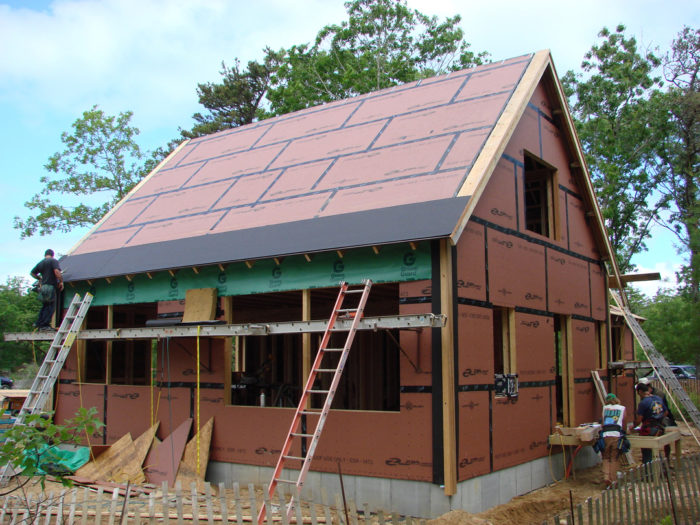
There’s a growing trend among builders concerned about air leakage to establish the air barrier at the exterior wall and roof sheathing. Typically this requires sealing the seams of the OSB or plywood sheathing with tape — either peel-and-stick tape…
Weekly Newsletter
Get building science and energy efficiency advice, plus special offers, in your inbox.

This article is only available to GBA Prime Members
Sign up for a free trial and get instant access to this article as well as GBA’s complete library of premium articles and construction details.
Start Free TrialAlready a member? Log in


72 Comments
Air Tight Attic Deck
Martin,
I think that an air-tight sheathing approach is the way to go.
I think that placing the pressure boundary at the roof deck only works for certain styles of Architecture.(extremely simple .. One or Two Ridge Roofs)
Placing the boundary at the roof deck also create a large amount of surface area.
I think an Air Tight Attic Floor concept could be adapted for almost any style of Architecture.
Air barrier at the underside of the roof trusses
John,
In buildings where the roof framing is made with trusses and the AB can be made as a simple flat plane under the bottom chord of the truss (and there are no mechanicals in the attic, and no oddball dormers, etc), the AB can be at the underside of the truss fairly easily. There needs to be a clear transition detail from the exterior wall AB to this ceiling AB plane. The recently completed Bement School Dorm in Deerfield, MA used this approach and is below 1 ACH50. Decking the attic floor in a stick-framed building could easily work as well. I haven't done this because a) trusses are cheaper in this application b) to get high R value in the ceiling with this approach you'd likely have insulation in the attic joists and above the attic floor decking and c) make a space that looks like it could be inhabited (i.e., deck it) and people will inhabit it eventually, probably making the extension of the thermal enclosure at that time much worse that the one you left them with.
Also, you may get comments from industry people about my observation that housewrap is not an air barrier. What I meant, and maybe said, is that i don't believe that people are making functional ABs from housewrap in buildings that are under 1 ACH50.
Marc Rosenbaum
Air barrier at the attic deck instead of the roof
John,
Thanks very much for your comment, and for the detail you sent me by e-mail. I have posted your detail as the second photo -- see above.
The assumption of OSB durability
It certainly true that you can achieve great immediate air tightness with sheet goods but the assumption that those sheet goods will survive a potential (and hopeful) life exceeding 100 years of moisture cycling through the walls of the building is untested and I think a little suspect There are countless examples of dwellings that are hundreds of years old sheeted with solid lumber sheathing with the additional virtues of a low carbon footprint, local production options and long term carbon sequestration.
Also assuming the tape sticks
You mention spray foam not working in cold temperatures. I haven't found any tape that adheres well in the cold either. The red Venture tape is the best in the cold and it is rated to only +25 degrees. the Grace Vycor mentioned doesn't even go that low. I've seen one builder hold Vycor in position and staple it up since the adhesive wouldn't stick, apparently hoping the adhesive would adhere itself once the weather warmed up. I haven't used the Huber system, does their tape work at lower temperatures?
Good point about low temperatures
Donald,
You're right about Vykor — the Grace specifications note, "Apply in fair weather to clean and dry surface at air temperatures of 40°F (4°C) or higher."
When I researched the topic for my June 2001 article on the topic for JLC ("Choosing Flexible Flashings"), I noted that cold-weather installation of peel-and-stick flashings can be problematic. One of the products recommended for cold weather use is Bakor Blueskin Weather Barrier; when I researched the article, the manufacturer recommended the product for use down to 10°F.
Some EPDM flashings can be used down to -20°F, but I'm not sure how well they stick to OSB or plywood.
OSB and Air-Stop Tape temperature
I would propose Plywood rather than OSB for the ACL(Air Control Layer)
I would propose to locate the tape inboard of the TCL(Thermal Control Layer)
I believe the Europeans have had good succes with "AirStop" tape that is not subjected to temperature extremes.
Marc Rosenbaum's comment b)
Marc,
Why not put ALL of the Insulation above the "deck"
Leave the ceiling joist space for wires and fixtures...
Electrician can "go to town" as long as he does not penetrate the ACL
PERSIST / REMOTE ?
John,
Let me see if I understand you. You want to use plywood wall sheathing as an air barrier -- but you want the tape covering the seams to be "inboard" of the wall insulation. In other words, all insulation is on the outside of the wall sheathing — following the "modified PERSIST" or "modified REMOTE" method. ("Modified" because of your twist -- using attic decking as the ceiling air barrier).
Is that what you are saying?
Yes....much like REMOTE..but not exactly
Martin,
The ceiling detail is one place where my proposal differs.
REMOTE (at Least Thorsten's version) flops the ACL to the inside of the structure at the top plate.
This is the transition detail that Marc mentioned when using trusses.
another difference....REMOTE does not use the sheathing as the air barrier....Thorsten Chlupp relies on Peel&Stick, Poly or Housewrap for Air control... and does not attempt to detail the sheathing as the ACL.
I would propose to "detail" (tape&gasket) the sheathing and omit the Peel&Stick
Another Observation
I have noticed that the Europeans do not always "break" their sheathing (racking board)on the studs.
This allows AirStop tape to be applied on the inside or sometimes both sides of the sheathing.
This practice may also reduce waste.(not sure just speculating)
No Peel n Stick?
John,
Eliminating the Peel and Stick? Where is your drainage plan then? To the outside of the foam sheathing? If thats the case, what about hydrostatic pressure between the foam board and the sheathing if any moisture gets to the wood sheathing layer (which it most likely will in the life of the home)?
Foam sheathing or housewrap as a WRB
Brett,
If you cover your plywood wall sheathing with one or several layers of rigid foam, it's relatively easy to establish your WRB on the exterior of the last layer of foam. Some builders leave the foam and use it as a WRB, with the vertical seams taped and the horizontal seams flashed (or simply equipped with tongue-and-groove joints).
Other builders prefer to install a layer of plastic housewrap on the exterior side of the last layer of foam.
Either way, a ventilated rainscreen drainage gap between the foam and the siding goes a long way towards eliminating worries about trapping moisture in the wall.
Finally, if you're losing sleep over the possibility of wet plywood, remember that the plywood can easily dry to the interior. The stud bays are empty.
Tape That Sticks to OSB
I recently received 3 rolls of this tape http://www.shop3m.com/3m-all-weather-flashing-tape-8067-bcsvcx6cxs.html to try out and was quite impressed with its ability to stick to OSB. We tried it out when it was about 40 degrees out and it stuck very well. http://solutions.3m.com/wps/portal/3M/en_US/3M-SpecialtyTapes/SpcltyTape/?PC_7_RJH9U5230GE3E02LECIE20KLR3_assetId=1180611197797
I had a video that showed them using it in a freezer and sticking to OSB and Tyvek. I'll try to find it and upload it.
Zip Tape
We've had good results applying zip tape in cold weather. I have no particular attachment to the zip system, but am thrilled at the ease of getting an airtight shell. The ability to do a blower door test on the un-insulated shell has become a critical part of our new construction methods, and we've found significant air leaks this way that would have been difficult if not impossible to find if we'd done ADA. Our last completed house got to .77 ACH this way.
Architects seem to be specifying bigger and bigger overhangs, so we haven't had much luck trying to figure out how to do plant-on eaves a la South Mountain. Instead we're installing blocking and sealing them well, between rafters right over the outer edge of the wall plate. Still working on that detail.
And Marc - is Martin right that you're specifying housewrap over zip wall? Is that for a drainage plane or other reasons?
window detail
is there a window flashing detail for the zip system around here somewhere. Builders I know express that as their concern if there is no felt or building paper to layer the window flanges in.
Window flanges
Robert,
That's why Marc Rosenbaum recommends the use of plastic housewrap over the Huber Zip system.
no air gap?
On the pic of John Brooks' framing, I don't see any air gap over the loose-fill insulation. Typo? thanks. j
not for all climates
John Klingel,
The detail is "in Progress" and not intended for all climates.
I am in a Hot/Mixed Humid climate.
I am considering not ventilating the "attic" .. at least not in the traditional way.
I would like to use the attic as a "buffer" zone.
I would actually like to see "controlled ventilation" in the attic.
Vented option
John Klingel,
I actually sent Martin a detail with a venting baffle.
Martin's comment was that the baffles would be difficult to install.
John Brooks' second detail
I have posted John Brooks’ second detail as photo #3, above.
Insulation, inside or outside?
I bumped into this thread following a Google search on insulation.
My experience and recommendation is that humidity/water vapour in the home is formed by people cooking, washing breathing and sweating.
With the average person creating around 1.4 litres of water vapour per 24 hours, old people a bit less, active children and pets a bit more.
I recommend that, people deal with this, by venting water vapour to the outside, or get rid of it by using a dehumidifier.
In every instance, that the home should be sealed on the inside, to prevent water vapour entering the walls, ceilings or floors, as heat and water vapour always move to cold.
If the insulation is placed on the outside, the coldest part of the wall is where it contacts the insulation.
Therefore, insulation should be on the room side of the outer walls, ceiling and floors, to keep the comfort zone as small as possible and save heating the structure and the possibility of interstitial condensation, followed by wood rot.
Lining the inside of the walls, floors and ceilings with at least two inches of polystyrene, Styrofoam or similar, helps avoid the transmission of heat through the structure by conduction.
Filling the structure with sheet polystyrene, will bring the home close to Passive House standard.
A few flaws in your analysis
Perry,
Although it's always refreshing to have a British perspective, Perry, I find myself once again disagreeing with many of your points.
1. Although you write, "the home should be sealed on the inside, to prevent water vapour entering the walls, ceilings or floors," it's also perfectly fine to put the air barrier on the outside of the wall. If you achieve 0.6 ach50 — in other words, a Passivhaus-level of air-tightness — you're not going to have any air moving through your wall. If no air is leaving the wall cavity, then no air is entering it. If you can stop air movement through the wall, you've stopped virtually all the water vapor — because the amount of water vapor transmitted by diffusion is very small.
2. Although you write, "If the insulation is placed on the outside, the coldest part of the wall is where it contacts the insulation," the opposite is true. Consider a 2x4 wall, sheathed on the exterior with plywood. The stud bays are empty, and 6 inches of rigid foam is installed on the outside of the plywood sheathing. The plane where the wall contacts the insulation is now warm — it's not the coldest part of the wall. The coldest part of the wall is the exterior surface of the foam insulation (or the siding).
3. You advise "Lining the inside of the walls, floors and ceilings with at least two inches of polystyrene." But the R-value of such insulation — only R-7 to R-13 — is much too low for most locations in North America.
4. Although you write, "insulation should be on the room side of the outer walls, ceiling and floors, to keep the comfort zone as small as possible," many people prefer to install the insulation on the exterior side of the wall, to keep the comfort zone as LARGE as possible. One disadvantage of thick walls is that they rob you of useful interior space.
5. This is the second time you have posted a comment advising builders to "Fill the structure [of a wall] with sheet polystyrene." Actually, rigid foam board is one of the most awkward types of insulation to use between studs. It is much more difficult to fit the insulation in nooks and crannies, and around the electrical wiring, than blown-in-place cellulose or fiberglass.
Alternate strategies for air-tightness
Hi Mark,
Great topic and good to read about real strategies for trying to achieve Passive House level air-tightness. We conducted a little experiment here in our shop using a product by STO called Gold Fill. It's a pre-mixed joint compound that is brush applied over a mesh tape. We built a 4x8 box sheathed in OSB, ran a blower-door test on it and then sealed all the seams with the StoGoldFill. The 'after' blower door test gave us sufficient confidence to try it in the field. We then used it on a recent retrofit project to seal the existing exterior T1-11 siding. The building tested out at 0.54 ach at 50pa, which has shown us that it is possible to reach the Passive House air-tightness requirements on a retrofit, using a little extra dilligence and some strategic planning ahead of time.
Overall we found this product to be easy to use and cost-effective.
I've posted a presentation http://www.slideshare.net if you're interested in any of the other construction details. It should be searchable under my name.
Cheers,
Bronwyn
StoGuard liquid-applied WRB
Bronwyn,
I wrote an article on liquid-applied WRBs for the May 2008 issue of Energy Design Update.
I wrote in part:
"Sto makes two separate lines of StoGuard systems. 'StoGuard with Gold Coat' is designed for use under EIFS; it cannot be used under cementitious stucco. 'StoGuard with EmeraldCoat,' on the other hand, is designed for used under cementitious stucco, but cannot be used under EIFS. ... Under brick, fiber-cement, or wood lap siding, either the Gold Coat or EmeraldCoat system can be used; however, Sto usually advises builders to choose StoGuard with EmeraldCoat for all siding types except EIFS.
"Gold Coat and EmeraldCoat can be installed over plywood, OSB, or gypsum sheathing. For builders using the Gold Coat system, wall sheathing joints must first covered with 4-inch-wide self-adhesive fiberglass tape called Sto Mesh. Wider (9-inch-wide) fiberglass tape is then installed around the perimeter of all rough openings, around outside corners, and at inside corner joints. The lengths of fiberglass tape are covered with a liquid product called Gold Fill, applied with a trowel or a texture sprayer. ... After the Gold Fill dries -- curing takes about four hours -- the entire surface of the building’s wall sheathing is treated with Sto Gold Coat, which is applied with a roller or sprayer. (Gold Coat has a thinner consistency than Gold Fill.)"
More information from the article:
"Contractors familiar with StoGuard praise the product’s durability. 'It’s a thick coating, and once it is applied, there is no way to take it off,' said Ernesto Medina, owner of Stucco and Masonry Renovators in Dallas, Georgia. 'It will not peel away.' The product’s tenacity will frustrate contractors who get it in their hair.
"StoGuard provides some ability for a wall to dry to the exterior. Since it is a Class III vapor retarder under definitions established in the 2007 Supplement to the IECC (see EDU, February 2008), it falls into the same category as latex paint. ... According to Petsko, builders don’t have to worry that siding fasteners will cause StoGuard to leak. 'Our product seals around nail penetrations,' Petsko told EDU.
"Sto promotes the StoGuard system for use under any type of siding. According to Petsko, there is no reason that a rainscreen application -- using either vertical strapping or a three-dimensional plastic mesh product -- can’t be used over StoGuard. ...
"StoGuard costs more than WRBs that come in a roll. 'It has to be done right,” said Medina. ... 'Most guys run over to Home Depot, grab a roll of housewrap, put it up on the walls, put some staples in it, and that’s it. They charge about 15 or 20 cents a square foot for a job like that. A careful contractor would charge maybe 40 cents a square foot to do housewrap properly. I charge about 60 or 65 cents for StoGuard.'
"Sales of StoGuard materials are not limited to licensed EIFS dealers; Sto Corporation will sell the materials to any contractor."
Huber Systems
Our company has used the Huber wall systems for about 3+ years and love the product and the tapes. Even works great in lower (30 degree) temps. Installing the sheathing nice and tight is much simplier for our carpenters (many of our urban projects are tall) and much easier for our supers to inspect. Further, we ran some cost analysis and the difference between OSB+ a house wrap & the Zip system is minimal. Around $400 for a 3000sqft, two story strucutre. I would highly recommend it to anyone.
Martin - question - do you know if Huber is treating the interior of these Zip Wall panels with some type of resin too? It has a different feeling & slickness to it (yes, on the inside) than a normal OSB panel. My only concern with the Zip wall is the "cold side" arguement and that moisture will condensate at this location. I'm wondering if Huber is treating the interior of their panels for this reason or some other? I would be interested in your opinons. Thanks.
Condensation on OSB sheathing
Micah,
Whether you use regular OSB or the Zip sheathing from Huber, the same considerations apply concerning condensation. If you install exterior foam that is thick enough to keep the sheathing above the dew point, you won't have any condensation problems.
If the stud bays are filled with dense-packed cellulose, the likelihood of condensation is much less than if the stud bays are filled with fiberglass. The walls at the highest risk for condensation problems are fiberglass-insulated walls with no exterior foam.
ZIP Roof Sheathing as Wall Sheathing?
I believe that ZIP wall panels are green colored.
In Image #1 above it looks like Roof Sheathing was used as Wall Sheathing.
I am just guessing that this may have been done to get the tongue and groove feature?
I wonder if there is a "downside" other than extra cost?
Is the roof product more or less permeable?
A parallel conversation at JLC
Allan Edwards has initiated a parallel conversation on this topic at the JLC forum.
It's here:
http://forums.jlconline.com/forums/showthread.php?t=51915
Comparing air barrier strategies
The advantage of exterior sheathing air sealing (as Marc presents) is in getting to VERY low air leakage rates — e.g., well under 1.5 ACH@50 Pascals.
Housewraps like Tyvek pioneered (as far as I know) exterior air sealing as a product for houses in the late 1980s. Going to taped and supported Tyvek was found to be an easy way to get "exceptional" airtightness: at the time this was under 3 ACH@50.
The airtight drywall approach and sealed poly approach can both deliver these levels of airtightness, but it was easier to train and inspect using ADA.
The "new" approach of sealed sheathing (as distinct to exterior air barrier) — long advocated in Canadian commercial construction (I have brochures selling the wonders of this from 1984 and 1986 in my office and pictures of sealed OSB in houses from the early '90s) — was found to be even more effective. Applying ANY fully adhered air barrier to a stiff, strong backup exterior sheathing will get much lower air leakage rates with the same level as effort as other common approaches.
Most new American houses are testing in the 4-6+ ACH@50 range, depending on where they are built. While I am big fan of exterior rigid air barriers, and recommend nothing but in commercial buildings, I am a realist that this is too much of a leap for 90%+ of American home builders. Just getting taped and sealed Tyvek or ADA with consistent <3 ach@50 would be a massive improvement.
So the conversation has to be more nuanced than "sealed sheathing is good — ADA, sealed Tyvek, sealed foam are bad."
What is the goal of the approach (1, 3, or 5 ACH@50)? Is it a custom small builder or a production builder? Are we in Maine or Miami? The costs — not just in dollars but in training and education of trades and code officials — of each approach is different in different areas, and so all of the approaches are "OK" — but "best" will depend.
If it is my house, and I can afford a few hundred or a thousand dollars more, I want as tight as I can get: so sealed exterior sheathing is for me. But it will take a long time before we get the rest (vast majority) of the housing industry to that point.
ZIP sheathing
The vapor permeance of Huber ZIP is in the same range as commodity OSBs. OSBs that we test have quite a range of wet-cup vapor permeances, and both roof and wall ZIP are essentially the same.
But ZIP, like all OSB, does not have the high permeability of a building paper, so one needs to design carefully. For best practice, that means insulation on the exterior to warm it up and to blunt thermal bridges at mudsills and floor joists. If you use a double stud wall, then I am concerned, but I have a low risk threshold since I am a forensic consultant too. :)
The back of the ZIP has a different texture because of the way the product is pressed, and you will notice that other OSB is like this too. There is no difference in performance as far as we have been able to see.
Finally, sealing to plywood is very difficult without mastic; sealing to OSB works OK with primers and some care; and sealing tape to ZIP is pretty darn easy. The smooth surface of ZIP is its huge virtue.
Yes, one can seal windows to ZIP as a WRB: there is a large set of details available from Huber if you ask for it that show you how. But for higher performance homes there is no reason not to install lapped housewrap or building paper.
Double wall?
John - why does double stud concern you more? Because it makes the sheathing that much colder?
OSB condensation
Dan,
I understood John Straube to mean that most houses with double-stud walls have no foam sheathing. If the builder chooses vulnerable OSB sheathing, the sheathing will be cold and therefore subject to condensation.
Mitigating the problem are two factors:
1. Cellulose acts as a moisture buffer, drawing the condensed moisture away from the OSB and storing it until the weather warms up.
2. Once spring weather comes, and the sun hits the siding, the OSB can dry to the exterior.
But John is a consultant who stays awake at night worrying. That's why he likes to see foam over the OSB -- to keep it nice and warm (and therefore dry).
worrying
I can relate - I've found the higher levels of performance I look for in my projects, the less sleep I get.
retro fit existing house
Most all the discussion seems to be about new construction. What can I do on my existing home in NW PA? It is a12 year old 1 story ranch on a heated slab. 2x6 walls with fiberglass insulation. I insisted on vapor barrior primer on the drywall, but couldn't get them to do anything extra to seal, so I have been working at using spray foam and gaskets to seal around outlet and fixture openings. I Don't have any baseboard up yet (don't ask), so sealing the bottom gap with spray foam will be easy. I realize I will probably never be able to get it as airtight as it should be, but hope to improve it as much as I can. Consistent use of exhaust fans and a humidifier keeps the interior moisture level pretty low.
My biggest worry is the exterior. They used OSB sheeting with vinyl siding over it without any tyvek or felt paper. "The building needs to breath" they said. If only I knew what I know now. I cringe thinking about the moisture damage that might be under the siding. I have looked under the siding in places and the OSB looks OK, so am I overreacting? What would you recommend doing? Should I just have a housewrap type barrior installed under new siding? What about insulation on the exterior, or would that only trap moisture? I lay awake at night wondering what to do.
I have been reading thru
I have been reading thru thiese posts and wondering about the use of foam block. Does it not meet what you are trying to achieve? Other than some quirks and being sure where you want openings what are the down sides?
Siding project advice
I am planning a siding project on our home this summer in Northern Illinois and I am trying to figure out how to do it right. I want to replace the vinyl siding with fiber cement. We have 2x4 walls 16" o.c. that currently have kraft faced fiber glass batts R15 in the walls. The exterior sheathing is non-structural fiberboard or blackboard no housewrap. So a number of questions. Should current insulation stay? Should current fiberboard be replaced with OSB or Huber Zip system? Should there be a rainscreen built behind siding. Am putting in new windows as well so am trying to figure out how all will be fitting together with window trim to match built out wall etc. Am planning on putting 1/2" rigid foam on as well. Any advice appreciated.
"Foam block"?
Lynn,
What do you mean by "foam block"? Do you mean insulated concrete forms (ICFs)? Or just rigid foam insulation (EPS or XPS or polyiso)? Or spray foam? Or something else?
Advice to Kevin
Kevin,
There is no single answer to your question. Better insulated walls cost more than poorly insulated walls, so the best job will require more money.
1. Should the current insulation stay? It's up to you. If you can afford spray polyurethane foam or dense-packed cellulose, either option will perform better than the fiberglass batts you have now.
2. Should the fiberboard sheathing be replaced with OSB? I don't think so, unless the fiberboard sheathing is deteriorated.
3. Should there be a rainscreen behind the siding? Yes.
4. Should you add 1/2-inch exterior rigid foam? It's up to you. A half-inch of foam doesn't do much — it adds between R-2 and R-3 to your wall. If you're installing new windows, why not do a better job with your foam sheathing? I'd add 4 or 6 inches of foam if I had the opportunity.
Insulation/vapour proof membrane/damp/mould/wood rot.
Your note 1.
The point I am making is that the molecules of water vapour are so tiny that they can pass through many things.
And water vapour always moves from hot to cold and towards low pressure.
Therefore, it is important that the water vapour created inside the home is prevented from entering the wood framing.
Water vapour while partly filling the spaces between the air molecules, moves of it own violation, into areas where the air molecules are too large to go.
It always moves to the coldest place it can find and to the nearest area of low pressure.
Having a vapour barrier on the outside of a building makes no sense in an area where the indoors temperature is always going to be warmer than the outside temperature.
Note: At 40f there are only five cc of water vapour in one cubic meter of air that's 5 in 1,000,000 cc .
Once you reach freezing air is totally dry.
A comparison is tiny ball bearings and footballs.
Another point is the volume of air inside a home is always changing and the water vapour quantity is always growing, so the quantity that moves over time is vast. A dehumidifer or forced ventilation help.
While the wood of the framing is hard and dry when it leaves the kiln, and has roughly the same insulation value as polystyrene, as time goes on it absorbs water vapour and gradually becomes wet. As we know water is 4,000 times worse an insulation than air, so as the wood picks up water from the air its insulation properties deteriorate.
As most of the heat that is lost from a home is via conduction, the situation where air holding quantities of water vapour is allowed access to the framing is obviously bad.
This damp moves through the wood making it an express route for warm air to the outside.
The air in the walls and ceiling (where gaps are larger than 16mm) produces a convection rotating current that transfers heat across the space into the wood framing and then to the outside, creating a heat bridge.
Having the insulation and the almost water vapour proof membrane on the inside of the home, will make it 4 inches smaller across the width of the building but that is a small price to pay to avoid, damp, mould and wood rot.
Your note 3.
Lining the inside of the building with two inches of insulation, is an improvement, the proposal is, an extra 2 inches on the inside to help stop the movement of heat to the framing, the spaces between the framing being filled with insulation plus the six inches on the outside.
The EU recommendation for cold areas is a total of 16 inches
of polystyrene while keeping the low per square meter heating requirement.
Your note 4.
It is accepted that people prefer large rooms. However, 4 inches off a width of 30 or more feet will not be noticed, except when the heating bills come in.
What is wrong with moving the framing to the perimeter and the insulation to the inside, when it takes up the same amount of space.
Your note 5.
You are perfectly correct, fitting sheet polystyrene between joists and rafters is time consuming, however, there are many people who are suffering from large heating bills, who given the knowledge of what is possible in Europe and the miniscule size of heating bills that can be enjoyed will be willing to DIY or pay someone else to sort out their living room and enjoy the winters.
It is perfectly true that it is easier to to a bad insulation job, than a time consuming thorough one, however, there are people who will pay once the long term advantages are made clear.
Saving 80% on every years heating bills, makes a useful amount of spending money.
Spray foam is in fact a better insulation, it is also easier to install, while being more expensive.
It is well worth using a few cans of foam in difficult to handle places.
The problem with fiberglass is that it is transparent to water vapour.
Water vapour moves into and through fiberglass, when it freezes and then thaws it makes the fiberglass wet, and wet equals total loss of insulation. Until the escaping warmth dries the fiberglass again.
It is also impossible to make fiberglass an air tight fit between the framing and gaps equal heat loss. .
The same is true of cellulose, only a closed cell insulation can provide an air proof waterproof insulation. Where there are holes and gaps the suction of the passing wind pulls the warm air from the home.
Spray in foam provides the perfect insulation, carefully cut friction fit polystyrene sheets come a very close second
It is 50 years since Dow started to sell Styrofoam and 44 years since I gutted and insulated my first house.
That Styrofoam is as good today as the day it was installed.
Fitting rigid polystyrene between studs
Perry,
Good luck with your campaign to convince North American builders to fit sheets of rigid polystyrene insulation between studs, electrical wires, and electrical boxes. If the method is commonly used in Europe, then European builders must be patient and/or have low labor rates.
Believe it or not, some North American builders are concerned about energy efficiency, and have been very familiar with advanced insulation techniques for decades. No one has adopted your method. It just makes no sense.
Dense-packed cellulose does an excellent job of limiting air infiltration and solving the convective loop problem.
The GBA Web site has dozens of articles warning builders of the drawbacks of fiberglass insulation. I do not recommend its use.
In almost all U.S. climates — with the exception of very hot humid areas like Houston or Florida — there should be no need to use a dehumidifier, as you suggest. If you need to run a dehumidifier in most climates, it usually means that there's something wrong with your house.
There is plenty of evidence that the use of an "almost vapor impermeable membrane" — e.g. polyethylene — on the interior side of a wall or ceiling does more harm than good, except in Alaska or the colder parts of Canada.
ICF's
Yes Martin,
I was talking about ICF. As I'm sure you know they create a thermo mass and stop air infiltration while providing solid insulation..
I
Answer to Lynn
Lynn,
You asked whether "the use of foam block [ICFs] ... [will] meet what you are trying to achieve."
In this blog I talked about airtightness. You are right that ICF walls are very airtight. However, the use of ICFs does not address airtightness at the ceiling or roof, so attention must still be paid to these planes, as well as to the area where the top of the wall meets the ceiling joists or roof framing.
Other areas requiring attention are window installation, door installation, and plumbing penetrations. If these details are done poorly or neglected, a home with ICF walls can still be very leaky,
tyvek
I would be curious about the issues/reasons why Tyvek is not regarded as a proper air-barrier. Especially when it comes to achieve air tightness ratings below 1.0 ach50 (or even 0.6 for passive house). This as I am developing details for Brownstone gut renovations and was intending to use it as an air-barrier (but vapor open) membrane on the inside of the brick of the century old brick buildings.
The other option would be to use stoguard on the entire brick interior of the house, before adding insulation and framing. But as this is a vapor barrier, my concern would be that it could trap vapor in the insulated wall on the inside of it.
Which would be the better way to go?
Advice to Floris
Floris,
While it is true that a piece of Tyvek is an air-barrier material, builders have not been able to achieve 0.6 ach50 by depending on taped Tyvek as the chief air barrier component. The probably reasons: fastener penetrations, imperfectly detailed edges and penetrations, and imperfect details at the wall/ceiling interface.
You are mistaken when you write that StoGuard is a vapor barrier. In fact, as I wrote in my comment of April 14 on this page, "StoGuard provides some ability for a wall to dry to the exterior. Since it is a Class III vapor retarder under definitions established in the 2007 Supplement to the IECC (see EDU, February 2008), it falls into the same category as latex paint."
To answer your question, "Which would be the better way to go?" — StoGuard.
What is the best air barrier under trusses?
Where I build 90% of the homes have vented attics and trusses. It was mentioned earlier about the possibility of using an air barrier below the bottom truss chord. What material would work? Any kind of sheet product seems like it would get destroyed by the mechanical subs before we got the ceiling sheetrock on. The only other way I am familiar with is using the urethane spray foam in all the cracks you can get to. After getting the walls so airtight it seems a waste to not have a viable way to get the ceiling air barrier as tight.
Air barrier below the ceiling truss chords
Jake,
The most common material to create an air barrier below the ceiling truss chords is drywall, of course. The usual caveats apply:
1. No can lights.
2. Seal all penetrations (plumbing vents, electrical penetrations).
3. Use caulk or gaskets between the drywall used on partition walls and the partition top plates.
4. Weatherstrip the attic access hatch, or provide limited access to the attic through a rarely used panel at the gable wall.
5. Connect the ceiling air barrier with the wall air barrier with good perimeter details — probably involving spray foam.
Martin,
I was hoping you
Martin,
I was hoping you wouldn't say that. I've tried using the airtight drywall approach before and haven't had great success with the drywall subs around here. They usually have a crew of 8 guys that hang like mad. It was like pure torture to get them to caulk. I am planning on using a liquid air/WRB on the exterior walls because of this and so was hoping there might be a similar solution to the ceiling. It sounds like if we go with trusses and a vented attic I must use a combo of the exterior air barrier and airtight drywall for the ceiling, right?
Cracks at the partition top plates
Jake,
If your drywall crew is allergic to caulk and gaskets, you can always go up into your attic after the drywall crew has gone home, and foam the cracks between the partition top plates and the partition drywall from above. This is a standard measure performed by weatherization crews every day of the week. It's time-consuming, but it works.
I don't know whether you'll hit 0.6 ach50 with this method, though.
Thanks
Martin,
I appreciate your help. That is what I have ended up doing. It works, but like you said, it is difficult to get it super tight. It is good to know, at least, that I'm not missing something better.
Vapour retarder and air barrier confusion
This discussion highlights the confusion around the air barrier and vapour barrier issue - a cloud in which I am deeply embedded. What I don't get is that OSB has very low permeability to water vapour - so it should be suitable to use as a vapour barrier/retarder on the inside surface of the wall, in climates like New York, or Toronto, which is where I am. But in this area, I see it being used all the time on the outside of the wall, with a poly vapour barrier/retarder on the inside surface. - This means the whole wall cavity is getting surrounded by nearly impermeable materials - how can the wall dry? If on the other hand, the exterior surface is used as the air barrier (which will also retard water vapour unless the air barrier is both impermeable to air but permeable to water vapour, like Tyvek is) with no additional vapour barrier on or near the inside surface, then surely water vapours moving from inside to outside will reach their dew point and condense somewhere inside the wall. Is everything upside down in this conversation?
Double wall and air tightness
I thought the purpose of the air barrier was to prevent the movement of air into the wall cavity, from the Exterior. With air not moving into the cavity, insulation works better.....and water vapours are kept out. It seems natural that this function be handled separately from the vapour barrier and airtightness function, to be achieved by some other membrane in the wall.
If a super-insulated house was to use a double wall construction, doesn't it make sense to use the vapour barrier as the membrane at which air-tightness is also achieved - by placing the membrane on the outboard side of the interior wall. Then all the services can run inside the wall cavities without any chance of penetrating the vapour and airtightness membrane. How to construct this efficiently is another issue, of course, but seems within the range of possibilities.
Response to Lyndon's two posts
Lyndon,
1. OSB has a permeance that varies from 0.7 perm to 2 perms. As the moisture content of OSB increases, so does its permeance.
2. You are correct that OSB is a fairly effective vapor retarder. A few Passivhaus builders (including Katrin Klingenberg) have used OSB on the interior of wall assemblies for this reason.
3. If builders in Toronto are using polyethylene vapor barriers on the interior of their OSB-sheathed walls, they are making a mistake. These walls would perform better without the poly, so they could dry to the interior during the summer. Interior poly is especially risky when used on air-conditioned houses.
4. You wrote, "If ... the exterior surface is used as the air barrier (which will also retard water vapour unless the air barrier is both impermeable to air but permeable to water vapour, like Tyvek is) with no additional vapour barrier on or near the inside surface, then surely water vapours moving from inside to outside will reach their dew point and condense somewhere inside the wall." Actually, no. Vapor diffusion from the interior of a building towards the exterior is a minor phenomenon. The most important mechanism whereby interior moisture enters wall cavities in the winter is via exfiltration (interior moisture piggybacking on escaping air), not diffusion. Read more here:
Vapor Retarders and Vapor Barriers
Forget Vapor Diffusion -- Stop the Air Leaks!
The problem of vapor diffusing outward during the winter is easily addressed with a few coats of latex paint or the kraft facing on fiberglass batts; polyethylene is unnecessary.
5. You wrote, "If a super-insulated house was to use a double wall construction, doesn't it make sense to use the vapor barrier as the membrane at which air-tightness is also achieved - by placing the membrane on the outboard side of the interior wall." Well, maybe. Especially in very hot climates, builders sometimes install exterior vapor barriers. In most homes in cold climates and mixed climates, however, vapor barriers are riskier than vapor retarders, and an exterior vapor barrier could get you into trouble. The exception is a vapor retarder that is also an insulation material with a fairly decent R-value -- in other words, rigid foam. This type of exterior vapor retarder (or even an exterior vapor barrier like foil-faced polyisocyanurate) can work well, as long as it is thick enough to warm the wall cavity above the dew point and prevent condensation problems.
What about nail holes?
I really like the taped sheathing approach as an air barrier. But what happens when the owner re-roofs or re-sides his home? He now has thousands of nail holes to deal with. I suppose a PERSIST type barrier or a spray on barrier could remedy the problem but not without a significant increase in cost....
Response to Garth
Garth,
An interesting point. I have forwarded your comment to Marc Rosenbaum.
Marc Rosenbaum's response
Garth,
I e-mailed Marc to ask him what happens once the roof has been stripped and all the roofing nails have been pulled. He answered, "You need to spray on a WRB or use peel-and-stick at that point."
I think, Garth, that you've pointed out an important drawback to this technique. Thanks.
Thanks
Martin
Thanks for checking this out. I can see the problem down the road being that the home owner or roofer will not know that the extra steps are necessary...might have to leave instructions under the shingles...
Separate the Cladding Structure
Garth,
Notice that your concern about replacing the roof cladding and the siding would not be a concern.
If the Enclosure were constructed as shown in Image 2.
Aluminum clad rigid polyiso foam and Aluminum tape
I can understand the trepidation of some folks about the longevity of tape & foam.
However, if aluminum "SMACNA" duct tape is used, I wouldn't be worried. And it's not significantly more costly.
Zip System and Housewraps
Quotes from the presentation:
John Straube wrote:
If I am understanding both Marc Rosenbaum (in his presentation) and John Straube (in his comment), it is better to use housewrap in addition to Zip panels rather than just relying on the Zip panels alone. Do I have that correct?
And if one were going to use housewrap with Zip panels, is there any particular housewrap that works particularly well with Zip panels? Or a housewrap that works particularly well under foam?
I was thinking of using Tyvek Drainwrap, thinking that there might be some additional benefit of using the draining housewrap under the foam in the even that any moisture makes its way behind the foam. Is that a good choice or is there a better one?
Also, I was planning on taping and sealing both the Zip (or plain OSB) sheathing AND taping the foam joints -- which will be two courses of 2" foam with staggered seams. Is that overkill? Or will it likely improve air tightness?
Response to Robert Dickinson
Robert Dickinson,
Q. "If I am understanding both Marc Rosenbaum (in his presentation) and John Straube (in his comment), it is better to use housewrap in addition to Zip panels rather than just relying on the Zip panels alone. Do I have that correct?"
A. Yes. Housewrap or asphalt felt over the ZIP sheathing allows you to integrate the WRB with your window and door flashings. Then you are depending on gravity and physics, not chemistry, to keep water out of your walls.
Q. "Is there any particular housewrap that works particularly well with ZIP panels? Or a housewrap that works particularly well under foam?"
A. All the usual options are available; your choice.
Q. "I was thinking of using Tyvek Drainwrap, thinking that there might be some additional benefit of using the draining housewrap under the foam in the even that any moisture makes its way behind the foam. Is that a good choice or is there a better one?"
A. As you say, there might be some additional benefit to using DrainWrap. It's up to you.
Q. "I was planning on taping and sealing both the Zip (or plain OSB) sheathing AND taping the foam joints -- which will be two courses of 2" foam with staggered seams. Is that overkill?"
A. That doesn't sound like overkill to me.
XPS on both outside and inside stud bays.
I live on Long Island and currently working on a home retrofit project. I am planning to put about 2 inches of recycled/salvaged XPS on the outside of the sheathing and the same on the inside between the bays. The XPS sheets will be cut a little smaller than the width of the bays and I will seal in the gap with spray foam to make it airtight. Will there be any problems with condensation or anything else?
Response to Beverly Johnson
Beverly,
I don't recommend your approach. If you want to install 4 inches of XPS, it would be best to put all of the rigid foam on the exterior side of the sheathing. If you do as I suggest, you should install the foam in two layers with staggered seams.
Once you install rigid foam on the exterior side of your plywood or OSB sheathing, you're going to want your wall assembly to be able to dry to the interior in case the sheathing ever gets wet. For more information on this issue, see Calculating the Minimum Thickness of Rigid Foam Sheathing.
If you prefer to have only 2 inches of rigid foam on the exterior side of your sheathing, it would be better to install vapor-permeable insulation between your studs. Options include dense-packed cellulose, mineral wool batts, or fiberglass batts.
Seal both sides
I suggest that air sealing only one side of the wall means that you could get air flowing through the insulation and then back out the same side. Ie, it doesn't pass through the wall, but it does move heat and moisture in bad ways.
PERSIST Ceiling sealing
This article is pretty old, but I will post here for now. (Or should I just go to the Questions section?)
I'll start here.....
I really like the idea of a continuous barrier on the ceiling of a PERSIST house (Don't need or want the extra space of a REMOTE house's attic). Considering all the effort put into the walls, it seems rather ridiculous to have a patchwork of drywall, OSB, or Poly on the ceiling.
I was thinking that after the walls are plumbed, straightened, braced, sheathed and membraned, that I could install the the truss hangers (H-10's) and run strings across the span. With these guidelines, I could install plywood/OSB above all the walls, ensuring that the edges line up with the center of the future trusses. I would hang 2' wide strips for the most part (assuming 2' OC trusses).
Once the partial ceiling sheathing is in place, the trusses could be installed and the remaining ceiling could be filled in and taped.
This sounds time consuming, but it is something that I could do myself.
Comments?
Response to Steve Young
Steve,
I'm not sure that I understand your question. It sounds like:
1. You want to build a house with a ceiling made from OSB or plywood.
2. For some reason, you want to install the OSB ceiling before you install the roof trusses.
Is this your plan? If so, I don't understand what advantages there are to this approach.
If I have misunderstood, please explain again.
A little more explanation, hopefully to clarify the proposal
Yes, you have the idea. There is a continuous barrier on the wall of a PERSIST house, but less attention is paid to the ceiling. I would like to have that as sealed as possible, but that cannot happen if the trusses are in place. You are stuck relying on a lot of joint sealing around the tops of all the walls.
I would like to have the trusses sit atop a layer of sheathing (Plywood or OSB). Only some of the sheathing can be installed and taped before the trusses. It would be attached to the cap plates of the walls (and later to the trusses). Once the the trusses are installed the remaining open areas would be installed and taped. This would be a sealed surface comparable to the membrane and sheathed walls.
Allow the plumber to put only one vent stack through the ceiling and you have the start of a very good envelope.
Apart from the planning and work involved, does this sound like a workable solution?
Response to Steve Young
Steve,
If your exterior walls are 2x6s, just install 8-inch-wide strips of OSB on top of the top plates, with the OSB strips aligned with the top plates on the exterior and overhanging the walls on the interior. Then you can tape to these strips when you install your ceiling.
Dead link
The link to the "Airtight Drywall Approach" is dead.
Response to Michael Bluejay
Michael,
I have fixed the broken link. Thanks for letting me know.
How much EPS foam?
My question is about thermal bridging with applied overhangs:
I am designing a passive house in zone 4A (Vancouver BC) and I am planning for a wood truss sloped roof (3:12) sitting on top of ICF walls.
The roof assembly above the trusses will be insulated and unvented below.
Here are the layers on top of the trusses:
1=0.5" plywood
2=6 mil poly
3=10" EPS Neopor foam mechanically fastened to the trusses
4=1" plywood strips perpendicular to the ridge and fastened to the trusses with 13" roof screws
5=1" plywood battens parallel to the ridge fastened to the strips
6=metal roofing fastened to the battens
The applied eave will be pretty much like in the photo #1 of this article (https://www.greenbuildingadvisor.com/blogs/dept/musings/airtight-wall-and-roof-sheathing) except that the applied overhang rafters will be surrounded and covered with the EPS foam.
In my case that will create a thermal bridge if I apply them straight above the poly so I am thinking to insert a 0.5" layer of foam to act as a thermal break between the poly and the applied rafters.
Does that sound right to you?
Would you insert more than 0.5" foam for the purpose of the thermal break?
Do you see a risk of rotting of the applied overhang structure since it will be entirely sandwiched between foam layers?
Stefan
Response to Stefan / Steven P
Stefan,
Ideally, you would use 2x4s above the rigid foam to create your roof overhangs. It sounds like you want to create your overhangs by using some type of framing members -- perhaps 2x4s? 2x6s? 2x8s? -- lower down in the assembly, so that the framing members are surrounded by EPS and create thermal bridges.
Unless you intended roof overhangs are extremely wide, you may be proposing unnecessarily thick lumber for your overhangs. In most cases, 2x4s on the flat will work, and these 2x4s can be installed above your rigid foam. Consult an engineer if you have unusually wide overhangs.
Log in or become a member to post a comment.
Sign up Log in