
More Green Building Blog


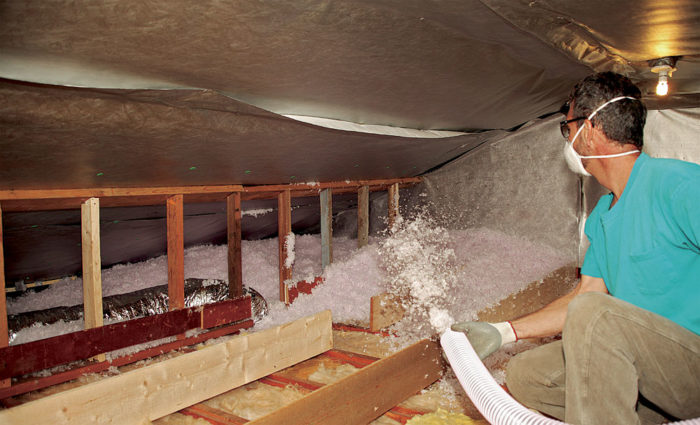
Do you want to keep your heating costs from going through the roof? It’s easy: Keep your heat from going through the roof. Saving money on heating-fuel costs is a lot simpler than negotiating with OPEC or your local utility. On a recent upgrade in the attic of a 1950s-era house (one of two projects shown here), I air-sealed and spread a 12-in.- deep layer of cellulose throughout 1500 sq. ft. of space in about a day. Coupled with other energy-saving improvements made to the home, the result was that the owner saw his heating and cooling costs reduced by half compared to the previous year, even in the face of higher electricity and heating-fuel costs.
I typically focus my efforts to improve the energy efficiency of an attic on two main areas: sealing air leaks in the ceiling and increasing the amount of insulation.
The payback period for tightening a leaky ceiling can be as short as a month. Adding insulation might take a few heating or cooling seasons to pay off, but the wait is relatively brief. I estimate the payback for air-sealing and upgrading attic insulation to be realized in three years.
On these projects, I also chose to install a radiant-reflective membrane. Besides reducing radiant-heat gain from the roof, the membrane makes the attic more attractive and dust-free for storage use, and it keeps the blown-in insulation from blocking the rafter bays. While they can reduce peak attic temperatures by 10°F to 30°F, the barriers haven’t proved to be cost effective in all geographic
regions, or in attics that are adequately insulated, that are air-sealed, and that have well-insulated, wrapped air-handling equipment and ductwork. you are probably better off spending the money on more insulation and air-sealing than on a…
Weekly Newsletter
Get building science and energy efficiency advice, plus special offers, in your inbox.

This article is only available to GBA Prime Members
Sign up for a free trial and get instant access to this article as well as GBA’s complete library of premium articles and construction details.
Start Free TrialAlready a member? Log in


10 Comments
Costs of labor
Great article. One might recall that Mike had an article in Fine Homebuilding which is worth reviewing.
17 hours of labor seems like a good estimate. What is the estimated labor costs? At $50 per hour the labor is $800 compared to the material cost of $500. Is this about right? high? low? 1500 square foot size implies a cost of about $1.00 per foot. This seems a bit low.
Also in air sealing is the older insulation removed? Is there a cost estimate for that?
Response to Pat Murphy
Pat,
The only way to determine your costs is to solicit bids from contractors. While a labor rate of $50 per hour may be normal in your area, the labor rates in this part of Vermont are lower than that. That doesn't make $50 per hour unreasonable; labor rates vary from one region to another.
It's impossible to guess how many hours it will take to air seal an attic without looking at the job. Every job is different.
Dear Mike and the GBA team: This is an excellent article on attic insulation with lots of good tips. There are two significant fire safety issues, however, that need to be corrected:
(1) Spray foam near heat sources: Canned spray foam, e.g. Great Stuff and 3M, are very flammable and will ignite at just 240 degrees F -- significantly below the ignition temp of wood. This is true for versions with "Fire Block" on the label. They should NEVER be installed near any source of heat, e.g. a recessed light can as shown in the article -- or the gap around a hot exhaust vent or interior chimney.
(2) Similarly, foam board is flammable and should never be installed near any source of heat, e.g. to create an air-seal box around a recessed light can. In the example in this article, the pieces of XPS foam board were also sealed with spray foam, which is very flammable. A better solution: make an air seal box out of pieces of drywall; tape the corners with HVAC foil tape, then seal the base with fire resistant sealant, e.g. 3M.
I hope this is helpful.
Mark Hays
Mark,
You're right -- but only if you are talking about older recessed can lights that lack a thermal switch. Using rigid foam to create an airtight cap is safe for newer recessed can fixtures that are IC-rated. The bottom line: determine whether your can lights have a thermal switch before you proceed-- or look for the IC rating.
Here's how I addressed the issue in my 2013 article on the topic for Fine Homebuilding:
"For years, weatherization contractors have been retrofitting airtight caps on leaky recessed cans, including older fixtures that lack a thermal switch. However, some experts call this practice risky, because fixtures without a thermal safety switch might overheat. The safest approach is to remove these older fixtures and to replace them with new IC-rated fixtures or surface-mounted fixtures.
"Working from the attic side, it’s safe to install an airtight cap above a leaky IC-rated fixture. You can build your own box or cap from foil-faced rigid foam or gypsum drywall. A homemade box should be large enough to leave 3 in. of clearance on the sides and top of the fixture. Seal all seams and wiring penetrations with tape or canned spray foam.
"Once you’ve built the cap, make a notch for the electrical cable, then seal the cap to the drywall with canned spray foam. The installed cap should be covered by a generous layer of insulation. Finally, from the interior side, remove the fixture trim, and carefully caulk the seam between the drywall ceiling and the fixture.
"At least three manufacturers sell caps for recessed cans. Tenmat makes the sturdiest covers; they are made of fire-resistant mineral wool. Tenmat covers are available from Energy Federation Inc. (efi.org) for $19.65 each."
Dear Martin: When GBA publishes recommendations, there is no way to determine how experienced the reader is. How would the average homeowner (or member of a remodeling contractor's team) reliably determine if a recessed can light has a thermal limit switch, per UL 1598? The person may also be crawling around in an attic with poor lighting, and previous homeowners may have installed a number of different recessed light cans -- so every can must be inspected.
With this in mind, GBA would be wise to err on the side of caution and recommend a consistently safe solution, e.g. Tenmat or drywall covers, sealed with fire resistant caulk. Home Depot and Amazon now sell Tenmat covers.
Spray foam, e.g. Great Stuff and 3M, should never by used near a recessed can light or other source of heat. With an ignition temperature of just 240 degrees F, these spray foams are much more flammable than even the paper facing on fiberglass batts -- which has an ignition temperature of 491 degrees F. DOW, the manufacturer of Great Stuff, published a Consumer Safety Information guide that warns, "Do not apply GREAT STUFF™ foam around heaters, high heat lamps or recessed lighting fixtures, radiators, furnaces or fireplaces where it could contact heat conducting surfaces." This should be a simple decision in the interest of safety. A good alternative is also available; fire resistant caulk, e.g. 3M IC 15WB, is easy to apply and non-flammable.
Mark Hays
Mark,
Q. "How would the average homeowner (or member of a remodeling contractor's team) reliably determine if a recessed can light has a thermal limit switch, per UL 1598?"
A. The answer can be found in my 2013 article, where I wrote, "The first step is to determine the type of fixture you have. You can usually tell from indoors if a recessed can is IC-rated. First, remove the trim and then remove the bulb. Look inside the fixture with a flashlight. If there are holes or slits in the side of the can, it is probably not IC-rated. Look for a label; most IC-rated fixtures include the letters “IC” in the model number.
"If you know that the fixture is IC-rated but you’re not sure if it is airtight, look for the letters “IC-AT” near the model number. If you can’t find a label, climb into the attic (if you have access), and look at the fixture from the attic side. An airtight fixture has a metal shroud over the entire fixture, without any holes or slits, and has a gasketed assembly where the electrical cable enters.
"An older fixture without a thermal switch should be removed and discarded. Once the fixture has been removed, the most energy-smart option is to patch the drywall and install a surface-mounted fixture (for example, a pendant light or track lighting)."
You have a valid point about this article written by Mike Guertin. I am no longer employed by Taunton Press -- but perhaps Mike Guertin or Brian Pontolilo will see your comment and respond.
Hi Mark.
Thanks for the feedback. I'd be curious to know what you think of the information in this article: Air-Sealing Can Lights Safely
Dear Brian: Thanks for the link to this excellent article -- another credit to the good work the FHB team has been doing for years. Larry Armada's tests substantiate the issues I was trying to describe related to the GBA article. It would be good if GBA added a link to Larry's article to this one -- along with other changes.
Three suggestions if Larry or FHB decide to publish an update: (1) Show how easy it is to build an enclosure with a piece of drywall and some foil HVAC tape. Large Tenmat covers are needed for older lights, and are special order -- so drywall is often the best option. (2) Show how to air-seal the bottom edge with fire-resistant sealant. A few pieces of HVAC tape are good to hold the enclosure in place, but sealant works better, particularly around the hole(s) needed for the electric cable and the supporting rods used to fasten many can lights to joists. The Depot and Lowes both carry 3M Fire Barrier caulk, so it is easy to find. (3) Specifically warn people NOT to use canned spray foam, e.g. Great Stuff and 3M, even if "Fire Block" is on the label. Even building inspectors are surprised when they hear that orange "Fire Block" foam will ignite at just 240 degrees F.
It appears that you are a GBA editor, so it would definitely be a good idea to contact Mike Guertin and update his article, in the interest of public safety.
Thanks,
Mark Hays
Thanks again for the thoughts Mark. Out of curiosity, what is your background and relationship to all of this?
Dear Brian: I was a software exec by day and remodeling became a hobby. With my tech background I focused on energy efficiency and building science. Looking closely at the details I found issues like the extreme flammability of one-component canned spray foam. — a great solution e.g. to air seal a new window but more dangerous than most people realize near a source of heat. This foam is also banned as a penetration fire block in commercial construction - because it will catch fire before the framing does. Residential building inspectors will fail an inspection too, if they are informed. So we use fire resistant sealant, e.g. 3M, to fire seal penetrations, with packed rock wool backing in larger gaps.
I have no connection to any building product manufacturer, other than as a customer.
Mark Hays
Log in or become a member to post a comment.
Sign up Log in