

More Green Building Blog


“With the right materials on hand, flashing a newly installed window should go smoothly. But what about an existing window that needs re-flashing when, say, the house is being resided. What’s the best approach?”
For both new and existing windows, the goals are the same: layer materials in the assembly so they direct water out and away from the house, and provide a path for any water that does get in to escape.
New windows can be installed in one of several ways. In this video, veteran builder Rick Arnold explains two approaches for integrating the water-resistant barrier (WRB) with the window flashing to prevent leaks. In one approach, the WRB is brought just inside the rough opening where it is taped to the framing. Alternately, the WRB can be cut back from the edge of the rough opening so the window flange is fastened and sealed directly to the sheathing. The WRB is joined to the window flange with flashing tape. Either way works.
When you’re flashing a window that’s already in place, the same fundamentals apply.
Start with the sides of the window by applying flashing tape over the nail flanges. The tape should extend several inches above the top of the window frame, and several inches below the bottom of the window frame. Arnold recommends the tape lap up the side of the window frame slightly—about 1/4 inch or so—to protect the vulnerable seam between the window frame and the nailing flange. Pressure-sensitive tape should be rolled out with a J-roller.
Next is the top of the window. Make an angled cut at each upper corner of the window and fold the WRB up and out of the way. Apply a strip of flashing tape over the nailing flange to seal the flange to the sheathing. This tape should cover the top of the tape at the sides of the window, and it should lap onto the top of the window frame slightly. This is followed by cap flashing that covers the head casing (Arnold beds the cap flashing in a bead of sealant). Then add another strip of flashing tape to seal the top of the cap flashing.
The last step is to fold the WRB down so it covers these layers. Tape the slits at the corners closed.
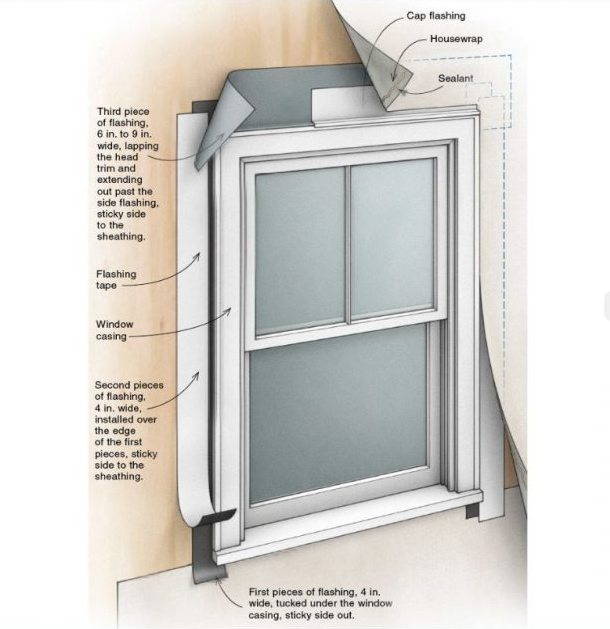
The key is applying the different layers so water that gets behind the siding is directed outward by gravity. Creating this weather lap is crucial. If the WRB is tucked behind the head flashing, water can find its way behind all of the layers you’ve applied. So, think like a drop of water and make sure the layers are in the right order.
The bottom of the window is another story. This is not sealed with flashing tape, and the reason is that any water that gets past all of the defenses you’ve just established should have a way out. Trapped water leads to rot.
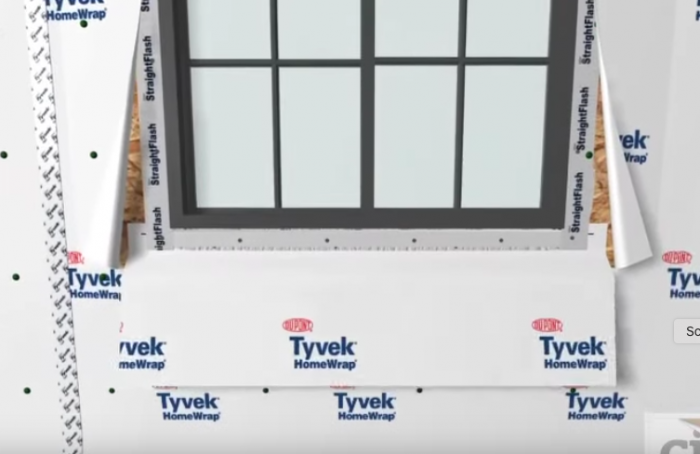
In new construction, a piece of beveled siding would be applied to the bottom of the rough opening (fat edge inward) to make a sloped surface that sheds water. A strip of WRB under the bottom nailing flange, applied before the window is installed, can be pulled out and allowed to drape over the WRB on the house, as shown in this instructional video from DuPont and in the illustration below.
When you’re dealing with a window that’s already installed, you don’t have the luxury of sloping the bottom of the rough opening. But the use of a waterproof membrane at the bottom of the window still is a good idea.
Malcolm Taylor, a builder on Vancouver Island, is used to dealing with rainy conditions and has repaired plenty of rot. He had some advice for dealing with this tricky area.
“My feeling is that a sloped sill isn’t half as important as the presence of a waterproof membrane,” he said in an email. “It’s often possible to slip that into place by removing all the fasteners from the flanges except at the head and slightly tilting the window out. The membrane can be folded against the interior trim to form a small end dam and the window re-secured.”
If a strip of WRB can be worked under the nailing fin at the bottom of the window it can be lapped (but not taped) over the WRB on the house. This is essentially the same approach as in new construction.
Most if not all windows now come with nailing fins, but in older homes windows may not have them. It’s been decades since wood windows were used where Taylor lives, and when he does come across them they are typically in such poor condition that they must be replaced. But it’s certainly possible to come across a wood window in pretty good condition, where tearing it out doesn’t make sense.
If you’re re-siding a garage or outbuilding with old wood window frames, and no nailing fins, just follow the same basic procedures as you would with a modern window. On the sides of the window, flashing tape can be lapped up by 1/4 inch on the casing to keep water out. The same techniques used at the top of a new window would apply here: Run a strip of flashing tape across the top of the window, install head flashing that extends down over the front edge of the casing, and make sure the housewrap laps down over the top of the head flashing.
Working on older houses inevitably involves making compromises. But the principles that guide the installation of new materials are the same ones that will protect old ones.
-Scott Gibson is a contributing writer at Fine Homebuilding magazine and Green Building Advisor.
Weekly Newsletter
Get building science and energy efficiency advice, plus special offers, in your inbox.


3 Comments
Very helpful, thanks!
I would love to see an expansion on this topic.
In Chicago where we have more than our share of bad weather, 95% ar existing. Many of the homes are decades old with a variety of wall assemblies. Triple wyeth walls, Stucco with box car siding. and frame houses with wood clapboards and empty wall cavities. Old isn't 10 years, old is 100 years.
Thanks for the great article.
I found that it works a lot better leaving it stick out a little bit from window so water drips off rather running down the wood of window trim the paint holds up way better on the window.
GreenBuildingAdvisor: https://www.greenbuildingadvisor.com/article/replacing-windows-on-a-1980s-farmhouse https://slope3.io
Log in or create an account to post a comment.
Sign up Log in