

Image Credit: All images: Chris Stratton and Wen Lee
Image Credit: All images: Chris Stratton and Wen Lee The plan was to start with the common areas of the house, outlined in blue, then turn to the bedrooms when that was complete. The kitchen was moved to the back yard during the process. Before the renovation, the living room showed all the expected signs of wear and tear from decades of use. What a mess! Pulling down drywall from the ceiling was only half the job. It all had to be shoveled up and moved to a dumpster out in front. The fireplace in the corner of the living room had been carefully built but was rarely used. The energy penalty of keeping it far outweighed its advantages. Removal of the fireplace and chimney forced repairs to the wall and roof. The job was lengthy and complicated but ultimately seemed like the right choice. A new section of stem wall links the existing foundation on each side. The two bolts placed in the new section of concrete will tie the new wall section to the foundation. A newly framed section of floor includes a mud sill, rim joist, and joists. Metal lathe will provide a base for the stucco that follows. With the addition of some paint, this area of new wall should match the house fairly well.
More Guest Blogs


Editor’s Note: This post is one of a series by Chris Stratton and Wen Lee, a husband-and-wife team living in the Los Angeles area who are turning their suburban house into an all-electric, zero-net energy home. They chronicle their attempts at a low-carbon, low-cost, and joyful lifestyle on their blog Frugal Happy. This post was written by Chris.
With permit in hand, it was now time to prepare for demolition. The plan is to live in the bedrooms while we do construction on the living room, dining room, and kitchen — rooms we collectively refer to as the common area, highlighted in the floor plan (see Image #2 below).
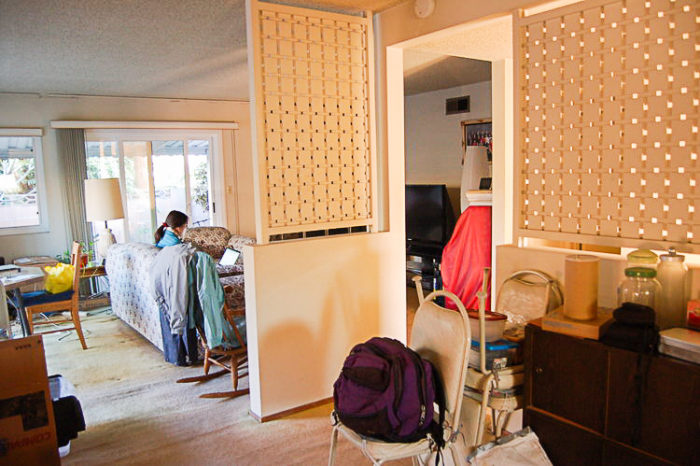
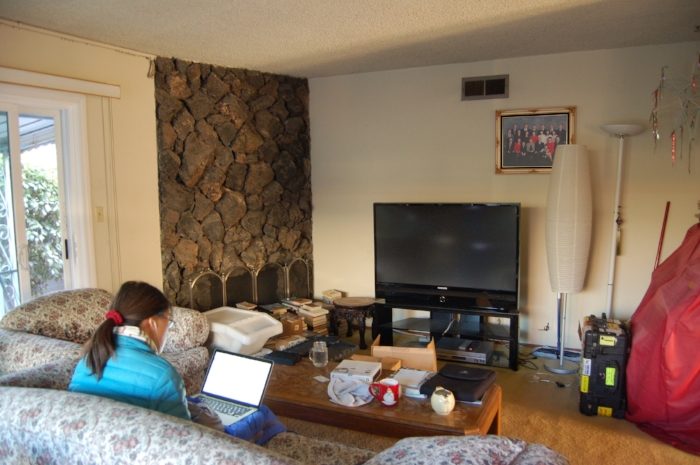
After the common area is done, or at least livable, we will switch and live there while the bedrooms are under construction. Because we were about to lose our living room and kitchen during construction, we set up a living and dining space in the master bedroom and turned the covered back patio into a makeshift outdoor kitchen. (The living room prior to demolition is shown in Image #3 below.)
We began clearing out the space. A lot of stuff we donated. Some stuff we kept and moved into other rooms. Some items were harder to move than others.
Eventually all the rooms in the common area were empty. In the living room, the carpeting is extremely worn in some areas, and looks brand new in others. I’m leaving it in place to protect the hardwood floor underneath during construction. When everything else is done, I’ll remove the carpet and refinish the hardwood floor.
I’m being somewhat glib about the prospect of beginning the demolition on the house, but it really was a scary thing to undertake. There’s so much uncertainty, so much self-doubt and second-guessing. How much is this project going to cost? Is it okay that I don’t really know what I’m doing? What if I mess it all up? So many questions, and so few easy or certain answers.
The house was kind of shabby in places and had some deferred maintenance, but it was perfectly functional. And I was about to start tearing it apart and turn it into an unlivable construction zone! And this is my wife’s childhood home, no less.
Before I began demolishing the ceiling drywall, I collected samples of it from different parts of the house and sent them off to a lab so that the “popcorn” finish could be tested for asbestos. It came back negative. And with the first hole poked in the ceiling, it begins…
</>
Demolition of the common area
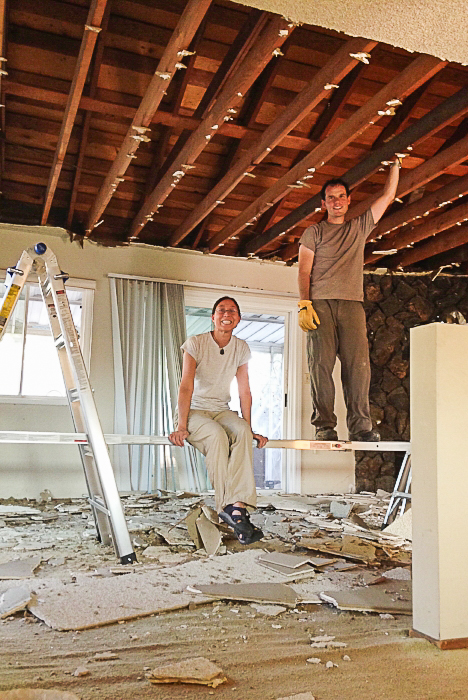
The idea was to take off the drywall in big sheets by trying to find the seams and pulling the nails out rather than just smashing it all apart. But as we were very much amateurs, we often ended up just smashing it apart. Wen and her brother Bin helped take out the ceiling.
We got the living room ceiling out after several hours of work. For me this was the first of many, many long, hot, sweaty days. Next came the decidedly less fun and exciting process of shoveling up hundreds of pounds of drywall first into a wheelbarrow, and then into a huge dumpster (see Image #4 below).
The dumpster gradually got more full. But it was still only about 75% full when they picked it up — not the most efficient use of an expensive resource.
A lot of the equipment I bought can be used throughout the project, so it can be considered an investment. The dumpsters, however, I did not use efficiently enough. I underestimated just how how laborious the demolition would be, and struggled to fill the 30 cubic-yard dumpster by myself within the seven-day rental period. I overworked myself that first week, so much so that the next week I needed a few days to recover and couldn’t work. I learned later that I could have just extended the dumpster another week at no charge. I guess the lesson is to know what your options are and to be realistic and conservative about what you can get done within a certain time period, especially when you haven’t done it before and uncertainty is high.
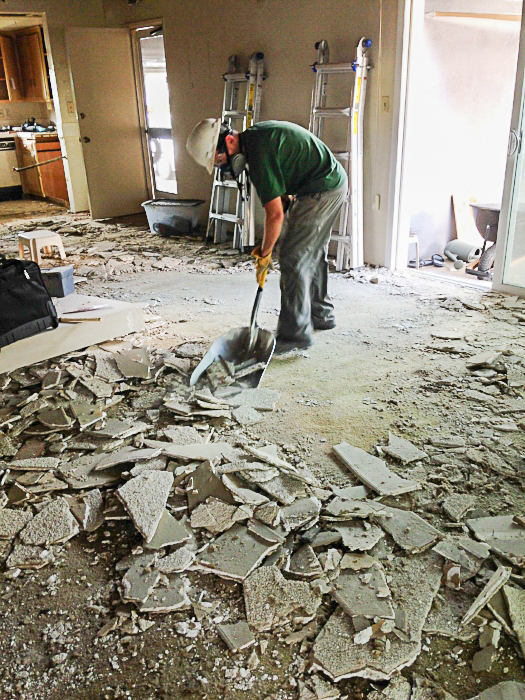
For some reason, there were no volunteer helpers for the cleanup part or any of the subsequent days of demolition. In any case, I pressed onward. After cleaning up the living room somewhat, I moved on to the kitchen. Also to be removed was the forced-air heating and cooling system of the house. We will be without central heating and cooling until I install the new heat pump system. We either donated or recycled the appliances.
I wanted to open up the common area and remove walls that made small spaces feel dark and even smaller. One of those areas to be opened up is the front door entry (as opposed to the entry door from the garage). With the HVAC being moved, there would be more space to make a mud room area for removing and storing outdoor clothing like jackets and shoes, and for more easily transitioning between inside and outside.
A bigger job than expected
The demolition required a significant amount of time and money. I spent about 115 hours and approximately $2,500 on the demolition. Of the total, $1,300 was for dumpster rental (it turns out that dumpsters are expensive), and the remainder was mostly spent on tools, safety gear, and equipment, including wrecking bars, gloves, hard hats, goggles, respirators, ladders and scaffolding, a wheelbarrow and brooms and dustpans and shovels, and blades for the reciprocating saw, angle grinder, and oscillating multitool. It sounds like (and is) a lot money for a DIY demolition of a space that’s only about 700 square feet.
With the ceiling gone and a good portion of the drywall on the walls gone and the kitchen appliances and about half the counter removed, and the forced-air heating and cooling system and ducts removed, I deemed the demolition sufficiently complete to begin construction on changing the roof structure of the common area. In retrospect, knowing what I know now through my own experience and based on conversations with actual contractors, even though the initial demolition felt like an enormous undertaking and a hell of a lot of work, it was far from complete.
In retrospect it was premature to declare the house ready to begin construction. There were too many electrical wires hanging down from the attic, too many walls that had nails and staples and little annoying bits — or even entire sheets — of drywall and plaster on them. And the chimney and fireplace should have been gone.
Everything should have been removed from the kitchen, including all the counters and cabinets, and yes, even the kitchen sink. Everything should have been down to bare, clean studs and ceiling joists. The initial construction — which I’ll talk about in another post — would have gone faster without having to backtrack and do more demolition. I didn’t know that then, but now I do. And learning’s the main goal of this project, so it’s okay. It’s good, in fact.
Another thing I’ve learned is that there’s such a thing as taking the “insourcing” (that is, DIY) dictum too far. In this case, in fact I probably should have hired some outside help for the demolition. Considering what I ended up paying for dumpster fees because it took so long to do the work myself, getting outside help for demolition would likely have cost about the same or only slightly more, and would have been much faster. There’s only so much to be learned about the physical process of demolition. At some point it just becomes mindless tedium.
But mindless as it is, sometimes it’s still fun.
And now the chimney
Once upon a time our living room had a fireplace. It was a gas fireplace, but it looked like it had never been used. Wen moved into the house in 1992 and she said she can’t ever remember her family using the fireplace (see Images #5 and #6 below).
The rocks lend some interest to the living room because of the angled wall, their texture, and their color. Fireplaces can be nice to look at, but they tend to be huge energy wasters, even if they’re not being used.
The R-value of brick is estimated to be R-0.8 per 4 inches. So if the fireplace ranged in depth from 8 inches to 12 inches, then its R-value ranged from R-1.6 to R-2.4. It would be very difficult to air seal the perimeter of the fireplace, and for the flue itself it’s nearly impossible to get a good air seal with the damper. All in all, a fireplace represents a huge thermal liability in a building envelope because of unavoidable thermal bridging and infiltration. If heating with wood is a priority, then a free-standing wood stove is a much more effective and efficient option.
So that’s the technical energy efficiency and indoor air quality rationale for getting rid of the fireplace. But the hearth has a deep place in our psyche, I think, since fire and warmth have been so important to our survival. For most of our history, the fireplace was the essential anchor of our homes, the setting around which every domestic task was oriented. Without the hearth, where is the heart of the home? Can it be a coincidence that these two words differ by only one letter?
That said, our hearth was never much of a center to our home. It’s not even clear that it was ever used. Even so, the prospect of its demolition seemed a little sad. We would be destroying the physical product of a skilled mason, razing the labors of a dead man’s dying trade. It felt like we were being too good for open fire, like we thought we are better than our forebears. Actually it’s true: we kind of are too good for open fire, with its inefficient heat, its air pollution. And if we’re not better than our forebears per se, then we are least more knowledgeable than them about the importance of a high-performance home.
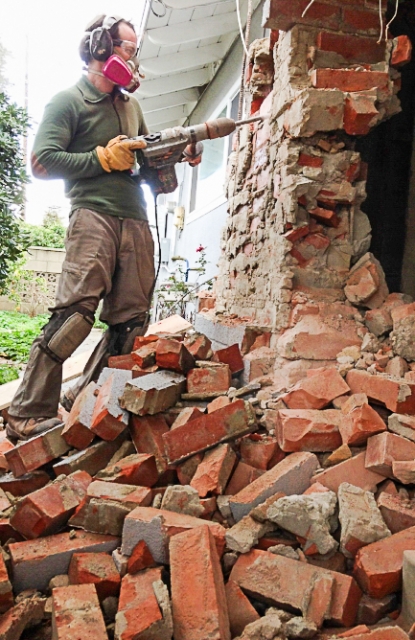
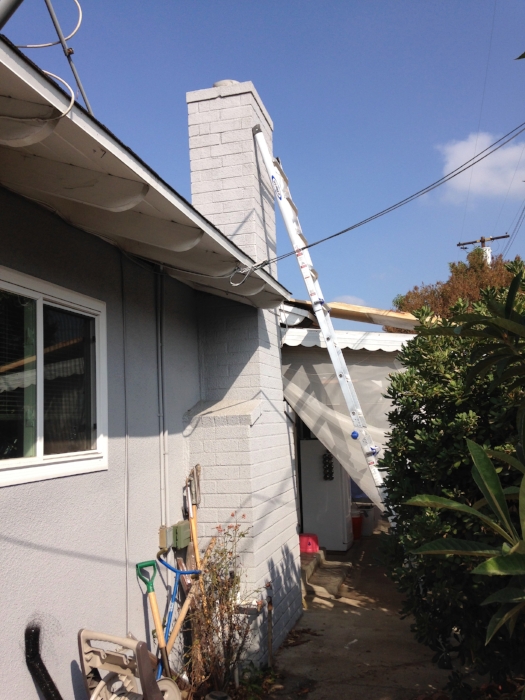
And so, with mixed feelings and though the path forward seemed difficult and uncertain, we embarked on the demolition of the chimney. Naively, I began with an actual chisel and a hammer. I didn’t know what to expect or how it would be constructed inside, so I started slow.
We also began demolishing the stones on the wall surrounding the fireplace. They look like volcanic rock of some kind, and were set in what appeared to be mortar that was on the surface of the interior brick. Our neighbor let us borrow a tool called a rotary hammer that can act like a mini jackhammer to chisel out the rocks and bricks. This tool made the demolition go much faster (see the photo at left).
One of the contractors who was helping me (or vice versa) put up the structure for the vaulted ceiling (more on that soon) let me borrow his rotary hammer, and after a few days most of the bricks of the exterior were down.
The same contractor also generously let me borrow his 35-pound demolition hammer for the bigger chunks inside. Using the demolition hammer higher up was not possible, because doing so would have been unwieldy and unsafe. But now that we were at ground level, I could go at it. The demolition hammer was a heavy monster and tiring to use. But it was effective. Soon there were increasingly large patches of daylight coming into our living room wall where the fireplace used to be.
All the bricks that I determined I could not reuse I schlepped, wheelbarrow load by wheelbarrow load, into the 30-cubic-yard dumpster. Based on the weight of each brick and an approximation of how many bricks I removed, I estimate the total mass of the bricks I removed to be something like 14,000 pounds. This unbelievable number seemed to be substantiated by a bill I later received from the dumpster company charging me for exceeding their 6-ton limit.
Building a new floor
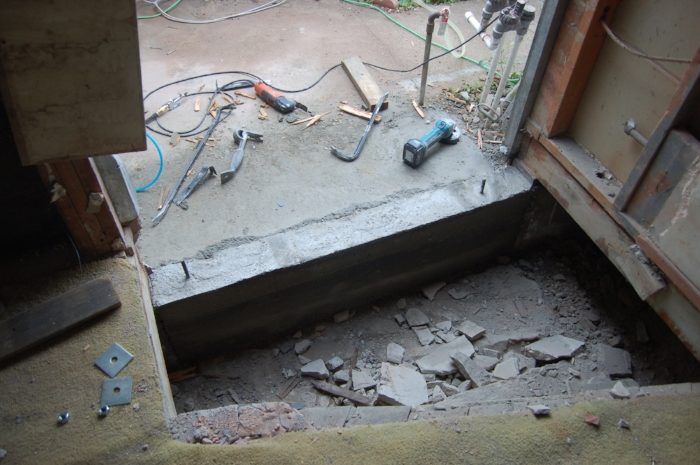
Eventually we got everything out. The good news was that there was poured concrete below the fireplace. This meant that we would not have to excavate and pour a footing for the new concrete stem wall foundation.
Now that I had finished the demolition grunt work, I hired two skilled contractors to help me form and pour the foundation wall. You only get one chance pouring concrete and I didn’t want to screw it up. We cleaned out the pit with water and compressed air so that the new concrete could bind well to the old concrete and brick. We constructed wooden forms for the new foundation wall and installed rebar.
To tie the new foundation to the old, we drilled holes about 10 inches deep into the sides of the existing concrete walls flanking our new one. Then we cleaned the debris from the holes using compressed air and what appear to be giant pipe cleaners. This helps ensure a clean surface for the epoxy to set to. We then filled these holes with epoxy and inserted the new horizontal rebar that would go across the new section of foundation wall.
The two pieces of threaded rod sticking up out of the top of the wall (see Image #7) will be used to tie down the sill plate (a 2×6 placed on top of the foundation wall) to the foundation, using the nuts and giant square-shaped washers at the bottom left of this image. This anchors the house to the foundation. After the foundation was poured, the contractors’ work was done and I was in charge of framing the new wall and floor on my own.
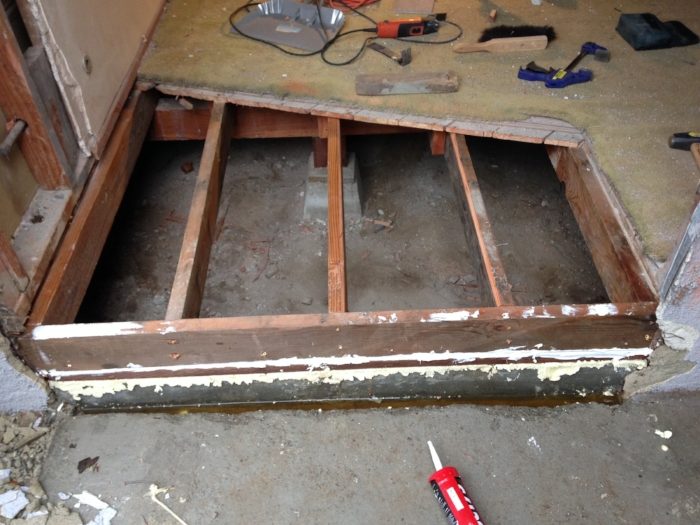
After the sill plate was in place, the next step was to frame the rest of the floor using the existing pattern and spacing (see Image #8 below). I thought this was going to be difficult, but it turned out to be fairly intuitive. (This is notable because in general in this project tasks have tended to be much harder and more time-consuming than I expect.)
The 2×6 band (or rim) joist goes on the outer edge of the wall and on top of the sill plate. The new 2×6 floor joists are sistered to the existing ones, overlapping enough to be supported by the 4×6 girder that’s spaced about 4 feet from the foundation wall, and which itself is supported by the concrete footing. Since the new floor joists were overlapping the old ones, I didn’t need to be precise about their length, as long as they were well connected to the existing joists, were supported by the girder, and terminated perpendicular to the band joist. I air-sealed the seam between the sill plate and foundation with spray foam, and the seam between the sill plate and band joist with caulk.
Next I put in 3/4-inch plywood on top of the floor joists to form the subfloor, then a sole (or bottom) plate — the 2×4 lying flat that forms the bottom of the wall.
Finishing up the exterior
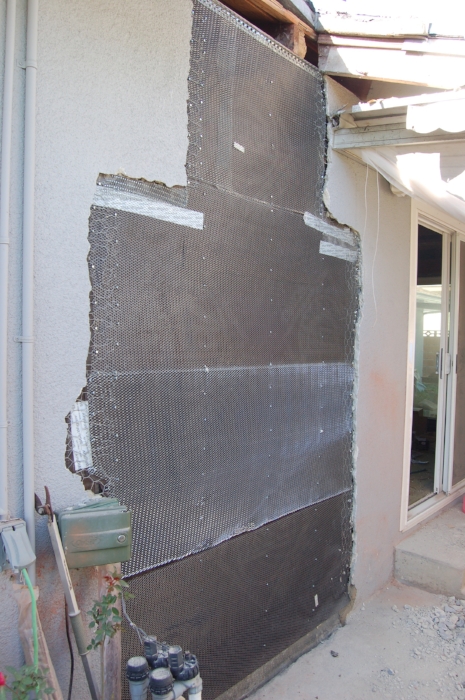
Next on the list of things to do that I have never done before is: stuccoing the wall. I first used a pneumatic air hammer to chisel away the ragged bits of stucco around the perimeter. This was to straighten the edge and expose the existing lath wire and building paper so it could be more easily tied into the new section. I then put down two plies of 60-pound building paper, lapping the upper layers over the lower ones, like shingles. This is to drain away any water that gets behind the stucco.
On top of the building paper I put horizontal strips of “pre-furred” metal lath (see Image #9 below). This would provide a substrate for the stucco to hang onto. I don’t think I did the lath quite right — there should have been more overlap, and the piece one up from the bottom is oriented upside down — but in the end it seemed to work well enough.
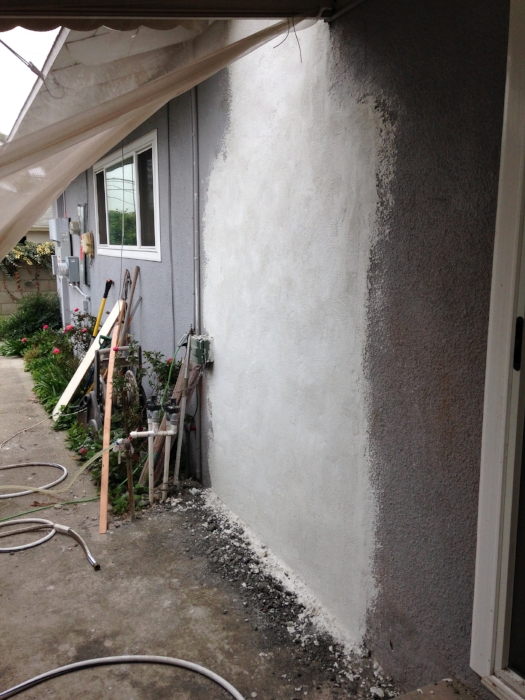
I prepped the edges of the existing stucco with glue that’s supposed to help it bind to new stuff. Then I mixed the stucco powder with water in a wheelbarrow until it reached something resembling the consistency depicted in videos I’d watched and which I’d read about. Then it was time to try my hand at slathering it on. It took four coats instead of the typical three, and lots of trial and error, but the end result is not too bad. Once it’s painted it shouldn’t be terribly noticeable, I hope (see Image #10 below).
I installed rafter tails and sheathing to roof the overhang where the chimney used to be. It’s pretty rough-looking so far, but it’s structurally secure and once it’s painted and cleaned up should be less offensive to the eye. After framing the wall, you might not have any inkling that there used to be a chimney there, except perhaps that the floor is different. Also the new studs stand out, but they will be covered up soon enough.
All in all, removing the chimney was a huge amount of work. It took me approximately 90 hours to demolish the chimney and haul the bricks to the dumpster. And the dumpster itself cost about $950, after the overage fee. There were many moments when I questioned my decision to undertake it.
Before beginning the renovation, I spoke with an experienced contractor about the prospect of removing the chimney and he said, “I removed a chimney once. Never again.” He advised me to leave it in place. In the end, I’m glad I did remove it, but I don’t know if I would have undertaken it had I known how much work it would entail. For anyone else contemplating a DIY chimney removal, I advise you to get the right tools, have patience, and work deliberately from top to bottom.
Weekly Newsletter
Get building science and energy efficiency advice, plus special offers, in your inbox.


6 Comments
Chris
I'm enjoying your blog - particularly the clear-eyed way you look back and re-assess the work you have done. Heaven forbid you ever end up have to do this again, but if you did I bet all this retrospection would stand you in good stead. Good stuff!
Well done indeed!
Chris and Wen...this is awesome and I'm excited to read your blog. We just completed a very similar project of our own and totally understand the DIY Demo Dilemma. To pay or not to pay that is question - ha! We also took down two (2) chimneys and hauled the bricks and the rest of it in a bucket down the stairs, through the living room and out the door into a dumpster. God awful work for sure but given the rates contractors are getting in your and my (Boston) neck of the woods you have to take on whatever you can to save the $$$.
Looking forward to your next installment!
@Malcolm
Thank you for reading, Malcolm. We enjoy getting your feedback.
@ P Ditty
Thanks for reading. Wow two chimneys and bucket upon bucket of bricks down stairs. Jeez. I understand.
Chris
A sort of peripheral question: Those wild '60s style screens that were in the living room. Were they wood or metal?
@ Malcolm re: screens
The screens separating the rooms were wood. I do have a bit of a soft spot for them. I kind of liked the filtering effect. But there was just too much opacity -- not enough available daylight to go blocking it off with permanent decorative screens, in my opinion. I still have them in storage; maybe I'll incorporate them later somewhere. They're major dust catchers though, and so hard to clean. We'll see.
Log in or create an account to post a comment.
Sign up Log in