

More Building Science


Among my fondest childhood memories are family trips to my grandfather’s summer cabin in the Bighorn Mountains of Wyoming. It was a squat, single-story structure of rough logs set on a foundation of granite cobbles. The original room, which served as an eat-in kitchen and family room, was centered around a massive open hearth. What began as a porch was enclosed to make sleeping quarters with curtains to separate the cots. A small addition housed a half bath with running water, although it always felt more authentic using the outhouse out back.
For a kid growing up in suburban New Jersey in the 1970s, trips to the cabin felt like stepping into a lost world. In the daytime, we hiked in the foothills of the Cloud Peak Wilderness, fished for rainbow trout, and whittled wooden toys. In the evenings, we popped corn in the fireplace with a long-handled popper and turned in early. The nights were chilly, even in August, and after the fire burned down, we burrowed deep into our sleeping bags.
The argument for heat pumps
Log cabins are popular around North America for their beauty, rustic charm, and ability to evoke a simpler, slower time. They are usually located in rural areas away from natural gas lines, where they rely on some combination of cordwood, pellets, propane, and electric resistance for heat. For cabin dwellers looking to reduce their heating costs, cut their carbon emissions, or just get away from the labor and mess of stoking a wood stove, air-source heat pumps are an attractive option.
With their typically small footprint and compact shape, log cabins are good candidates for heat pump technology. Cabins often feature an open floor plan with a high-ceilinged great room open to a loft. These characteristics make it possible to serve most of the living space with one or two ductless minisplit heads.
Homeowners who have been heating with wood are generally accustomed to temperature variations within their space and may already be using electric-resistance heaters in small rooms like bathrooms, bedrooms, or offices that are farther away from the stove. The use of small resistance heaters dovetails well with a one- or two-head heat pump design. This approach is generally more efficient and more cost-effective than adding heat pump heads to the smaller rooms.
Some cons to consider
But log cabins also present some challenges for heat pump applications. One set of issues involves correctly calculating heating—and, to a lesser extent, cooling—requirements. Air leakage is the single largest component of heat loss in many log cabins. Because air leakage can be so variable—and potentially so high—it’s critical to use blower-door readings rather than qualitative ratings, in heating load calculations. Some older log cabins rank among the leakiest structures I’ve seen. But I’ve also tested newer log cabins that meet current code standards for airtightness. If you don’t test, you don’t know. A blower-door test and infrared scan performed by a trained building analyst will provide this critical data and may also identify some cost-effective air-sealing opportunities. A targeted air-sealing scope may even allow the use of a smaller, less-expensive heat pump.
One set of air leaks specific to log cabins involves the walls themselves. Sill beams are a common leakage location in older houses; if we imagine a log cabin as a house built of stacked-up sill beams, we start to see the magnitude of the problem. As the logs that make up the cabin settle, shrink, and swell, new gaps can open up at horizontal joints and corners; keeping the log walls properly chinked represents an ongoing task. A few years ago, I worked with a young couple who had just purchased an owner-built log cabin with excessive leaks between the logs. They took it on themselves to caulk every seam in the house. After dozens of hours of work and dozens of tubes of brown caulk, they dropped their air-leakage rate by more than a third and dramatically improved their comfort. Modern kit-style log homes incorporate gaskets and tongue-in-groove milling that go a long way toward eliminating leakage between logs.
Dealing with air leakage
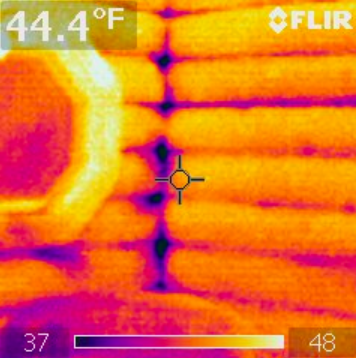
Air leaks at horizontal joints and corners show up clearly in an infrared scan, especially with the blower door running.
Large air leaks can also occur at the roof-wall junction. This area can be especially leaky in older cabins, where rough-cut rafters sit on rough-cut logs, creating a series of irregular openings. Gaps are often stuffed with fiberglass, which is an ineffective air barrier. A better fix involves sealing the openings with rigid materials and expanding foam. In many cabins, this detail will remain exposed to the living space and needs to be caulked neatly or covered with wood trim.
The roof assembly itself may also be a major source of air leakage. In particular, the combination of an air-permeable interior surface, such as tongue-in-groove paneling with an air-permeable insulation like fiberglass can lead to high rates of exfiltration as warm air rises and finds its way out gaps at the top of the house. If the ceiling assembly incorporates a properly detailed air barrier or an air-impermeable insulation like closed-cell foam, these leaks will be greatly reduced.
Air sealing opportunities in the basement or crawlspace depend on age and style of construction. Cabins with rough sill beams and stacked-stone walls may require extensive work, while cabins on poured-concrete or block foundations may need only targeted measures. As in any other house type, properly encapsulating and conditioning a cabin’s vented crawlspace will result in large improvements in comfort, efficiency, and moisture control.
Other sources of heat loss
Besides air leakage, the other source of heat loss is conduction through solid materials like the logs themselves. An 8-in.-thick log wall has an R-value of around 11, so it transfers almost twice as much heat per sq. ft. as a fully insulated 2×6 wall. (The high mass of log walls makes their thermal performance slightly better than R-values alone would suggest.) The options for improving log wall R-values are expensive, and they risk sacrificing the aesthetic features that attracted homeowners to log cabins in the first place (see Q & A Spotlight: Fixing A Leaky Log Home). In most cases, it will make sense to focus on air leakage reduction and leave log wall R-values “as is.”
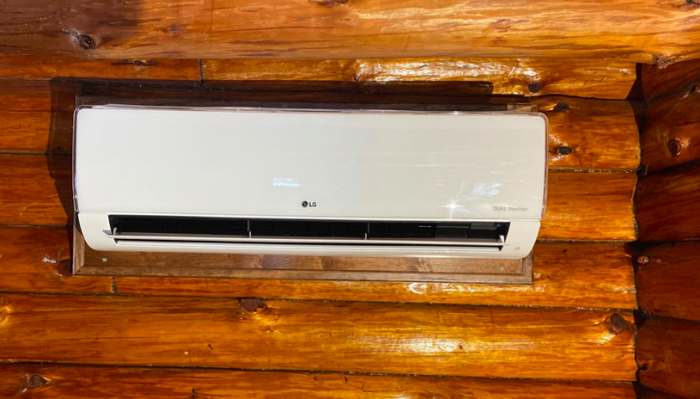
Heat pump installation in a log home
When it comes time for installation, one challenge involves hanging indoor heads on uneven walls. To drain condensate properly, heads need to be mounted level and plumb. High-wall heads typically have a steel mounting bracket that is screwed to the wall; the head itself then hangs from tabs on the top of the bracket and clips into smaller tabs on the bottom. If the mounting bracket isn’t tightly screwed in, or if it’s warped in such a way that the bottom clips can’t engage, the normally quiet units may rattle.
We have experimented with using shims directly behind the mounting plate, but this approach is finicky and can leave unsightly gaps where the bright white of the unit contrasts with the dark wood of the logs. Another approach involves securing a piece of cabinet-grade 3/4-in. plywood to the log wall, using shims as needed to bring it into plumb, then attaching the mounting bracket to the plywood. The plywood can be stained to match the logs, and either cut to the outline of the ductless head or slightly oversized and picture-framed with trim. Low-wall or “floor” units that attach directly to the wall without a bracket may also benefit from plywood backer boards.
As in other housing types, high-wall heads in log cabins should be mounted at least 6 in. below the ceiling to ensure adequate airflow and mixing. In vaulted rooms, especially in heating-dominated climates, heads shouldn’t be placed too high on the wall. The Northeast Energy Efficiency Partnership recommends that high-wall heads discharge air no more than 8 ft. above the floor. Low-wall units are also a great choice when heating is the primary goal.
Architectural complexities
A third set of challenges involves working with thick walls and around complex corners. Drilling through log walls to run piping and electrical connections can add hours to an installation. Installers should be sure to bring a rugged corded drill, a sharp self-feeding bit, and a bit extension. (An enthusiastic helper never hurts, either!) To ensure proper condensate drainage, the wall penetration needs to pitch downward to the exterior. Drain lines should always drop at least 1/4 in. per ft. of horizontal run. For wall penetrations with flexible hoses, I’m more comfortable with a steeper pitch, on the order of 3/4 in. to 1 in. across an 8-in. wall.
Routing exterior line sets around a log cabin’s complex corner details can be a time-consuming task. If the line sets need to be enclosed in plastic line set covers, the cabin’s corners will require multiple 90° ells and possibly some flexible fittings. For this reason, I prefer, whenever possible, to place the outdoor unit on the same side of the house as the indoor head or to route line sets through the basement or crawlspace.
I also try to avoid placing outdoor units under a roof’s drip line. Rain and snowmelt dripping onto the unit may lead to ice buildup and problems with the defrost cycle; and heavy snow packs sliding off metal roofs may cause physical damage. For these reasons, I prefer to place outdoor units either on gable ends or under protective overhangs. When neither of these options is possible, I recommend an aftermarket snow shield.
I sometimes think back on the log cabin in the Bighorns and how it shaped both my personal aesthetic and my environmental consciousness. Those magical days got me started on a winding path that led first to ecology, then energy efficiency, and most recently heat pumps and electrification. I know many folks who feel the same way about log cabins. As we look for ways to bring this beloved housing style in line with climate goals and modern expectations of convenience, air-source heat pumps can play an important role.
_________________________________________________________________________
Jon Harrod is founder of Snug Planet, a contracting company in Ithaca, N.Y., whose mission is to reduce building energy use in ways that make sense for people and the planet. Jon holds multiple certifications from the Building Performance Institute and has published numerous articles on energy efficiency and green building. Photos courtesy of author.
Weekly Newsletter
Get building science and energy efficiency advice, plus special offers, in your inbox.


3 Comments
I wonder about the use of Aerobarrier in a log cabin?
That's an interesting idea! Aerobarrier is something I've been intrigued with for a while, but I haven't been part of an actual project that uses it. My limited experience with Aeroseal is that it's an amazing product.
As the article notes, it can be difficult to determine the heating load in an old log cabin. If you cannot get a blower test or accurately measure the insulation, one simple alternative is to measure how much heat is needed to maintain the temperature. If you have electric heat your utility can usually tell you how much power you have used in a day. If it is a cold day and you have no other big electrical loads you might assume that 90% of your power went to heat. Comparing the average temperature that day to the local design load should enable you to get pretty close to how much heat you will need from a heat pump. Right?
Log in or create an account to post a comment.
Sign up Log in