
More Musings of an Energy Nerd


When GBA readers post questions about cathedral ceiling insulation, they are often directed to a 3,800-word article from 2011 called “How to Build an Insulated Cathedral Ceiling.” While the comprehensive information in that article—including detailed discussions of vapor diffusion, condensation risks, and failure modes—is useful, it may represent information overload for many builders.
This article will cut to the chase by providing simple descriptions of five cathedral ceilings that work. While these five assemblies are probably the most common approaches used, note that there are other acceptable ways to insulate a cathedral ceiling.
General principles
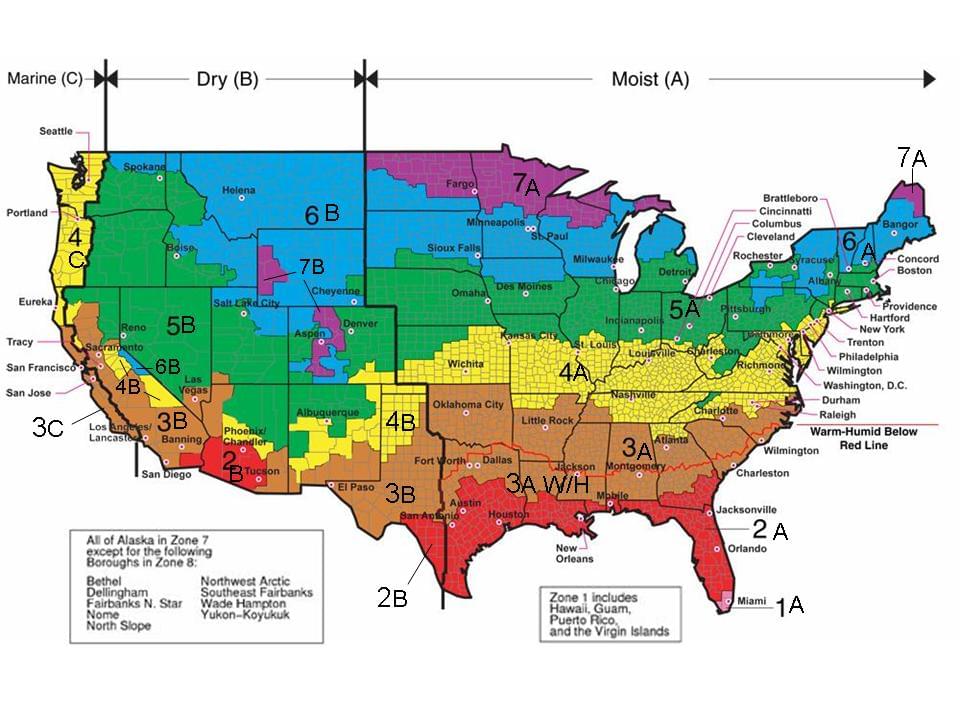
R-value minimums. In Climate Zones 4, 5, 6, 7, and 8, most prescriptive building codes require ceiling insulation to have a minimum R-value of R-49. In Zones 2 and 3, the minimum requirement is R-38, while in Zone 1, it’s R-30. (Here is a link to a climate zone map.)
That said, local codes may differ from these general guidelines, so it’s worth asking your local building department about minimum R-value requirements in your community.
For more information on minimum R-values for cathedral ceilings, see “Three Code-Approved Tricks for Reducing Insulation Thickness.”
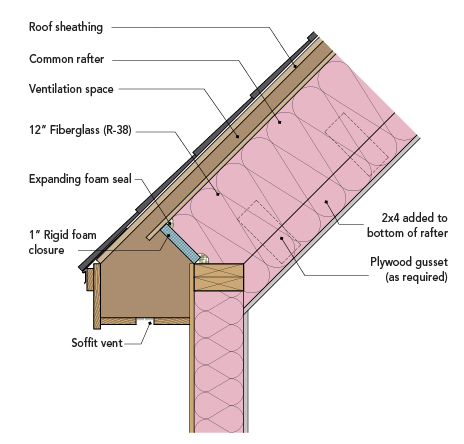
Rafter depth. Note that 2×10 rafters equipped with a 1-inch-deep ventilation space have room for only 8 inches of insulation. If you are insulating with fiberglass, that’s not enough space for the minimum R-values required by building codes unless you live in Climate Zone 1. So if you hope to insulate your ceiling with a fluffy insulation material like fiberglass batts, and you plan to install all of the insulation between your rafters, you’ll either need very deep rafters, or you’ll need to scab on some extra framing material (for example, 2x4s) to your rafters with plywood gussets to get enough depth for the minimum insulation levels required by building codes.
Air sealing. Most cathedral ceiling moisture…
Weekly Newsletter
Get building science and energy efficiency advice, plus special offers, in your inbox.

This article is only available to GBA Prime Members
Sign up for a free trial and get instant access to this article as well as GBA’s complete library of premium articles and construction details.
Start Free TrialAlready a member? Log in


143 Comments
Excellent article, Martin. Thanks for condensing this all into one concise article. It's already bookmarked on my list for client advice.
FWIW, I've used all 5 of these approaches on my own projects. #1 is certainly the easiest to install and most familiar for builders. It is also the one I see screwed up most often. I'm seeing a lot more of #4 lately. Aside from being expensive, it is simple and that seems to be its biggest selling point. I usually see this one with dramatically less R-value than code because of the high cost of SPF. Somehow, it still gets sold/approved. I am ashamed to admit that I'm using it on a large condominium weatherization project right now....
What aspect of #1 is most frequently messed up?
J. Wolfe,
The most frequently messed-up detail of Approach #1 is probably the failure to provide an airtight ceiling.
Other common errors: failure to provide enough R-value to meet code, especially near the eaves; sloppy insulation of batt-type insulation; failure to provide enough ventilation space (ideally 2 inches).
Great summary, thank you. The challenge now is for folks to do a search instead of asking the same old question “How do I build a cathedral ceiling?”
I don’t know if it’s worth noting that the 2021 IECC increased the insulation values by quite a bit. Perhaps a mentioned of this should be included, or in a short time, this blog will need to be updated.
On option #5, it reads “R-5 in Zone 1, 2, or 4;” Should it be R-5 in Zone 1, 2, or 3?
The sections where it says that open cell foam against the roof decking is a bad idea, it should be in CAPS, BOLD, and higher pica. Maybe folks won't miss it! I won't hold my breath... 😝
Armando,
Thanks for notifying me of the typo concerning the climate zones in Assembly #5. I have corrected the error.
I feel like there should have been a sixth roof. What about something like the cool vent by Hunter Panels? You have 5.5 inches fluffy underneath, deck board, WRB, ridged insulation, an air gap, another deck board, and then the shingles.
Doing something like this would get to an R-60 (the 2021 code requirements) cheaper than closed-cell foam. It would also be easier to retrofit. You would have 8 inches of poly (R-40) on the roof and 5.5 inches of mineral wool (R-22.5) in the rafter. Something like this would also mean you don't need heels on the trusses.
I like the idea because, in essence, it's an overroof. From what I have seen here and over at Building Science, this is the roof you need in areas that get a lot of snow and are cold.
Is there some reason not to do this?
Joe,
The vent cavity above the rigid insulation in that assembly is sort of a belt-and-suspenders thing. With the vapor retarder at the lower deck level, there shouldn't be enough moisture present under the shingles to need additional ventilation. It doesn't hurt but it does cost more.
Hi Peter,
Thank you for your reply. It is good to know. BTW, I had to look up what the term "belt-and-suspenders" meant. Based on the context, I think it is a great way to explain it.
belt-and-suspenders:
involving or employing multiple methods or procedures to achieve a desired result especially out of caution or fear of failure
Joe,
In the second paragraph of this article, I wrote, "While these five assemblies are probably the most common approaches used, note that there are other acceptable ways to insulate a cathedral ceiling."
In your comment, you wrote, "I feel like there should have been a sixth roof." Well, why not a seventh and eighth? I decided to stop at five, to keep the article simple.
Your suggested roof is similar to Assembly #3 on this page, except for the addition of ventilation channels above the upper roof sheathing. Note that the ventilation channels are unnecessary, as long as the thickness of the rigid foam is adequate for your climate zone. That said, there is some evidence that ventilation channels above the uppermost layer of roof sheathing can reduce ice dams, and if you live in an area plagued by ice dams, the expense of the roof assembly you favor may be justified.
1. Be nice.
2. If you can't be nice, be polite.
Joe,
Sorry. No intent to cause offense. It's easily possible to list ten different ways to insulate a cathedral ceiling, and yours is one of them. I accept your point that perhaps my article could have benefited from a sixth roof assembly. Sometimes, however, it's hard to know where to stop when searching for the balance between simplicity and clarity on the one hand, and completeness on the other.
This article was aiming for simplicity and clarity, and I'm sorry if it fell short.
It's fine, but perhaps in zone 5 I would not be worried about the venting over top of the rigid material. To be honest, I also skim over ideas that use proprietary words for basic things. Sometimes the trademark wins (Xerox). In this case, Hshield and Coolvent just make me frown and move on.
Martin,
Great stuff.
Could you maybe help me out with a related issue. The foam closure in assemblies #1 and #2 is shown sealed to the framing to stop air movement. Baffles are also shown separating the batt insulation from the air-space. After reading RDH's study of the effect of wind-washing, I'm having doubts about whether either in necessary, or if there is no need for the closures or baffles except contain the insulation. Does wind-washing decrease the R-value of these assemblies enough to justify air-sealing batt insulation in roofs?
Malcolm,
I've always advocated in favor of air barriers to reduce wind-washing near soffit vents, especially when builders insulate with fiberglass batts. For similar reasons, I think that ventilation baffles should be installed with attention to airtightness.
Some research findings show that the labor to create airtight details in these areas isn't worth the trouble. Fair enough. It's possible that most builders lack the resources or time to focus on nitpicky air-sealing details in these areas; that the energy saved is too little to justify the labor; and that the type of meticulous attention I describe is better spent on other aspects of the building's air barrier. If you decide to make do with simpler details, I understand the decision.
But I don't like the idea of the wind blowing through fiberglass batts. It just seems wrong.
Malcolm, do you have a link to that study? Is it the 2016 one? Isn't that regarding rigid mineral board (I didn't read it through; perhaps it gives mention to fiberglass cavity fill?)?
Tyler,
https://www.rdh.com/wp-content/uploads/2017/10/Van-Straaten-Windwashing.pdf
See tables 8 and 9.
I don't quite know how to think about wind-washing. That's something I'm looking for help with. If you hire an insulation company here, their default method of insulating above the exterior walls is to fold over a batt and block the cavity below the baffle with it. How much of en energy penalty does that cause over air-sealed blocks? Similarly, cathedral ceilings almost never have baffles if there is sufficient height to allow a 3" air-gap to the sheathing. Installing continuous baffles in each bay is a significant task. Is it worth it?
Thanks. I'll have to look more into it.
I'm being a bit lazy, in that I still didn't read the entire study, but above the table it says: "Two fibreglass batt samples (low density and high air permeability) were used as products with known susceptibility to wind washing to confirm the ability of the apparatus to measure wind washing effects." (Suggesting even the author feels wind-washing is a concern with FB).
In table 9, it appears that an R-13 batt is derated R-1 at wind speeds of 3ft/s. I'm not sure that's 'insignificant,' but it depends.
I also wonder if wind speeds might tend to be in the high range at that soffit location vs behind cladding.
All that said, I take your point about whether it is worth it. I really have no idea, and could see how it may not be.
It does keep the air coming out of the ridge vent cleaner after flowing through the filter, I mean insulation.
Martin,
Thanks so much for this article. Not having been a member until today I had read your original article from 2010 and had some questions so I drew a diagram of my proposed combination of rigid under shingle and batt between rafters with a view to posting in the comments section. To my delight after joining I found this updated article which answered most of my questions. I still have a couple of remaining questions. In the lower sections where I am not adding rigid insulation beneath the shingle would you recommend installing roof and soffit vents to create an independent vented section of the attic that is separate from the unvented part above?
Thank you in advance.
A2ZED
A2Z,
Your sketch shows a kneewall. The best way to address this issue is to use the same insulation method on both sides of the kneewall -- in other words, to continue insulating the slope of the roofline all the way down to the eaves.
This article explains more: "Insulating Behind Kneewalls."
If you ignore my advice, and try to create a vented mini-attic behind the kneewall, you can. If you do that, I would opt for soffit vents and triangular end-wall vents in the cramped attic.
That said, you'll end up with complicated air-sealing details if you do it that way.
Thanks so much for your prompt and informative reply, Martin! Much appreciated.
I for sure do not want to "ignore" your advice. But unfortunately it may come down to budget. To continue the insulation over all the roof doubles the price and takes me over budget. There is only one room that would reap the benefits of the better way to do it, if it were all the upstairs rooms I would think differently. I will speak with my roofer and engineer tomorrow.
There is currently zero insulation so anything is going to be better than what is currently there!
Thanks again!
For a 12/12 it would only be about %40 compared to insulating the kneewalls. I take it that the other 60% would be because of needing to meet code minimum roof vs wall insulation? That does seem like a code annoyance... it may make more sense to drop insulation across the whole roof. For a vaulted ceiling, you may be able to get away with r38 depending on your code.
There's this newer HFO blown closed cell foam with nominal R7/in. If applied to a depth of 7-in. for R49 (CZ5B, reportedly less is needed the thicker it gets) against the roof sheathing ( a 4:12 pitch) it will envelop the upper chord and a few inches of the web members of the wood roof trusses. I have worried a bit about the impermeable underlayment and impermeable foam trapping moisture in the sheathing if it gets there in the first place. Roofs leak. There is limited experience with the HFO blown foam. The wood truss is a thermal bridge. Do I need to lose sleep over this planned assembly?
Eddy,
The following article should answer your questions: "Sandwiching Roof Sheathing Between Two Impermeable Layers."
Thank you. I am breathing easier.
Thanks for this information, it's timely for me. It seems like folks trying to minimize use of foam will end up with Assembly #1. What does an R-60+ cathedral roof assembly end up looking like? Is this a situation where inclusion of some rigid or spray foam is preferred for cost and practicality reasons?
Depends on which batts you were using. For r4 mineral wool you would need at least 15 inches of insulation. So with ventilation baffles, you are looking at 16 - 18” ijoists to achieve r60. My understanding is foam could get you a smaller and safer assembly, but likely with higher labor and materials.
I have 2 x 12 rafters with 2 x 2's on top of them from the original roof system. Then site built 1/2 plywood baffles leaving a 1 1/2" gap. Then R30 rockwool, r15 rockwool, intello, perpendicular 2x4's on edge with r15 rockwool. Haven't decided on the final layer inside.
At ~22' peak, I wasn't too worried about the additional depth of the 2x4s.
I’m designing at a new house in CZ4, with R60 cathedral ceiling, and I’m thinking of using 3” R18 min. polyiso rigid foam on top of the roof decking and 2x12 rafter with 11.25” R40 DP cellulose, or 11 7/8 TJI rafters with R42 min. DP Cellulose.
Thank you for this article Martin. For #1, does the validity change when dense pack fiberglass is used instead of batts, and the “baffle” is a layer of osb with 2x4s laid on top? There was some debate if this had enough drying potential. Reading GBA makes me far more worried about these assemblies than my builder or insulation contractor seem to be. I feel a bit like someone reading webmd, and then staying up at night worried my roof will have cancer.
Carson,
I'm not sure whether the "baffle" you are talking about is a continuous layer of sheathing above the rafters -- in other words, the roof sheathing -- or narrow rectangles of OSB inserted between the rafters in the manner of conventional ventilation baffles.
If you are thinking of cutting OSB into narrow strips, and using those narrow strips as ventilation baffles, don't worry. The ventilation channels will keep your roof sheathing dry.
If you are thinking of establishing ventilation channels above a continuous layer of roof sheathing, you should read my article, "How to Build an Insulated Cathedral Ceiling." Scroll down to the section with the subheading, "Creating vent channels above the roof sheathing," and read the paragraphs that follow.
continuous sheathing, albeit there would then be another layer of roof sheathing on top of the 2x4s for shingles. Why is a continuous layer of osb more dangerous than one between the rafters? Is it the increased likelihood of air leakage from the "baffles" that makes it a superior assembly? Or perhaps that you can get away with thinner osb? Why would you need a WRB applied to the osb sheathing but not the osb baffles? In my mind they are exactly the same assembly, one just uses additional 2x4s and one uses the existing 2x4s from the ijoists.
Carson,
That's why I'm not sold on OSB or plywood as baffles. Any moisture that makes its way up through the insulation has to then move through the OSB or roof framing members by diffusion before being vented to the outside.
On a roof with the ventilation cavity over the sheathing, all the moisture has to diffuse through the plywood or OSB that way.
To my mind, much more resilient is an assembly where the vent channel is not separated from the insulation, or is separated by something high perm like say house-wrap to reduce wind-washing and contain the insulation.
thanks for the reply Malcolm. So instead of: sheathing over the framing with osb, adding membrane, then adding 2x4 on top of the sheathing where the rafters are, then adding another layer of osb for roof sheathing; could one just cover the framing with taped tyvek, run 2x4s on top of where the rafters are, then the roof sheathing? This is to avoid losing the insulation depth and having to fasten some sort of baffle like assembly for the house-wrap.
Carson,
The continuous sheathing above the rafters (in your case, OSB) has several purposes, one of which is structural. The sheathing adds strength to the roof assembly, and a layer of housewrap won't provide that function. So if you want to pursue your idea, you'll definitely need to talk to an engineer.
There's another problem with the idea, and it concerns buildability. It's very hard to stand on unsheathed roof trusses or rafters while wrestling with a large roll of housewrap, with the goal of fastening the housewrap to the trusses or rafters -- even on a day without any wind. And all those difficulties happen even before you attempt to tape the housewrap seams.
my insulation contractor recently recommended #5, but without any sort of interior air barrier. They want to flash the roof sheathing, dense pack fiberglass bibs into the bays, and then wooden T&G directly over the blown in netting. My concern is interior air getting in and condensing, but then again I have a hard time getting my head around the issues with 4" layer of closed cell spray foam. It would seem that the spray foam would avoid any surface reaching dew point and seal any air leaks through the sheathing, which would appear to negate moisture and exfiltration concerns? My builder was concerned that exterior rigid foam would add too much labor compared to the flash and batt/pack method.
Carson,
In a flash-and-batt assembly, the closed-cell spray foam is the air barrier, and, if the contractor knows what he or she is doing, the spray foam layer is thick enough to keep the interior surface of the cured spray foam above the dew point in winter. So (assuming the spray foam job is flawless) you don't have to worry about air leakage or condensation.
An interior air barrier between the tongue-and-groove boards and the fiberglass insulation isn't necessary if the contractor does a perfect job of installing the spray foam, but such an air barrier might be useful if the spray foam job is sloppy and there are hidden air paths between the interior and the ridge.
For a real-world example of a sloppy spray foam job, see this article: "What Is My Roof Trying to Tell Me?"
Carson,
475 Performance Building suggests a similar assembly. As Martin points out the problem is safely building it. I wouldn't want to tape that house-wrap, or work on a roof with only membrane covering the framing while I installed the 2"x4"s on the top of the rafters. The finished assembly would work very well though.
malcolm, do you have a link to the 475 assembly? I was able to find this article: https://foursevenfive.com/blog/foam-free-der-roof-assemblies/, but it is for retrofits and doesn't seem to match what you were recommending.
Thanks Martin, the foam failure was a very timely article. This issue though is if the interior air barrier is *typically* redundant, intello membrane on the bottom adds thousands of dollars which is expensive insurance. For buildability then if I follow correctly, the baffles for a cathedral ceiling, whether housewrap or thin fiberboard, are put in from below after the top sheathing goes on?
Carson,
Q. "The baffles for a cathedral ceiling, whether housewrap or thin fiberboard, are put in from below after the top sheathing goes on?"
A. You've basically got it right, except for the fact that there is no "top sheathing" with a vented roof assembly, because a vented roof generally only has one layer of roof sheathing, not two layers. (Two layers of sheathing usually imply that you have an unvented assembly.) If the idea of ventilation baffles is new to you, you should read this article: "Site-Built Ventilation Baffles for Roofs."
Carson,
I can't find the pictures, which I'm pretty sure were here 0n GBA, but you can see a similar assembly in this 475 video at 40 seconds and 1.06.
https://www.youtube.com/watch?v=hLjYiSOegmg
Just thought I would toss a picture out of a partial finished ceiling with site made baffles. I used 1/2 plywood and 1 1/2" thick eps strips.
The second picture is almost complete. I plan to air seal it, even if some say it is a waste.
you guys are awesome, thank you. The Mento plus does seem like a great idea to skip the extra sheathing or baffles, but Martin is a former roofer so he likely has a good nose for the labor involved.
Carson,
If it was something like a single storey 4/12 roof with a simple shape I might be tempted to try it. I'd probably work in eight foot increments, stapling the underlayment, nailing the battens, and running two courses of sheathing. Wandering around on a few 2"x4's the way they are seems a bit sketchy.
" the closed-cell spray foam is the air barrier". So out of these assemblies, only #1 and #2 would truly require an interior air barrier, with #2 the interior air barrier likely being the interior side foam. For #3, 4, and 5, the exterior foam boards or spray foam would be sufficient to prevent condensation issues, so interior air sealing is not required, only an extra precaution.
Carson,
Yes, you're right.
Martin,
Would you add to your description of assemblies 4 and 5 that the roofing and roofing underlayment should both allow for outward drying? This would avoid "sandwiching roof sheathing between two impermeable layers". (I just reread that 2019 article.) I am currently planning on standing seam metal roofing and 8" of closed cell spray foam in the rafter bays with a ventilation channels in between the foam and the sheathing. In your opinion, is the ventilation necessary or advisable or not? I live in zone 5. Thanks
Steve,
I would urge any GBA readers who are worried about the issue you raise to read my article on the topic, "Sandwiching Roof Sheathing Between Two Impermeable Layers."
I disagree with your attempt to reduce the discussion in that article to your proposed advice ("the roofing and roofing underlayment should both allow for outward drying"). The issue is not as simple as you imply, and plenty of builders have decided to install vapor-impermeable roofing above flash-and-batt roof assemblies or spray-foam insulated assemblies.
If that approach makes you nervous, you are, of course, free to choose an assembly that makes you more comfortable.
Martin,
I've read the article you mention and other related articles. I am not reducing the discussion; GBA has (thankfully) made me very aware that this discussion is complex. Nor, by way of my question, was I proposing advice. Rather I was checking to see if you forgot to include some of that complexity on impermeable sheathing or if you didn't mention it because you thought it was no longer a concern.
Everything makes me nervous! As a new builder, about to put on a metal roof, directly after this snowstorm, and then insulate a cathedral ceiling, I am trying to make sense of things given what seems to be divergent expert advice and go with a sound design. I take it that venting the bays can't hurt and if anything makes the assembly more robust/resilient. Is that your take?
Steve,
You wrote, "I was checking to see if you forgot to include some of that complexity on impermeable sheathing or if you didn't mention it because you thought it was no longer a concern."
This article deliberately tries to avoid complexity, although it includes links and a "Related Articles" sidebar that provide more information. Here's a fun fact about building: it's almost always possible to screw something up, and any attempt to provide instructions is necessarily incomplete, because no author can include warnings against every imaginable error or omission that an inexperienced builder might come up with.
I'll include a link to my article, "Sandwiching Roof Sheathing Between Two Impermeable Layers," where relevant. Thanks for raising the issue.
I have two thoughts ....
If # 4 and 5 work why does #1 need to have the complex cold roof channel ? That -- Typically is not built correctly anyway. Why not have a proper VB (not plastic) ... if the fiberglass is thick enough ....what's the problem.
I just had my property foamed last week. New addition has a cathedral ceiling --- Zinc SS roof ... recommended base sheet applied to deck is waterproof. I'm not worried about the plywood sheathing not drying -- where is the moisture coming from ?
I had a guy years ago not wanting to foam a deck with a slate roof above -- he said the deck can't dry/. The guy had clearly never seen a slate roof go on.
Yeldog,
Q. "If #4 and 5 work, why does #1 need to have the complex cold roof channel? ... If the fiberglass is thick enough, what's the problem?"
A. The interior of the home is warm and moist during the winter, and the roof sheathing is cold (and therefore a potential condensing surface). Moisture moves from the interior to the sheathing two ways: by diffusion (slowed by a vapor retarder or vapor barrier) and by air movement (slowed by an interior air barrier). The thickness of the fiberglass is irrelevant, because fiberglass is neither a vapor retarder nor an air barrier. [Later edit: Actually, the thinner the fiberglass insulation, the lower the chance of condensation. If there is no insulation at all, the sheathing will be warm, and therefore condensation is unlikely. Your proposal of using thick fiberglass actually raises the risk compared to thin fiberglass.]
Experience shows (and field research confirms) that it is impossible to create a tight enough air barrier on the interior to prevent air movement through hidden pathways from reaching the cold sheathing if your chosen insulation is fiberglass. If you want to try, go ahead. But in 5 or 10 years your roof sheathing might be a soggy mess. It's not worth the risk. (For more information on some confirmatory field research, see "Filling Rafter Bays With Fluffy Insulation.")
If you add a ventilation channel between the top of the insulation and the underside of the roof sheathing, the ventilation channel removes the incidental moisture that reaches the sheathing, keeping the sheathing dry and keeping the assembly safe.
If you install closed-cell spray foam insulation, and if the insulation is installed conscientiously, the spray foam is an effective air barrier and vapor barrier that prevents the migration of moisture from the warm interior to the cold sheathing.
Martin -- It's been my observation that failures are more likely when penetrations are present --- most often recessed lights and plastic VB. I question the drying ability of the channel in #1 -- I guess it does something. I'm not an expert .. but I have done about 50 projects and it's interesting when you rip apart the best and greatest from 25 years ago and you see where they fail. Plastic is the devil .... I wonder what ZIP type buildings are going to look like in 30 years .
Have never seen rot in a filled fiberglass bay .... covered (closed) with sheetrock.
Foam does have its issues -- but, it's simple to build and solves lots of problems . End up with a nice quiet -- energy efficient building.
Yeldog,
You haven't mentioned your climate zone or geographical location. I seriously doubt that the polyethylene vapor barrier was the cause of the failures you've seen; rather, the problem is probably air leakage.
That said, building science experts in Massachusetts who have tried to put together careful assemblies with fiberglass and no vent channel have reported worrisome levels of sheathing moisture. Just because you haven't seen a failure doesn't mean that the approach you describe -- "a filled fiberglass bay" -- is an acceptable approach.
If you live in a warm climate, you might consider an assembly that includes vapor diffusion ports.
Have mostly done it mid-atlantic. Did build a house in VT and rebuild one my father built there in the 60's. Don't think I have ever ripped apart a house done with plastic w/o damage someplace ... it's all about leaking ... I agree. Most assemblies leak. The plastic traps any moisture .that does get in there.
It's just been my observation -- these vented assemblies seem to bring in moisture VS solve moisture. Why not control the moisture in the house?
Yeldog,
The other reason to include a ventilation channel in assembly #1 is that all the building codes I know of require it.
Controlling indoor humidity does help, but that alone would never be enough to stop that warm interior air condensing on the sheathing - remembering that it's relative humidity we are measuring, meaning that air in a house kept at say 40% will easily condense at the temperature the roof will be in most seasons.
Malcolm : Interestingly in NJ the energy audits are requiring sealed assemblies in order to get the rebates and loans ? NJ clean energy program. I have used it for two properties .... going on three .. all six audits.
Are you speaking of the internal baffles -- that go from soffit to attic space ? I have seen so many damp attic spaces where the moisture came from outside .... same with crawl spaces.
I agree with above -- it's all about the leaking.
When I renovated our house, I put asphalt roll roofing on a shed dormer over a bathroom. Underneath the plywood sheathing in the bays was a 3/4 vent channel, 1 inch of polyiso and 7.5 inches of cellulose and then a layer of poly and sheetrock. The sheathing was fine for several years. But when the roll roofing deteriorated I had it replaced with TPO. Within a year the plywood became mushy, but only in the two bays that terminated at a chimney at the ridge. Because of the chimney, these bays did not connect to the ridge vent. It seems moisture from the bathroom was able to escape through the asphalt roll roofing, even in these unvented bays. But when these bays were covered by TPO, moisture could not escape. The sheathing over the bays that reached the ridge vent have remained strong even under the TPO.
At first I just had the mushy sheathing replaced and patched up the TPO, not understanding the cause of the problem. The roof quickly became mushy again. I then ripped out the sheathing again and added a back vent at the base of the chimney. The sheathing got mushy again. I finally realized, upon ripping out the sheath mushy a third time, that the framing around the chimney perpendicular to the rafters was blocking the vent channel from making it to the back vent. Drilling holes in this framing has finally fixed the problem. Not something I want to go through again.
In zone 2A new construction objective to construct one story house with a conditioned attic space. No onsite spray foam (except for small sealing applications on seams) can be applied. g Foil faced Thermax installed under the roof rafters is being evaluated. This would be a slight modification to the cathedral ceiling assembly indicated in this article. The area between the rafter would be left open for venting the underside of the roof decking, with foil face foam board used as a moisture seal at the bottom of the roof rafters. This eliminate the need for baffle vents and reduces installation cost by not having to make cuts to fill insulation between the rafters. The objective is conserve not only energy to heat and cool in addition this design minimizes the multiple layer of material that you find in exterior roof insulation (requires two sets of decking in most assembles). See the attached drawing the 4" thermax installed would yield R 26 which is in the acceptable range for zone 2A. If a higher R value is needed an additional 2" sheet R 13 could be added for a total of R 39. This eliminates on site foam application and the toxic emissions and potential for errors in field installation. One other benefit of this design in this super hot climate it allows venting the underside of the deck to minimize shingle damage. All joints of the foam board will be sealed with spray foam and taped to make a air tight barrier between the conditioned attic and the vented roof rafters. Not clear to me if the foil faced foam board requires a fire cover in this application? Also not sure why you don't see this assembly very often other than price?
Ben,
As I wrote in the second paragraph of my article, "While these five assemblies are probably the most common approaches used, note that there are other acceptable ways to insulate a cathedral ceiling."
Q. "I'm not sure why you don't see this assembly very often other than price?"
A. You suggested assembly has the following disadvantages: (1) As described, the assembly is only R-26, although you correctly note that someone could always add thicker foam. (2) This approach reduces the ceiling height of the attic to a considerable degree. (3) This approach requires a conversation with your local code official concerning whether or not the Thermax requires a thermal barrier (usually, 1/2-inch drywall). In most cases, builders can convince code officials that Thermax can be left exposed -- but the need to present documentation and to successfully convince a local code official often isn't worth the hassle.
Thanks for the quick response. In this case the lower headroom is less of a disadvantage because it is attic space that needs to be minimized. Would it be acceptable to run the foam board up the rafters to the collar ties (and across) to minimize the conditioned space (see attached). Are there any foam board products that are better at fire safety, and are there differences in production emissions? My novice reading on the topic is that control production of foam boards produces less environments impact than "field" applied spray foam that seems to be inconsistent in quality. Let me know if you disagree.
Ben,
The assembly you describe, including the version that includes rigid foam under the horizontal collar ties, would work, provided that (a) you are confident that you can secure the foam with large washers and long screws, and (b) the seams are sealed to make them airtight.
Thermax is a brand of polyisocyanurate that many building inspectors allow to be left exposed. That said, it's impossible to predict how your local building inspector will rule on this issue. Talk to your local building department.
Ben,
You could achieve the same R-value, with no cutting or baffles, by using 6" batt insulation in the cavities and only 1" of Thermax. The main advantage would be the ease of fastening the foam, which could be secured with cap nails.
Thanks Is there a minimum opening or clearance needed for air flow under the roof deck? I have 2 x 10 rafters (9.25 ") less 6" for batt insulation leaves 3.25 inches of air space. Also based on Martin's comments there may be a need to seal the assembly with some material to insure that we have an air tight systems, however it seems wasteful to duplicate decking material.
Ben,
I'm not sure what Malcolm is suggesting, but it sounds like he wants you to switch from an unvented approach to a vented approach. If you take Malcolm's advice, that means that you'll need soffit vents and a ridge vent. (At least I think that's what Malcolm is proposing.)
Q. "Is there a minimum opening or clearance needed for air flow under the roof deck?"
A. Most codes call for a minimum of 1 inch for a vent space, but 2 inches is better.
Q. "There may be a need to seal the assembly with some material to insure that we have an air tight systems."
A. I think you're referring to the need for a ventilation baffle to separate the top of your fiberglass insulation from the ventilation space. I certainly recommend the use of a ventilation baffle if you are planning to use fiberglass insulation in a vented roof assembly. Malcolm knows that many contractors skip the baffle, and just leave an air space above the fiberglass, with no air barrier to separate the fiberglass insulation from the moving air stream. You get to choose which approach makes sense to you.
Martin and Ben,
First, A very merry Christmas to you both!
Bens's foam-only assembly is vented. He just was proposing not to have any insulation in the cavity. Filling them with batts (our code requires a 3" channel if no baffles used) seems a lot easier that trying to install that much foam. I'm sure the R-value of the batts will degrade a bit due to wind washing (again I'm still unclear by how much), and the air-barrier will still be the foam, so no extra decking.
Malcolm,
Merry Christmas, and thanks. You're right, of course -- Ben's proposed roof assembly was always vented. My mistake. And I agree -- your approach would be easier.
Thanks to both of you. I appreciate the great guidance.
Would the ambient air temp influence when you would consider performing option 4? We have a post-and-beam type cathedral ceiling in our ranch, so the bays are about 3 times as wide as the typical assembly. It's a small project area, so I am wanting to do option 4. Second question would be about dealing with potential overfill of the cavity. The beams are 6x6s. Maybe that won't be an issue. The cavity depth might just get me to a code-minimum R-value; would foam attached to the undersides of the beams cause a drying inward issue? Maybe I am missing the point on that. Thanks in advance for the help, Bill.
Bill,
Q. "Would the ambient air temp influence when you would consider performing option 4?"
A. Yes. Most spray foam manufacturers require a surface temperature range between 60°F and 80°F for installation of spray foam. If you ware working in winter, the building must be heated for installation of spray foam insulation.
Q. "Second question would be about dealing with potential overfill of the cavity."
A. It's difficult but not impossible to trim cured closed-cell spray foam. Most installers try to install just the right amount of closed-cell spray foam so that no trimming is necessary.
Q. "Would foam attached to the undersides of the beams cause a drying inward issue?"
A. Assuming the beams are dry on the day that the foam is installed, a little foam on the beams would not be an issue.
Thanks for the responses Martin. This site has been a great resource for me; a regular Joe Homeowner, thanks to the shared information from so many members with much more knowledge and experience than I have. I'll let you know how the project goes! Best, Bill.
Hello,
I am new to this forum. My question is regarding closed cell vs open cell in roofs. I was always advised against closed cell insulation in a roof as if there is any leak in the roofing, the closed cell insulation will keep the water trapped for some time, leading to rot (or rust). If you use open cell, then if there is a leak, you will know asap and can take care of it.
Clearly this forum feels the opposite, but would you mind speaking about it?
Thank you,
architect in NY.
There's a been controversy about why, but there are a lot of reports of problems. This article and the comments on it might be a good starting point:
https://www.greenbuildingadvisor.com/article/high-humidity-in-unvented-conditioned-attics
Then this one has a moderately technical explanation of the cause of the problem, and a link to a more technical explanation:
https://www.greenbuildingadvisor.com/article/high-humidity-in-spray-foam-attics
Personally, I'm not a fan of either approach, because as you explain (and as noted in the last paragraph on #5 in this article), the closed-cell approach isn't all that robust either. Fortunately, there are options 1, 2, and 3 that don't use spray foam at all.
Thanks for the reply Charlie. I am not a big fan of spray foam either. It seems too permanent to me. I like mineral wool. I like option 3. It is similar to working with SIP panels.
Justin,
All roofs leak eventually, and if the roof leak is either undetected or ignored for long enough, some sheathing can rot. If this issue is a concern to you, design your house to have a vented unconditioned attic with insulation on the attic floor -- that way you can enter your attic periodically to inspect the roof sheathing for leaks. This is my preferred approach.
I don't think there is any evidence that owners of homes with unvented cathedral ceilings insulated with open-cell spray foam discover leaks any faster than owners of homes with unvented cathedral ceilings insulated with closed-cell spray foam. There are too many variables to make that statement. Some leaks are obvious, and some are subtle -- and the reasons for the differences are myriad.
Have never used open cell ... I started using closed almost 30 years ago after ripping apart too many disasters done in the early 70's w/ plastic Vapor Barrier. Even leaky fiberglass batt s -- they all leaked BTW. I'm wondering what is going to happen in 20 years if the zip system tape starts to fail.
Most of my projects have been in the mid-atlantic -- so climate may play a roll. tight homes need ventilation.
As I said above ... NJ's clean energy program has the contractors create closed attics .. so if this approach is wrong .. we will see lost of problems in 10 years
Hi Martin,
Very useful article ! Thanks.
I am really trying to simplify things as much as possible, so decided to investigate closer Roof#3 from above (added ventilation layer shouldn't change the nature of the issue i am going to ask for).
The problem is that running a U-calculator shows very bad results in regards to possible condensation. Please, take a look on the attached image..
https://pasteboard.co/JJakqp3.jpg
User 758,
I have attached an image of your proposed assembly. All I can say is I a not familiar with the software you are using. Your proposed assembly has 120 mm (4.7 inches) of EPS, which should have an R-value of about R-18 or R-19. Your assembly also has 180 mm (7 inches) of mineral wool, which should have an R-value of about R-28. That puts your total assembly at about R-46.
You have 39% of your total insulation in the form of exterior rigid foam. That will work in Zone 4. In Zones 6, 7, or 8, it's definitely not enough exterior rigid foam. In Zone 5, it's marginal and possibly risky. More information here: "Combining Exterior Rigid Foam With Fluffy Insulation."
Hi Martin,
My name is Edward (user 758). Nice to meet you!
The software, I am using is a R-value calculator:
https://www.ubakus.com/en/r-value-calculator/index.php?
, which can basically simulate the behaviour of a component (roof, wall, floor) based on a particular set of parameters, like materials used, their width and so on. It is even trying to simulate the weather condition for a specified geographical location (well, just for some Europe countries). My estimations, shows that my country (Bulgaria) is located to an analogue of Zone 5, so it is really questionable one and really difficult to plan for.
It is really interesting to see how the assembles you described will behave during my winter and summer extreme days. So, i am going to specify the exact R values for Zone 5 as you advised and send you the reports for the first 3 roof assembles as attachments. I believe those reports can help to do more "informed" decisions.
Edward,
All software has limitations, so software predictions need to be verified by field studies. The five cathedral ceiling solutions shown in my article, along with the R-value recommendations for the various layers, are robust solutions for the climate zones mentioned. These five solutions have proved the test of time, and have proved their worth in field studies.
For more information on the risks over depending blindly on software, without the corrective data from field studies, see "WUFI Is Driving Me Crazy."
Roof#1 (2x10 rafter + 2x4 added on the bottom of rafter)
-----------------------------------------------------------------------------
Total insulation with = 320 mm ~ 12.5 ", so
the R value = 12.5 x 4 (for mineral wool) = 50, which should be just right for zone 5 requirement of 49.
Now, lets see the summer (+33C temperature outside/ 80% humidity) and winter (-10C/80%) reports (attached)..
Both summer and winter looks ok (well, a small condense during winter should not be a problem)..
Roof#2 (2x10 rafter + 2" EPS instead of 2x4 at the bottom of the rafter)
-----------------------------------------------------------------------------
The R value should be the same as with Roof#1 (as we replaced 4" of wool with 2" of EPS).
But, when we see the reports, we can say that the summer behaviour change for worse :(
Roof#3 (2x10 rafter + 5.5" EPS insulation above OSB3 sheathing)
-----------------------------------------------------------------------------
Based on your recommendations, i have provided a little more insulation for roof#3, so we have about 10" mineral wool + 5.5 EPS above sheathing now, which provides R value of more than 60 (now we have external R value of more than 20)..
But, now, looking on the winter report we observe condensation in place :(
It looks, like the safest approach is the Roof#1.. But, it is still not the end of my journey :).. For roof#1 we should introduce baffles, which will introduce another vaporous issue on its own .. If we use XPS for them, even 1" will produce condensation during winter.. i think we don't have 100% "clean" roof design here.. am i right ?!
Edward,
If you are making your own ventilation baffles, XPS is not the only choice. While field studies have shown that your worries are baseless -- moisture accumulation on the underside of ventilation baffies is not really a problem, as I discuss in the following article: "Site-Built Ventilation Baffles for Roofs" -- you can choose a vapor-permeable material for your baffles if you want. Anyone worried that XPS is too vapor-impermeable for use as a ventilation baffle can use cardboard or fiberboard.
For a thorough discussion of all of these issues, see "Site-Built Ventilation Baffles for Roofs."
.. adding the rest of the reports..
Good information. Has anybody had any experience with a BASF product called Neopor?
Donras,
Scott Gibson mentioned Neopor in his recent article, "A Buyer’s Guide to Insulation."
Neopor has been available in the U.S. since 2007. When Neopor was first released, I wrote an article about the product for Energy Design Update. Here's what I wrote:
Neopor EPS Insulation
A German manufacturer of styrofoam beads, BASF, has developed a new type of high-R expanded polystyrene (EPS) foam. BASF’s Neopor foam boasts an R-value of 4.4 to 4.7 per inch, considerably higher than typical EPS foams, which range from R-3.1 to R-4.2 per inch. Available in Europe for several years, Neopor is now being distributed in North America. Unfortunately, BASF marketing materials provide an inadequate explanation of how Neopor’s improved performance is achieved. In spite of this limitation, BASF’s claims appear to be well founded.
It’s Gray
While EPS foam is typically white, Neopor foam is gray. The manufacturer explains Neopor’s performance this way: “Neopor is based on polystyrene and contains microscopic flakes of graphite that reflect heat radiation, thus improving insulation. … In Neopor, tiny flakes of graphite reflect heat radiation and make the insulating boards almost impermeable to heat.” The explanation is unclear; many readers, upon reaching the phrase “almost impermeable to heat,” will hear a beeping sound from their internal hogwash-detectors. In another marketing document, BASF provides a few more clues: “The new feature of Neopor is infrared absorbers and reflectors: compared with conventional insulating materials, they lower the thermal conductivity and give the material its silver-gray color.” BASF researcher Klaus Hahn describes Neopor’s performance in similar terms: “The key factor for Neopor is that it contains microscopic particles which scatter and absorb radiated heat. The principle sounds simple, but achieving uniform incorporation of these particles into the polystyrene matrix was a real challenge.”
Dark Materials Absorb Radiation
The graphite added to Neopor improves its performance by darkening the product, thereby reducing the amount of heat radiation that can pass through the foam. “It’s an EPS product, processed in the same way as other types of EPS,” explained BASF marketing specialist Christine Morey. “The graphite in the product is incorporated into the polymer. It absorbs the infrared and reflects it. Compared to white EPS, Neopor’s performance is 15 to 20 percent better in terms of R-value per inch.”
To understand how dark graphite particles raise the R-value of Neopor, it’s helpful to remember that EPS foam is not a solid material. “The inside of all types of lowdensity insulation includes a lot of air space,” explains Dave Yarbrough, research engineer at R & D Services in Cookeville, Tennessee. “For example, cellulose and fiberglass insulations consist of many very small pieces of solid material separated by air. During heat transfer, there is internal radiation between one piece of material and another, across the small air spaces. Radiation transfer through fiberglass accounts for about 40 percent of the total heat transfer; because cellulose is kind of dark, it does a better job of blocking radiation than fiberglass.”
The graphite in Neopor acts as an “opacifier” that darkens the material. “Adding an opacifier to the foam reduces radiation transfer through the material,” says Yarbrough. “Off the top of my head, I’d say that radiation transfer through regular low-density foam accounts for about one-third of the total heat transfer.”
Since Neopor has less radiation transfer than conventional EPS foams, it has a higher R-value per inch of thickness. The improvement depends on a reduction in heat transfer between small pieces of material inside the insulation, not on the performance of an air space adjacent to the foam (as would be the case if the improvement came from foil facing), so Neopor does not require an adjacent air space to achieve its higher-than-usual R-value.
Retrofit Applications
In Europe, Neopor has been installed on the exterior façades of existing buildings undergoing energy retrofit work. It has also been used to manufacture insulated concrete forms (ICFs). One German ICF manufacturer, Varianthaus, has established a US distribution network for its Neopor ICFs.
Although Neopor has a higher R-value per inch than other types of EPS, it does not perform as well as extruded polystyrene (R-5 per inch) or polyisocyanurate (R-6.5 per inch). Unless Neopor is sold at a lower price than better-performing foams, it is unlikely to attract many buyers. According to Morey, Neopor is being sold “at a 35 percent cost premium over white EPS.”
Question regarding an upcoming build in Zone 5. I am deciding between Assembly #1 and Assembly #2. If I wanted to run a single 1.5'' layer of exterior Rockwool insulation on top of the roof sheathing, would this cause either Assembly #1 or Assembly #2 to become prone to condensation issues?
Thank you
Dan,
Assembly #1 and Assembly #2 are both vented assemblies. You will be inviting cold outdoor air into a ventilation channel under the roof sheathing. You can't put any continuous insulation on the exterior side of the sheathing in this case, because the continuous insulation will be worthless -- it will be a blanket with a wind tunnel under it, so to speak. You don't install a blanket somewhere where it won't do any good. Some people would say that you might as well hang your insulation on a clothesline in your back yard.
Martin,
As always thank you for the sound advice and daily dose of dry humor.
"Some people would say that you might as well hang your insulation on a clothesline in your back yard."
If we chose to go with Assembly #2 would we have an issue if we built our ventilation channels from rigid foam, then followed Assembly #2 as shown? Would "sandwhiching" our mineral wool batt insulation between a rigid foam vent channel and the additional layer of foam (to increase R value) be unwise?
Dan,
Q. "If we chose to go with Assembly #2, would we have an issue if we built our ventilation channels from rigid foam, then followed Assembly #2 as shown? Would sandwiching our mineral wool batt insulation between a rigid foam vent channel and the additional layer of foam (to increase R value) be unwise?"
A. That type of sandwich won't cause issues. For more information, see "Site-Built Ventilation Baffles for Roofs." Scroll down until you find the paragraphs below the heading, "Do baffles need to be vapor-permeable?"
In that section of the article, I wrote, "There really aren’t any reports of failures or problems resulting from the use of vapor-impermeable materials — for example, polypropylene, vinyl, or foil-faced polyiso — to make ventilation baffles. The main reasons:
● Not much moisture manages to make its way to the ventilation baffles (especially in homes that pay attention to airtightness);
● The air in the ventilation channels is often warmer than outdoor air, a fact which limits condensation; and
● Any moisture that does make its way there seems to be incorporated into the rafters via sorption. The ventilation channels are able to remove a limited amount of moisture from the rafters, and it appears that the rate of drying exceeds the rate of wetting."
Martin,
Thank you, I have not yet finished the "Site-Built Ventilation Baffles for Roofs" article. But have found it very helpful thus far. Does it make a difference in the integrity of the assembly if the site-built baffles are different foam than the additional foam layer under the batt insulation? Is foil faced polyiso the best choice for that additional foam layer under the batt insulation?
In Assembly #2, blown cellulose replace the blown fiberglass?
Yes, you can substitute cellulose for batts -- but you need to plan ahead to minimize settling. You'll be installing the cellulose using the dense-pack method. In some parts of the country, cellulose installers aren't familiar with the dense-pack method -- so you'll have to choose the right installer if you specify cellulose.
For more information, see "How to Install Cellulose Insulation."
Historic home re-roof dilemma
I own a historic home built in 1905 in Redlands California, climate zone 10. The roof currently has three layers of roofing: two layers of wood shingles and one layer of asphalt shingles. These 3 layers are attached to 7/8 “ thick skip sheathing, all supported by full dimension 2 x 4 old growth Douglas fir rafters on 32 inch centers with cross ties attached horizontally. No insulation at all. Let’s just say, structural engineering of the roof assembly left a lot to be desired 120 years ago.
My plan is to remove the top layer of asphalt shingles and the middle layer of wood shingles, but leave the lower layer of wood shingles that is against the skip sheathing; this will allow me to retain the authentic appearance looking up at the underside of the roof assembly from the living space below. I need to re-roof and have a number of conditions that I would like to accomplish in the process. I have included proposed drawings for your consideration. Because this is a historic home, I would like to maintain, as much as possible, the authentic look of the home.
Considerations and Concerns:
1) Keep thickness of roof assembly as thin as possible while maximizing the insulation value. I am
adding a molding (see proposed drawings) to help camouflage the increased thickness. I realize
the proposed 4” of polyiso does not meet recommended R value, but I am only willing to go so
far on increasing the roof thickness.
2) Weight is a major consideration; must minimize the weight of the roof assembly (currently over
6 lbs. per sq. ft.) The proposed roof system only weighs 4.37 lbs./ sq. ft.; that is all most
2.0 lbs. lighter per square foot than the existing 3-layer roof that is currently on the house. I
would have liked to put plywood on top of polyiso, but am concerned about adding another
1 lb. per sq. ft. and the additional roof thickness.
3) The roof type would likely be considered a cathedral, as the underside of the roof structure is
the finished ceiling of the living space below. I would like to retain this authentic “look”,
therefore, no insulation or finished ceiling (drywall) on the inside of the roof assembly. Only
the underside of the skip sheathing and wood shingles are seen when you look up from the
living space.
4) Will there be a moisture concern or breathability issues?
5) Is venting of the roof assembly necessary?
6) I will be using the recommended installation instructions for the polyiso rigid insulation and the
standing seam metal roof.
7) Can I used metal roof fasteners that go down through the polyiso and attach to the skip
sheathing or should I use metal or wood purlins (again more weight).
I hope I have provide sufficient information; let me know if you need more.
Please let me know if this proposed roof assembly will work; if not, what do I need to change.
Optimax,
You've given us the California climate zone (presumably), but that's a different climate zone system than the one used by the U.S. Department of Energy or most national energy advice web sites, including Green Building Advisor. So I don't know much about your climate -- but looking at a map, it appears that Redlands is east of Los Angeles, near San Bernadino. So I'm assuming that snow load is not a consideration.
Even without a snow load, you need to talk to an engineer about your 2x4 rafters, 32 inches on center. My opinion is irrelevant. You need an engineer's stamp on your proposed plan, and the approval of your local code enforcement officer.
My own advice would be to include a layer of OSB or plywood above the rigid foam, and I'm guessing that almost all roofers would agree. Again, my opinion is irrelevant -- the opinion that matters is the opinion of the roofer you intend to hire to install your standing-seam metal roof. The roofer will have a strong opinion on what he or she needs to fasten the roofing.
Finally, your rake details remind me of the Achilles' heel of cathedral ceiling designs with roof sheathing boards (in your case, the skip sheathing boards) that extend beyond the exterior walls to form a rake overhang. These sheathing extensions make air sealing almost impossible.
Historic or no, this smells to me like a "tear everything off, including the rafters" job. But maybe I'm wrong.
Hi - Newbie to the forum here
We are adding a full second story to our 1949 home with a low slope (1:12) unvented hot cathedral ceiling (open rafters below insulation) in climate zone 6, snow load 50. My concern is with ice damming. My assembly is:
- Fully adhered EPDM
- coverboard
- 2 1/2" Polyiso
- 2x6x16 sleepers that extend out to create a 4' overhang, cavity filled with closed cell spray at the envelope perimeter
- water/air barrier
- sheathing
- 1/4" finish plywood
- I-Joist rafters open to below
The siding is rainscreen with open-joint black pine tar painted pine and we plan to paint the exposed overhang underside with the same black pine tar. Could you help me walk through the ice dam concern and general thoughts about my roof and the detail attached?
Much appreciated, love your site, learning lots!
Tina
Thanks for this and all the amazing articles. I've been a homeowner-fan of high efficiency building for a long time. 12 years ago we had a massive efficiency retrofit of our home in Maine and have never looked back.
I'm now planning a small outbuilding to function as an office space and storage area. I was hoping to hire it out, though with the combination of near-zero availability of builders along with skyrocketing materials costs I'll be building it all myself. As such, I've gone with as simple a design as I can: 12'x20' outside dimensions with a 2/12 roof (3/12 if needed, though looks like with Vycor I can go with 2/12). I've found plenty of details such as 4-05052 and this article's option 3 that show detail for the eve soffit, though I cannot find anything for the top eve. I'm planning on 6" of XPS over a 2x8 rafter with rockwool batts and roof sheathing indicated in the 4-05052 drawing,
I did find the excellent article on BSC's site that shows detailed photos of the rakes (https://www.buildingscience.com/documents/insights/bsi-063-over-roofing), though Martin your reply above I think suggests that the approach there of fastening rake fascia from the layer of sheathing above the roof foam problematic? Is there another alternative since the roof foam would need to interface with the exterior wall foam to form a continuous barrier? Haven't found a detail drawing for that, either; any guidance contrary to the BSC article is much appreciated!
Unlike the bottom eve, where the rafter tails can support the roof assembly, I'm not sure at all how the detail for the top edge would be supported. I've drawn in the "?" to indicate this. I'd really rather not run the rafter tails out the front and have a front fascia that's over 12" tall from an aesthetic point of view, and would also like to not break the continuous foam enclosure by somehow running dimensional lumber back on top of the 5/8" structural sheathing. Though also not sure how far the plywood can be cantilevered out without some sort of 2x tied into the structural framing. A nearby town's codes suggest 60lbs dead load for roofs to account for snow (not like we get as much these days with winters a string of freeze-thaw cycles :/)
I also don't want to reinvent a solution that already exists that I simply haven't been able to find! Any suggestions are greatly appreciated! Also please note that I omitted much of the roofing and especially self adhered membrane details in my quick sketch as those are pretty clear in other sources. Thanks in advance for your help!
kcallahan459,
Here's what I would suggest.
- Eliminate the horizontal soffit and expose your rafter tails instead at both the eves and ridge. Taper them so the ends are 3" deep and the fascia covering the foam can overlap the top edge by 1", and still be reasonably shallow.
-Stop your rigid insulation at the exterior wall, and block in between the rafters rather than running the wall foam up to the roof foam. I'd run that blocking at 90 degrees to the rafters, not plumb , and far enough out to cover the top of your siding.
- For finished sloped soffits, replace the first layer of blocking you show at the ends of the roof foam with 2"x6" t&g. This can run continuously along the eaves, ridge and along the rakes from the fascias to the exterior walls.
Thanks for the reply, Malcolm! I've done my best to translate what I *think* you're saying into some drawings. In the eve detail, the rafter tail is trimmed and there's no longer a soffit board though there is a fascia board.
On the ridge I was struggling to interpret how I would keep the foam a continuous envelope, so not sure at all that it's what you had in mind. And looking at the version of the drawing I just posted, I left the blocking out ::facepalm:: will add that and replace the drawing...
These are the details that have me scratching my head as a DIY that is encountering this for the first (and probably last) time rather than a professional crew that's seen these things all the time.
Here's a modified version of the ridge with blocking behind the exterior wall foam and an option and notes for additional 2x at the rafter tips, which I've drawn as a continuous piece that would be face nailed to the rafter tails. I could also imagine this being installed as blocking at the rafter tails, though not sure the tradeoffs or if this was something I made up...
What you show as a 2"x10" rough fascia would be smaller and sit on the end of the lower layer of plywood. It would be fastened to the rafter tails below and the plywood above. The finished fascia would be attached to the rough one and be slightly longer.
The blocking should be further out by the siding, much as you show it at the eaves.
kcallahan549,
You are selling yourself short. These complex details don't get done all the time and would tax many full time builders. It's a complex roof, even if it is only on a small building.
The sketches are pretty close. A couple of small things I was suggesting doing a bit differently:
- If your conditioned area stops at the flat ceiling, that's where I'd define my primary air-barrier and not worry about the continuity of the exterior foam. So I'd stop it at the bottom of the rafter tails at the ridge just as I suggested you'd do at the eaves.
- You can also stop your roof foam at the exterior walls too and support the edge of the plywood overhangs on the rough fascia. Rather than three blocks, I'd just use an upright 2"x6" with a bevelled top and bottom to match the slope - but whatever you find easier I'd do.
- if you are painting the exterior, then allowing the underside of the plywood roof sheathing to form your soffits makes sense. If you want something more finished, you can substitute the t&g for the first layer of foam at the overhangs.
- I would only run the finished fascias down until they just lapped the top of the exposed rafter tails. That allows the fascias to be smaller, and the exposed tails will look good. My outbuilding has a similar look:
Super helpful; your input is like gold and has gotten me around the corner where I was stuck thinking through these details, so THANK YOU!!! And I appreciate the vote of confidence as well :)
I've made a bit of the mess of the drawings with erasing and redrawing, so will skip uploading another sketch. The photo of your building as a reference is super helpful as well as I wasn't able to picture what you meant about the fascia leaving the cut rafter ends exposed (which seems like would help air flow, also).
Also, the offset blocking on the edge of the roof foam is, I assume at least, to allow the seams to be staggered without cutting a strip off one of the layer runs. I agree that it doesn't have to be full dimensional lumber; perhaps at the top it's not even needed as at the bottom it serves double duty as a nailing backer for the fascia.
I'm curious about leaving a gap in the foam in climate zone 6? We have spray foam in a shed roof on our house that was framed with 2x6 rafters that bridge interior to exterior and the melt pattern in roof snow and frost is easy to see. I'd be concerned about designing such a gap into the insulation envelope WRT condensation even if the air barrier is preventing movement.
kcallanhan549,
You may be right - and extending the foam on the roof right out to the eaves certainly will do no harm.
Good luck with your build!
OK, figured I'd make a clean final drawing for my own reference and add it to the thread in case it might help someone else. There are several details, such as peel and stick roofing membrane covering both decks, and likely wrapping the top edges of foam. Though all in all confident it'll work and last a very long time!
Kcallaham459,
Two very minor suggestions:
Don't start to taper the rafter tails until they are outside the siding. That way you don't have to bevel the frieze trim or blocking.
The top plate in your wall will be flat, and the rafters will have birdsmouths.
Perfect; thanks!
This is great! I do have a question.
In my 1970s home that we are currently planning the remodel, the roof rafters are 2x8. Would a flash and batt with 2" of closed cell and R-15 mineral wool PLUS securing securing a mineral wool "board" product (like Rockwool Comfortboard) be a good solution to achieve the R-30 (CZ1 - Houston) and increase the whole wall R-value by addressing the thermal bridging?
Texas Kyle,
Your reference to "whole wall R-value" is confusing. I'm going to assume that was a mistake, because it sounds as if you are really asking about a roof assembly, not a wall assembly.
If you have rafters that are 7 1/4 inches deep, and you install 2 inches of closed-cell spray foam (about R-13 of foam) and R-15 of mineral wool, you'll end up with about R-28 of insulation. Adding a continuous layer of insulation on the interior side of your rafters (either rigid foam or, if you don't mind tackling the "squishiness" issue, semi-rigid mineral wool) will, indeed, increase the R-value of the roof assembly and reduce thermal bridging through the rafters.
Thanks Martin,
Yes, I guess "whole wall" is a mistake since I am referring to the roof, but hopefully you get my point. I am a homeowner not a builder.
Kyle -
For future reference, Houston is in CZ2. I would make sure to install an air supply and dehumidification to you attic condition project.
To get to R38 (2018 IECC) you need 2" ccSPF R13 + 7.5" permeable insulation, which means you need to add 2x2s or cross purlins under your rafters. To get to R49 (2021 IECC) you need 2" ccSPF + 10" R35 permeable insulation. Again, add depth to the rafters. You could use 10" R35 ocSPF as an alternative.
There are two ways to avoid thermal bridging in a conditioned attic, one, install rigid foam on top of the roof decking, or two, install taped and sealed rigid foam under the rafters with a ventilated channel and permeable insulation under the roof decking.
Good read: https://basc.pnnl.gov/home-improvement-expert/checklists/vented-unvented-attic
On assembly #3 in zone 3A, is the exterior rigid insulation on the walls required? Any reason open cell spray foam can't be used instead of the fiberglass?
Doelman,
Q. "On assembly #3 in zone 3A, is the exterior rigid insulation on the walls required?"
A. No.
Q. "Any reason open cell spray foam can't be used instead of the fiberglass?"
A. No, other than the fact that spray foam is manufactured with a blowing agent that has a high global warming potential.
Holy comments! What an amazing blog post. After finding this one I signed up for GBA.
Martin, as you mentioned in the 2011 post, it seems the key decision to making a cathedral ceiling work is air tightness. All 5 of these plans seem to provide this.
Here's my question - which design is most robust to air seal failure? It seems like each of these designs will fail in their own ways if the air seal is punctured or opened, some worse than others, but which one fails the least badly? If we were to end up having a hole (age, contractor mistake, damage, who knows), I'd like to optimize for robustness.
If it helps with context, I'm in climate zone 6 near a big lake considering building one of the growing-in-popularity Estonian https://avrame.com/ kits, and I'd like it to last a long time (thermal drift is topical). It will be cold in the winter, and in the warm summer it will be humid outside and air conditioned inside. The roof is metal and the rafters have 12" depth to work with. I'm certainly partial to putting some insulation outside the sheathing for thermal bridging reasons. In the ideal scenario we'd love to keep VOC-producing items on the outside of the housing space, though that may be going for one layup too many here.
This overall topic seems like a threshold question about whether or not an A-frame is even worth considering.
Thanks!
“[Deleted]”
Hello
It sound like there is another option at least for hot humid climates. Unvented and unconditioned assembly. According to this article (https://www.buildingscience.com/documents/guides-and-manuals/gm-2101-guide-building-conditioned-unvented-attics-and-unconditioned) it's a valid approach to just close the soffit vents, leave the insulation on the attic floor and install some means of removing the moisture (dehumidifier, supply or vapor diffusion port)
Is my understanding correct and has anybody experience with this approach
Thank you
N. Jansen,
The five methods described in this article are not intended to be exhaustive. The methods I describe are common, but there are many other ways to insulate a cathedral ceiling assembly.
The article you linked to discusses the use of vapor diffusion ports in warm climates. This method works, but there are climate and building code limitations to its application in the U.S.
For more information on vapor diffusion ports, see "Vapor Diffusion Ports."
For a comprehensive article on all of the different ways to insulate a cathedral ceiling, see "How to Build an Insulated Cathedral Ceiling."
I have a question regarding details 1&2 specifically. I understand having the insulation between the framing and in #2, having rigid insulation on the warm side of the wall assembly leaves the sheathing cold and susceptible to wetting on the back side, correct?
Assuming a well detailed interior air barrier (ie. utilizing a service cavity in front of the foam board in #2 to eliminate ceiling penetrations) is it just the added heat passing through the sheathing that creates the condensation or do you need the moisture in the interior air passing through to the sheathing for wetting to occur?
Forgive my ignorance as I'm sure that's been beaten to death.
And if that's the case, why wouldn't air baffles made from plywood or OSB and caulked air tight create the same wet situation but at the inside of the air baffle ? Will the plywood baffle wick the moisture through the panel and dry to the ventilation cavity?
And if you make the baffles from foam, caulked or sprayed in with can foam, wouldn't that be creating a double vapor barrier situation in detail #2? At least plywood is relatively open perm when wet.
What I am leading to is, if I build a structure with zip sheathing for example, cut off my rafter overhangs like so many details show and run my wall sheathing up and meet the roof sheathing ("monopoly framing") and have it all taped and flashed, then install 2x4 on the flat creating a ventilation channel with eave inlets and ridge vent, install wood structural panels(plywood or OSB) over that and then my roofing, is it possible to create an unvented detail that doesn't rely on spray foam nor exterior roof insulation? My zip roof sheathing would then be positioned like the ventilation baffle in detail #2 and the plywood/osb panel layer that is accepting the roofing above the ventilation cavity would be in the typical roof sheathing location in detail #2.
I'm not trying to reinvent the wheel. Just trying to understand the functional difference between details 1 & 2 and my proposed detail. I would argue that they would function similarly but I may be missing a critical part of how things actually are functioning.
Zone 4A here.
Sayn,
Q. "Assuming a well detailed interior air barrier (ie. utilizing a service cavity in front of the foam board in #2 to eliminate ceiling penetrations) is it just the added heat passing through the sheathing that creates the condensation or do you need the moisture in the interior air passing through to the sheathing for wetting to occur?"
A. The wetting you are talking about occurs because of air leakage. (Interior air sneaks through small cracks and reaches the cold sheathing). "Added heat" doesn't encourage condensation. Condensation happens on cold surfaces, not warm surfaces.
Q. "Why wouldn't air baffles made from plywood or OSB and caulked air tight create the same wet situation but at the inside of the air baffle?"
A. The ventilation baffles you describe aren't quite as cold as roof sheathing, for one thing. Moreover, the presence of a ventilation channel provides a mechanism for drying; this allows the very tops of each rafter to dry out to the ventilation channel, pulling moisture from the rafters. The ventilation channel also helps dry the top of each ventilation baffle, lowering the moisture content of the ventilation baffle.
Q. "If you make the baffles from foam, caulked or sprayed in with can foam, wouldn't that be creating a double vapor barrier situation?"
A. Some people worry about the use of vapor-impermeable materials to make ventilation baffles, but in practice we haven't observed any problems. Here is my explanation (from another article titled "Site-Built Ventilation Baffles for Roofs"):
"What if interior moisture is able to reach the underside of a ventilation baffle — isn’t it possible that the moisture might condense against the baffle (especially if the baffle is cold)? If so, isn’t this a good argument in favor of using vapor-permeable materials (for example, fiberboard, cardboard, or thin EPS) for ventilation baffles?
The answers to both questions is a qualified yes. Anyone worried about this possibility should probably make their ventilation baffles out of a vapor-permeable material.
That said, there really aren’t any reports of failures or problems resulting from the use of vapor-impermeable materials — for example, polypropylene, vinyl, or foil-faced polyiso — to make ventilation baffles. The main reasons:
● Not much moisture manages to make its way to the ventilation baffles (especially in homes that pay attention to airtightness);
● The air in the ventilation channels is often warmer than outdoor air, a fact which limits condensation; and
● Any moisture that does make its way there seems to be incorporated into the rafters via sorption. The ventilation channels are able to remove a limited amount of moisture from the rafters, and it appears that the rate of drying exceeds the rate of wetting."
Q. "If I install 2x4 on the flat [above my roof sheathing], creating a ventilation channel with eave inlets and ridge vent, install wood structural panels (plywood or OSB) over that and then my roofing, is it possible to create an unvented detail that doesn't rely on spray foam nor exterior roof insulation?"
A. Many builders have used that approach. I discuss this approach in another article, "How to Build an Insulated Cathedral Ceiling." Here's what I wrote:
If you prefer, you can locate your ventilation channels on top of the roof sheathing rather than under the roof sheathing. If you decide to do this, make sure that any roofing underlayment that you install above the roof sheathing is vapor-permeable — for example, #15 asphalt felt, VaproShield SlopeShield, or Solitex Mento — and that your local building department accepts this approach to roof venting. If you install ventilation channels on top of a vapor-impermeable synthetic roofing underlayment, the flowing air won’t be able to help dry out the roof sheathing.
If you plan to install ventilation channels above your roof sheathing, it’s best to choose a roof sheathing that is vapor-permeable (for example, fiberboard). If you use plywood or OSB, there’s a small chance that the sheathing can still accumulate worrisome amounts of moisture over the winter; this is especially true for north-facing roofs.
You can create 1 1/2-inch-high ventilation channels above the roof sheathing with 2x4s installed on the flat, with the 2x4s located above the rafters, 16 inches or 24 inches on center. Although this approach is less fussy than installing vent baffles underneath the sheathing, it usually costs more, because most types of roofing require a second layer of plywood or OSB on top of the vent channels.
In some cases, these ventilation channels are installed above a layer or two of rigid foam. It’s also possible to purchase nailbase (a type of SIP with OSB on one side instead of two) that includes integrated ventilation channels between the OSB and the rigid foam; one brand of these panels is Cool-Vent from Hunter Panels.
If you are choosing to build a vented roof assembly, don’t forget to include soffit vents and ridge vents.
Forgive me I didn't see that other article before posting.
Thanks for the explanation.
Does making the "ventilation baffles" out of thicker foam (2" or thicker foil faced poly iso with seams foamed/caulked then taped and edges taped to the rafters) decrease condensation risk in addition to increasing the cavity r value? This would be for detail #1 without any interior foam board.
I understand "cut and cobble" is shown not to be a great installation method for good reasons. I could simply pay to have the project spray foamed for flash and batt but that scares me as well as if I hire the wrong contractor, they apply it poorly or not uniformly, removal of failed spray foam or any other number issues (trying to detect small cracks, holes and other application faults).
And to be honest, As someone in a trade, the appearance for a flash and batt install looks sloppy and the uneven nature and spatter leaves the batts compressed at different areas on the backside.
However the ability to create nicely taped joints with foil faced polyiso leads me to my question.
I'm an electrician by trade and this is a personal build. I would be doing the installation of these baffles personally.
I could see having a sufficiently thick foam baffle (following 2021 irc ratios) could create the following scenario
1) the taped and detailed foil faced foam baffles would prevent any moist air from hitting the sheathing
2) a thick foam baffle should prevent condensation on the warm facing side of the baffle
3) thick foam baffle would resist bowing from mineral wool batts
4) the foil faced baffles would stop summer vapor drive?
The trusses I'll be insulating are a gambrel scissor type truss that will have depth roughly 11.75" at the wall plate and well over 24" I believe at the ridge.
I'm hesitant still with committing to full exterior continuous insulation as the costs and thicknesses needed (especially with trying to utilize a mineral wool product) make other approaches more appealing.
I appreciate you taking the time to answer my questions. This site is a great resource.
Sayn,
If thick rigid foam makes you feel better, feel free to use thick rigid foam. It will work fine. There is no downside other than the higher cost.
The project still hasn't commenced. Still debating a variance request with my town for my project.
Back on topic however, I am still trying to work out in my head insulating the gambrel scissor trusses constructed of 2x6 and 2x4 chords.
Say I break down and commit to hiring a spray foam contractor to do a combination of closed cell first then open cell to add the needed depth.
Would it be wise to still utilize a fully baffled ventilation channel from eave to ridge for a ventilated roof deck?
Or would it be better to just run sleepers for a ventilation channel on top of the roof deck and utilize a fascia venting detail?
I feel I already have a decent truss depth and baffles under the deck would be much cheaper and faster to install myself than all the additional furring and sheathing needed to do above deck ventilation.
I'm probably overthinking this.
Spray foam however does make me nervous for two reasons:
1) a botched installation
2) future discovery that it really is super unhealthy for occupants
3) any future work or removal of foam for any reason be it structural repair, water damage/repair, etc.
Regarding the definition of a convoluted roof preventing a vented assembly….would a gable roof with one centrally located shed dormer be ok to build as a vented assembly?
BrunoF,
It depends. There are things that can make difficult to vent roofs more resilient. Shed dormers that extend right to the peak, and down to the exterior wall, are easier than those that don't. Over-venting can also make some roofs work.
This is my roof. It has a small attic running the length of the house that each cathedral portion is connected to. It also has 2"x4" strapping under the roofing, which allows cross ventilation between rafter bays, which is especially useful on hipped portion. I have no moisture problems.
A main gable, a hipped roof, two shed dormers, and a flat roof over the chimney/lantern. Only an architect would design something like it.
Thx. My setup is pretty simple (I think)…please see attached elevation.
BrunoF,
It's very doable, but the devil is in the details. How is it framed? A ridge beam? Dropped?
A section through that dormer would be really useful.
Here are two pics…but it looks like I have a spot that will trap airflow where the top of the dormer meets the other roof.
BrunoF,
Yes. Unless you want to backtrack and re-frame the dormer with strapping, it looks like venting it is out.
Edit: It would be pretty simple to do. Pull the sheathing, attach Tyvek Commercial across the tops of the rafters, strap vertically with 2"x2"s or 2"x4"s, and re-sheathe. That avoids all the complexity of an un-vented assembly.
Martin, I have a question. I am retrofitting an existing house with very narrow overhangs. The upper floor is 2x6 rafter, with 42" knee-walls on both sides. It will become living space. The 'triangles' created by the knee-walls will be unused., however. Th existing roof is asphalt shingle and I plan to cover the existing roof with steel. I have planned to install Rockwool bats (R22) with 3/4" rigid foam (foil faced) on the living side of the ceiling and the knee walls, all well taped. We will add insulation on the outer side roof to meet insulation mins. I don't have room for vent channels, so am considering an un-vented roof, and adding dense pack cellulose to the triangles (over a vapour barrier on the floor) And also to the space betweenthe peak and the collar ties. I am thinking about blocking the soffit overhang with 2" rigid foam. Is this a decent approach? I've had folks suggest spray foam, but the cost (as you have cited) is prohibitive.
Lynelle,
The real benefit to this article, which I refer to frequently, is it lays out five r0ofs we know work, if you install them as they are shown - without modifying them.
So if you want to use exterior insulation, there should be no interior foil-faced foam, or areas that are insulated differently, as you propose with the triangles behind the knee walls.
Lynelle,
I'm not sure exactly what you mean with some of your descriptions. But if you plan to install new roofing (steel roofing), the obvious way to proceed is to install an adequately thick layer of rigid foam on the exterior side of the roof sheathing before the new roofing is installed. (This would be "Assembly #3" as described in the article on this page.) The thickness of the required rigid foam will depend on your climate zone.
If you follow this approach, you will end up with an unvented roof assembly. The "triangles" you describe would be dealt with in exactly the same way as the occupied space -- by installing rigid foam about the roof sheathing, and some type of fluffy insulation (your suggestion of Rockwool batts is fine) between the rafters.
I'm designing a carriage house (ADU, aka garage with an apartment above it) in Detroit, climate zone 5A. It's got some fussy. details. I'm worried about moisture issues from condensation, and I could use some feedback.
The bedroom will have engineered attic trusses at 24" O.C. with built-in book cases between the vertical truss members of the knee wall. There garage below will be unconditioned and insulated. There is a thermal bridge in the garage at the water table. I've attached sheet showing a section through the space, and a similar detail that I'm using in another portion of the building.
I'm using Assembly #2: Vented assembly with fiberglass batts and interior rigid foam
From my understanding, the rigid needs to be taped and sealed along the perimeter to air seal it, preventing moist air from condensing on the bottom of the sheathing. In this particular room, the knee walls and cavities make sealing it tricky. In the drawing I'm calling for spray foam insulation to seal the additional penetrations. Does this work? Is there a better/simpler way to handle it? I don't think the contractor is going to like having to mess with coping the subfloor around the trusses, or the all the spray foam seals. I'm worried some will get missed.
Thanks in advance for your help.
PS. I've posted the same thing in the comments on this page. I'm not sure which would get a better response. Please delete if it's an issue.https://www.greenbuildingadvisor.com/article/bonus-room-problems#comment-267229
Revo,
It might be easier to design this space with conventional rafters (continuous from the exterior walls to the ridge) instead of engineered trusses with kneewalls. If you insist on sticking with the trusses, using spray foam to air seal the intersection of the top of the kneewalls with the interior sloped rigid foam is certainly one option. You're right that the air sealing work will be fussy.
Hi Martin,
Thanks for the quick response.
Unfortunately We're stuck with attic trusses for that area. Without them, the beam at the intersection of the 'L' form would have to be massive in order to carry the load down from the ridge beam. The first floor is one big open space. No walls/columns to carry the load. I've attached a roof plan for reference. The precious section was taken where the dashed blue line is.
Thinking about it further, I'm worried about the lack of ventilation at the intersection of the gables (area in dashed red box). Without a soffit in that area, getting ventilation in at the bottom will be tricky.
Maybe roofs #4 or #5 would be better in this application? What are your thoughts? I've left a message with my Certainteed rep to see if they will warranty their shingles on an unvented roof. The cost of the material might outweigh all the fussy details, sealant, baffles, and ridge venting.
revo351,
Like Martin I'm a bit confused as to why you can't frame this with rafters? The roof would have no ridge beam, so there would be no roof loads to transfer. Both the horizontal and vertical loads would be taken up by the exterior walls and floor. It's a pretty common way to frame these roofs. Another alternative would be parallel chord trusses.
The advantage is you end up with a continuous sub-floor that acts as an air-barrier, and clear-span roof members meaning you can reconfigure the space in any way you want, while removing any impediments to using Assembly #2. My own preference, which would solve any venting complications at the valley, would be to use this one:
https://www.greenbuildingadvisor.com/article/building-a-vaulted-high-performance-and-foam-free-roof-assembly
Hi Malcom,
Thanks for your input.
I've attached the initial markup from my structural engineer from last year. Notice the notes boxed in yellow. Hopefully they aren't coming through too pixilated. I trust their calcs and recommendations. Using pre-engineered trusses eliminated 2 beams and greatly reduced the size of the central beam.
We are less than a week from issuing for bid. That doesn't leave enough time for the engineer to redo their calcs, resize the members, and for me to make all the adjustments to my drawings.
The system in the article that you sent me is interesting. Definitely something to consider for future projects. I've got another ADU design starting up right after I finish this project where we were considering using the 'perfect wall' (insulation on the exterior of sheathing throughout the structure. However, that may be a good fit. I wonder if anyone has seen how a a similar system has held up after 10+ years of installation.
revo351,
Fair enough. You are well past the point where you want to be considering any major changes.
I'd offer some suggestions:
- Use Assembly #1 but strap the roof over the trusses with 2"x material and rely on that to vent the portions that do not have a continuous path from eaves to peak.
- Use assembly #5 throughout.
- Use a combination of the two. Most of the roof can easily be vented using #1. Reserve #5 for the problem areas.
Thanks again Malcom.
I just got off the phone with the Certainteed. They'll warranty the shingles over an unvented roof. I'm going to switch over to Assembly #5 throughout. That will simplify things for the contractor. It'll also keep the interior spring lines and gable peaks consistent.
revo351,
Good luck with your build!
Hey Martin,
I've just finished reading a lot of your articles: Vapor Diffusion Ports; How to Build an Insulated Cathedral Ceiling; Creating a Conditioned Attic and; All About Attic Venting. They were great articles and I wanted to thank you for taking the time to write them. However, being new to this, I'm still not totally sure I understand all the factors at play here.
I am building my first house in Calgary AB, Canada (Zone 6 or 7) and am looking to do a passive house inspired build. For this I've tried to make sure I have two continuous air barriers - the vapor barrier behind the drywall and the WRB outside the sheathing. The WRB will be tied into the roof underlayment at the roof/wall connection and the vapor barrier will be linked to Mento leaders that wrap around the floor joist and outside the rim joist between levels. The second floor is a vaulted ceiling with a short 'attic' running through the ridge. Since I was planning on having my vapor barrier be continuous to the ridge of the house I was curious if that mitigated some of the concerns regarding ridge rot and having vapor enter the roof assembly.
I've included a rough drawing to show what I'm considering and wanted to know if you had any comments.
Thanks again,
Anthony
Anthony,
You're building in a cold climate. My article on vapor diffusion ports is irrelevant to your situation, since vapor diffusion ports only work in hot climates (Climate Zones 1, 2, or 3).
You have chosen a vented roof assembly with air-permeable insulation (mineral wool). This approach requires a continuous ventilation path between the top of the insulation layer and the underside of the roof sheathing. While your drawing appears to show a 1.5-inch-high ventilation channel above the insulation layer, I'm not sure that you have included a ridge vent. If you have a ridge vent, you're on the right path.
The most problematic detail is the two dormers that interfere with the ventilation channels. If you want a vented roof assembly, you can't have the two dormers.
Hey Martin,
Thanks for the reply, that all makes sense. I have a follow up question about the dormers. If the 'rafters' are parallel chord trusses, instead of 2x dimensional, with an approximately 18" cavity would this work to get ventilation below the sheathing above the dormers? It seems like the air would be able to pass freely from cavity to cavity as there will be plenty of space above 12" of mineral wool.
Thoughts?
Anthony,
That might work. The only problem with installing 12 inches of fluffy insulation in a 24-inch-deep cavity is that you have to worry about slumping or sliding of the insulation, either during installation or afterward.
Log in or become a member to post a comment.
Sign up Log in