Extended Window Jambs & Sills
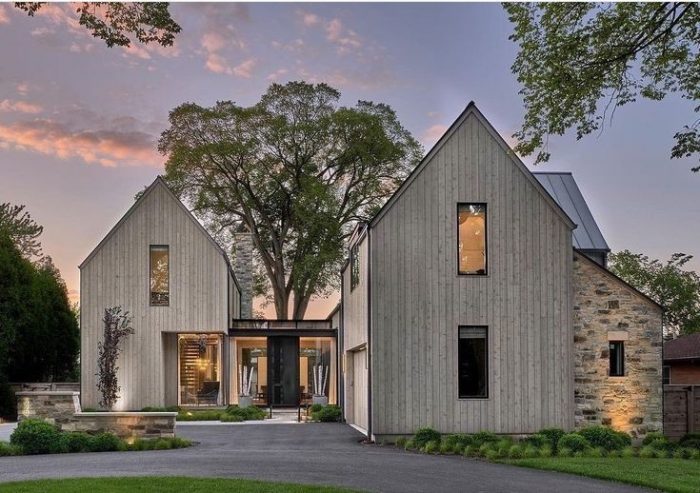
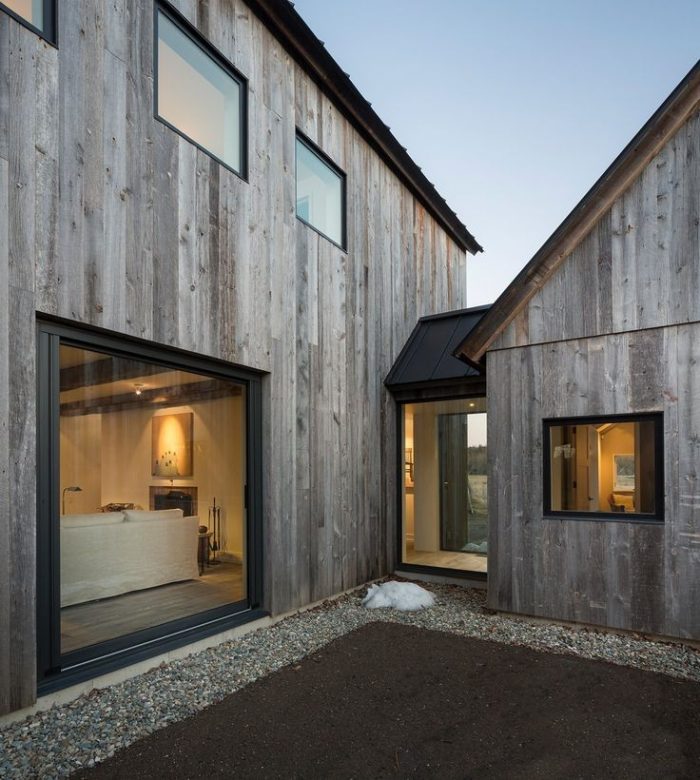
Hello. We’re building a modern farmhouse with Scandinavian features and I really would like to not have any window trim (casings) on the exterior. I’ve read a couple of articles here about just building extension jambs and sills, which I think would achieve the look I’m going for. My question is if we just build extension jambs/sills and the windows need to be replaced in the future will we have to cut away at some of the siding to get the window out? Is there another way to achieve this look without potentially compromising siding in the future? I’ve attached photos of the look I’m going for.
GBA Detail Library
A collection of one thousand construction details organized by climate and house part
Replies
Are you using flanged or flangeless windows?
Sorry, forgot to mention that. They're flanged.
Check out comment 18 here: https://www.greenbuildingadvisor.com/article/windows-in-thick-walls.
If flangeless, as the ones in your inspiration image are likely to be, it's even easier--I'd use similar details but there is no flange to worry about.
Thank you. So it looks like in that example drawing in the comments the siding is over the buck which sits over the flange. I've never physically replaced a window myself but I'm guessing that since I have flanged windows if I were to just use extended jambs and no casings then we would end up having to cut siding if we need to replace a window one day, correct?
Theminesweeper,
With flanged windows the only way I know of avoiding that is having the trim mounted directly to the wall or rain-screen strapping. Once you extend the siding over the flange, it has to come off before the window can be replaced.
When that occurs - and you should see a lifespan of at least 40 years for the window (maybe less for the glazing, but that can be replaced interdependently) - casing the windows in similar siding material in the same plane doesn't seem like a huge compromise of the aesthetic to me.
Much more likely is that in 40+ years the look of houses will have changed significantly enough that it isn't even an issue.
No, my comment #18 specifically addresses the flange issue. There is no need to remove any siding.
Michael,
I missed that too. You do still end up with a cased opening, not the siding butting into the window frame, but if the buck was painted the same colour as the window, it would probably look like part of it.
Adding casing is optional. You can locate the buck off the flange and use shims or foam to push what I call "fin jambs" to be adjacent to the window frame.
Michael -
I came across this article hoping for a similar trim detail (see photo attached). Your drawing linked in the thread makes complete sense if you have exterior insulation that is proud of your sheathing OR if you have exterior insulation.
My dilemma is I am looking at some large Marvin picture windows, non-operable, and direct glazed. I'm not sure if these can be mounted without a flange that mounts to the outside of the sheathing, since the picture window doesn't have a removable sash to screw through.
European windows usually have the metal fastening strip that allows you to inset the window in the rough opening, allowing for the extension jamb trim to be nailed straight into your framing.
Any thoughts or advice is welcome! Thanks
Rainbirdd, check out the installation instructions: https://www.marvin.com/f/1019562/x/02478d6ce5/mndg_installation_19915887.pdf. They can be ordered with or without nailing flanges. If you don't want flanges, you screw through the jambs into the framing and the glazing is then set into the window frame.
How you would install what I call fin jambs depends on:
1. How thick is the wall framing
2. Do you want a window flange
3. Where in the wall do you want the window
4. Do you have a rain screen cavity, and if so, how thick and what are the materials
Ah yes - I've read through this installation guide and they have a youtube video showing installation too - problem is, this is for an entirely independent product line they have called 'Modern' windows (i.e. it's their take on the European thin-line, aluminum frame windows). Those windows basically allow you to screw from inside the jamb and then there's a cap/cover that goes over top of the screws.
The rest of their window lines - Ultimate and Elevate - are wood interior with either fiberglass or aluminum exterior. I'm waiting to hear from Marvin if there's an install method because it doesn't seem that with a 'direct glaze' picture window there is anywhere to actually screw into since the glass terminates directly into the jamb with no sash, etc.
My walls are 2x6 with Quarrix furring strips on the exterior as to hang vertical t&g cladding, so with the cladding material, I have a tad over 1" to the exterior surface. Ideally the window would be inset only slightly, rather than a full inset with no sill on the interior - i'd still like to have a proper interior sill.
Again, this might simply be a question of can the Ultimate / Elevate windows be mounted without the nailing flange on the exterior...
I've used the Integtity Ultrex windows (now called Elevate), and they had the option of metal mounting straps. The straps were available in two different lengths. I think the Elevate windows are identical, just a rebranding, but not 100% positive on that. I'll attach the Integrity installation manual if i can.
Reply to comment 16: Frank, Marvin Elevate are the same as the former Integrity wood-frame, Ultrex-clad line. The all-Ultrex line is now called Marvin Essential.
Ah yes, thanks Michael, my memory isn't what it used to be. I should have double-checked that, but finding information on Marvin's website was an exercise in frustration the last time I tried.
Frank, believe me, I understand both the memory issue and frustration with Marvin's site! It's currently relatively usable, especially compared to past versions. Elevate is one of my go-to brands so I'm familiar with their details.
Deleted
Deleted
Ah yes - I've read through this installation guide and they have a youtube video showing installation too - problem is, this is for an entirely independent product line they have called 'Modern' windows (i.e. it's their take on the European thin-line, aluminum frame windows). Those windows basically allow you to screw from inside the jamb and then there's a cap/cover that goes over top of the screws.
The rest of their window lines - Ultimate and Elevate - are wood interior with either fiberglass or aluminum exterior. I'm waiting to hear from Marvin if there's an install method because it doesn't seem that with a 'direct glaze' picture window there is anywhere to actually screw into since the glass terminates directly into the jamb with no sash, etc.
My walls are 2x6 with Quarrix furring strips on the exterior as to hang vertical t&g cladding, so with the cladding material, I have a tad over 1" to the exterior surface. Ideally the window would be inset only slightly, rather than a full inset with no sill on the interior - i'd still like to have a proper interior sill.
Again, this might simply be a question of can the Ultimate / Elevate windows be mounted without the nailing flange on the exterior. I'd hope I don't have to fabricate something myself
I'm familiar with many different window types. Most or all major window manufacturers offer flangeless windows or "insert" windows; you're responsible for making the assembly watertight and airtight.
With or without flanges, I think the solution is to run solid wood blocking around the window opening--allowing for airflow and drainage--and attach the fin jamb to that. With a flange, I would add either an additional piece of furring or a narrow "casing" so the flange can be accessed for replacement or repair in the future, without destroying the cladding.
Thanks for all the helpful info y'all!
I quickly spec'd out the assembly I am thinking (shown as variant 3) alongside the typical trim assembly & a potential work-around (#2) to achieve a similar but not exact result. The install I came up with is similar to what you mentioned Michael, but I'm not using solid wood blocking around the interior of the rough opening, simply just insetting the trim-board itself into the RO & face nailing that into the studs. This should allow the siding to terminate directly against the trim board itself too.
Rainbirdd, is your plan for variant 3 to install the trim boards to the rough opening before installing the window? In that case, you'll have to leave some shim space between the window and the trim boards, which you would probably want to cover with a thin secondary piece of trim. If the sill is similar, you'd have to allow for drainage.
FrankD - Yes, that's the intention, although you bring up a great point I hadn't considered. Thinking about it briefly, I suppose you could cut a rabbit into the backside of the trim board to allow for a shim, instead of adding a secondary trim piece...although depending on the width of the shim itself, this might not give you a structural surface to nail through (i.e. if the shim is 1/4", you wouldn't want to cut a 3/4" rabbit and nail through the remaining 1/4").
Only other thing I can think of is to shim it further back inside the rough opening and then get a trim piece that'd cover up the shim that could be nailed in after the window is set, but not exactly sure how that'd work in practice w/o cutting the trim board still. That said, as of now, the trim board is set at a somewhat arbitrary depth inside the RO.
Maybe there's another option i'm not considering - kind of a complicated detail
I suppose this is a slightly different variation of what Michael mentioned (i.e. framing out the entire opening) - I could see this working, but it has implications for interior window trim, since the window needs to sit back into the opening 2-3".
Only other thing with this one is I'd question whether the 1.5" nailing surface shown is enough to create a strong connection...
Rainbirdd, that detail looks buildable. Just be sure that you know exactly where the WRB is and that it's continuous. Same for the air control layer. You should have no gaps in either, other than a small gap in the WRB so a sill pan can drain. Alternatively, you can use a "full barrier" system that seals the WRB tightly to the window all around, but it's riskier than allow the window opening to drain if it were to leak.
Michael - planning to use Adhero 3000 and wrap that into the RO + liquid flash the sill pan, then add liquid flash / tapes to seal window once set. Back fill air gaps with spray foam on the interior.
Thinking about this considerably more, I believe I've narrowed the options down to two assemblies that accomplish two things:
1. Allow for the desired trim assembly
2. Allow for install with the nailing flange on the outside of the sheathing
3. Doesn't require a more complicated method or assembly from what is typical & repeatable for a normal framing crew.
Those two options are attached - I believe my gut simply tells me to at a 2x4 furring box (Option 1 here) on the exterior of every RO, similar to if you were installing exterior insulation. This allows me to keep the window installation simple, doesn't require strapping, and is repeatable without special instruction.
So all that to say, I think this would essentially be the same method you originally stated, just without that exterior insulation lol.