Adding Rake to Gable Ends with Exterior Insulation
Chainsaw remodel on existing 1906 roof. Looking for help understanding finish details, in particular how rake is added to gable ends if there is 4-6″ of foam board insulation added on top of existing roof. There will be sleepers on top of foam to create ventilation channel. Attached sketch (Orange is existing and the rest will be new construction) shows 4″ of foam on top of roof, and two inches on exterior walls (similar to detail shown with the proposal from Rockwool also attached) but I think I will need more foam on roof to get my insulation ratio correct with interior (r-30 in between rafters). In this drawing I propose a customized rafter tail to extend the ventilation channel but that seems labor intensive, yet if I only have the ends of horizontally laid sleepers for rafter tails then there is not much to support soffit construction. For the gable end, my only thought is to place a pseudo-rafter on the edge of the existing roof, but how do I secure it so it can support the rake so I can extend my eaves?
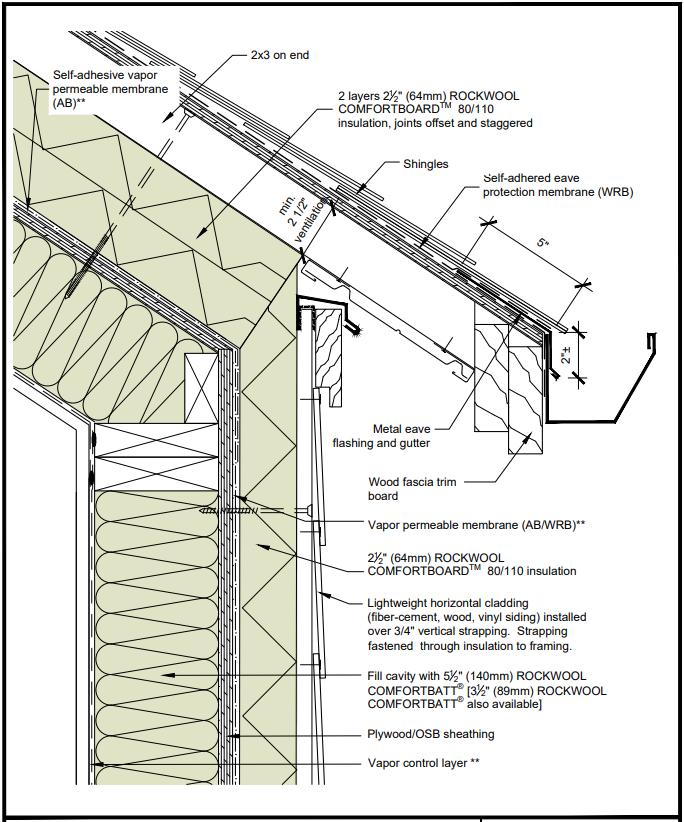
Also, proportions and finish details seem like they could be a challenge. With 6″ of foam and then 2 1/8 \” of sleeper and sheathing depth there is a lot of space to cover with trim. Maybe I have missed them, but I cannot find anything to address this in the detail library here on GBA.
Thoughts?

GBA Detail Library
A collection of one thousand construction details organized by climate and house part


Replies
I placed new rafters on top of old roof to create a new overhang, then spray foamed entire roof. If you're against spray foam, you could work foam board around rafters and foam around the gaps
Take a loot at this thread:
https://www.greenbuildingadvisor.com/question/risk-of-rot-in-warm-roof-outlooks
I would skip the exterior rigid for the roof and set new rafters plus batts. Much simpler to build, works just as well and way cheaper insulation and you don't have to worry about bolt on overhangs.
Akos,
With this approach, am I creating a hot or cold roof? If I am venting above the batts, and I need at least r-30 of insulation on roof, am I framing with 2x10s so there is an air gap above? How are these rafters attached? I-joists? so there is a nailing surface? And does that solve my rake problem in the gable end? If the roof is 12/12 does that alter the plan?
Thanks
Somewhat in between, neither hot nor cold roof.
Since it is not using rigid foam insulation, the condensing plane is somewhere along the exterior fluffy insulation layer so if there is moisture bellow the roof, it can condense out. With this type of roof, not much if any moisture should make it to there but a bit of drying capacity is a good idea. For example, if you are using standing seam roofing, the ribs and striations of most profile would create enough of a vent gap. For a bit of extra safety, a full 1.5" vent soffit to ridge channel is easy to include.
If you want R30 above the roof deck, than you need 2x8s for the over roof. If you also need the vent channel, than you are looking to bump it up to 2x10 or strap out the 2x8s.
The over roof rafters get toe nailed to the roof deck and anchored at the outside wall with straps. For the best assembly R value, you want the over roof rafters to be either perpendicular or offset to the ones bellow. It might make more sense to frame the ceiling with purlins so this way the roof rafters are in the right direction for venting.
For the rake ends you can do standard ladder framing.
Akos,
Thanks for taking the time to answer my questions, now I have even more.
They are now based on this roof assembly inside to out. Sheetrock, strapping, rafters (existing are 3x5 on 34 inch centers with no ridgebeam, but that will be remedied and expanded to 2x8s) with r-30 batts, original pine board sheathing, new WRB, r-30 batt insulation placed either horizontally or offset vertically to allow for thermobridging protection(technically, the exterior insulation on the roof should be 51% of assembly, so not sure if r-30 over r-30 works), air ventilation gap, or not, then sheathing, and standing seam metal roof.
If I use a horizontal approach to laying the batts, then it is not vented, correct? Do I even need venting in an r-60+ roof assembly in climate zone 6A? Does venting over 6" of rigid foam board work anyways or does that assembly dry to the inside regardless?
My original question about nailing the rake to foam vs a new rafter placed on the edge had two parts--first, how strong is the assembly if rake is hanging off of a toe-nailed rafter secured to the rest of the assembly with sheathing, and next from a design standpoint, I now have a very wide roof trim element that needs to be balanced on a traditional New England farm house. To these questions I now add a structural question--2x8 or 2x1os plus batts vs foam board and 2x4s will weigh more--a lot more? Enough to alter structural analysis? Maybe not. No doubt the cost of 8" of r-30 batts will be much less than 5-6" of foam. Ease of installation?--nothing is as easy on 12/12 roofs as it is on 5/12.
At any rate, if you have the time to muse some more on this subject and address my thoughts that would be much appreciated.
Brad
Brad,
Who will be doing this work? If you are looking for trades, your best option is a nailbase panel (polyiso with OSB bonded on one side) over the existing roof without cutting off the existing overhangs. This does add a bit of height, but you can hide some of it by tapering the rafter tails by the facia.
Akos,
Hopefully, I am not doing the work on the roof. So far, I have relied on articles here on GBA to inform my approach, or the approach I hope the builders will use. This article: https://www.greenbuildingadvisor.com/article/combining-exterior-rigid-foam-with-fluffy-insulation#0 is what got me onto my current thinking. Using nailbase panels could be an option but as you note, I might still have a thick edge. I could also decrease my insulation to the r-49 minimum. This would alleviate the need to fir out my interior rafters, use fluffy r-23 insulation inside, and I could add r-26 or so on the outside which I could accomplish with 4 inches of polyiso foam. Adding 2x4 sleepers on their sides and a ventilation channel would then require shorter screws and would also present a proportionately more traditional trim detail.
As a retrofit using expensive insulation anything much an R25 assembly has no ROI, a well sealed R30 roof is all you really need for efficiency and comfort.
Instead of aiming for R49, the better one is for U factor based compliance that takes into account the fact the a roof with exterior insulation has much lower thermal bridging.
I'm in the land of older 2.5 story homes, the typical insulation retrofit is spray foam. Not the greenest or the cheapest but can be installed from the inside and the random non standard rafter size or spacing doesn't matter. In your case, I would strap out the rafters with horizontal 2x on 16" OC and spray foam the rafter space making to sure to cover the rafters with at least 1" of foam. This significantly reduces the thermal bridging and gets you a reasonable R value assembly plus it is now much easier to hang drywall.
If you want an SPF free option, the exterior nailbase panel is probably the best way to go. I would add in the missing interior rafters so you can use 16" batts, you can even downsize these to R19 or R15 to reduce the amount of exterior rigid. A the overhangs, you can taper the bottom of the existing rafters/lookouts so they are say 1.5" at the edge. Above the roof picture frame all the nailbase with 2x beveled to match the roof slope and nailbase height. In case of 12:12 roof and 3" nailbase, this will mean about 4 1/4" extra height, add on 3/4" sheathing and 1.5 rafter tip, the facia is only 6.5" tall. I have 12" rake ends on my home and from 25' to the ground, you don't even notice it.
Roofers are not good frames, you probably want to split the job up between trades. I would get a roofer to strip the existing roof and install I&W over the whole place. The I&W now is your main air barrier plus it gets you weather tight while the exterior roof is installed. A carpenter can then install the nailbase over the deck and do the trimming and facia support. Once this is done the metal roofer installs a new underlayment and metal roof.
Akos,
You are correct--this is a 2.5 story house--I intend to turn the third floor attic into livable space. You are also correct, I was trying to avoid spray foam. I am not sure ROI is a factor, if it were, and if I was ignoring the environmental impact, I likely would have demolished the old house and started over. That said, I have never been a fan of spending money that does not provide a reasonable benefit. Your analysis has provided much food for thought. And to return to one of the original questions, if I drop the total r-value of the roof, do I need to make sure it is ventilated? Note from my original post that my existing structure is balloon framed with 4x4 studs supporting a 5x6 plate that has rafters toe nailed to it. I have not dissected the existing soffit detail, but it does not include any rafter tails--it was added after the main structure was built. I think that argues for your approach that would avoid chainsawing those soffits off. My intent in removing them was to add an air barrier over then entire wall.
Fortunately or unfortunately, it is still a contractor's market in my area, so I have time to keep tweaking the plan while looking for members of the building team--and yes, you are correct, I am GCing the project myself.
Thanks again.
The stackup with sufficient exterior rigid foam for condensation control does not need any venting. The only time this type of roof would need venting is if you are in heavy snow country (above 60lb/sqft).
I'm in the north edge of zone 5 and have this type of assembly on one part of my roof (standing seam over 2.5" exterior polyiso above, R24 bellow in the rafters) and it has worked great. No issues with comfort or ice buildup.
Air barrier continuity between wall and roof is great if it can be easily done but you can also seal with a small amount of spray foam at the wall plate/rafter intersection. With such an old building, no matter what you do, at the end of the day, it will be way more energy efficient.
Here's a few pics of house with rafters on top of existing roof. One advantage was that this approach straightened a slight swayback in the existing structure.
Akos,
Really enjoying your input. Much appreciated. Lots more questions, but my day job sometimes interferes with my building science hobby.
I have same, or similar problem with walls. 4" current depth. No insulation. Pine board sheathing. Plan was to remove clapboards, place blueskin or other WRB. Fill interior with fluffy insulation and wrap exterior with 2" comfort board, rain screen and new siding. Al windows are single pane glass, many panes falling out. Plan to replace when siding/exterior insulation project done.
Currently working on basement where water freely flows. Replacing rotten sills, and installing 10-15mil plastic to create reverse swimming pool. Thoughts?
Akos,
Can you help me better understand your perspective to do a framed over-roof filled with mineral wool vs a rigid install? Or vs working from the inside (assuming the roof is coming off no matter what)?
Is the purported cost reduction purely in materials? Doing a quick calc, it looks to me that R-26 of polyiso is about $2,600 in materials for 1,000 sq. ft. of roof. Mineral wool at R23 (so not even exact comparison- but is the size of the batt) is $1,950 for 1,000 sq. ft.
That doesn't strike me as much in savings. And there is lumber for the mineral wool, but screws for the foam... maybe a wash on these other materials.
Or is the assertion that the over-framing is actually cheaper in labor than installing the foam? I've not performed either task, so I don't have first hand experience, but it seems the foam would in many ways be easier to tack up than framing a whole new over roof. Even if I am wrong on that point, how wrong am I? (as in how much labor savings could the mineral option provide?)
Then there is option 3 that you mention: deal with it from the inside using spray foam.
We have had a local insulation/energy audit contractor suggest that this would be the cheaper option EVEN given that we are stripping our roof down for a re roof anyways. Are you implying the same? If so, how is that possible? A gut of the inside, adding strapping, spraying cc foam, then all new drywall etc. when we're taking the roof down to sheathing no matter what (so not a comparison of gutting one vs the other).
For some reason I am struggling to wrap my head around these perspectives (perspectives that people with tremendous experience seem to share, but it doesn't quite add up to me).
The foam over-roof still seems the simplest of the 3. The advice to do it from the inside is confounding, and the advise to frame over the roof and fill with mineral wool is (while less confounding) seemingly not offering that much in savings and I would think doesn't perform quite as well. Where have I gone astray?
*I should have clarified, this is also for a 1/2 story situation (cape) that has insulation on the floor and verticals of the kneewalls, then along the slope, and then along the flat of a small attic triangle.
An over roof doesn't need to be insulated with MW, you can use anything, even loose fill.
I have done both types of roof and find them about the same effort, someone used to framing might prefer lumber over dealing with foot long screws.
The lumber over roof also has built in new rafter tails which makes a chainsaw retrofit much simpler.
The one drawback of the lumber+fluffy is that it still should be somewhat vented.
In case of an existing cape with insulation in the attic/knee walls, most of that has to come out if you are insulating on the outside. The interior fluffy needs to be directly under the exterior insulation. Once the ceiling and walls are demoed, spray foam is probably the simpler option.
"The interior fluffy needs to be directly under the exterior insulation."
Thanks for the response. Thus installer actually seemed fine with leaving it in place, saying it was series heat flow (which it is). I mentioned that it's best to have it on the same plane, but to be honest, I don't understand the reasoning behind it. I've heard it said numerous times here, but never once heard the actual scientific reasoning behind it. Is it really totally necessary?
Tyler, gaps between insulation layers often have uninsulated edges, creating a thermal bypass. If you can seal and insulate the perimeter in a way that will remain sealed, I don't see a problem with having a gap between insulation layers. But having gone through the exercise many times, it's often surprisingly difficult to fully seal the edges of those gaps.
Thanks Michael, I appreciate the response.
This is one of those projects that gets talked about a lot here, but the reality of performing the work brings lots of questions and doubts to the forefront. Like, is adding insulation over a roof sensible during a re roof. Does the attic insulation really need to be relocated. Etc.
In this case, we are looking at spray foaming the little gable triangles to seal all the needed sides.
The issue can also be creating in-between spaces where relative humidity can be very high.
For example, in case with 50% exterior/interior R value ratio with 10F outdoors, 70F indoors.
If you have a mini attic type of space between the interior rigid and fluffy, this attic space is now at 40F. Assuming the house air is 40% RH, the dewpoint is 45F, that means there will be condensation inside this mini attic space.
How much condensation will occur is hard to predicts, to me this falls into the not good category.
If you do want to split split the insulation, one way to do it is to install more exterior rigid to bring up the rigid/fluffy ratio. This way even if there is an in-between space, that will be much closer to indoor temperature.
Akos,
I can't argue with that math, but then how is that any different than any other more contiguous assembly using the 51/49 ratio (as mandated by code for cz6?
Is it just that it's a more volumous space potentially existing in those conditions?
The insulation directly in contact with the underside of the sheathing prevents convective airflow. You will get some local condensation but it will be much less since the airflow is much lower. This little bit of condensation is the reason this type of assembly needs to be able to dry to the interior.
Akos,
Thanks for the reply.
I'm not sure I really get it still. Is the idea that the convection you speak of will bring more interior air (and therefore moisture) into this little attic space vs insulation tight to the sheathing which would limit the total amount of air (and moisture) reaching the sheathing to begin with? It seems like there are quite a few other factors at play, like the tightness of the drywall (in both cases) types of insulation used, etc. It's a bit hard to imagine this being such a fundamental difference as far as risk, but maybe I'm just not getting my brain around it.
If we go ahead and build it this way maybe I'll put some monitors in there and keep an eye on things. Though it's unlikely we would ever have 40%rh in the coldest winter days in this scenario which is an office, so that probably buys us some good margin.
Is it roof details outstripping interior details on cost?
I am looking to do something similar to extend my roof overhang (4" existing) to 3 ft. I'm looking to add 2 layers of 1 1/2" polyiso (3" total) over existing sheathing, then 2x4 flat sleepers with homemade truss overhang kickers at new overhang w/ lag screws into facia and sleepers above. New roof shtg above sleepers w/ continuous ice and water shield under battens and roof tiles. This gives me my thermal break, added insulation (R-56 total), and a nice overhang. I'm also adding 3" insulation to exterior with a rain screen and new stucco. Zone 9B.
I've done this with layers of rigid foam and extending 2X sleepers to create the overhang, and I've done it by over-framing a roof and insulating with mineral wool. There are pros and cons to each approach, but cost, environmental impact and performance are pretty similar either way. On one project I found that the existing rafters had not been installed carefully; trying to get 9" screws to hit those rafters was nearly impossible. (We had marked the tops and bottoms of the rafters but didn't realize how bowed they were along the length until we already had all of the foam tacked into place.) I often prefer to vent roofs, which is important if using mineral wool, even on the exterior.
OK, I am the original poster on this thread, I have read all of the points and understand most of them. This paper addresses my issue, but also adds a few more questions.
https://buildingscience.com/documents/insights/bsi-063-over-roofing
Part of my original question is answered with the general detail drawings but I think there are a few missing parts.
If I understand Akos's ROI concept, then I would just do what Joe initially did to the attic--spray foam, finish the space, and call it good. There is a chance that I will end up with the thermal bridging problem that he eventually dealt with by adding the 6" of polyiso. But it will be an improvement, and it's cost is less.
I need the new roof now, and the attic is exposed and a clean slate. So I can address this problem from either side or both.
I started to wonder if a compromise would work--flash and fill my 2x8 rafter space. I get the advantage of CCSF, but minimize its use. But then I read this: https://www.greenbuildingadvisor.com/article/flash-and-batt-insulation
So, I started thinking about U-factor, could I add a thermal break on the inside if it is vapor open? Roof detail inside out then becomes:
sheetrock
horizontal strapping
1 or 2 inches of wood-fiber or wool-fiber board
Blown cellulose
Spray foam 4" Ideally using the most environmentally friendly spray foam option
Sheathing
Vapor impermeable membrane
Shingles or metal roof
Clearly I am still struggling with this. So I read: https://www.finehomebuilding.com/2021/01/15/is-there-environmentally-friendly-spray-foam-insulation
And then started wondering why I am not cut-and-cobbling this entire roof?
All help appreciated
Vetitude,
From what I've read (mostly on this forum), I think the cut-and-cobble approach has enough room for error that it's a pretty risky approach when used in an unvented roof assembly. Good article here:
https://www.greenbuildingadvisor.com/article/cut-and-cobble-insulation
Thanks. I needed a reason not to cut and cobble!
Brad