
Image Credit: William Lucrisia
More Q&A Spotlight


Is there anything worse than getting midway through a renovation and then suddenly wondering whether you’ve got some important detail all wrong?
That seems to be the predicament of William Lucrisia, who’s in the midst of an insulation upgrade at his house north of Seattle.
“The house was heated by propane,” he explains in a Q&A post at Green Building Advisor. It was a cost that was hard to get hold of, especially with some of the design [features] of the house (high ceiling).”
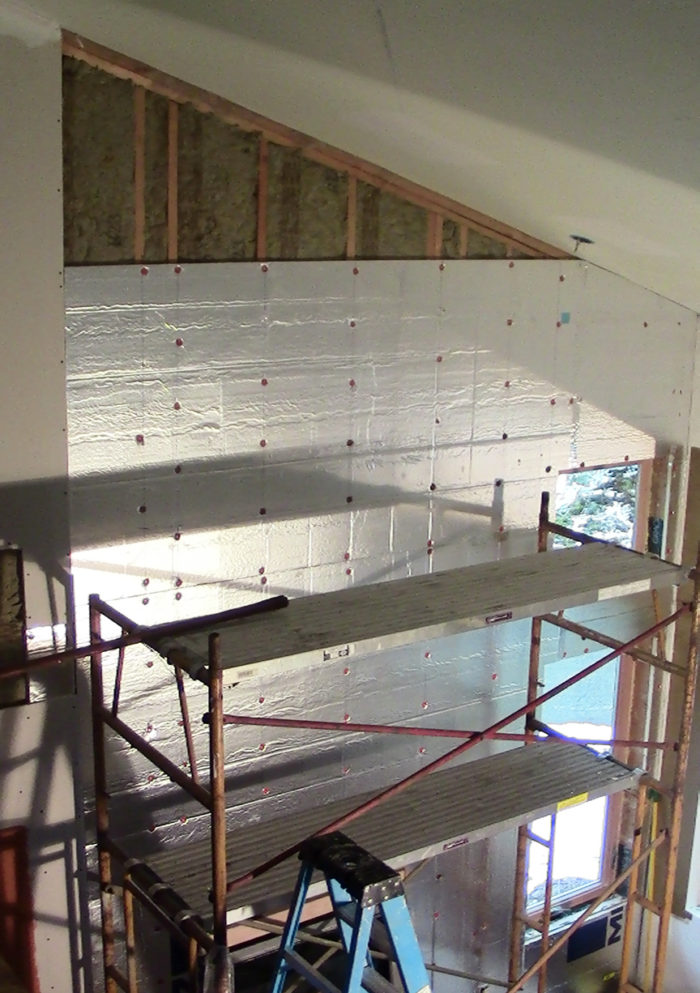
So Lucrisia set about making improvements, and his plan involved gutting interior walls and adding mineral wool insulation and then a layer of foil-faced polyisocyanurate insulation before applying new gypsum drywall.
“I am a bit ‘OCD’ now that the living room is for the most part done… I wonder if I am trapping moisture inside my walls, having used the foil-faced polyiso just behind the Sheetrock… Was it okay to do what I have done?”
That’s the question for this Q&A Spotlight.
The walls are OK, but what about the ceiling?
The foil face of the polyiso insulation won’t allow the passage of moisture, but Lucrisia should have no problems as long as the walls can dry to the exterior, says GBA senior editor Martin Holladay. And that, Lucrisia says, appears to be the case.
“I presume things will dry from the exterior,” he writes. “It’s typical sheathing and siding on the exterior. It’s just that my wooded area with the rain and cool air air scares me with some of the stuff I have been reading lately.”
But a related issue concerns the ceiling. A second photo that Lucrisia posts with his question shows a ceiling finished with slats of wood, and Holladay wants to…
Weekly Newsletter
Get building science and energy efficiency advice, plus special offers, in your inbox.

This article is only available to GBA Prime Members
Sign up for a free trial and get instant access to this article as well as GBA’s complete library of premium articles and construction details.
Start Free TrialAlready a member? Log in


10 Comments
I am considering a similar
I am considering a similar insulation arrangement for my unfinished "basement" before turning it into a better insulated storage room which has a full hight stud wall (with R11 fiberglass) on one side and a sub grade 4' concrete wall on the other + stud& fiberglass above. Adding 2" of foam then drywall seems considerably less labor intensive than building a 2nd/dubble stud wall + insulation + drywall. -- The wall is not particularly large, so the foam cost is ~$100-150 max
But i am confused by the comments on the mold potential & interior humidity. Wouldnt the foil facing provide a near perfect moisture barrier on the inside, thereby blocking interior moisture from getting into the stud cavities and preventing high humidity in the stud cavities? Given the high humidity inside the home this article is written about, it sounds like having the vapor barrier on the inside + the relatively vapor permiable roxul would be better to allow for drying to the exterior would be better and would therefore prevent mold. Additionally as a thought exercise, if the stud cavity dries too slowly to the exterior, and mold forms inside the walls, then you have 3 layers of vapor barriers which then would prevent the mold from entering the inhabited portions of the house (2 layers of foil + mold resistant drywall?
Question for my application, if i plan to use floor based, passive, geothermal to heat and cool my storage 1/2 basement to a nice and toasty 45-50F (in Boston), would I be better off with XPS or polyiso on the walls? Also, should i add a 1/2" or 1" of XPS on the floor to eliminate the potential for condensation on the floor in the summer, with the trade off of cutting down on my heat flow in the winter.
It's also about climate . . .
Most moisture entering wall cavities from the inside is carried in moving air, not vapor diffusion through materials. If Mr. Lucrisia has done a great job of making his interior foam layer air-tight he has likely minimized that issue. His elevated indoor RH MAY be related to the loss of the wall as a buffer, that should be manageable through the source control he mentions, and through effective ventilation.
The challenge with continuous, vapor impermeable insulation on the interior side of the wall cavity is that you isolate the cavity from the interior temperature, making that cavity cold.
While we in Seattle like to keep our spectacular weather a secret, the truth is that we have a short (but beautiful) drying season and a 9 month long grey season during which ambient RH hovers between 80% and 100% RH. Wall siding and sheathing stay pretty wet for 9 of every 12 months - just the way it is, and we love it . . . honestly, we do!
To me, the risk with Mr Lucrisia's assembly is from the outside, not the inside - particularly if he is in a shady spot surrounded by trees, or southwest exposure to prevailing winter storm winds. Exterior moisture can find it's way into the wall cavities through penetrations, failed flashing, failed WRB that allows water from saturated siding (with no rain screen) to soak through (certain building wraps DO allow this to happen). Moisture in that cold cavity will just sit - no drying to the outside and no heat driving it out from the inside.
Candidly, I did a similar experiment when I built out an office in my attached garage about 6 years ago. I added two inches of XPS on the inside of a 2x4 exterior wall with an R-13 batt in the cavity. No rainscreen on the exterior, but 24" eave (single story) and it is a north wall, protected from the winter storms and no solar drive when the siding/sheathing are wet (but no rainscreen either). I've seen and smelled no issues and the IR camera shows no signs of damp - but next spring, I plan to open up a section and take a look. Fingers crossed.
In summary - In our climate, continuous vapor impermeable insulation on the interior is a risk, but a small one. This assembly is less forgiving of weaknesses in the WRB - and it is more likely to support mold growth in the event of moisture penetration. If the interior is well sealed, this will likely be more of a structural concern than a health concern.
flues and chimneys
Dana Dorsett suggests additional air sealing first. "You can leave the existing attic-floor insulation in place," Dorsett writes, "but air-seal all penetrations before adding more. Wrap R-15 rock wool around any flues or chimneys (tied in place with steel wire, or wire fencing) to keep cellulose from contacting them."
It should be noted that it is dangerous to insulate some types of chimneys, and in these cases contact with cellulose should be prevented with metal shields, not insulation.
Insulation condensation
William has the right idea. It makes sense to have the insulation on the inside of a home. Why? Well, heat always moves to cold. So stopping your expensive heat from first entering the buildings frame and then disappearing in many directions – into the walls, ceilings, ground and sky saves money.
The worry that moisture may get into the walls, is fair. However water vapor like heat always moves to cold – so, putting in place insulation as pictured that is thick enough to maintain the walls, floors, and ceiling surface temperatures above dew point solves this problem. Water vapor faced by a warm surface has no reason to enter a wall.
With an room temperature of 70f and 65% humidity dew point is 57f. From the text and pictures I would guess holding a surface temperature of 70f will not require unreasonable amounts of heat.
Seattle has a reputation for having lots of rain, this isn't a problem as long as you keep it out of the building, rain doesn't indicate 100% humidity, that level of humidity exists high in the sky where the rain started its journey, the air at ground level, will usually be drier.
The air inside the home is usually warmer and wetter that that outside, that's why we run exhaust fans to push our water vapor out and draw in colder and drier air from outside.
Because the temperature outside is colder than the home (the homes outside temperature will mostly be warmer) water vapor, in this climate will not enter the walls as other surfaces/areas will be colder and will be more attractive.
Response to Jonathan (#1) and charles (#3)
On the cathedralized ceiling there is a risk of a moisture trap between the impermeable roofing and impermeable foil facers, should the roof venting not be up to snuff.
On the walls in a Seattle climate the exterior moisture drives are pretty high- best practices would be that all siding be back ventilated with a minimum of 10mm of air or non-wicking mesh between the weather resistant barrier and the siding (as is required in nearby coastal B.C.) to limit wetting of the sheathing from the exterior. Most houses in Seattle would still be OK with in interior vapor barriers even if it's clapboards tight to #15 felt, no rainscreen and deep overhangs that limit direct rain wetting also helps, but its still a concern, in a place where 90%RH & higher and mid-winter temps in the high-30s is common. Being able to dry toward the interior offers up some resilience to bulk moisture incursions, since drying toward the exterior during the wet season is nearly impossible.
In a garage office there are very few interior sources of moisture, but 2" of XPS still leaves 0.5-0.7perms of drying capacity toward the interior. The kraft facers on the batt go high-permeance if the cavities are humid, but are about 0.5 perms when dry, so drying toward the interior is really only limited by the XPS. You have fully an order of magnitude higher drying capacity than you would with foil facers(!). But you also have the 2' overhangs, with very little direct rain-wetting so you'd be unlikely to run into a problem. Almost all moisture problems in wall assemblies of any stackup are related to bulk water incursions, and most of the rest are due to air leakage issues, with vapor diffusion WAY down the list.
My preferred season in the PNW is from the summer solstice to half-past August, when the days are clear & long, which allows ample opportunity for backcountry skiing on the glaciers & permanent snowfields. Thanksgiving through spring Equinox can be pretty dark, damp, & dreary though. (I recall a winter during my mis-spent youth when I didn't see the sun for ~30 consecutive days...)
charles makes a very good point about the type of chimney making a difference on how it is treated from an insulation point of view. B-vent would be precluded from that recommendation, and any legacy single-wall combustion venting even more so.
I did this in Maine on the Coast
After spending a lot of time learning about dew points, etc., I executed a renovation in a 1927 cottage at the Beach using this approach. Since air conditioning is not part of the plan, I figured being able to dry only one way to the outside would work. I have added closed cell foam to all of the ceilings with a flash and batt approach to the main(no pun intended) part of the house which is not cathedral (which is closed cell) to get it to equal to or above recommended insulation levels and have sealed the crawl space per modern techniques. Moisture levels seem to be higher than I expected so it is still a work in process. I am not sure if the proximity to the Ocean is part of the cause since it is high moisture environment based on location. I finished the main room this year so I am still learning and adjusting to the effects. I can say that any wall that was not sealed properly saw paint degradation very rapidly.
Did he screw up?
Duh, its a problem because its PolyIso and a second vapour barrier, other than that and time wasted it should be OK. If it was the exterior then it would be a different story.
Adding exterior Styro with interior vapor barrier
The article describes one situation. However, the situation with my home is similar but with one important (and very typical exception). We thought of adding 1 to 2 inches of exterior styro (NH) as part of new siding. However, we have 3.5 inches of fiberglass and a PE vapor barrier between the Fiberglass and the sheetrock. Without a way to dry, we decided against exterior styro. Comments on our decision.
Responst to Paul Termin
Paul,
See my answer to a similar situation in a recent Q&A thread:
https://www.greenbuildingadvisor.com/community/forum/general-questions/38708/need-advice-outside-insulation-under-new-vinyl-siding
Reflective Barrier
The reflective foil face requires an airspace or the benefit is negated. Adding strapping will create that airspace and provide a structure to attach interior finishes without lengthened fasteners. However, be sure to choose the most economical strapping, or the cost/benefit will be higher than increasing the foam thickness and forgetting reflectivity.
While no wall assembly is perfect, this feature has a lot of benefits (in cold climates, equipped with mechanical ventilation) with respect to air-vapour barrier continuity, thermal bridging (140 mm studs), ease of installation, water vapour migration, and condensation in the wall assembly.
Log in or become a member to post a comment.
Sign up Log in