
Image Credit: Michael Chandler, Chandler Design-Build
Image Credit: Michael Chandler, Chandler Design-Build Two water heating systems. The mechanical room includes a 160-gallon solar storage tank which is connected to the rooftop solar collectors. The solar thermal system helps heat domestic hot water as well as contributing to the space heating system. With the help of a heat exchanger, solar heat is transferred from the solar storage tank to a 30-gallon domestic hot water tank and to under-floor PEX tubing. The green Taco mixing valve on the right adjusts the temperature of the water in the slab to compensate for the outdoor temperature. During spells of cloudy weather, a wall-mounted on-demand gas water heater (vented through 3-in. PVC) provides backup heating and hot water.
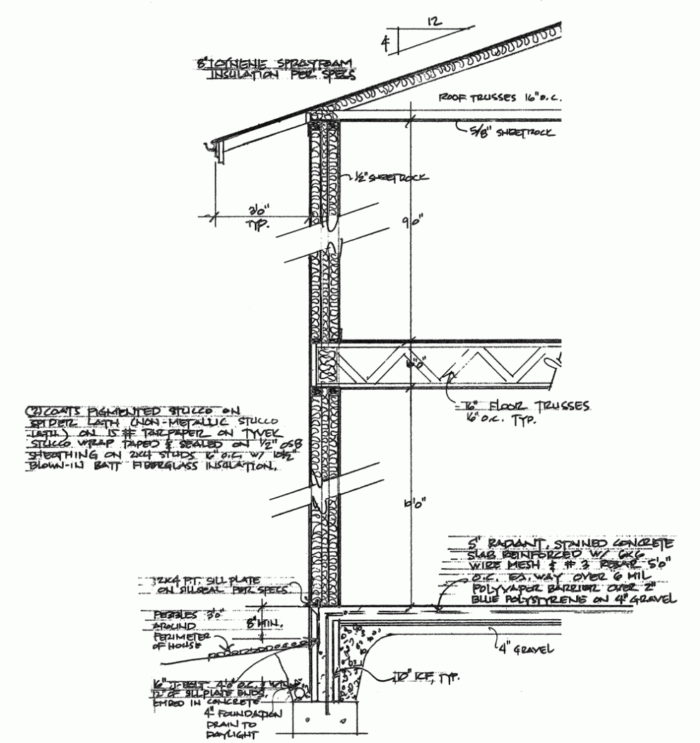
Image Credit: Michael Chandler, Chandler Design-Build Notched forms. We notch the ICFs on the inside to receive the slab. The perimeter of the forms is braced with 1x6s that are set exactly level. After the ICFs are filled with concrete, we trim the foam to level using the 1x6s as a guide. Then we install the sub-slab materials: gravel fill, a layer of foam insulation, and a polyethylene vapor barrier. The poly creates a slip sheet that prevents the slab from bonding to the walls.
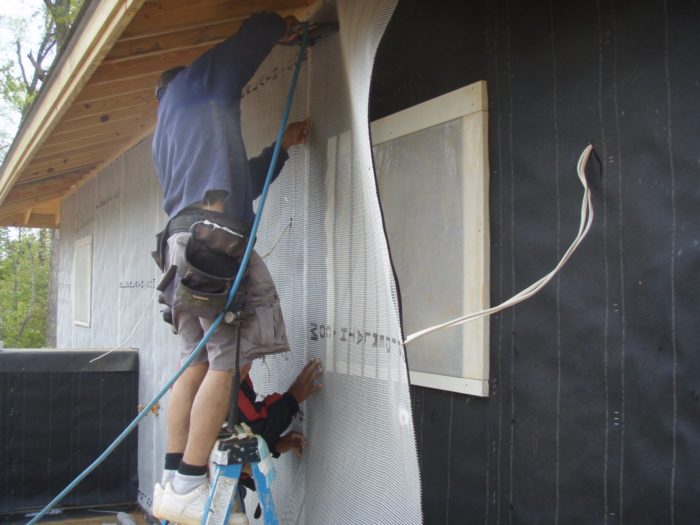
Image Credit: Michael Chandler, Chandler Design-Build Fiberglass lath. The lightweight fiberglas SpiderLath was installed over two layers of WRB (asphalt felt and Tyvek Wrinkle Wrap). The fiberglass lath is stapled every 6 in. each way through soft rubber gasket strips so every penetration is sealed and drained. Fiber-cement trim boards around the windows and doors allow for future window maintenance without the need to demolish any of the stucco.
Image Credit: Michael Chandler, Chandler Design-Build Multiple layers create a durable, watertight roof. The brick tile patio is laid over two layers of fiber-cement board flashed to the weep screed. Under the fiber-cement board is a layer if watertight EPDM (synthetic rubber) roofing that wraps up the wall behind the galvanized flashings and housewrap.
Image Credit: Michael Chandler, Chandler Design-Build Locally sourced materials. The boards used for the ceilings and much of the pine trim were purchased directly from the local sawmill.The curved concrete retaining walls sit on a rain garden footing designed to collect and hold run-off and storm water on site.
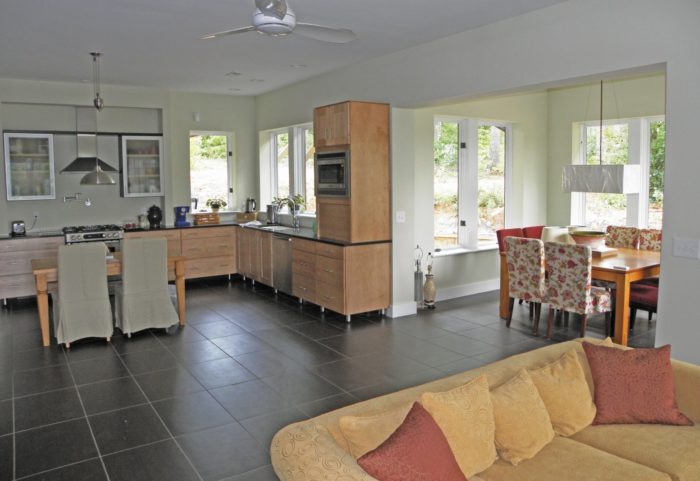
Image Credit: Michael Chandler Drywall returns give the windows a modern look. Thick double-stud walls wall create deep window stools. The space heating system is supplemented by solar hot water panels on the roof; heat is distributed through radiant tubing under the tile floor. Ten-foot ceilings contribute to the great room's airy, spacious feeling.
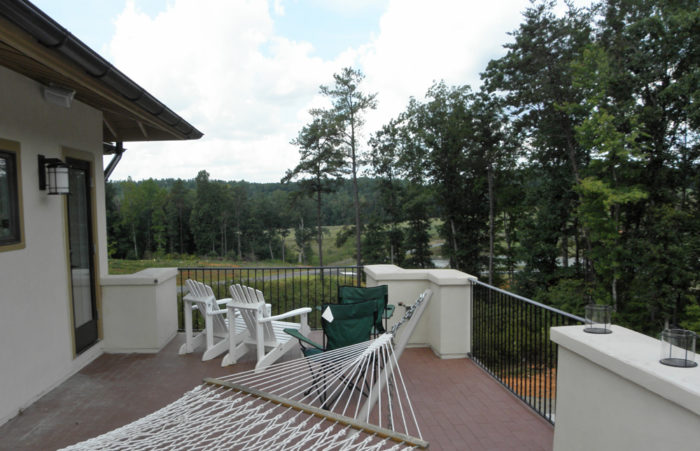
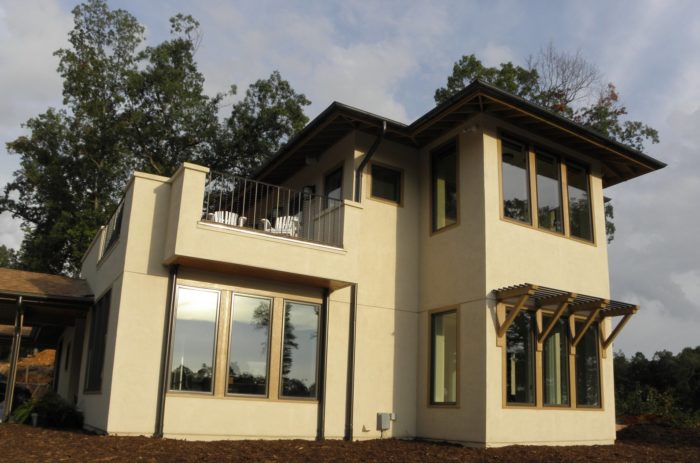
Image Credit: Michael Chandler, Chandler Design-Build A rooftop patio. Plants grown on the roof garden are safe from marauding deer and rabbits. The cantilevered section of the rooftop patio includes a hurricane drain with two scuppers for rain collection.
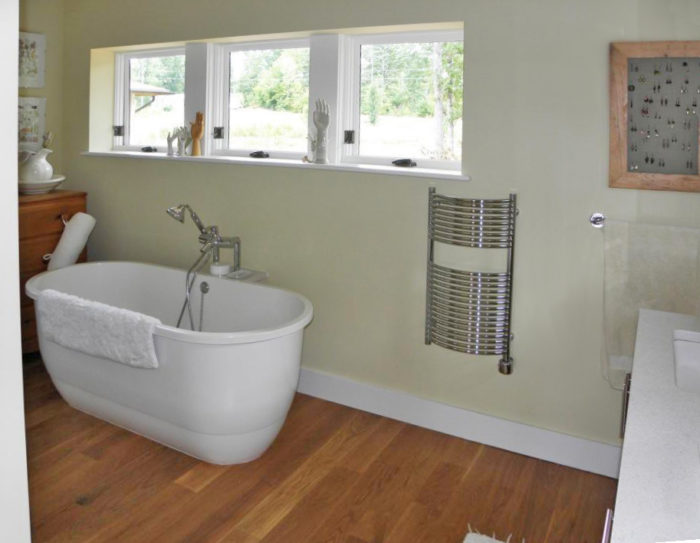
Image Credit: Michael Chandler, Chandler Design-Build Luxurious and energy-efficient. On sunny days, when the free-standing bathtub is supplied with solar hot water, the homeowners say they feel they are "bathing in sunshine."
Image Credit: Michael Chandler, Chandler Design-Build A detail of the walkable roof
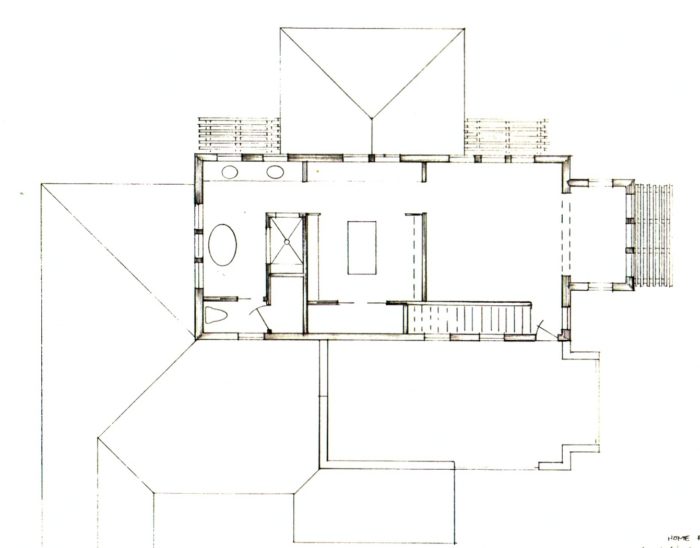
Image Credit: Michael Chandler First floor plan
Image Credit: Michael Chandler Second floor plan
Image Credit: Michael Chandler ICF stemwalls. The home's perimeter stem walls were built with insulated concrete forms (ICFs). Once the sub-slab area was filled with crushed stone, a continuous horizontal layer of 2 in. of rigid XPS and a polyethylene vapor barrier were installed. The inner foam on the top course of ICF blocks was carefully notched to receive the slab.
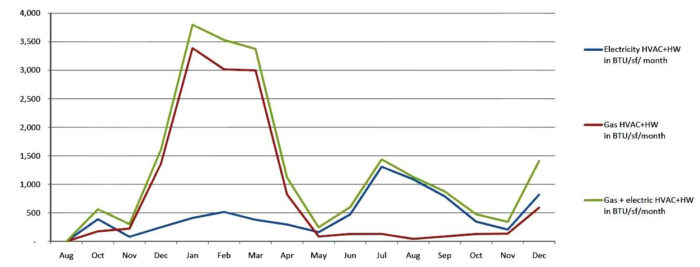
Image Credit: Michael Chandler, Chandler Design-Build Twelve month average energy use, 5,190 BTU/h. Since the conditioned area is 2,480 square feet, that's 2.09 BTUH/sf average over the year. The blower-door test result: 847 cfm50 or 1.91 ach50. A more useful metric is cfm50/sf; for this house, that works out to 0.34 cfm50/sf.
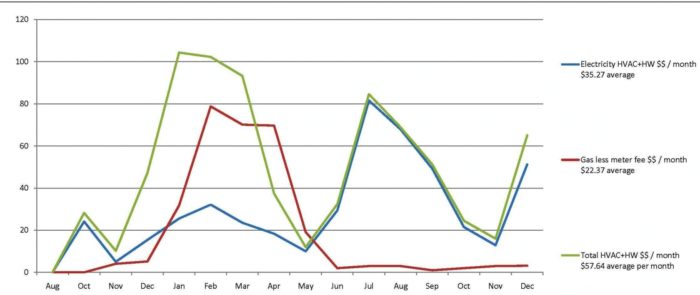
Image Credit: Michael Chandler The energy costs shown in this graph do not include estimated plug loads of $55 per month. The average total for heating, cooling, and domestic hot water is $57.64 per month. From June through August, the average electricity consumption (excluding estimated plug loads) was $61.92; for December through April, it was $76.88.
Image Credit: Michael Chandler
LEED Silver, Energy Star, Builders’ Challenge, a Gold rating from a local green program, and pending LEED for Homes certification make this house a green building rating system handbook
UPDATED 2/23/2011 with floor plans, details, and an energy use graph
Although I’ve been building green homes for 30 years, I joined the certification game only five years ago. I’ve gained so much from the feedback provided by the Energy Star Homes program and the NAHB Green Building Initiative that I decided to dive right in to help create the new National Green Building Standard (NGBS, also known as ANSI-700 or NAHB-Green).
I’ve been wanting to make a point about what I see as unproductive tension between the NAHB and the USGBC over the relative greenness of the two systems. Recent discussions with USGBC partisans encouraged me to enroll a house in multiple certification programs, including LEED for Homes, NGBS, and Energy Star. To provide further comparisons, for a modest addition cost we also certified to a local program, “Green Home Builders of the Triangle,” and to the DOE Builders’ Challenge.
With documentation from four programs in hand, and a fifth (LEED for Homes) pending, I braved the arduous application process for the Energy Value Housing Awards, and came up a winner there as well.
Different rating programs have surprising similarities
After going through this exercise, my sense is that there were more similarities than I was expecting. I thought that LEED would penalize me more than it did for building in an area where sorting and weighing the construction trash is not affordable. I was also unaware of the points NGBS would have given me for it.
NGBS gave me lots of credit for features that enhance durability, whereas LEED gave only a limited number of points for creating and implementing a durability plan. I didn’t do any “point chasing” for LEED or NGBS other than adding a few more jumper ducts than we normally would have and offering the homeowner free 1.28 GPF toilets to prevent the installation of 1.6 GPF units that she had picked up at a plumbing supplier’s “going out of business” sale. The Builders’ Challenge program encouraged us to install carbon monoxide detectors. Other than that, I just built to our normal quality standard. The house ended up scoring LEED Silver and NGBS Gold.
It seems to me that NGBS rewards builders for making an organized effort to take actions towards sustainability, while LEED holds builders to higher standards for planning and documentation. Much of the documentation required by NGBS can be done with a digital camera; LEED requirements for documentation and inspection seem more stringent.
Jamie Hager, my verifier from Southern Energy Management, helped me understand and interpret the LEED program. The useful NGBS Web site provided clear explanations, minimizing the need for a consultant.
Calculating certification costs
It cost me about $650 in certification costs to comply with the Energy Star and Builders’ Challenge programs. Adding the NGBS report card cost me about $650 more, and the LEED cost me about $1,950 more.
In the future I’ll continue to certify all my homes to Energy Star and NGBS, but will only certify my very highest performing homes to LEED. This is in keeping with LEED’s goal of being the certification of choice for the very highest performing homes in America. It seems to me that there is no cause for tension here.
Double-stud walls are the least expensive
Vicky and Jonathan Bryant, who both come from England, asked us to design a house with autoclaved aerated concrete (AAC) walls. They thought that thick AAC walls would recreate the feelings evoked by the thick stone walls of their childhood. While I had some concerns about the lack of a drainage plane and the window and door installation details, we went ahead and priced the house three ways: AAC, insulated concrete forms (ICFs), and double-stud walls.
The double-stud system saved them $30,000 over the AAC and $15,000 over the ICF (part of which may have been due to lack of competition in those trades). It cost us $4,200 to upgrade from our standard 2×6 energy-framed walls to double-stud R-46 Spider-insulated walls — $2,400 for the 2×12 top plates and non-load bearing interior wall panels and $1,800 for the additional insulation thickness.
We wrapped the radiant slab with 9-in termite-resistant PolySteel ICFs. The building inspector wouldn’t accept the exterior 2×4 wall bearing only 2 inches on the concrete, so we had to increase that wall to a 2×6 with a 2 1/2-in. purlin at the midpoint connecting it to the interior 2×4 wall panel.
Stucco done right
Hoping to evoke memories of thick stone walls, we specified stucco cladding. However, we didn’t want to extend the stucco right up to the windows and doors; we wanted to have access in the future in case a window needed maintenance. By trimming the aluminum-clad windows with fiber-cement-board trim, we left easy access to the Tyvek tape and window nailing flanges.
Since Jonathan Bryant is a managing director of BASF Plant Science, he hoped to get special pricing on their very nice synthetic stucco products. In the end, however, the cost of the BASF system couldn’t compete with our local masons who are accustomed to traditional hard-coat stucco. Because the mason’s bid for lath preparation was high — and because I prefer to have tight control on the drainage plane installation and protection — our crew installed the housewrap and flashing details. We used non-metallic SpiderLath, a product with rubber gaskets running vertically to seal the nail penetrations (6 in. o.c. each way). The lath was installed to comply with guidelines faxed to us by the Jacksonville (Florida) Building Inspections Department.
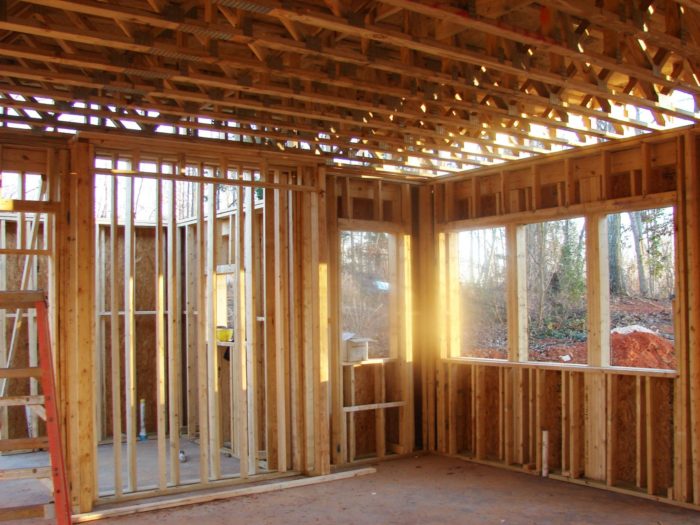
Panelized walls are strong and go up fast
We had the wall panels delivered sheathed with 1/2-in. OSB. The stringent OSB nailing specs provide hurricane resistance (it’s not the wind, but the flying trees that are the problem in this part of the state). The OSB was fastened 3 in. o.c. at the panelization plant (Builders First Source) using a computer-driven sheathing stapler.
We wrapped the walls on-site with Tyvek Wrinkle Wrap. We then taped the window flanges and electrical penetrations and lapped and taped the step flashings. We applied a weep screed along the bottom of the wall, integrated with our galvanized termite flashings.
Once this was all watertight we covered the Tyvek with two layers of #15 asphalt felt and then the SpiderLath. The stucco crew covered the lath with a two-coat 3/4-in.-thick layer of type-S stucco. The moisture of the first coat caused the asphalt felt layers to wrinkle and create a drainage space in front of the Tyvek. The second coat was applied and smoothed after the first was fully hardened. The stucco was then painted with an elastomeric paint to seal it and allow us to touch up scratches and dings in the future if needed.
Planning for accessibility
The Bryants wanted to have a master bedroom on the second floor but also wanted the house to include “aging-in-place” details and to be handicapped visitable so their parents could easily come to stay.
Our designer, Beth Williams, included a comfortable first-floor bedroom with a bathroom designed to be walker-accessible. We saved money by having the first-floor bathroom open to the hall just outside the guest bedroom, so it could double as a powder room.
Taking advantage of the sun
On the roof we installed three solar thermal collectors from our local solar collector manufacturer, Solar H2OT. The system was designed in collaboration with their lead engineer, Dan Gretch, and local radiant floor guru, Roy Schmidt. We used a 160-gallon unpressurized storage tank from STSS as the drain-back tank for the system. The tank has an internal heat exchanger for the domestic hot water and another for the radiant floor.
The space heating system Roy designed includes an outdoor reset mixing valve that adjusts the temperature of the water in the floor in response to the temperature outside the house. As the temperature outside warms up the temperature of the water entering the floor is reduced and a cold evening triggers a warmer water temperature to the floor. Even with a three-panel system we still need an efficient back-up heater; we chose the 94% efficient Quietside 120-ODW natural gas condensing on-demand water heater which we were able to purchase for less than $1,200.
Weekly Newsletter
Get building science and energy efficiency advice, plus special offers, in your inbox.
Lessons Learned
The double-stud system was a big success for us, but I would pay more attention to the door strikes next time. We packed out the dividers between the front door and its sidelights too much; as a result, the door latch has left a black line where it rubs against the interior trim.
Too much foundation foam makes for a skeptical inspector. Next time I’ll be more proactive in getting my engineer behind the double 2x4 wall system so I don’t have to go to 2x6 exterior wall panels. And I may compromise by using a 2x10 upper top plate rather than a 2x12. The big benefit as I see it is the 2.5 in. thermal break between the walls stuffed full of Spider fiberglass insulation.
The solar storage tank was a headache. The 160-gallon SSTS solar tank is an unpressurized EPDM-lined tub-style tank that comes knocked down and has to be assembled on site. The synthetic rubber liner had a toxic powder on it that caused one of my workers to get quite ill for two days due to exposure during assembly. The fact that the tank doesn’t seal all that well and is full of very hot water has led to excessive humidity in the tank room. In the future I’ll stick with a large conventional water heater tank or two. I think I could install two 120-gallon Solar Pro tanks for the installed cost of the 160-gallon SSTS tank, with a lot fewer headaches (it would be close though).
Tyvek and asphalt felt can be partners. While I feel comfortable with the stucco system we used — I did a lot of research on it — I still prefer red cedar shingles for an exterior siding material. But I’m sold on putting a layer of asphalt felt over the Tyvek regardless of the siding to defend it from surfactants in the siding material and give a dedicated drainage path between the tarpaper and the Tyvek. It took little time or money and I really feel it will enhance the long term performance of the wall. Sort of a variant on my foundation rule, “Install the best waterproofing you can afford, and then don’t let it get wet!”
The integration of the galvanized termite flashing and the galvanized weep screed at the top of the ICF slab was more challenging than I expected. Our blower-door test came in at 1.75 ACH @ 50 Pascals, which, while respectable, is a far cry from our previous house which tested at 0.70. I think the difference lies in that detail. I’ll continue to line my radiant slabs with the PolySteel ICFs, but I’ll pay more attention to getting that seal tighter.
Roof garden gets a thumbs up. The roof garden has been an unqualified success. We built a rubber roof with scuppers and a hurricane drain and then floated a brick floor 1/2 in. above it on Ameridrain drainage mats and flashed that layer into the wall flashing to keep the rubber roof from getting wet. The Bryants have plans to establish a serious vegetable garden up there away from the grazing deer. We installed a water spigot for tending the lettuce and tomatoes as well as a gas outlet for their barbecue grill.
Just walking out onto that area is magical. I’ll do it again as soon as I can find a client for it.
The gutter-fed rain garden was cost-effective. All the gutter flow was collected in rain gardens buried under the ornamental planting beds and under the vegetable garden so that the collected water could just soak up through the soil into the roots above it.
This was amazingly economical — about $260 per rain garden more than trenching the storm water to the neighbor’s property line — and it gained us a positive landscape feature.
Further energy savings will be challenging. With the walls at R-46 and 8 in. of foam in the roof, zoned bypass dehumidification and cooling, solar-assisted floor heat and U-0.30 / 0.30 SHGC windows with exterior shading, we seem to be at a point where further energy improvements are getting exponentially more expensive.
The obvious next step is to seriously question the benefit of every square foot of glass — to work on reducing glazing area while still giving clients the living experience they want. Beyond that we’ll be looking at ultra-high-performance windows and the cost/benefit of installing even deeper foam in the roof.
I do think we’ve moved beyond the HERS software, which is why we’re spending the money (over $3,000) to have third-party energy monitoring done on this project to see if there are any lessons to be learned there that may inform our next move. At the same time I’m going back to past homes we’ve built and getting propane and electric usage records to look for trends and patterns there.
A great team. While the features of this home were a lot of fun for me, and while I am proud of its green rating scores and energy performance, I have to give a lot of credit to my crew, especially Chris Kersher and Mat McDonald who pulled it all together.
It has been a blessing to work with such enthusiastic clients. Jon Bryant did all the computer and smart-home wiring, and Vicky Bryant, who works as an interior designer, sourced all the of the indoor furnishings with an eye to indoor air quality and environmental sustainability.
It would be pointless to put so much attention into a house like this if the house were not also a joy to be in and to live in, so I give deepest gratitude to my designer and business partner, Beth Williams, who designed this wonderful small home.
The home sits lightly on the planet. Its real success is shown in the faces of the people who walk through the house, as well as in the faces of the Bryants since they’ve moved in. It’s a joyful space to come home to. Vicky talks about how filling her tub up with solar-heated water feels like “bathing in sunshine.” That’s a luxury a person can feel good about.
— Michael Chandler, president of Chandler Design-Build and a GBA Advisor, has been designing and building high-performance homes since 1978.
General Specs and Team
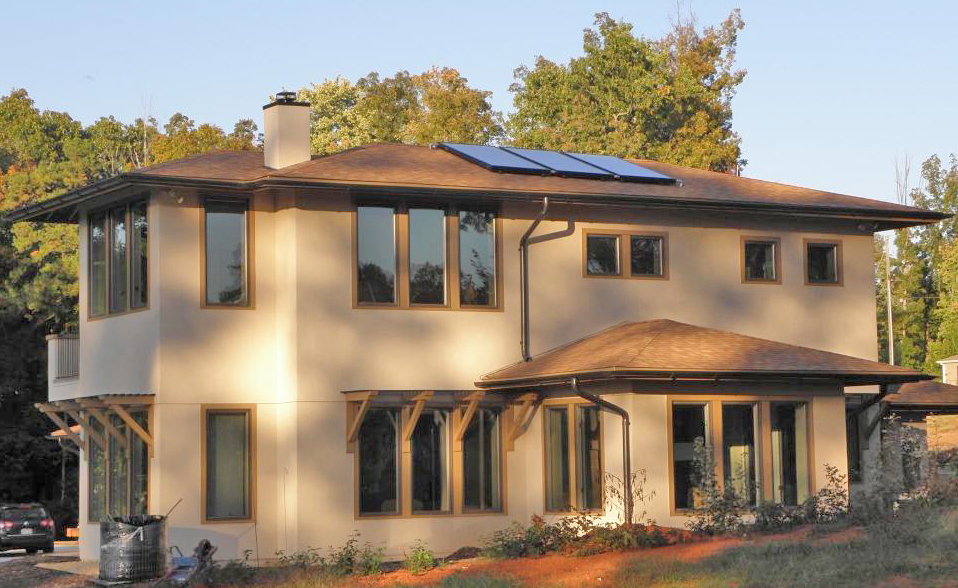
| Location: | Saxapahaw, NC |
|---|---|
| Bedrooms: | 3 |
| Bathrooms: | 2 |
| Living Space: | 2498 |
| Cost: | 158 |
Builder: Chandler Design-Build Designer: Beth Williams, Chandler Design-Build Energy consultants: Southern Energy Management
Construction
Foundation: Slab on grade, 9-in. PolySteel ICF perimeter insulation, 2 layers 1-in. XPS foam under slab
Walls: 13 1/2-in. double-stud wall with 11 1/2-in. Spider fiberglass (R-46)
Windows: Peachtree 700 with double-pane, low-e, argon-filled glazing (SHGC = 0.30, U-0.30); windows on south and west have exterior shading
Roof: trusses with 5 1/2-in. top chord.
Roof insulation 8 in. Icynene open-cell foam (R-30)
Garage: detached with breezeway connector
Energy
- Windows laid out for optimal daylighting
- CFL lighting fixtures
- Energy Star appliances
- Chimney effect of stairwell and window layout provides natural cooling, ventilation
- Web-enabled thermostats
- Smoke alarms with long-term battery solution
Energy Specs
Cooling / dehumidification: 15 SEER zoned-bypass heat pump (Heil with R-410A refrigerant).
Water heating: Solar hot water (drain-back system) with 3 solar collectors (Solar Hot USA) and 160-gal. SSTS water tank with internal heat exchanger; backup heater is 120 KBTUh condensing natural gas on-demand water heater (Quietside ODW-120) with 15-gallon tempering tank.
Annual energy use: being monitored by Truveon Inc.
Water Efficiency
- Two rainwater catchment systems collect 100% of gutter output for rain gardens and vegetable garden. Water delivered to retaining-wall planter and ornamental garden by capillary action without pumps
- 1.28 gpf toilets
- Low-flow faucets and shower heads
- Xeriscaping with native plants; no lawn
- Energy Star washing machine and dishwasher
Indoor Air Quality
- Exhaust-only ventilation system; Watt Stopper motion sensors in bathrooms respond to building occupancy levels
- 6-in. passive intake damper behind dryer opens in response to modest CFM range hood.
- Zoned-bypass HVAC for enhanced summer dehumidification with cooling
- MERV 11 central air filter
- Airtight wood stove
- Interior paints and sealers contain no or low VOCs
- Formaldehyde-free cabinetry
- No carpet; wide plank local oak flooring upstairs and tile on radiant slab downstairs
Green Materials and Resource Efficiency
- Panelized and truss construction; wall panels built off site with all waste diverted to I-joist plant
- Trussed roof and floor to minimize waste on site
- Extra deep roof overhangs (32” plus 6” half-round gutters) shade windows and protect siding from rain
- Wrinkle Wrap Tyvek housewrap with two layers of #15 asphalt felt integrated into drip screed and step flashings with kick-outs
- SpiderLath gasketed non-metallic stucco lath seals nail penetrations and anchors stucco to building; air space behind provided by the wrinkling of the felt when wetted by the stucco application, diverting water down the gaskets to the weep screed and out
- Clad widows trimmed by fiber-cement board exterior trim before stucco
Site Design##
- Sited on an abandoned septic field for old mobile home park
- No lawn, trees protected under supervision of an arborist during construction
Certification
- Energy Value Housing Award finalist
- LEED-H certified Silver
- NAHB-green ANSI 900 certified Gold
- Local Green Home Builders of the Triangle certified Gold
- Energy Star certified HERS 48
- US DOE Builders Challenge certified
- Ongoing third-party energy monitoring by Truveon Inc.


14 Comments
This is an impressive
This is an impressive project, and your assessment of it is very interesting and entertaining. I particularly like the Lessons Learned section and appreciate your willingness to do an honest evaluation of the project for the sake of other green builders. Keep up the great work.
NC HBH
Great house and great sq ft price and details of construction process. thanks
Why did you not do the NC Healthy Built Home certification?
Awesome job !
Michael , another well done Green home ! Thanks for sharing your project evaluation with the rest of us , Green Newbies , who can learn a lot from those who have been doing this longer !
NC Healthy Built
Boone
Five certifications seemed to be a bit excessive as it is, and I hear that the HBH is moving to adopt the NGBS standard, so it seems to me that the important comparisons to look into are the Energy Star to Builders Challenge comparison, the GBI to NGBS comparison and the NGBS to LEED comparison.
I appreciate the banter and competitiveness we "NAHBers" have with the "USGBCers" but I felt that it was getting to a place that was unproductive for the promotion of Green Building. I am hoping that building a home that is certified to both will point out our commonalities and bring home the thought that we're all preaching from the same gospel, Just some of us preach to a congregation that is more inclusive than others.
Those of us in the NAHB are not mercenary green washers any more than those in the USGBC are a bunch of dilettante architects and consultants with wealthy liberal clientele. If our shared goal is to transform the market we will get there faster by working cooperatively rather than by taking cheap shots at each other.
Energy Value Housing Awards
Boone I hope you understood that the comment in my reply was just a clarification of why I chose to certify to the five programs I did and to comment on the silly name calling that led me to make this decision.
We did recently get a letter about receiving an EVHA award in Last Vegas this January, won't know until we get there if it's a silver or a gold, but folks can check out the competition and vote for their favorites at The NAHB Research Center website http://www.nahbrc.com/evha/voting.aspx
Ours is #20 if you feel inclined to give us a boost.
AAC Price Difference
Michael,
Very helpful synopsis on the materials you chose and their respective costs and advantages. I think it says a lot when a builder so carefully monitors his past projects for information on continually making improvements.
I was truly surprised by the price increase in the cost of using AAC. Would you mind elaborating a little more on this for me? It seems like all of the layers and details required to create a good drainage plane for the stucco on a wood framed wall would add up, when one of the supposed benefits of the AAC is their ability to easily accept a stucco finish. Was this factored into the price difference?
I can definitely see other drawbacks to the AAC - the lack of a drainage plane that you mentioned and also the lower R-values than what you ended up with. I just wasn't aware that the price was a penalty as well. I am strongly considering using them for my own house since the plant is within 50 miles of me. Thanks for your input!
Jamie
AAC cost differential
Jamie
I wasn't comfortable with our team trying such a major project with AAC as our first effort so I interviewed a builder who was AAC focused and got a price from him to put up the shell. His price was pretty steep, and a good part of the differential may have been his profit margin as compared to the profit margin of the panelized wall company, but the differential I quoted did take into consideration the housewrap, tar paper and SpiderLathe.
The other thing to consider with AAC is the embodied energy content of all that aluminum in their foaming process. I try to minimize the amount of aluminum in my homes from an embodied energy perspective.
Affirmation
Great to get Joe Lstiburek's article on stucco best practices today http://www.buildingscience.com/documents/insights/bsi-029-stucco-woes-the-perfect-storm
He doesn't have an answer to why two layers of tar paper over the house wrap works better than one but I feel strongly it's because of the way the two layers wrinkle against each other as they absorb the moisture in the wet stucco and form a double drainage gap between the back of the stucco and the front of the house wrap.
More info on this years EVHA winning homes (including this one) can be downloaded at http://www.nahbrc.com/evha/2010-EVHA-Mag.pdf
This is an inspiring project.
Michael, if you have this information, I'd like to know how the heating and cooling loads differed, and how the projected energy consumption was for the heating and cooling months. I think it would be illuminating to understand how the superinsulation and high airtightness would affect the optimum hvac design for our region.
Thank you Michael
I have to thank you so much as your articles on your actual experiences going low Energy, going green and even going so far to really push all the ratings together to explore... just super...
Now... I have to be careful of one thing.... my head exploding from all the input.
aj
Keep posting details... all that you can... so helpful to all of us just thinking about getting rated... rating.. and all.
Costs and usefullness, high points and low points.... what to do... and not do... lead the way Michael
Building today = Building Green
The home building industry today is extremely efficient compared to 50 years ago. The use of advanced materials and techniques have cut down waste during construction. The environmental footprint of building a house today is about half of what it was 50 years ago. When you buy a new home today, the impact on the environment is felt even before someone moves in.
All the various green reports
I just wanted to let you all know that the final scoring tools for NAHB Green Building Guildelines, NAHB ANSI 700 National Green Building Standard, LEED for homes, and Energy Star showing BTU/ year projections for various sub systems within the house are all posted here http://www.chandlerdesignbuild.com/indexFull.php?id=bryantResidenceImages&t=The%20Bryant%20Residence I'll be following up with the actual energy usage data sometime soon and adding it to that site as well. We have not yet gotten the individual monitors installed on the subsystems as originally planned. My employees wanted that three grand diverted to their profit sharing checks and I chose to go along with that in hopes that I could find a grant to cover that cost.
Flat roof cross-section
I am interested in the methods used to build the flat roof deck. The comments state that the builder used epdm, two layers of fiber cement and then affixed the patio, am I reading this correctly? I am looking at replacing a couple tin flat roofs(yes used as roof deck floor) and have been considering the epdm, then sleepers (rounded with epdm face) with decking above. However the method used here may be a viable option.
Thanks in advance
tile roof details
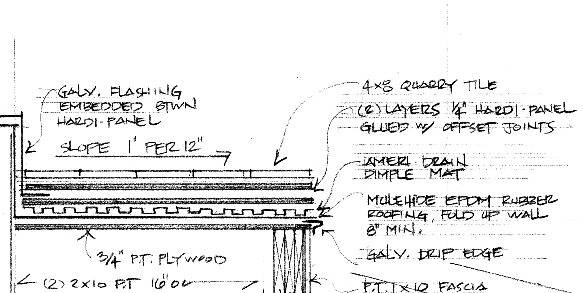
Garret The detail we drew for this house didn't translate well for the internet but one for a similar project that we drew for another builder to complete was more legible so I've posted that one. layers from the bottom, trusses starting at 14" and progressing to 24" in 24' run w/ 8" open cell spray foam, 3/4 T&G ply, 1/2" rebound board w/ Mulehyde EPDM rolled up the walls and flashed into down spouts with over flow for hurricanes at the end of the balcony, Ameridrain dimple mat, 4'x8'x3/8" hardibacker, Galvanized flashing run up the wall over the rubber flashing and behind the house wrap, a second layer of hardibacker glued to the first layer, (floating, no fasteners through the rubber) trapping the galvanized flashing between layers, 4x8 quarry tile pavers set without grout to keep the frost from popping the grout. Michael
Log in or create an account to post a comment.
Sign up Log in