
More Musings of an Energy Nerd


If you want to improve the energy performance of an older house, one of the first steps is to plug your attic air leaks. Although many GBA articles address aspects of attic air sealing, no single article provides an overview of the topic. This article is an attempt to provide that missing overview.
I’ll try to explain how you can seal air leaks in a conventional vented, unconditioned attic. If your house has cathedral ceilings — that is, insulated sloped roof assemblies — the air sealing tips in this article don’t apply to your house.
There are four basic steps to sealing attic air leaks:
- Inspecting your attic;
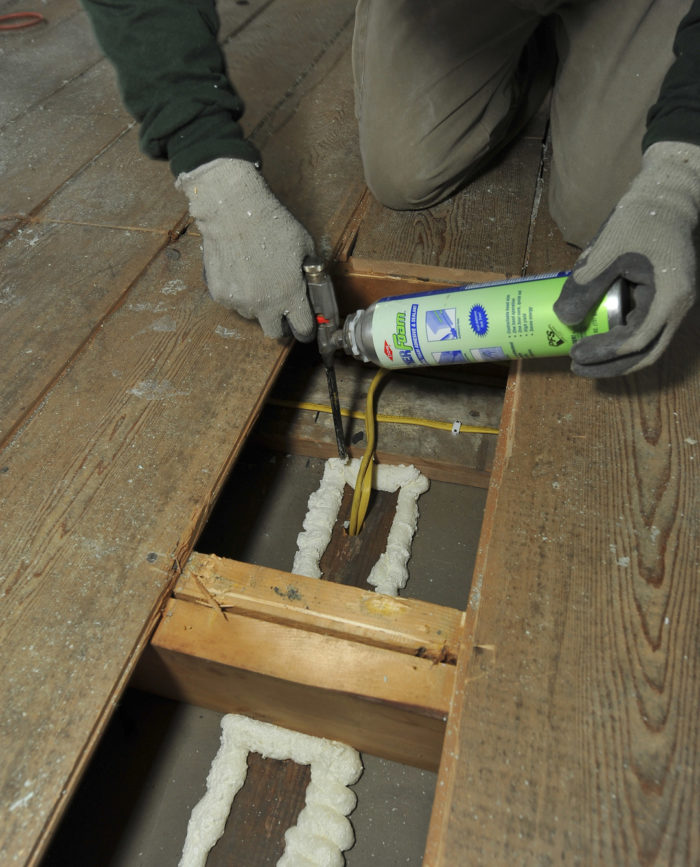
- Patching the big holes;
- Sealing the cracks and small holes; and
- Weatherstripping the access hatch.
Once this air sealing work is done, you may want to add more insulation to your attic floor. If you want to add insulation, remember that air leaks have to be sealed first.
Inspecting your attic
The easiest way to find air leaks is with a blower door. In some cases, a theatrical fog machine is also very useful. (For more information on these two pieces of equipment, see Blower Door Basics and Pinpointing Leaks With a Fog Machine.)
If you don’t have a blower door, you’ll have to find your attic air leaks using your eyes and your powers of deduction. You’ll also need a powerful flashlight. If you don’t like balancing on joists, bring a couple of 2 ft. by 3 ft. pieces of plywood to step on while inspecting your attic. Needless to say, you don’t want to step between the floor joists and punch a hole in the ceiling.
Warning: if your attic floor is insulated with vermiculite, a type of insulation that may contain asbestos, don’t touch the insulation.…
Weekly Newsletter
Get building science and energy efficiency advice, plus special offers, in your inbox.

This article is only available to GBA Prime Members
Sign up for a free trial and get instant access to this article as well as GBA’s complete library of premium articles and construction details.
Start Free TrialAlready a member? Log in


60 Comments
Nice Job Martin. By the way,
Nice Job Martin. By the way, its not just brick chimneys that present challenges. My home has a gas fireplace installed in a "kick-out" in the family room. This is in the center of the house and the correct metal piping was used for the chimney. However, at the termination of the kick-out in the attic, I was faced with an open chase of 3' x 5' with the chimney pipe squarely in the center of the open chase. Closing this one single huge opening made an unbelievable difference in the conditions in both the Family room and kitchen behind it. I used cement board to cover the majority of the chase along with sheet metal around the chimney pipe sealed with intumescent caulk. All metal flues should be dealt with in the manner you describe for brick chimneys.
Response to Chris Brown
Chris,
Thanks for the feedback. In response to your comments, I have edited the article to include information on sealing around metal chimneys.
Another way to air seal can lights
Most recently we've been air sealing can lights using replacement LED trim kits. The Cree CR6 has a warm color temperature (2700k) and is fully dimmable (no buzz) and we sell it to the client as a dual energy upgrade - more efficient lighting and air sealing in one. We order the trim kits online in bulk packs.
The install is easy, I think the trim kits are faster to install than boxing out the light in the attic. We use caulking to seal the edge of the trim to the drywall. And then, so long as your fixture is rated for Insulation Contact (IC) we blow insulation right over the lights.
Response to Devan Anthony
Devan,
I agree with your recommendation, and it's one of the recommendations I made in my article, Recessed Can Lights. (I'm not sure whether you noticed the link, but I recommended that article in my discussion of can lights.)
In the Fine Homebuilding article I linked to, I wrote, "Another way to cut down on air leakage through a can—especially one installed in a cathedral ceiling—is with an LED conversion kit. These kits include airtight compartments that can be inserted to replace an existing fixture’s can and lamp trim. Examples of LED conversion kits include the Cree LR6 LED conversion kit (about $130) and the Cooper All Pro LED conversion kit (about $80)."
Response to Martin
Martin,
Of course you already made this recommendation! I admit that I did not click through to your Fine Homebuilding article.
Here's a review of the CR6 after they've been installed in a new home for 2 years:
https://youtu.be/NnOCr9zrOb8
The homeowner loves them.
The Cree CR6 can be found online for $35-40. Difference between the CR6 and the LR6 that you priced in your article seems to be the size of the heat sink and the integrated trim ring. The LR6 has longer life due to the bigger heat sink (50000 hrs), but the CR6 still is rated for 35000 hrs, which at 6 hrs a day is nearly 16 years!
Wish I'd gotten this article sooner!
We're having an insulation company come out in 3 days to insulate (mostly with batts) the kneewall in our sidecrawls (as we call them.) I'm not sure if we've discussed blocking at all.
The only discussion regarding penetrations we've had was regarding a water supply pipe that takes the long way through the attic to our bathroom (and yes, it gets cold in the winters).
Prior to today I had assumed that insulating the sloped ceiling was inherently bad because we just had mold remediation done on the (formerly) insulated north sloped ceiling. Humid air got trapped behind the insulation.
However in your diagram of a sloped ceiling, I'm guessing that's what the rigid insulation is meant to protect?
Response to Robert Guico
Robert,
There is nothing "inherently bad" about insulating sloped ceilings. What's bad is getting the details wrong.
The usual mistakes include: (a) failing to include an air barrier on the interior as well as the exterior side of air-permeable insulation like fiberglass batts, (b) failing to install enough insulation to meet the minimum R-value requirements of the building code, and (c) failing to include a vent channel between the top of air-permeable insulation and the underside of the roof sheathing.
Here is a link to an article that tells you how to do it right: How to Build an Insulated Cathedral Ceiling.
If you had mold in an insulated sloped ceiling, I'm guessing that your ceiling had air leaks, or insufficient R-value, or an ineffective ventilation channel, or all three problems.
Electrical Boxes
I've never really understood climbing into an attic to seal an electrical box. Why not just drop the fixtrure and caulk it from below? Granted you can't use spray foam but a good caulk and your finger can effectively seal the boxes from below which is WAY more comfortable, can be done while the football game is on and is much more accessible to the refrigerator. If you are opposed to getting a tingle every now and again, shut the power off first and a piece of extra tubing can help direct the caulk easier than you might be able to with the caulk gun. You can pull outlets and switches out of the box as well and seal them too with little effort....power off is almost a must because twisting the metal caulk gun to hit all corners will almost certainly result in touhing terminals (the resulting shock shouldn't be fatal but flinging a messy caulk gun on your wifes carpet just might be!)
Also, depending on your local HVAC practice, don't forget to check the return air ducts. Here locally they depending on the wall board to create their chases and I have seen cases where the return air is sucking outside air from the attic (which you might catch in attic sealing or it can even be linking to the outside horizontally through electrical holes and plumbing pipes. I had a brand new home with frozen water pipes in the middle of the house before (should never happen btw) the pipes ran through the return air which was drawing direct outside air two floors above in the attic. Because it was very cold the furnace ran more meaning more cold air came in meaning more run time etc etc. Eventually, the run time was long enough that the pipes froze in the basement which is always 60 degrees. My prefered method for dealing with the return airs is to cut a 2x4 the width of the stud bay and drive it into place above the return air grill and then seal with caulk. WARNING, #1 make sure this return air chase doesn't also serve another on the floor above. #2 you may have to have the HVAC guys come back and re calibrate the system. His original sloppiness may have given him plenty of return air while your careful sealing may resulting in a lack of return air. I always try to further open the hole to its maximum.
Response to B.W.
B.W.,
You're right that it's possible to seal leaks at a ceiling electrical box from below. However, if you're in the attic anyway, pulling up batts to look for problems, and you are in full air-sealing mode -- equipped with rubber gloves, a caulk gun, and some canned spray foam -- why not address the electrical boxes when you come across them? You're up there anyway. It's not as if it makes sense to climb down the hatch at that point, look for a screwdriver, and remove the ceiling fixture.
The bottom line: either way works, and you should use whatever approach seems simpler to you.
As far as return air ducts are concerned: your points are well taken. Personally, however, I wouldn't try to retrofit stud bays to make them "better" paths for return air. The right way to fix this problem is to install new galvanized ductwork, properly sized, and to box it in where necessary with a new chase. After all, a stud bay only measures 3 1/2 inches by 14 1/2 inches -- nowhere near big enough to provide many cfm.
air sealing with vermiculite
Any thoughts on air sealing when you attic has vermiculite insulation?
Old furnace / water heater chimneys
For every five condensing water heaters installed, there are probably 3 open chimneys left penetrating through everything. These are chimneys that are no longer even used, but probably lead straight outside.
Response to Stephen Martinson
Stephen,
If you have vermiculite insulation in your attic, that's bad news. The safest approach to attic vermiculite is to assume that the vermiculite contains asbestos. That means that you shouldn't disturb it.
Properly air sealing an attic with vermiculite insulation requires that the vermiculite be removed. That's an expensive proposition, unfortunately, because the work must usually be done by an asbestos abatement contractor.
For more information on vermiculite and asbestos, see:
Protect Your Family from Asbestos-Contaminated Vermiculite Insulation
Asbestos in Vermiculite Insulation
Response to Bryce Nesbitt
Bryce,
You make a good point about unused chimneys. Unused chimneys represent a thermal bridge as well as an air-leakage path.
Unused chimneys -- both brick chimneys and metal chimneys -- should be removed. At the very least, the top section of the chimney should be demolished down to a level that is lower than the ceiling air barrier, so that the penetration through the attic floor can be patched.
I have edited the article to reflect your suggestion. Thanks.
Eliminate unecessary access / vermiculite
You wouldn't believe how often I see a house with an attic access in the house and in the attached garage, or where one could easily be put in the garage. In this case seal the one in the house shut (or drywall in smooth if you no longer wish to look at it) and cover it with a full depth of insulation, then use or make one in the garage. I've performed this conversion many times just make sure you can access the entire attic from the garage as this is not always the case.
Also, vermiculite is a big problem in my area (middle of Michigan) and my worst nightmare as a home performance contractor. I believe the most important aspect of public safety is missing in the case vermiculite (and lead paint as well ), awareness. Practically nobody seems to know about this stuff and "don't touch it" is a terrible police. As you read this a plumber, electrician, and mechanical contractor are pushing it out of their way to do something (which brings up the issue of panned framing for return air in these attics), the stuff pours in the room every time some changes a light fixture and getting home owners not to store stuff up there is actually laughable. Of course, the cost of remediation has stopped every project I've looked at in it tracks, which probably means the home owner hired another insulator to blow over top of it. So, I'm writing this to ask Mr. Holladay, or anyone else reading with more influence than I, to help think of more realistic solutions to vermiculite, because its not going away on its own. There's probably 10 million homes with vermiculite in them, that's a home performance issue, not to mention an IAQ problem. Suggestions anyone?
Response to Andy Kosick
Andy,
Permanently sealing the attic hatch in a house with an attached garage is an excellent suggestion.
I don't have any suggestions or innovative ideas when it comes to vermiculite. I used to be a certified lead abatement contractor (I got the certification, although I never worked in the field), and I know enough about hazardous materials to say that it's best to leave this topic to the experts.
I'm not an asbestos expert. I don't recommend that builders innovate in this field. Abatement is expensive, but it's the best way to proceed if you want to air seal your attic.
Response to Martin Holladay
Thanks for the response.
I didn't mean to imply avoiding proper abatement in the case of vermiculite just how do we get it to actually happen. For instance, my only idea with an merit is to require inspection for and acknowledgement of vermiculite the time of sale (as if a home sale needs more paperwork), and while it wouldn't force abatement to take place, it may force the issue at a time when it's likely to be taken care of properly. It would also open up the possibility of rolling the cost into a mortgage making it an easier pill to swallow and for that matter more work for abatement contractors might increase production and help bring the cost down. All I know is I've done audits for a few new home owners and had to tell them they just purchased a HASMAT problem.
Gun foam pricing
I've looked at getting one of those foam guns and using Great Stuff Pro or equivalent foam, but the "pro" foam always seems to be WAY more expensive. I can get Great Stuff for about $0.30 per ounce, but the local places don't seem to stock the pro foam, and the cheapest I can find it online is about $0.50 per ounce plus significant shipping cost. And then there's the cost of the gun.
Where does everyone get this foam at a reasonable price?
Foam pricing
i see it on amazon for $0.38 per ounce. for the normal red greatstuff.
the blue window/door is more - at $.48
havn't seen it much cheaper than that...
Great Stuff Pro
I have bought Great Stuff Pro from Home Depot, Lowes and Menards. I have tried 3 versions. The cheapest is around $0.50 per ounce but I try to buy on sale. I also use a non Dow gun, Foam N Seal, for instance, has worked as well as the Dow brand gun, at half the price.
Hardest part for me is figuring out when the can should be tossed. There seems to be a dispersal agent which runs out before the foam, I can hear liquid in the can when shaking the can, but it only trickles out.
I find the foam is useful when the gap is more than 1/4 inch, smaller gaps are easier with caulk.
Bath fan dampers and stack effect
Are bathroom fan dampers typically spring-loaded to stay closed unless the fan is running so as to prevent heated air from escaping thru the fan exhaust? If not, don't these fans represent significant leakage points? Should one consider adding a spring-closed-motor-opened damper inline with the exhaust duct from the fan? Thanks in advance.
Response to Venkat Y
Venkat Y,
Bathroom exhaust fans include backdraft dampers that limit (but do not absolutely prevent) reverse air flow. For technical reasons, it's hard to make these backdraft dampers absolutely airtight.
It's theoretically possible to add a motorized damper downstream of the fan, electrically tied to the fan motor. But nobody does that, for two reasons:
1. Adding a motorized damper adds complexity to the system, and adds a component that may fail in the future and cause problems.
2. The potential energy savings are too low to justify the cost of the equipment.
Conditioned air leaving building
Hi Martin,
My understanding of backdrafting is unconditioned air "entering" the building envelope via the exhaust vent and I appreciate your comments in regard to that issue above.
But I was referring to the opposite problem: conditioned air "leaving" the building via the exhaust vents due to pressure differentials (either due to wind or because I maintain a slight positive pressure in the otherwise tight building envelope), stack effect, etc., or simply because the damper doesn't close all the way when the fan isn't running. Could the losses here be as bad as a recessed light that's not air sealed or worse?
Thanks in advance.
Response to Venkat Y
Venkat,
As far as I know, most exhaust fan dampers use springs to hold them in a closed position, to limit air flow in either direction when the fans are not operating. Examine the fan you are thinking of installing to determine how the damper operates.
Again, I don't think that the energy savings associated with a motorized damper would be great enough to justify the investment in the added equipment.
Around chimney air leaks: followup question
Great overview. Much appreciated.
And now my followup question: Once I seal the code-required gap between the wooden ceiling frame and the chimney with sheet metal and then seal any small gaps with heat resistant silicone, should I then put some fiberglass insulation on top of the sheet metal or is that (1) unnecessary and (2) dangerous? In other words, is the sheet metal sufficient to provide insulation equivalent to the rest of the attic which has two layers of R-30 insulation?
Response to Ed Osborne
Ed,
If you want to insulate right up to a chimney, it's best to wrap the chimney with mineral wool batts rather than fiberglass (because mineral wool can sustain higher temperatures without damage than fiberglass). Secure the mineral wool batts with loops of steel wire.
Response to Martin Holladay
Thanks, Martin, for your response. Is there any downside/danger to sealing the chimney-to-ceiling airflow gap with sheet metal and then wrapping chimney with batts?
Also, are mineral wool batts commonly available?
Response to Ed Osborne
Ed,
I'm not sure what you mean by the "chimney-to-ceiling airflow gap."
Codes require a gap between chimneys and wood framing. This gap should not be filled with insulation. However, codes do not require airflow through this gap. Nor do codes prohibit installing insulation above the sheet metal that is installed above this gap.
If you are talking about a metal chimney, you should always follow the installation instructions provided by the metal chimney manufacturer.
Mineral wool batts should be widely available. I have purchased mineral wool batts at Home Depot.
Response to Martin Holladay
By "chimney-to-ceiling" I meant the gap between my brick chimney and the wood frame. (Sorry for the confusion: I meant to say floor as in ceiling floor.) based on your comments, I'm going to install sheet metal to bridge the gap and then wrap the chimney with mineral wool batts above it. I've already experienced a noticeable improvement in the upstairs office and bedroom after installing attic insulation, and this should be the icing on the cake.
sealing attic with wooden ceiling?
If the ceiling below the attic is tongue and groove pine, would plastic sheeting between the ceiling and the insulation help make it air tight? If the ceiling is not yet installed should the sheeting be stapled to the bottom of the joists? Do you have other tips for sealing this kind of ceiling? I hope I do not have to put a layer of plywood between the pine and the joists.
Dave
Response to David Martin
David,
You absolutely must have a tight air barrier under your tongue-and-groove ceiling, since the boards do nothing to slow down air flow. The standard solution -- and the one I recommend -- is to install a layer of 1/2-inch drywall with taped seams first, followed by the tongue-and-groove boards.
Use air gap around chimney as intake vent?
Great article, thanks for taking the time. This may seem like one of those dumb questions, however, here goes; I am purchasing a 1662 sq ft home which needs a new roof. It is located in Orange County, CA, very moderate / warm climate, and mild winters. I have a chance to start with a clean slate and fully intend to do so with attic sealing and ventilation. Based on the 1/300 ratio, I am currently good with exhaust vents (gables) at 364 sq in NFVA but lacking intakes at only 216 in sq. I am aiming for 400 in sq of each. I intend to have the roofer add (QTY 3) O' Hagins at 72 sq in each low down on the roof. However, there is a space around the chimney that connects directly to the crawl space below the home which obviously in turn connects to many outside mesh vents at ground level. Can I use that space around the chimney as intake venting and avoid the O" Hagins on the roof? The area around the chimney is sealed off completely from any part of the conditioned living space within the house (or so I believe!). All that would remain would be to cover said chimney gap with wire mesh as a secondary barrier to prevent any rodent infiltration! Thanks.
tongue and groove ceiling continued
When I asked how to make a tongue and groove ceiling air tight, Martin advised me to put sheetrock above the wood ceiling. Could I use a 1/2" rigid foam panel instead if I tape the joints? Besides adding a bit more insulation, these panels are much lighter and easier to fasten to a ceiling. And they don't seem to have much structural use since the tongue and groove boards will be nailed to the ceiling joists.
Response to Andy Close (Comment #31)
Andy,
I was unfamiliar with "O'Hagins," but evidently O'Hagin is the name of a manufacturer of roof venting products. (For interested readers, here is a link: http://www.ohagin.com/products.asp .)
I have two comments:
1. Don't worry too much about achieving the 1/300 ratio (or even about attic ventilation in general). The 1/300 ratio is an arbitrary number that has been in the code for decades; there has never been any scientific attempt to explain where this arbitrary number came from. For more information on why you don't have to worry too much about attic ventilation, see All About Attic Venting.
2. It's a bad idea, for several reasons, to use a leaky attic chase that connects your crawl space with your attic as a ventilation channel. The main reason this is a bad idea is that this attic chase connects with your interior air (since it is highly unlikely that the original builders did a good job of air sealing the partitions that surround the chimney).
If you encourage air flow through this chase, you will be pulling conditioned air out of your house and increasing your heating bills and air conditioning bills. So seal up that chase! You should use the air sealing techniques described in this article -- both in the attic and in the crawl space -- to prevent any air from entering the chimney chase or exiting the chimney chase.
Response to David Martin (Comment #32)
David,
Yes, carefully taped rigid foam can be used as an air barrier. If you are not going to install any gypsum drywall, it's important to check with your local building department to make sure that omitting the drywall is permissible in your jurisdiction. (Some building inspectors insist that rigid foam needs to be protected by drywall for fire safety reasons; other inspectors allow the use of pine or spruce boards as you propose.)
If you install rigid foam, you might also want to install 1x3 or 1x4 strapping, 16 inches on center, on the interior side of the rigid foam. The strapping will make it easier to install the tongue-and-groove boards.
Question to Martin (Comment 4/5)
Martin, question on can light insulation and your recommendation of LED conversion kit as an effective way to air seal can lights. Several years ago I installed rockwool can light covers in each of our attic-exposed can lights, spray foamed in place. Last week I purchased a new toy - a FLIR infrared camera for my iPhone (I know, dangerous for an amateur energy nerd with OCD). I immediately noticed every can light (despite my rockwool covers and ~R50 insulation) was blood red when viewed in IR. This is with the lights off and outdoor temps in the low 80s. My question is - is this just the unavoidable, unintended consequence of can lights or can something be done to reduce the heat loss in winter and gain in summer? I assume the conversion kits you referenced would be redundant to the rockwool and LED lights I already have.
Response to Brian Gray
Your lights might be warm because they hadn't been off long enough to cool down completely, because of air leakage, or because of the insulation being weaker there. If it's air leakage, it might be worth fixing. If you have a house that's otherwise pretty tight, you might be able to do a blower door like test just by turning on all your exhaust fans. If you can feel air coming in and/or the thermal image gets worse, you could try the conversion kit and could probably get a better seal.
Response to Brian Gray
Brian,
In my article, I wrote, "Recessed can lights are bad news; most are responsible for very significant air leaks. The best solution to the can light problem is to permanently remove the can lights and replace them with surface-mounted fixtures." I stand by those sentences.
In Comment #4, I wrote, "Another way to cut down on air leakage through a can—especially one installed in a cathedral ceiling—is with an LED conversion kit." Note that I wrote that this is a way to "cut down on air leakage," not "eliminate air leakage."
I'm not sure why your insulated can lights are hot right now. (I'm assuming that your house is air conditioned, and that your ceiling drywall is cooler than your recessed can lights -- but you didn't give many details.) Certainly Charlie Sullivan's guesses are a good place to start. Let us know whether the LED lamps were totally cool (off for an hour) when this infrared scan was made.
Chimney chase ends in conditioned space
Hi Martin,
You mentioned that in the case of cathedral ceilings, this work is not necessary. However, I recently converted my unconditioned attic to a conditioned space. My chimney is exposed on this floor. Therefore, my chimney chase ends at this level and is exposed up to the roof framing. I was thinking of sealing the chase at the floor level, but you say this is unnecessary? By leaving it open, it is essentially a heater blowing air up from the basement. Do you generally recommend doing nothing, or should I at least use flashing and caulk at the roof level below my insulation?
Response to A. Bradford
A. Bradford,
The most important place to air seal around a chimney is where the chimney penetrates the thermal envelope. In your house, it sounds like that penetration occurs at the roof line. So you should certainly seal the air leaks around the chimney at this location, by installing metal flashing with sealed seams around the chimney, on the underside of the rafters.
As you note, the chase on the attic floor is not as much of a problem, because your basement and your attic are both inside of your thermal envelope. (If your basement is outside of your thermal envelope, that's another issue.)
Even though this chase won't be responsible for infiltration or exfiltration problems, it might be a good idea to seal it -- if only to reduce opportunities for odor transfer or rodent highways.
Thank you Martin!
Thank you Martin!
RE: comments 29, 30, 32, 34 -- sealing above pine board ceiling
I too would like to air seal attic with rigid foam board on rafters before attaching pine ceiling. Can I use a full inch? Won't foam board's low permeability be an issue? I always thought winter moist air must be given an outlet via the ceiling and attic. Has that changed over the years? Tony Esper, Northern Michigan
Response to Tony Esper (Comment #41)
Tony,
Q. "I too would like to air seal attic with rigid foam board on rafters before attaching pine ceiling. Can I use a full inch?"
A. Yes.
Q. "Won't foam board's low permeability be an issue?"
A. No. In northern Michigan especially, it is traditional (and required by building codes) to install an interior vapor retarder on walls and ceilings. In fact, interior rigid foam is a much better choice than interior polyethylene for this purpose.
Q. "I always thought winter moist air must be given an outlet via the ceiling and attic. Has that changed over the years?"
A. No. Nothing has changed. The idea that builders or homeowners should encourage moisture to flow through a ceiling assembly has always been wrong. But some people share that mistaken idea anyway.
Here's what I wrote about that topic in one of my articles (All About Attic Venting):
“My nickname for this explanation is, ‘Your ceiling is a safety valve.’
“This explanation is entirely divorced from any understanding of building science. Here’s how an old-time New England builder might explain the theory: ‘You can’t put a poly vapor barrier in your ceiling because your ceiling has to breathe. If you put polyethylene up there, the moisture won’t have anywhere to go. It will be trapped. You want the moisture to be able to get out.’
“The ceiling-is-a-safety-valve theory encompasses several misconceptions. Here are two of them:
• The purpose of attic vents is to help lower indoor humidity levels. If you encourage moisture to flow through your ceiling assembly, you will improve conditions inside your house.
• Because your attic is vented, you need to feed a continual stream of moisture towards the attic vents so that the vents have something to do.
“Of course, these ideas are misguided. Ideally, your ceiling should include a thermal barrier that separates the warm, humid, interior air from the cold, dry, attic air. You don’t want to encourage any moisture flow through that assembly — whether by air leakage or by diffusion.”
In another one of my article (Worries About Trapping Moisture), I noted:
“Water doesn’t need to escape from your house. Although it’s true that indoor air is warm and humid during the winter, while outdoor air is cold and dry, that doesn’t mean that indoor moisture needs to ‘escape’ from your house. It’s perfectly OK if the indoor moisture stays where it is without ‘escaping.’ Some old-time carpenters look at walls that include a layer of rigid foam and exclaim, ‘That won’t work! If you put in a layer of foam, the moisture will have nowhere to go!’ Moisture in your home isn’t like your retired parents in Michigan on New Year’s Day, itching to go to Florida. The moisture can stay right where it is, all winter long.”
Re: comment 41- air sealing, radiant barrier, attic venting
Martin,
Thank you very much for your valued response. I am happy to learn so much more about vapor levels and vapor migration in a structure, and about how to properly seal my cabin walls and ceiling to prevent air leakage and vapor condensation inside walls and attics. I have spent many hours reading articles and blogs at GreenBuilderAdvisor.com – a wealth of information and education. Thank you to everyone at GBA. I have much more reading to do!
My 400sf cabin in northern Michigan was built in 1940 for summer use only and I want to rehab it over the next 2 to 3 years to make it comfortable, efficient and winter livable. I am 66 and this will be a fun retirement project with no deadlines to complete the various phases.
I plan to install new roof trusses with 13” heels and will insulate with 3½” mineral wool between ceiling joists, plus 7” mineral wool perpendicular to the joists. I’ll seal the ceiling with 1” ISO attached to the joists (foil face down) and sealed per your guidelines. Then 1x4 strapping and a pine board finished ceiling (also ½” drywall over the strapping if required by code). Total R-value: about R15+R30+R6=R51
Q1: Radiant barrier: I have not found any definitive studies on the benefits of a ceiling radiant barrier for my application, but it seems reasonable that the ISO foil face will contribute to comfort level at least to some degree. Your thoughts? Will my ¾” space (1x4’s) below the foil face be enough or should it be a full inch as some articles say?
Q2: Attic venting: I plan to order trusses with 13” heels because the mineral wool will be 10½” thick and I want to allow about a 2” airspace above that. My OSB wall sheeting will extend up to within 2” of the roof decking (sealed around all the 2-bys) to provide the ventilation baffles. Does this sound OK or should the heel be a bit higher? The taller the heel gets, the taller the fascia will be and I’m not sure how that will look. I can make the overhangs longer to lessen the facia height but will that take away from the “cabin look”? Maybe not, I don’t know. Maybe it won’t be cabin-like anymore anyway after the renovation.
Q3: After reading GBA articles on attic ventilation I’ve learned that venting occurs mostly due to wind and not so much by natural warm air movement from the soffit, along the underside of the roof and out the ridge vent, as is the common belief. I had believed that ridge vents were superior to gable vents because they are at the very peek of the roof. But now, in the interest of having a nice clean ridge line, am I just as well off with a gable vent high in each gable?
Thank you! Tony Esper
Response to Tony Esper (Comment #43)
Tony,
Q. "I have not found any definitive studies on the benefits of a ceiling radiant barrier for my application, but it seems reasonable that the foil-faced polyiso will contribute to comfort level at least to some degree. Your thoughts? Will my ¾ inch space (1x4’s) below the foil face be enough or should it be a full inch as some articles say?"
A. The answer can be found in a book called ASHRAE Fundamentals. The R-value of a 3/4-inch air space on a 45-degree slope, when the air space has a shiny foil surface on one side of the air space, varies from about R-1 to R-2.9, depending on the delta-T across the air space and the cleanliness of the foil. (Dusty foil lowers the R-value of the air space.)
Q. "My OSB wall sheathing will extend up to within 2 inches of the roof decking (sealed around all the 2-bys) to provide the ventilation baffles. Does this sound OK or should the heel be a bit higher?"
A. While it's important to stop your wall sheathing at the right height to allow for air flow above the wall sheathing, it's also important to install ventilation baffles (either manufactured baffles or site-built baffles) between the top of your insulation and the air space. Here is a link to an article with more information on this issue: Site-Built Ventilation Baffles for Roofs.
Q. "I had believed that ridge vents were superior to gable vents because they are at the very peak of the roof. But now, in the interest of having a nice clean ridge line, am I just as well off with a gable vent high in each gable?"
A. The best ventilation is provided by a combination of soffit vents and a ridge vent. Gable vents are obsolete and are no longer recommended.
Re: Comment 44
Martin,
Thank you very much for your response.
Regarding my question on heel height and ventilation baffles, I can see the need for baffles attached to the underside of the roof deck if I use blown insulation, but in my case, since I will have 10.5 inches of mineral wool at the heel and the heel will be 13 inches, the remaining air gap is 2.5 inches.
I sure don't mind attaching baffles to the roof deck, in addition to the vertical air-wash baffles - I just like to understand why, provided there is already a clear 2.5 inch airway. And, as mentioned in my comment, I have yet to order the trusses so I can order whatever heel height I need.My roof pitch will be 4/12.
On the other hand, if I use roof deck baffles I can reduce the heel height to 12 inches, and that's a good point too. But theoretically, with 10.5 inches of mineral wool, how high does the heel have to be in order to not need baffles on the underside of the roof deck?
Thanks again. Tony Esper
Response to Tony Esper (Comment #45)
Tony,
It's possible I misunderstood your question about ventilation baffles. You are right that you can omit the ventilation baffles near the eaves when installing batts. (The ventilation baffles are always required when blown-in insulation is used.)
While the ventilation baffles are optional in your case, I think they are a good idea -- because the baffles limit wind-washing through the air-permeable insulation at this vulnerable location (where poor insulation performance can lead to ice dams).
Thank you, Martin. Clear and incredibly helpful, as usual.
Thanks for all the great information. I have been looking all over for some of the insulation information you provided to no avail. My question is how do I find a vermiculite/asbestos remediation specialist? I have it in the attic over two bedrooms. An animal got into the house and managed to dislodge a garbage bag size amount of it into a walk in attic. I left it where it is for now as I had read about the asbestos. Can I clean it up myself (wearing a mask) or do I leave it for an expert? Any ball park figures on what it costs? Thanks so much.
S.D.,
First of all, you should read this article: "Fixing Attics With Vermiculite Insulation."
Don't touch the vermiculite or attempt to clean it up yourself.
The type of specialist you are looking for is called an asbestos abatement specialist. You can Google these words, along with your home state or city, to find a contractor to help you.
Thanks a bunch. I appreciate it.
Hi, thanks for a really interesting blog post, I'm currently looking at air sealing our house as we are in the middle of a nightmare. Long story short, mice managed to get into the cavities of our house, and have caused no end of leaks and problems. There's evidence that the mice have got into the loft, hence way I'm looking at air sealing, to cover off both the mouse and as an insulation upgrade. As you can see from the photos, we had to have the ceilings down so we could get a clear picture of the damage, Ideally I want to block so of the holes around the electrical cables and the pipes, but I've read that expanding foam can be a fire risk? Not sure if you could confirm that either way?
Thanks Again, Dave
Dave,
Canned spray foam is routinely used to seal air leaks at cable penetrations. That said, you should know:
1. You can't install spray foam inside an electrical box -- the volume of air in the electrical box helps dissipate heat, so installing spray foam in a box is an electrical code violation.
2. If you are sealing air leaks in framing that is considered fire blocking (for code reasons), then you have to use caulking or special spray foam that is approved as fire blocking.
3. Most codes require foam to be protected by a layer of 1/2-inch gypsum drywall. If you have a drywall ceiling, and your air sealing work will be hidden behind this ceiling, you should be fine on that score.
Are there general guidelines as to when non fire-rated spray foam can be used and when fire-rated is required (i.e. around outlets, wire penetrations, etc.)? Also, same question for fire-rated foam vs fire-rated caulk.
I did see Martin’s comment (#52), which I interpret as the bottom plate, horizontal stud blocks, and top plate of certain walls – “2. If you are sealing air leaks in framing that is considered fire blocking (for code reasons), then you have to use caulking or special spray foam that is approved as fire blocking.”
Jacob,
I'm not an expert in fire-blocking, but I highly recommend a JLC article called "Fire-Blocking Basics." (See attachment.)
Friendly heads-up on a dead link.
“How to Air-Seal Ceiling-to-Wall Connections in Attics” links to https://www.greenbuildingadvisor.com/content/how-air-seal-ceiling-wall-connections-attics
This page no longer exists.
Hope this helps.
Rolltideryan,
Thanks. I've edited the article to remove the dead link.
I have an attic floor that look exactly like the first photo except there is old, grey, loose (cellulose?) sitting between all of the joists. Instead of going through and cutting out the boards, removing the insulation, sealing, etc. , could I just have someone come in and dense pack under the attic floor boards with cellulose? That would air seal and beef up the R value a bit, right?
If I did that, would it be worth me buying rigid foam panels and installing them over my boards to get a higher value? I assume I'd have to screw or glue them down to the attic floor, tape the joints and then caulk or foam all around the edges. Then, I could put down some OSB or thin plywood to protect the insulation/seems.
I also have to figure out how to seal off all around the edges where I can literally see into my soffit and down into my second floor walls!
Aaron,
Q. "I have an attic floor that look exactly like the first photo except there is old, grey, loose (cellulose?) sitting between all of the joists. Instead of going through and cutting out the boards, removing the insulation, sealing, etc., could I just have someone come in and dense pack under the attic floor boards with cellulose?"
A. Yes, you could do that. But if you do that, you won't have sealed existing air leaks as well as you would have if you followed the advice in this article.
Q. "That would air seal and beef up the R value a bit, right?"
A. It would beef up the R-value. It wouldn't seal air leaks, but it would slow down the rate of leakage.
Q. "If I did that, would it be worth me buying rigid foam panels and installing them over my boards to get a higher value? I assume I'd have to screw or glue them down to the attic floor, tape the joints and then caulk or foam all around the edges. Then, I could put down some OSB or thin plywood to protect the insulation/seems."
A. If you do that, the OSB or plywood would be essential. (Exposed rigid foam can be a fire hazard.)
If you care about getting the best bang for your buck, you might just install more cellulose on top of your floorboards. But if you do that, you'll lose the chance to use your attic for storage (which may be one of your goals).
Q. "I also have to figure out how to seal off all around the edges where I can literally see into my soffit and down into my second floor walls!"
A. Yes, you do.
Thank you, Martin.
It sounds like I should buck up and do the air sealing. I think I'm comfortable with how to do that in the interior of the attic (seal any areas where second floor walls meet the attic, where cables run into attic and any penetrations into the attic from lights/exhaust fan.)
I'm still a little fuzzy on what to do at the edges. I've attached a profile of my roof at the roof/attic/wall intersection. I have a 1915 hip-roofed house with no insulation in the walls (and no intention of insulating them as I have good, painted wood siding and good interior plaster.). If I cut out pieces of attic flooring, I can see that there is a double 2x4 plate running around the inside that is resting on my wall 2x4s. The rafter sits flat on that double plate. If I reach my hand down under the double plate (there is a small gap by the attic joist), there is a straight shot down to the empty wall on the E and W walls of my house, on the N and S walls I have to drill through a 2x4 to get into the wall. If I reach over the top of the double plate, I can feel into my old wooden soffit, and that is where my yankee/in-built downspout would run for example. So air can flow into my soffit and go right into the attic. I guess the best solution is to block off those holes between the rafters and then spray foam all over that blocking, up the roof sheathing a ways and dover that double plate and down onto the second floor ceiling a bit to cover up all of those leaky areas?
Air can still come into the soffit and go through the sheathing and into my wall cavity or go up my wall cavity and out into the soffit through leaks in my sheathing right? But I guess I just have to live with that unless I go into the soffit and insulate the sheathing some?
Finally, my rafters have fiberglass batt between then that stops at the double plate at the top and has poly over the batt. It was done years before I bought the house. I know this is a terrible way to do it after reading this site. The attic then has a knee wall and sheetrock over the rafters/batt all the way up to the top of the attic ceiling. Should I tear out all of the sheetrock and batt insulation to make sure the roof isn't getting moisture damage? I was debating spray foaming all the way up to the roof vs insulating the floor with foam boards, as I had stated above. The floor option would be DIY and cheaper. I only use the attic for some storage and don't intend to inhabit it or run ducts/air handlers up there.
I will be going up into my attic here in the next month to complete air sealing and then adding extra blown in fibreglass. I was hoping if I could get clarification on the use of Great Stuff "gaps and cracks pro" fire retardant (red) spray foam.....am I ok to spray this foam around all my plumbing vent stacks? inside all the holes that have electrical wire running through the top plates?
As for the electrical boxes, is the general consensus that the black acoustical sealant the best product to use for air sealing?
Much appreciated! Thank you!
Log in or become a member to post a comment.
Sign up Log in