
Image Credit: David Goodyear
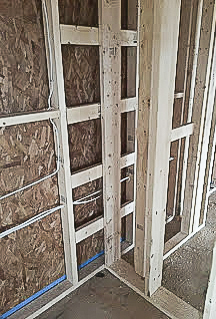
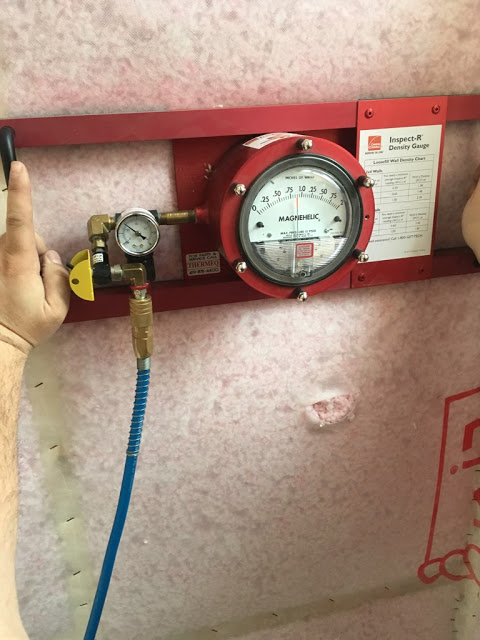
Image Credit: David Goodyear A row of blocking at mid-height should prevent the studs from bowing or twisting. Blocking provided a solid point of attachment between interior partitions and the exterior service wall. This device tests the density of the blown-in fiberglass insulation. It found R-values of at least R-15.
More Guest Blogs


Editor’s Note: This is one of a series of blogs by David Goodyear describing the construction of his new home in Flatrock, Newfoundland, the first in the province built to the Passive House standard. The first installment of the GBA blog series was titled An Introduction to the Flatrock Passive House. For a list of Goodyear’s earlier blogs on this site, see the “Related Articles” sidebar below; you’ll find his complete blog here.
Our plan of attack from the beginning was to erect all exterior service walls first and then frame the interior partitions later. The plans called for 2×4 framing 24 inches on center. The framers worked pretty quickly, and the service walls were nearly complete in just two days. To strengthen the interior petitions and service walls, we installed staggered blocking at half height to help prevent the studs from bowing, warping and twisting (see Image #2 below).
Now it’s starting to look like a house!
Because we would be installing drywall returns around all windows, I opted to add 1/2-inch slots to the window frames at the time they were made. To make the lives of the drywall installers easier, the rough stud openings had to align with the drywall returns so shims would not have to be used.
The exterior service walls sit on 1 1/2-inch-thick strips of expanded polystyrene (EPS) foam. The foam prevents thermal bridging through the bottom wall plate to the concrete stem wall foundation. We attached the service wall to the 2×8 exterior stud wall with 5-inch #10 screws, toed through top and bottom plates. To ensure the walls were straight, we placed shims behind the screw locations and straightened the wall with string lines. Once straightened, the wall was secured by driving the screw though the top plate of the service walls, through the OSB and into the exterior wall plates.
Tackling the stairs
I had been dreading the stairs because I had never worked on a staircase before. My plan was to build the rough staircase so it could be capped later. Quite a bit of planning had to go into this. I had to ensure that all the components were offset from the walls to account for drywall and a skirt board, and make sure I had room for railings.
Another reason I dreaded the staircase was because the house plans called for a winder stair in order to make up the number of stairs required for the 9-foot ceilings. The winder looked confusing. However, once I investigated further I determined that two risers and a landing would work fine. The rest of the staircase just worked out. The rise and run meet code and will be very similar in feel to the staircase in my current house.
There were no details in the plans about connecting interior walls to the service walls. Blocking seemed like a good method to get more insulation into the service wall, and it also provided a place to nail drywall (see Image #3 below).
The weather has turned cold — then warm — then cold again. While working at the house I have had a lot of time to assess how the house behaves. With no heat source in the house and many cloudy days, the house cooled a lot. One day when it turned 14°C outside (57°F), I walked into the house and it was like an icebox! I could see my breath!
Twenty-four hours later it felt just as cold and I could still see my breath despite 24 hours of warmer than seasonal temperatures. Having the sun shining the past couple of days has been welcomed. It has warmed the space significantly. Despite not having any attic insulation yet, I am pleased with the way the house responds to exterior temperature swings. It really goes to show that air sealing plays a huge part in energy savings.
Adding the insulation
Choosing insulation for the interior service wall was challenging. I originally thought that I would do the work myself with batts. Intimidation set in once I realized how many wires, plumbing pipes, receptacles, and mechanical elements are integrated into the walls. Reading an article by Allison Bailes on insulation installation quality made me wonder whether it would even be possible to get a Class I installation in walls with so many complications.
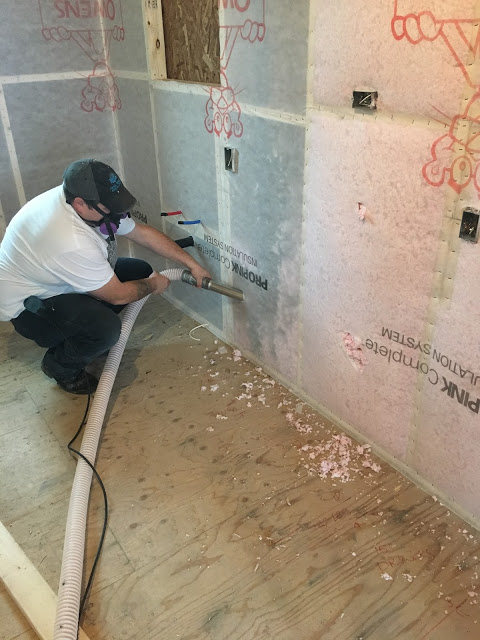
Luckily, Bill Gifford of Home Shield Insulation, the insulator for my attic spaces, also knows a thing or two… or three… about dense-packing fiberglass. He uses the Owens Corning ProPink wall insulation system, which is really a type of BIBS (Blown In Blanket system).
The system involves stapling a breathable, semi-stretchy fabric to the service walls. The fabric is cut to allow for wall penetrations like electrical boxes, pipes, etc. Then, a pointy ended pipe attached to a flexible hose is pushed through the blanket in several places and the insulation fills the cavity. It is not quite as simple as that, so I’ll elaborate.
Blowing the insulation into the walls is very methodical and appears to be an art of sorts. Bill typically starts in the bottom corner of a stud cavity and angles the pipe towards the corner. As the corner fills, the sound of the air coming out of the pipe changes, and the flow rate of the insulation delivery basically stops once the dense packing is complete for the settings on his machine. As soon as the pipe is moved, the insulation starts flowing again. A cavity can be filled pretty quickly.
I suspect Bill’s technique has been developed after years of doing this type of insulation system. He interacts fluidly with the delivery hose. Once dense packing is complete in one area of the cavity, he moves the delivery pipe to another, stabs a hole and starts filling again. He was able to complete the insulation upstairs in one day.
Testing the result
It took about two days to staple the fabric and two days to complete the insulation installation. After installation was complete, he carried out some quality assurance testing with an Inspect-R gauge, a device which measures R-values using compressed air (see Image #4 below). Values acquired for the gauge were higher than 0.65, so we have at least R-15 in the interior service wall.
Besides the fact that the R-value is higher than typical batts for a 2×4 cavity, the filling is much better. The insulation fills everything: it works around electrical boxes, between wires, etc. No cutting, splitting and pulling batts into place. This is a great wall system. I am much happier now looking at pink walls! I have been staring at studs for much too long. The structure is now starting to look like a house.
Things are warming up! Before Christmas, the building was cold and I found it unbearable while working. The electrical inspection passed and the service was hooked up to the pole on December 22. Since then the heat has been on. Heating up a cold structure is no small feat. The amount of thermal mass in the concrete slab alone is huge, i.e. about 25 cubic meters. I estimated that it would take almost 300 kWh of electricity to bring it up to temperature!
Thick walls and lots of material make for a slow heating process. With temporary construction heaters running we have chewed through almost 1500 kWh just bringing the house up to temperature. The heating load has decreased considerably since the temperature inside has leveled. The load does appear to be related to the number of people working in the house and whether or not it’s a sunny day. I have nothing quantitative at this point but it looks like the house is behaving as it should!
Weekly Newsletter
Get building science and energy efficiency advice, plus special offers, in your inbox.


3 Comments
> Inspect-R gauge, a device which measures R-values
Apparently it measures pressure drop and from that they derive density and a center wall R value.
Inspect-r
As you mentioned, the gauge measures pressure drop. Owens Corning include a table with the gauge which correlates pressure drop to r-value.
Think SPRAY applied & screeded insulation for service cavities
It can be daunting when any insulation installer realizes "how many wires, plumbing pipes, receptacles, and mechanical elements are integrated into the walls".
Think SPRAY applied insulation, and in particular, Mineral Wool! I almost missed the future by a hot minute, but attached is picture from my jobsite last week. The local installer had to borrow the equipment from another branch, but they did it - relief!
Look how patient and steady it is, just waiting for the Intello Plus and service cavity wall to go up, or drywall, or what ever – with no fussy blown-in details, nor Insulweb. Imagine how clingy, filling, and easy-to-install the SPRAY applied method will be, around wires and other obstructions! The joy of inspectors to see a more fire retardant wall . . . Now, consider the actually green, great Rvalue, and naturally more value-added qualities of Mineral Wool . . . voilà !
Until the next Insulation improvement (in what - 30 more years?), the future is now - specifiers, builders, schedulers, installers, homeowners . . . value-added all the way through.
youtube dot com /watch?v=fsaNBThAjRM (Spray and Scrub- Stud scrubbing shown at minute 3:36)
Log in or create an account to post a comment.
Sign up Log in