
Image Credit: David Goodyear
More Guest Blogs


Editor’s Note: This is one of a series of blogs by David Goodyear describing the construction of his new home in Flatrock, Newfoundland, the first in the province built to the Passive House standard. The first installment of the GBA blog series was titled An Introduction to the Flatrock Passive House. For a list of Goodyear’s earlier blogs on this site, see the “Related Articles” sidebar below; you’ll find his complete blog here.
Energy use in a building scales with air infiltration, and decreasing the air infiltration rate can have a huge impact on heating costs. This article illustrates things nicely. Heating energy decreases linearly with decreasing infiltration while conduction losses through the insulation change little with air infiltration.
A tighter air barrier has several implications. It leads to lower energy bills, and it also leads to a more resilient structure that is less susceptible to moisture damage. In addition, balanced mechanical ventilation provides fresh air more effectively than random infiltration and is a controlled route for energy capture/release through a heat-recovery or energy-recovery ventilator.
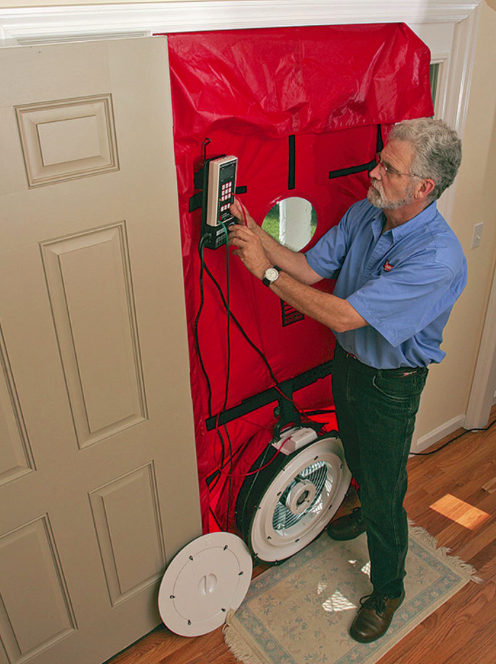
Infiltration rates are typically measured with a blower door test. A fan is placed in an exterior doorway. The fan is then turned on and the differential pressure it creates causes the house to leak from the exterior to the interior (depressurization) or vice versa (pressurization).
Typically, the air leakage rate is measured at 50 pascals of depressurization. The air volume flow rate is determined from the fan parameters and then translated into cubic feet per hour. Dividing this by the volume of the house gives the ach50 (air changes per hour @ 50 Pa). Most new homes would test at between 3 and 5 ach50, depending on how well the air barrier is installed, although there’s no way to tell unless a blower door test is actually conducted.
The PHIUS+ 2015 standard requires 0.05 cubic feet per minute (cfm) at 50 pascals per square foot of gross envelope area, which at our new house corresponds to 295.69 cfm or 0.93 ach50.
It will take more than one test
Defining the air barrier requires the implementation of incremental details at different stages of construction. Once the details are intact, they can be tied together into one continuous air barrier. A blower door test is really a “stress test” that shows quantitatively whether the air barrier is intact and how airtight the structure actually is.
Blower door testing should be arranged after completion of each major milestone of construction. The first test tells us that the air barrier is intact and has no major flaws. If there are flaws in the air barrier, they can be corrected before the next stage of construction. That first test for us came after we completed the OSB air barrier on the inside of the exterior walls.
But it won’t be the last. The air barrier will still require many penetrations for various services, i.e. electrical and ventilation, all of which will be sealed to the air barrier in some way. A second blower door test will determine if the barrier is still intact after these modifications have been made and the air sealing details have been completed.
Preliminary results are great
Brad Dunn was on site around 9:00 a.m. on the morning of the test. I did the general tour showing him the various air sealing details. He was impressed and said he would be very surprised if there were issues. The system he was using can be set up with several discs that allow for progressively lower air flows.
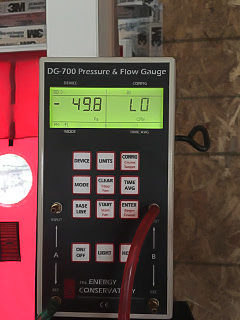
We used the smallest disc that he had available. After turning on the fan, and adjusting the fan speed to get about 50 Pa, the meter read “LO.” I was happy! It took a few seconds to get the numbers. They were hard to capture with pictures of so I made note of them. At 50 Pa, the average measured value for cfm was about 147.
Now for the numbers. Using the gross envelope area:
147 cfm50 / 5913.8 square feet = 0.025 cfm50 / square foot.
The standard requires 0.05 cfm50 / square foot. Our number is good!
In terms of air changes:
(147 cfm50 x 60 min / hr) / ( 19,082.5 cubic feet) = 0.45 ach50!
The required air changes from the infiltration test had to meet 0.93 ach50 so I am quite happy with this result.
These results also can be used to calculate heat losses in kilowatt hours. (For a detailed look at the math, see this post). How much should we save by making the house tighter than it had to be? At our current five-year projected electricity rate, we should save $97 per year if heating with electricity when compared to a house sealed to 0.93 ach50. Because I will be heating with wood, it will save about 50-60 chunks of wood annually.
This raises the question: Is reaching 0.45 ach50 worth it? In terms of the money saved on energy compared to the effort involved, I would say probably not. If we had reached 0.93 ach50 I would have been pleased but at 0.45 ach50 it gives us some buffer for issues as construction moves along.
A methodical approach helps
All the required air-sealing tasks were well documented in the plans but it did require us to come up with a well-thought-out, methodical approach. We couldn’t have done this without discussing details in depth with my Passive House designer, Mike Anderson of Passive Design Solutions. In the past three weeks we completed an amazing amount of work:
- Insulating the exterior walls.
- Erecting the OSB air barrier.
- Tape-sealing and caulking joints in the OSB air barrier.
- Tape-sealing the OSB air barrier to the window bucks, the rim joist space, and the slab.
- Spray-foaming rim joists.
- Spray-foaming, applying backer rod, and caulking around all windows and doors.
My father was on site for 21 days working nine-hour days. I was on site during the weekdays working 4.5-hour days and working nine-hour days on the weekends, for a total of 310 person-hours. Our initial test result of 0.45 ach50 is a testament to our methodical approach and diligent attention to details. It’s an amazing result on my first Passive House!
Weekly Newsletter
Get building science and energy efficiency advice, plus special offers, in your inbox.


8 Comments
Poor metrics
Kudos for calculating metrics with some relevance (like $/year). Even better might be something like tons of atmospheric carbon/year/occupant.
Labor hours
What were your 310 labor hours doing?
T Carleson
I think the 310 hours was spent on the tasks he lists immediately above.
It represents about 12k more in labour than I typically spend on the same tasks for a house.
Settling and adhesives
I wonder what happens over time as tapes and adhesives lose their grip from the stresses on them with the freeze and heat cycles. I've done some remodels on ten to twenty year old builds that the flashing tapes virtual fell off. Then add in some settling and material shrinkage. What will that blower door read down the road.
Settlingnand adhesives.
I am hoping my hat the redundant taping system ie tape and acoustical sealant will last a long time. All of the air sealing details are inside the house air barrier and will likely not see large temperature swings, humidity etc that could lead to advanced aging. I have wondered what will happen further down the road.....I'll cross my fingers I guess!
Labour hours,
We spent that time erecting all the osb, sealing all the joins with acoustical sealant and tape, blueskin around all corners and tying into the air barrier from the previous phase of construction as well as insulating the exterior 2x8 wall, spray foaming rim joists, air sealing the windows to the window bucks....
New build ACH
Congrats, I'm enjoying following your progress.
Most of the new homes I'm assessing in Halifax have an ACH@50Pa in the 1.5-2.5 range. Granted, the majority of them are registered under the ENERGY STAR for New Homes program which likely accounts for the low air leakage rates.
ESNH minimum requirements (v12.8 for Canada) for air leakage rates are 2.5 (detached) and 3 (semi-detached) respectively.
LucasNS
I'm glad youre enjoying the progress! More to come promise!
Log in or create an account to post a comment.
Sign up Log in