

More Energy-Smart Details


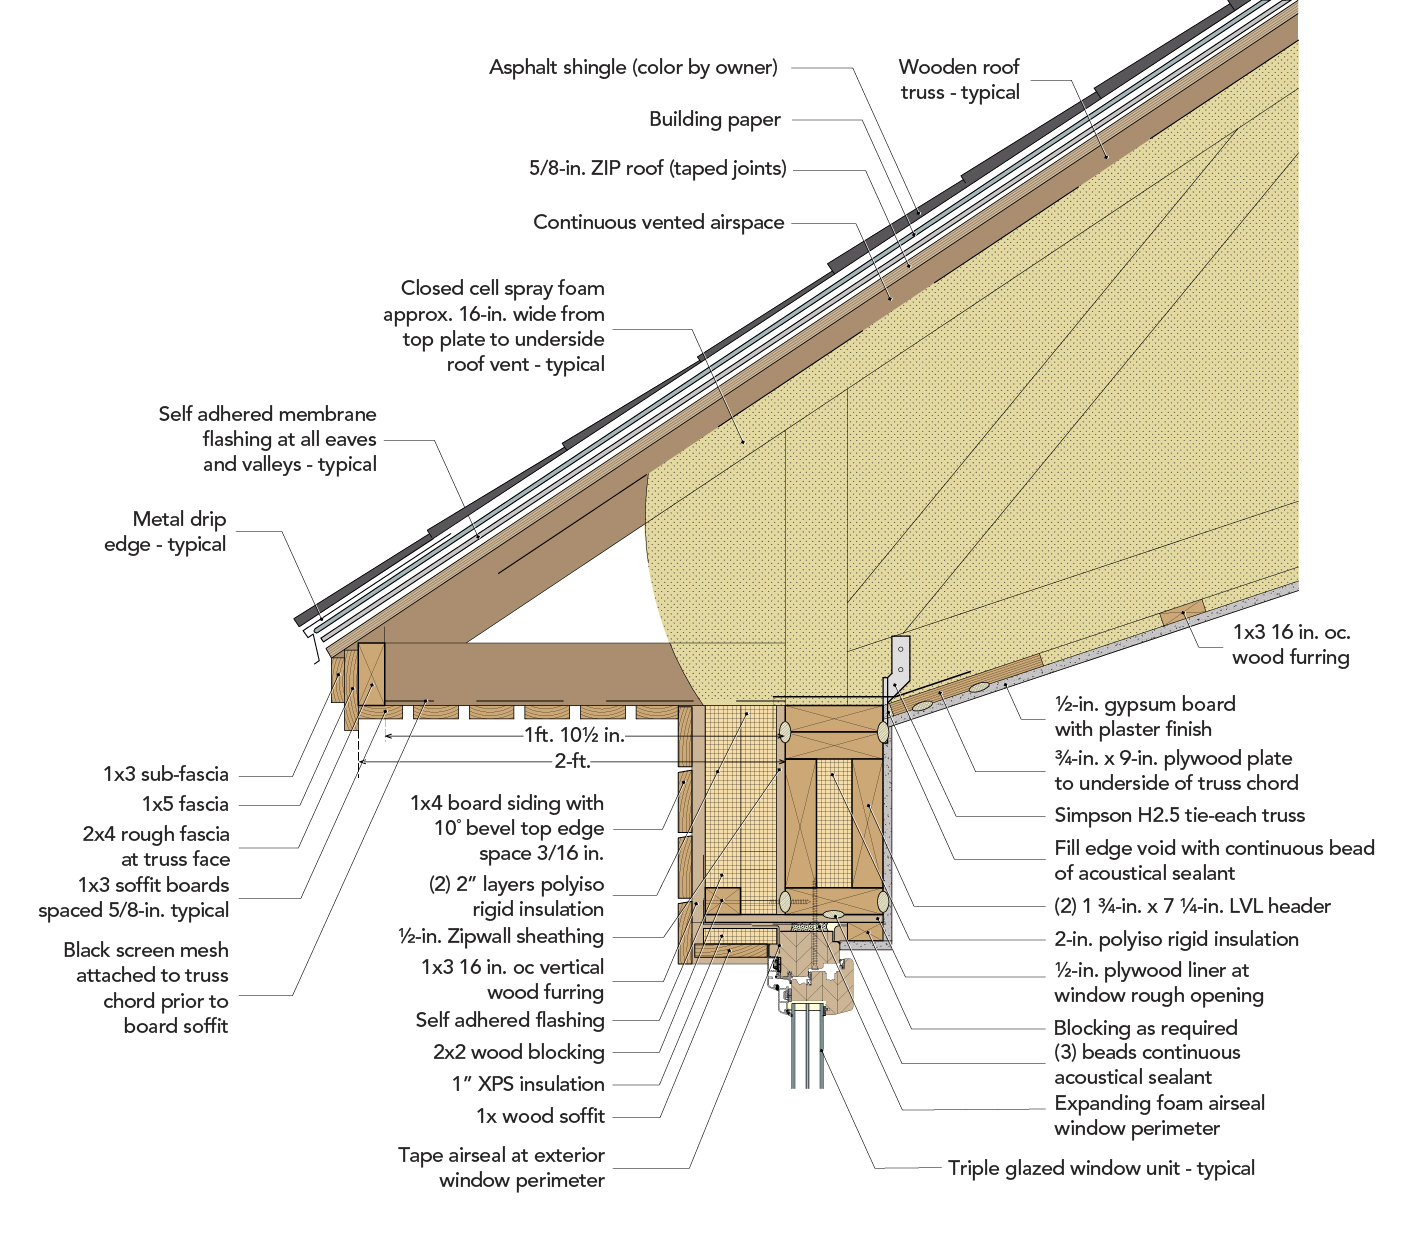
Cantilevered floor systems are frequently used in residential architecture. They provide an opportunity to capture additional square footage without enlarging the house’s footprint. But they can be problematic if not detailed well—leading to moisture issues and occupant discomfort. Correctly positioning the water, air, vapor, and thermal control layers is crucial.
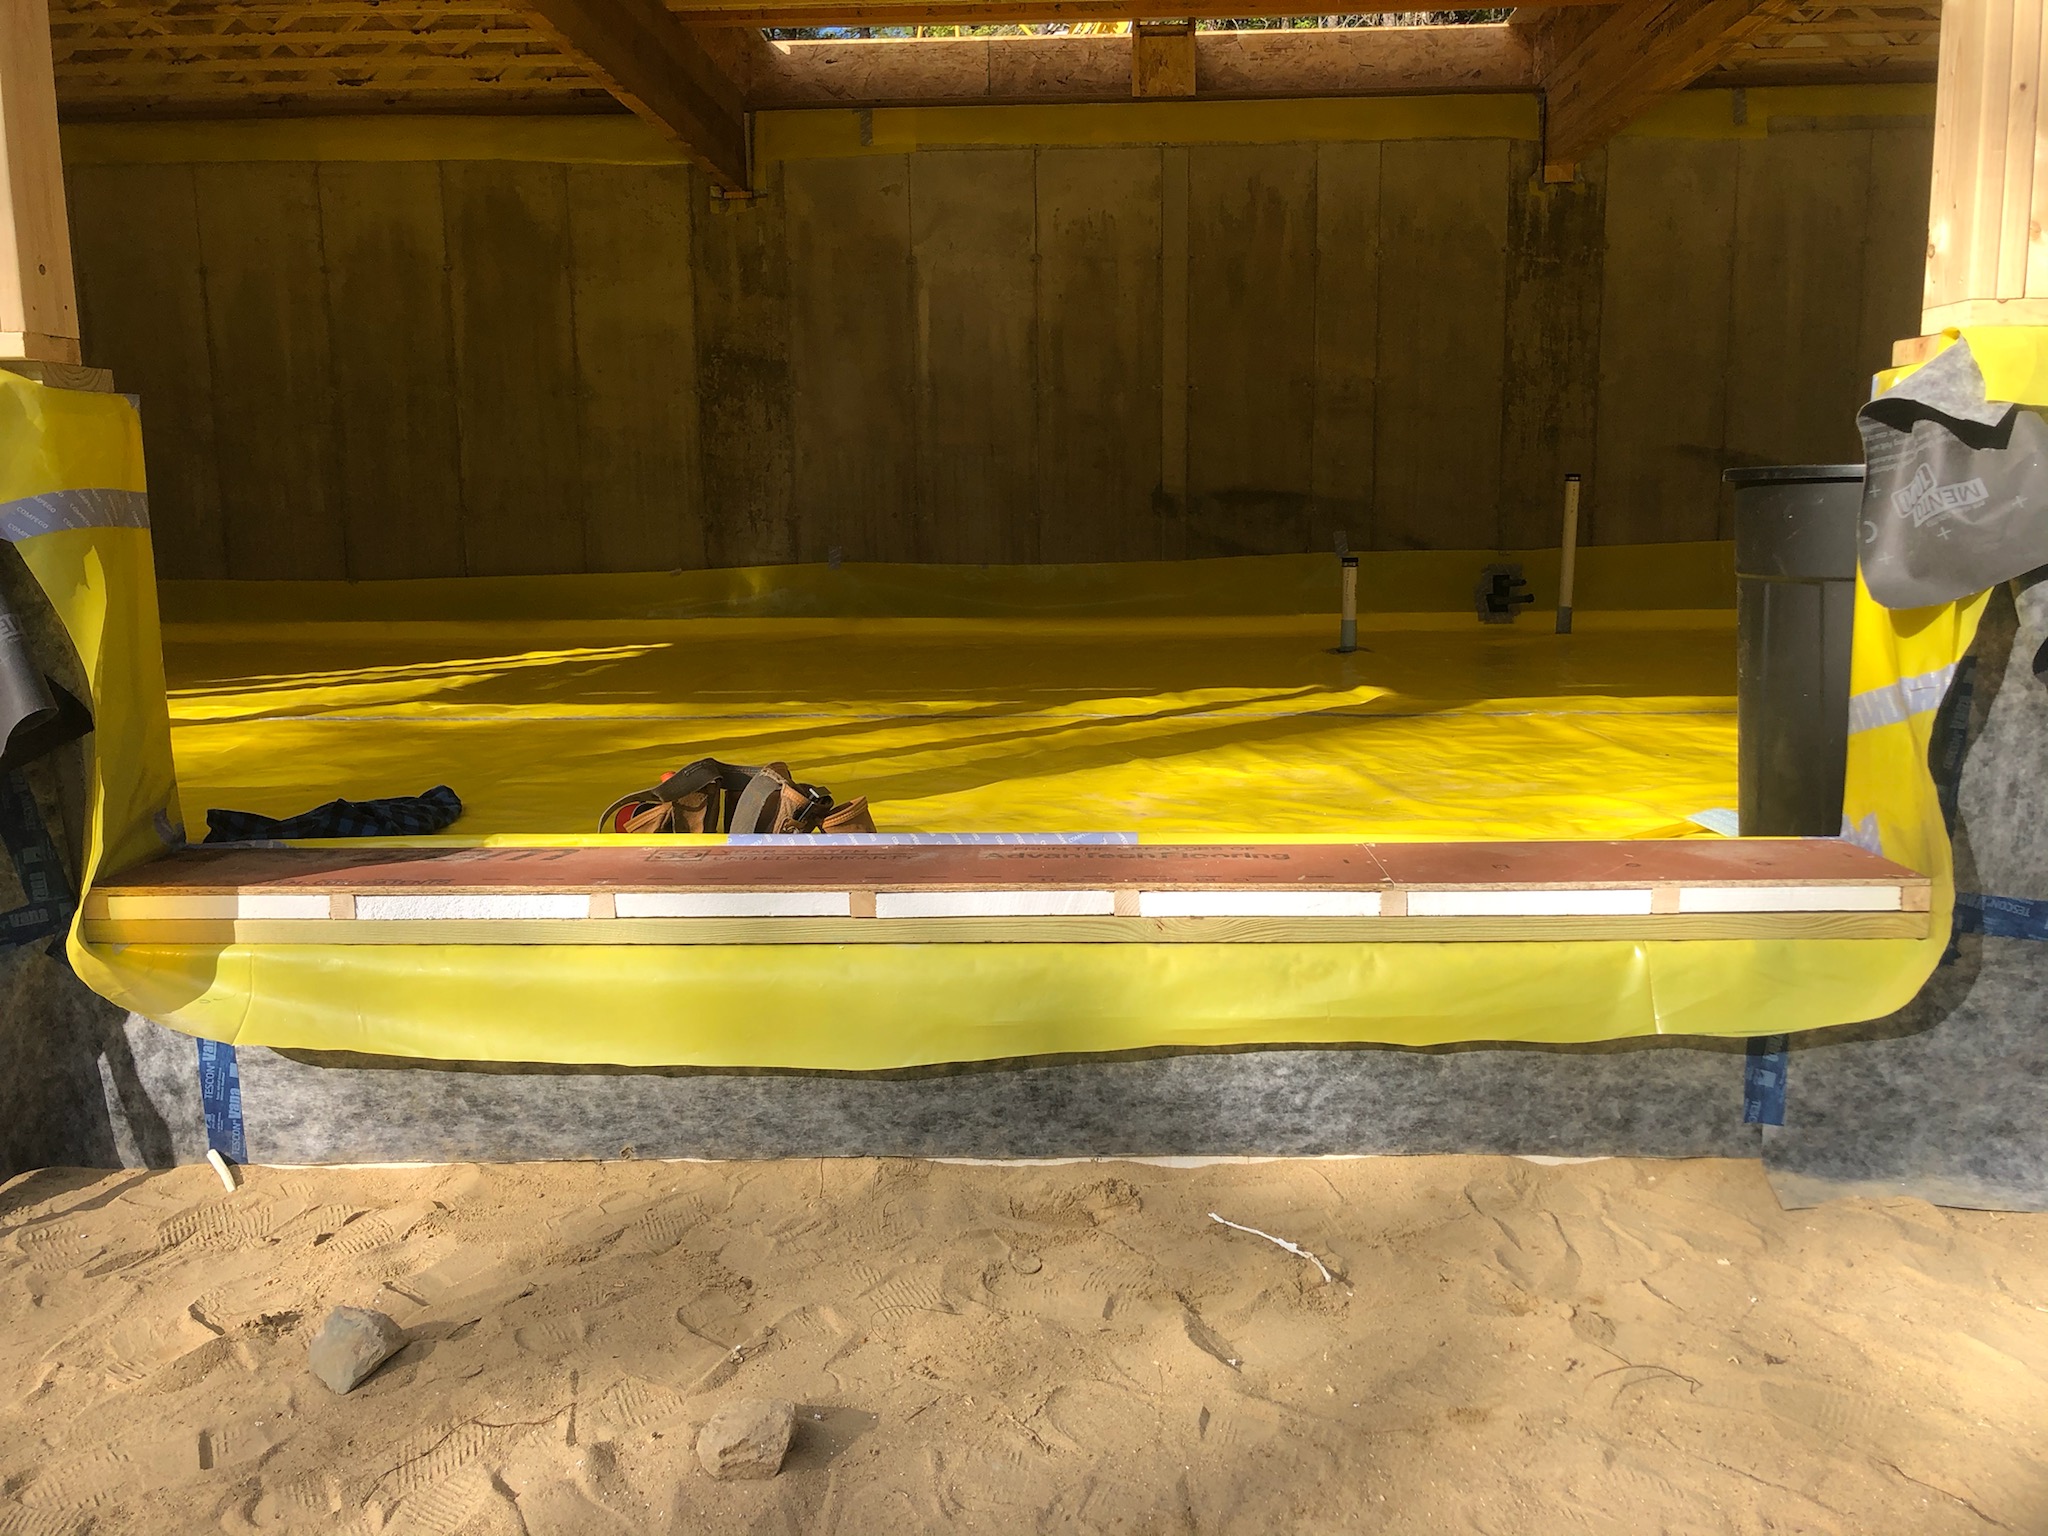
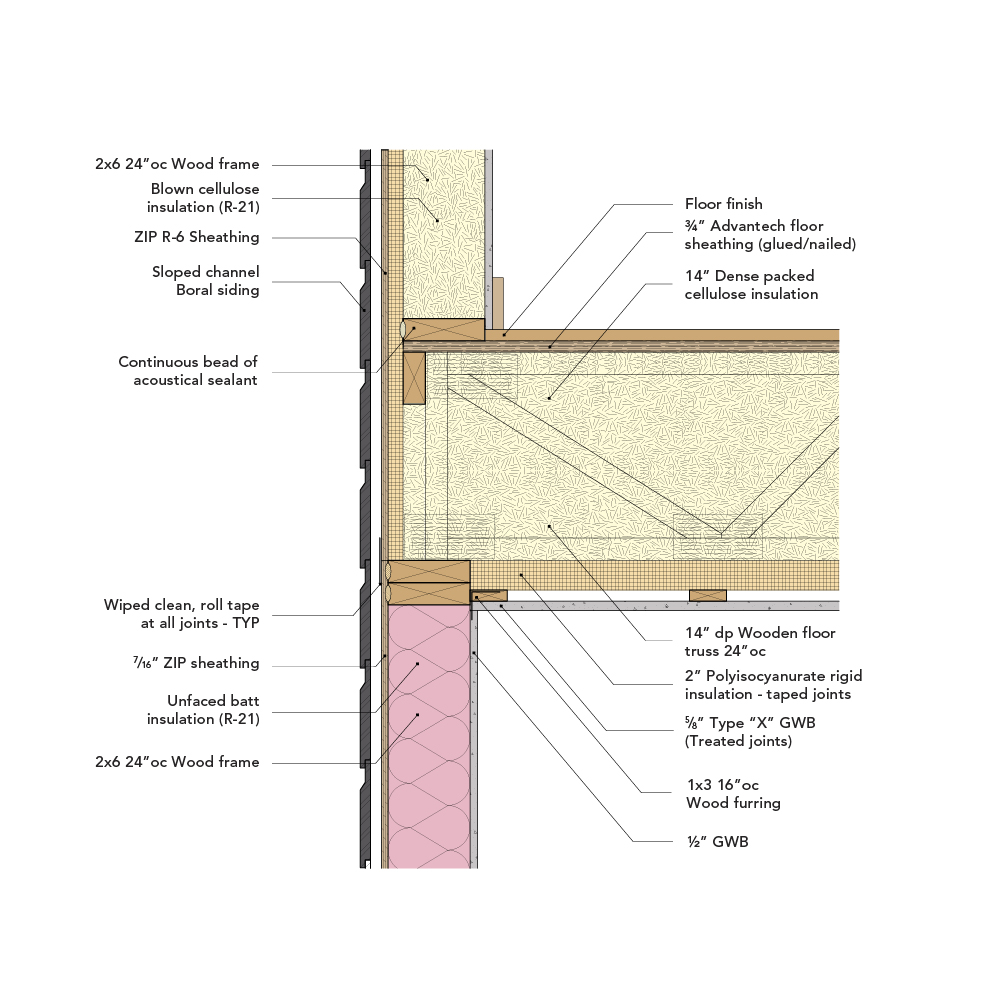
In the control layer hierarchy, bulk water management comes first. An overhanging floor system inherently protects the wall assembly below but we should still strive for appropriate water management within the wall assembly itself. In this detail, we used Zip R-6 sheathing, a type of OSB backed with 1 in. of laminated rigid-foam insulation with an integrated weather-resistant barrier (WRB). Using Zip R means there is no need for an additional weather barrier. Once installed, all the joints should be wiped cleaned, sealed with Zip tape, and rolled with adequate pressure. (Click here for “Zip Sheathing Tips.”) The taped Zip R will handle the field of water management.
To reduce stress on the WRB, a drainage/ventilation plane is created on the face of the Zip R sheathing using 1×3 wood furring strips spaced 24 in. on center to align with the 2×6 stud framing below. A corrugated vent strip runs along the bottom of the gap, allowing for proper drainage and adequate ventilation; it also keeps bugs and critters out. In this case, the exterior finish—cement board siding—is installed on top of the furring strips.
With the water management control layer positioned for success, the next consideration is air leakage. Air-sealing protects against the transfer of energy either by heat loss or heat gain through the building assembly. Restricting the flow of air diminishes the energy penalty. A good air-sealing strategy also prohibits moisture from moving along an air stream and hitting a cold surface, where it can condense…
Weekly Newsletter
Get building science and energy efficiency advice, plus special offers, in your inbox.

This article is only available to GBA Prime Members
Sign up for a free trial and get instant access to this article as well as GBA’s complete library of premium articles and construction details.
Start Free TrialAlready a member? Log in


26 Comments
I sit here reading this with my toes against the baseboard in an assmebly like this, poorly constructed in 1970, and retrofitted more recently with an attempted air barrier that didn't fully succeed. My toes are a little chilly, and would be much happier if it had been done according to this detail.
That's a great detail once complete, but I don't see how it's viable to insulate the cantilevered portions of each joist space with cellulose. Is it imperative that the areas get dense-packed and not just filled with batts?
>" I don't see how it's viable to insulate the cantilevered portions of each joist space with cellulose. Is it imperative that the areas get dense-packed and not just filled with batts?"
The density doesn't have to be very high if it's only 9.5" deep (a 2x10 bay)- even 2-2.5lbs is dense enough to inhibit settling, quite air retardent, and will meet/beat IRC 2018 prescriptives for floors in any climate zone. Open blown cellulose is typically <1.5lbs, and would not settle more than an inch at that depth.
Even if it did settle an inch (to 8.5") over time, it's still going to meet IRC code, and won't expose any big thermal bridges.
Unless the cantilever is 30"+ out from the supporting wall a single 1.25" hole bored through the 2x10 blocking and blowing it with a cone nozzle (not a dense packing hose) would be sufficient for hitting those kind of density numbers even with a wimpy single stage blower.
GBA often features excellent detailing which is perfectly appropriate for the kind of crews run by firms like Hammer and Hand, or the other performance oriented builders clustered in New England that I bet Alexandra has had good experiences with. For them to get widespread adoption in the industry they need to be capable of easily fitting into the typical sequence of construction and not have too many stages.
You may be right, that it's a simple as having someone drill holes in all the blocks and then afterwards air-seal these holes with spray foam, but I'd love to see a simpler version that avoided a bit of that back and forth - although I have to admit I'm stumped as to what that would look like.
We put air sealing tape over the holes rather than spray foam, but the same idea.
I've used a similar detail but the insulators wanted us to install nailers at each joist, they stretched Insulweb across the nailers and blew the cantilevers, then the carpenters placed the solid blocking over the nailers. We moved the nailer to the interior so we didn't need the batts.
Message to self: Don't design houses with cantilevers.
Message to self: never buy another house that has cantilevers. Especially cantilevered bays with windows. I've moved a lot/lived in a lot of houses, and every cantilever was an unmitigated disaster with cold and wood rot.
I agree that I've see (one time) a Fine Homebuilding article showing a correctly designed and built bay, but that's not how they're built in the field by any regular builder. A correctly designed cantilever is...one that got eliminated in the design phase.
Andrew,
I've forgotten - where are you again? The great Lakes area?
Malcolm, cantilevered bump-outs add a lot of personality to an otherwise boxy or plain design, and on the example I mentioned we were building on an existing foundation. I had originally spec'd a new raised slab for the bump-out but for site and budgeting issues, we went with the cantilever. I don't see how it's much different from building on piers. But I don't recall--maybe you don't like that approach either?
Not wild about piers either, but my experience here has been that cantilevers, especially small ones under bays, get no attention. They usually have no blocking or air-sealing at the exterior wall, and have a piece of sheathing as the soffit if it isn't visible. Because that soffit is usually close to grade, it isn't inspected regularly, and if the house has a rodent infestation that's usually where they started from.
All of which are curable using Alexandra's detailing, but given the choice I'd rather bump the foundation in and out as required by the exterior profile.
@ Malcolm - yes, I've owned houses mostly in the Great Lakes region, with a few excursions to England and Arizona...no water problems in Arizona so far ;).
Bump-outs can certainly add personality, and if I were to have another built, I'd bump the foundation in and out to follow the profile as you suggest. But bump-outs increase the complexity of the foundation, the framing, and the roof (think valleys), all at additional cost and increased probability of water problems. Framing factor typically goes up a lot in bays as well. From an engineering perspective, it's a big negative, but as Lstiburek says, that's why they don't let engineers design buildings for people to live and work in.
I think I'm missing a detail in the graphic. Where does it show insulation in the cantilevered floor space. Insulation seems to only be mentioned in the following text.
The grey coloured areas in the walls and cantilever are called out as Blown Cavity Insulation.
Thanks Malcolm, my computer contrast failed to show the light grey. I hoped and interpreted that the space was blown in but it wouldn't hurt to split one of the "Blown cavity insulation" arrows to the non noted space. Good article.
Cheers, Conrad
It took me a bit too.
Why the 24 inch restriction on a cantilevered span? I can see this detail being operable in longer spans as well when structurally supported.
I am also curious about a bump out of greater than 24". I understand the recommendation for an engineers stamp, but would these details carry across a larger bump out as well?
Limiting cantilevers to no more than 24" is a long-standing rule of thumb, without getting an engineer involved. The IRC now has tables that show more detail, and options--see R502.3.3(1): https://codes.iccsafe.org/content/IRC2015/chapter-5-floors#IRC2015_Pt03_Ch05_SecR502.3.3
Nice detail. Thinking about how air would escape from the top of the lower section of rainscreen: is that soffit closure vented, and is the inner piece of 1x3 furring installed with some gaps to allow airflow? Or do we rely on the small gap shown between the frieze trim/cleat and top course of siding on the lower wall section?
Paul,
Most rain-screens aren't vented at the top.
Hi Malcolm, that may be so for most rainscreens. And I have read that venting the top (especially into a ventilated roof assembly) is not allowed by code in some locations.
However, most Baczek rainscreen details I have seen have top and bottom openings to allow air movement which promotes drying. For example: https://www.jlconline.com/how-to/exteriors/installing-effective-rainscreens_o#:~:text=At%20the%20top%20of%20the%20wall%20in%20a%20closed%20system
I guess I was wondering if Alexandra did the same type of thing here. But maybe there is a reason for the top of the lower section to be closed in this case (perhaps code requirements).
Paul,
Like you I'll be interested in Alexandra's reply.
I am wondering about the firing strips on the soffit of the cantilever? Is this really needed since you have the vented vertical part of the assembly?
Thanks
Wouldn't think it would be needed unless using wood siding, which you want to be able to dry to avoid rot...
Same feature another day... Today's cantilever led to four of the joists rotted to 8 inches back. 3 not even touching the band anymore. The band had some rot but certainly not like the joists. Not much holding up that wall! 1970 build. A NW corner with shade trees. If anyone wants, I can upload some nasty photos.
Log in or become a member to post a comment.
Sign up Log in