

Image Credit: US Environmental Protection Agency
Image Credit: US Environmental Protection Agency The pen test for the heat control layer is shown here. Tracing the red line around the building enclosure, you can see where the insulation goes.
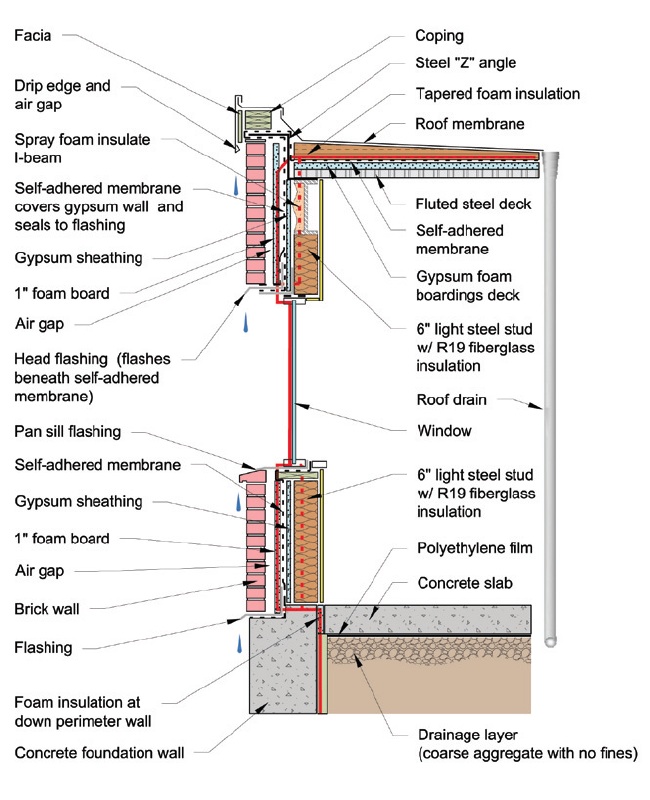
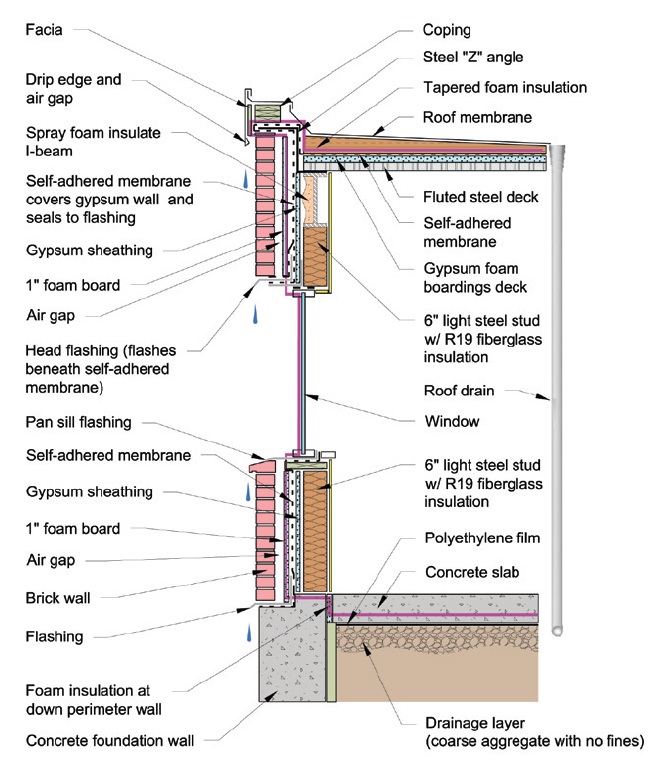
Image Credit: US Environmental Protection Agency The pen test for the air control layer is shown here. Tracing the purple line around the building enclosure, you can see all the components that make up the air barrier.
Image Credit: US Environmental Protection Agency
More Building Science


I listened to the IAQ Radio podcast a few weeks ago when they interviewed Lew Harriman and Terry Brennan, who were discussing the new moisture control guide published by the EPA last year. Brennan is the lead author of the document, and it’s a really great resource full of useful information about indoor air quality, fundamental building science principles, and how to control moisture. If you have anything to do with buildings, you really should download it now and read it.
The pen test
One of the most important tools in the guide is the pen test described in Appendix A. It’s something that should be done on every building, by the architect during design and by the contractor before and during construction. It’s both simple and powerful and can prevent a lot of problems down the road.
To do the pen test, you simply pick a spot on a section in the plans and trace the control layers for liquid water (rain), heat, and air. (They don’t discuss doing the pen test for the water vapor control layer. It’s more complex because it’s generally more important for assemblies to be able to dry than it is to stop water vapor and because it’s the cumulative effect of all the layers in an assembly that determine how much water vapor will get through.) If you have to pick up your pen at any point, you’ve discovered a flaw in that particular control layer.
Rain, heat, and air control layers
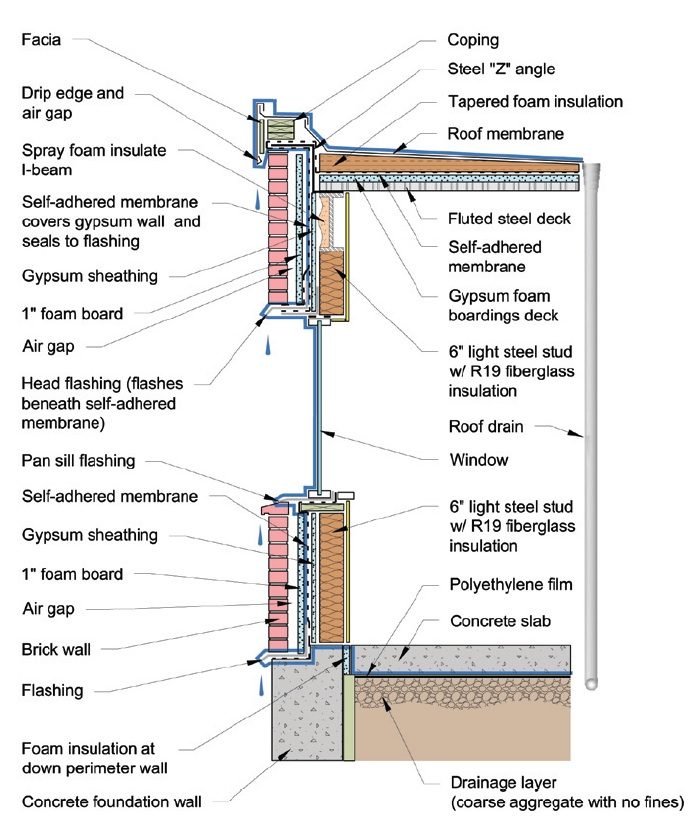
Below are the three pen test diagrams from the EPA moisture control guide. The first shows the liquid water control layer in blue. You can follow it from the roof membrane all the way down to the polyethylene sheet under the slab in this section. Anywhere you have a transition from one material to another or where the openings are, you need to pay special attention. Notice the different flashings and drip edges in this diagram.
The second diagram shows the heat control layer, which some people like to call insulation. Just follow the red line to see where the insulation is. In this case it really does need to be continuous becasue the structure of the building includes steel studs. Cavity insulation only would cause major problems.
The final diagram here shows the air control layer in purple. Controlling air leakage is huge, so make sure you design the details until you can draw without lifting that pen.
One final note about the pen test: It starts with design. The builder then goes over the plans and makes sure they understand how to do it right. But then comes the most important part: execution! Once construction begins, all kinds of unanticipated obstacles pop up. Changes get made on the fly, and what was a continuous line on paper now gets chopped up. And that’s where the pen test shows its real value.
The most important outcome
When architects and contractors train themselves in using the pen test as a tool with their plans, it really is just that — training. Yes, you want to use it to find and design out problems from the start, but even more important is to be able to look at the building as it’s going up and seeing the continuity—or lack thereof—in the control layers.
Your plans may not show a section with a critical flashing detail. Or maybe an electrician cuts a penetration that wasn’t on the plans. This is where that training pays off and you can look at the building with “pen test eyes.”
Allison Bailes of Decatur, Georgia, is a speaker, writer, energy consultant, RESNET-certified trainer, and the author of the Energy Vanguard Blog. Check out his in-depth course, Mastering Building Science at Heatspring Learning Institute, and follow him on Twitter at @EnergyVanguard.
Weekly Newsletter
Get building science and energy efficiency advice, plus special offers, in your inbox.


0 Comments
Log in or create an account to post a comment.
Sign up Log in