
Image Credit: Matt Bath
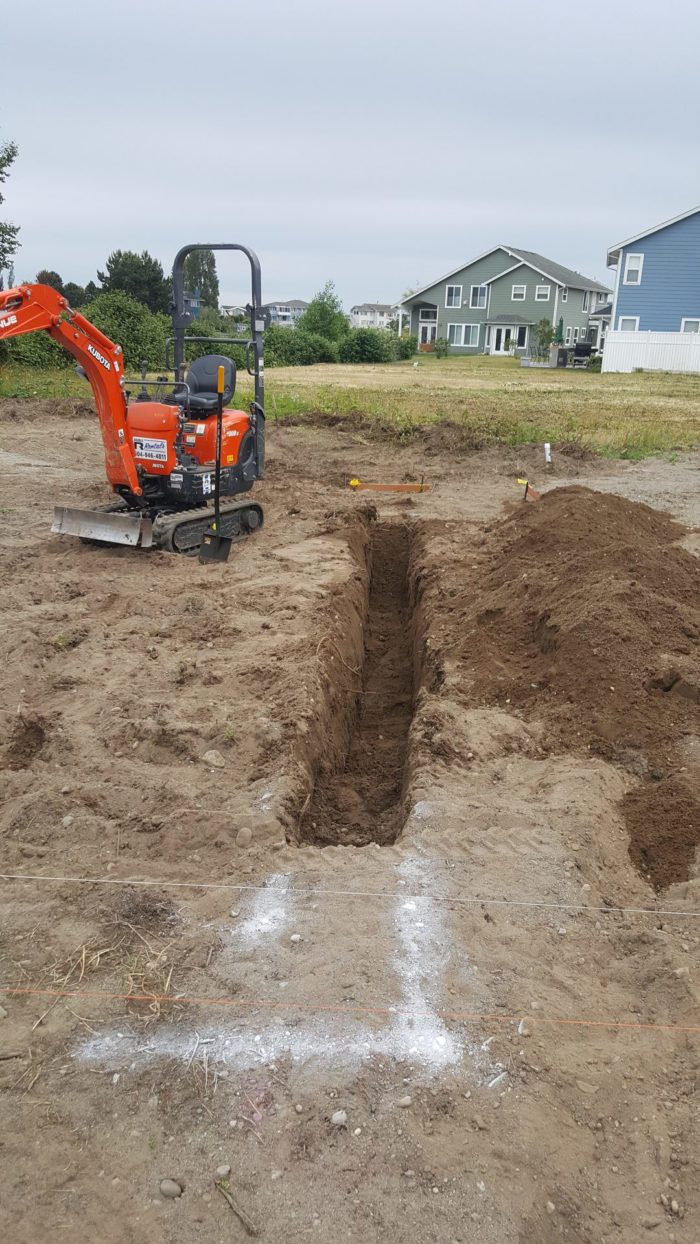
Image Credit: Matt Bath The perimeter trench is for the stemwalls. Other trenches will handle plumbing and wiring runs.
Image Credit: Matt Bath Digging for the footings is complete. Interior trenches will accommodate plumbing and wiring lines. Formwork for the 8-inch stem walls are braced on the outside. The formwork for the stem walls and footings is now complete and ready for concrete. Excess concrete was placed in the area that will eventually become the slab. Wood spreaders keep the forms exactly 8 inches apart. When some of them pulled away under the weight of concrete, the crew made a run for steel spreaders. Stem walls are now complete. The slab will be poured next.
More Guest Blogs


Editor’s note: This is one in a series of blogs detailing the construction of a net-zero energy house in Point Roberts, Washington, by an owner/builder with relatively little building experience. You’ll find Matt Bath’s full blog, Saving Sustainably, here. If you want to follow project costs, you can keep an eye on a budget worksheet here.
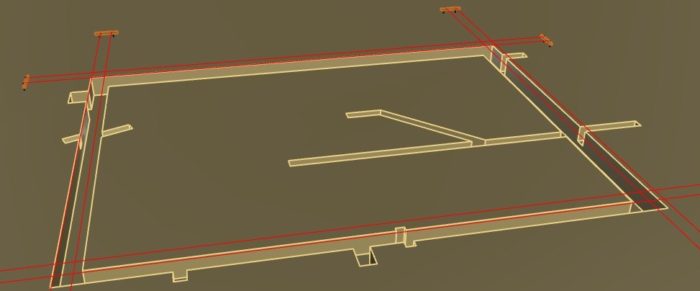
With the permit approved it was time to break ground! I had already planned to rent a mini excavator and surveyed the lot extensively so I knew where and how I wanted to orient the house. The drawing in Image #2 (at the bottom of the article) shows my foundation plan. You can see the perimeter footings forming a rectangle; the other trenches that run through it will be for plumbing, electrical, and HVAC.
Before digging, I needed a game plan. I set up some makeshift batter boards with 2-foot nail stakes and scrap wood and then stretched string lines between them to mark out the inside and outside of the trenches. I measured carefully to ensure the strings were spaced the correct distance apart from each other and also measured the diagonal distances between the corners to ensure that they formed perfect 90° angles.
I was careful to leave enough room between the trench and the batter boards for the mini excavator. Once I was sure the lines were straight and square, I notched the batter boards where the strings crossed the board so I could remove them and reset them without measuring again.
Next, I marked lines beneath the string lines with spray paint. Unfortunately, I had already gone through one can before I read that I could simply use cornmeal to mark the lines. I bought a bag and put some in a container with a spout on it and just poured it over the string lines. It fell past the string and made a neat line on the ground — yet another way of Saving Sustainably. Once the lines were marked I removed the string lines and hopped on the mini.
Getting the hang of a mini excavator
When I was planning the build, I thought seriously about buying a mini excavator. They have great resale value and are incredibly handy. You can use them not only to excavate, but also to raise walls, move dirt around, or just move heavy objects. In the end, I’m glad I decided against it. The thrill of operating one of these machines is an experience I was happy to have, but by the fourth hour or so I was losing interest.
It takes about an hour to get pretty good on the controls, so of course the learning aspect of that was an enjoyable challenge. But once you have it down, the digging becomes monotonous and I’m not a fan of diesel fumes. If I had it to do over again I would just use a skid steer to clear the topsoil and level everything and then I would dig the footings by hand. That said, the soil is pretty sandy here so I might feel differently about that if I had to deal with more clay-like soils.
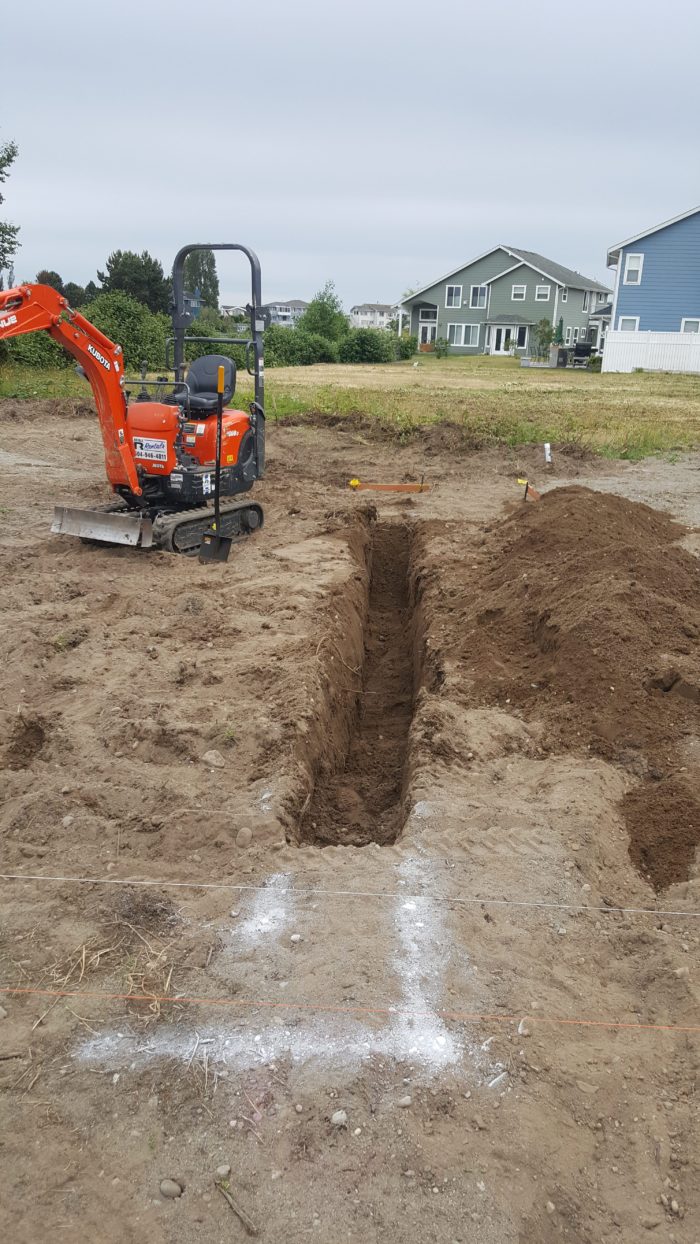
After the footing trenches were dug, I used the mini to move the spoils out of the way where they will remain until I finish building and will use it to backfill. I did use some of the soil to add on to my septic field mound just to give it a neater look. I used my level to level the interior and make sure my footings were dug to the proper depth.
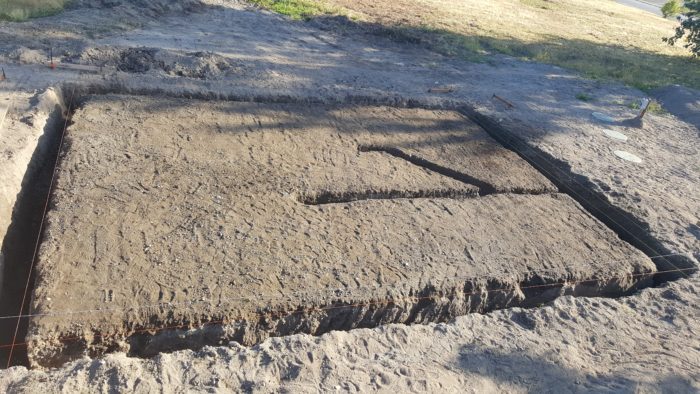
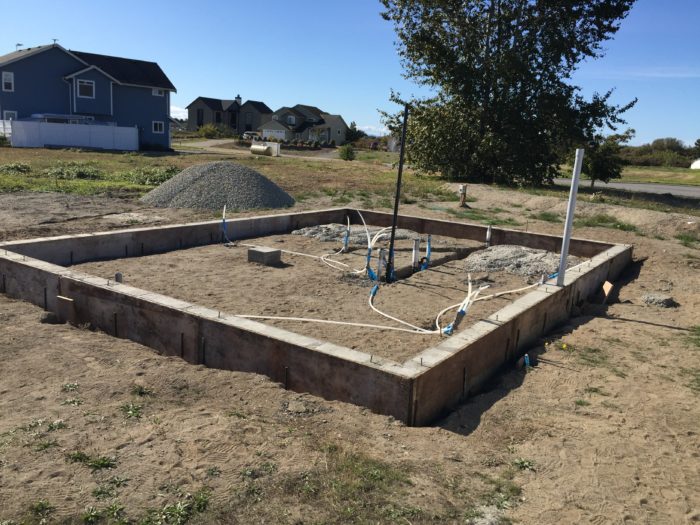
Now the only thing left as far as digging is concerned was just a few small trenches for utilities (HVAC, water supply, electrical). It’s very gratifying to see the design I have been working so hard on slowly becoming reality (see Image #3 below).
Adding steel reinforcement
County building codes required two runs of horizontal steel rebar at the bottom of the footings and one horizontal run within the top 12 inches of the stem wall. The three horizontal runs must be connected by L-shaped vertical pieces of rebar every 4 feet.
One of the more difficult aspects of installing rebar is making sure it’s embedded within the concrete as opposed to just lying on top of it or underneath it. (Most codes require rebar to be no closer to the surface of the concrete than 3 inches). I will be using small blocks called dobies to support the rebar; when the concrete is poured, the rebar will remain the required distance off the ground. The vertical rebar is held upright by tying it to the bottom runs using rebar tie wire. To make things easier, I bought a neat little tool for $15 that quickly and neatly twists the tie wires together as I pulled on the handle.
Rebar comes in lengths of up to 20 feet. When you need a run longer than that, two or more pieces must be spliced together. These splices must not occur in exactly the same spots on each run and must be 50 bar diameters in length. Since I am using #4 rebar, the diameter is 4/8 or 1/2 inch, meaning the splice overlap must be at least 25 inches.
I noticed that one of my Point Roberts neighbors had an old rebar bender/cutter in his yard, and I asked him if I could borrow it for a week. It was barely holding itself together and at least twice as hard to operate as a newer one, but it did the job and saved me the cost of renting one.
Building the forms
One of the more intimidating parts of the build has been putting up the form boards. It’s one thing to make an incredibly detailed drawing on a CAD program in which everything is perfect and straight and level. It is quite another to take a crumbly and uneven medium like soil and place forms that will be just as straight and level as the CAD drawing.
I’ve thanked myself for sticking to a small footprint many times over the last few weeks as I trudge back and forth from my trusty builder’s level to the grade stake, fine-tuning everything. With outside dimensions of 24 feet by 32 feet, the foundation should have a diagonal measurement of 40 feet — a dimension I can use to check to make sure the foundation has square corners.
There are two distinct sections of the foundation: an 8-inch thick stem wall at the top, and a thicker 16-inch-wide footing below it. The soil will act as a form for the footing, and the form boards will create the 8-inch stem wall. Footings and stem walls are both poured at the same time. After adding insulation to the inside of the stem walls, I’ll schedule a second pour for the slabs.
To build the forms, I started by running the outside form boards all the way around the foundation. I cut a couple 9-inch blocks to hold the form boards up while I screwed them to the nail stakes. I chose 9 inches because the footing needs to be a minimum of 7 inches deep and I wanted just a small buffer in case any dirt caved in between the time I level the forms and the time the inspector comes to check the depth of the footing. With the unfortunately sky-high concrete prices in the area I will pay about $200 for this buffer, but I’ve decided it is worth it.
I set each form board on the blocks and then lifted it up just slightly before screwing it to the stakes I had pounded in. The extra lift at the end is something I learned from my mentor. It is quite simple to nail in a stake just a bit more to lower the form, yet even with incredible strength it is virtually impossible to pull one out of the ground and expect it to stay there. By nailing the form to the stakes just a bit higher than they needed to be I was able to easily fine-tune the forms by pounding a stake down just a bit here or there.
I used the builder’s level to decide how much extra to pound each stake in. I used a couple of clamps and a small 2×4 as a jig to hold the grade stake straight on top of the form and then checked the height with the level. Using this point as a reference, I worked my way around the perimeter, clamping the grade stake on top of the form, checking the height against the reference height, pounding the nail stake holding the form down a bit if needed, and then rechecking the height with the level. Once all the forms were level, I measured the lengths of each side and then measured the diagonals to ensure the sides were squared to each other.
I decided to use screws rather than nails to attach the forms. Screws are more expensive, but they are easier both to install and to remove once the concrete has been poured. With any luck I will be able to reuse them later on in the build.
Completing the stem wall forms
If I had decided to pour the foundation walls and the slab all at the same time, this would have been all the formwork I needed. But for several reasons, I decided to pour the slab and stem walls separately, so I needed to complete the stem wall forms by adding an inside form 8 inches away from the outside. The double pour will allow for more control, hopefully resulting in a smoother, more level slab. It also allows me to insulate the inside of the footing wall before I pour the slab.
I set up the second set of form boards exactly 8 inches away from the first, and connected the two sides with scrap wood, placing the scrap at the exact locations where anchor bolts would go. This way, I can use the scrap wood to hold the bolt while the concrete cures around it.
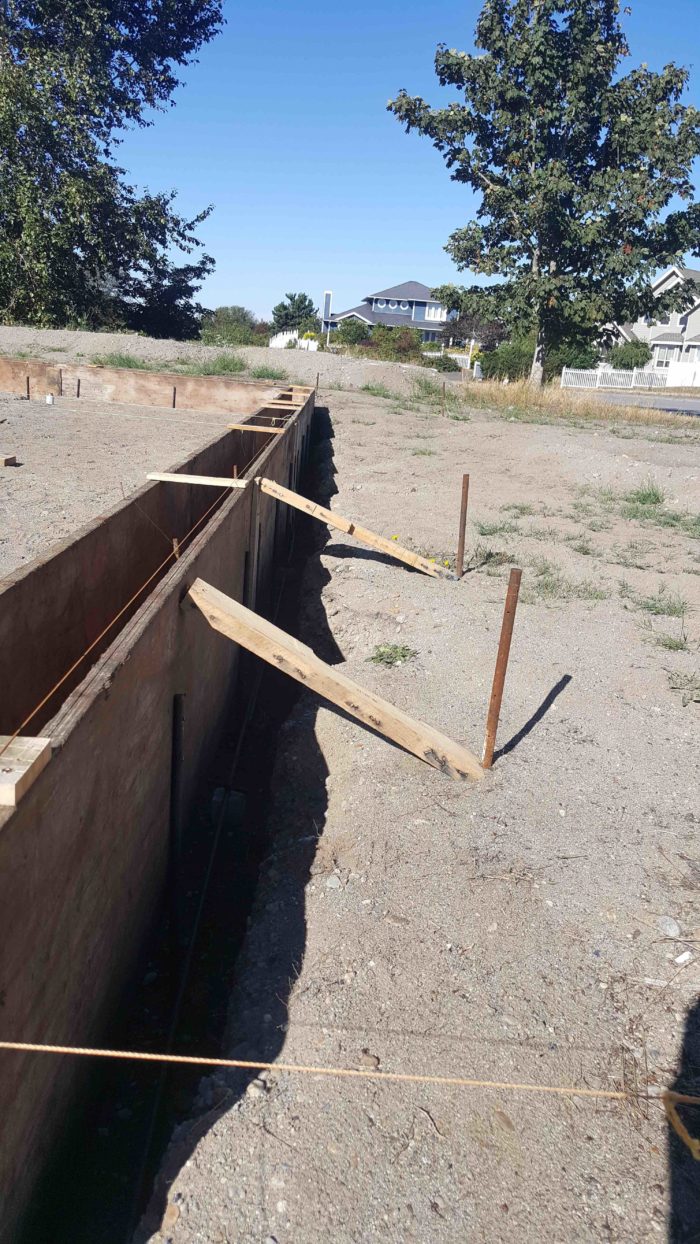
Once the second set of form boards were attached and level with the first set, I began straightening them out and bracing them (see Image #4 below). The boards may not look pretty, but they are free and I can’t see spending money on temporary bracing. When it comes time to pour concrete, we will be banging the forms with hammers trying to work the air pockets out of the concrete so I need to ensure the forms won’t move around at all.
With the forms perfectly marking out the edges of the house, I now had a reference to place the plumbing. When bracing the main drain line, I maintained a downward slope of 1/4 inch for every foot of pipe all the way through the line to the septic tank. I used the builder’s level to make sure that I was starting at the right spot.
Footings clear inspection
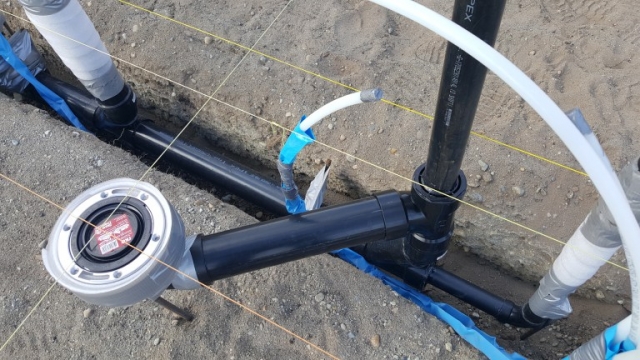
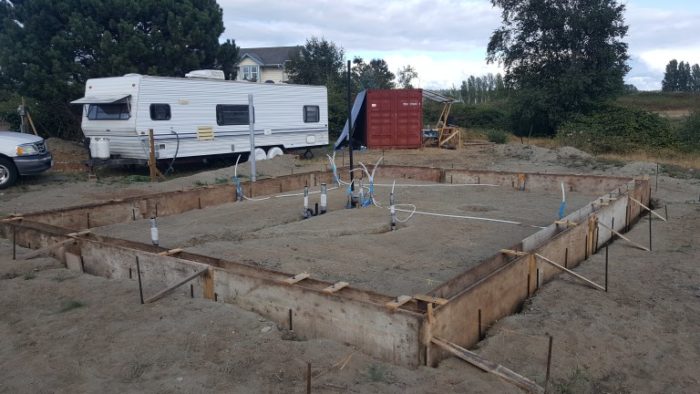
As the date for a required formwork inspection approached, I took care of a few last details (see Image #5 below). These included forming a small point-load footing for the stairway, laying out all the cold water supply lines, and setting up the utility sweeps for the electrical, heat-pump water heater, and ductless minisplit systems. I also made a few minor adjustments to the forms to straighten out the rebar and make sure they were precisely squared and leveled, and laid out the anchor bolts.
I’ll be running the hot water lines inside the conditioned space of the house, meaning that they will stay nice and warm at the same temperature as the house. The cold water lines, on the other hand, don’t need that kind of insulation so I am running them underneath the slab alongside the rest of the plumbing I had already installed. I will be using a hybrid type of water supply installation for the cold water lines, meaning it will be halfway between the trunk-and-branch method and the home-run method. The hot water lines will be almost exclusively home runs with one minor exception.
With a trunk-and-branch layout, a main supply line travels through the entire house with branch lines serving fixtures such as a toilet or sink. The home-run method means that as soon as the water line enters the house it is piped into what is called a manifold, where it immediately branches off into as many lines as there are fixtures in the house.
When dealing with hot water lines, the trunk-and-branch system has a major flaw in that if you want hot water in one of the fixtures and the water currently in the trunk has already cooled off, you have to wait until all of the water in the trunk has exited the fixture before you get hot water. This is not only annoying but also extremely wasteful. The home-run method uses more piping, but solves this problem, ultimately paying off in the long run. For cold water lines this isn’t an issue, so I just ran the piping as efficiently as I could to reduce the amount of PEX piping I needed to buy.
Pouring the concrete
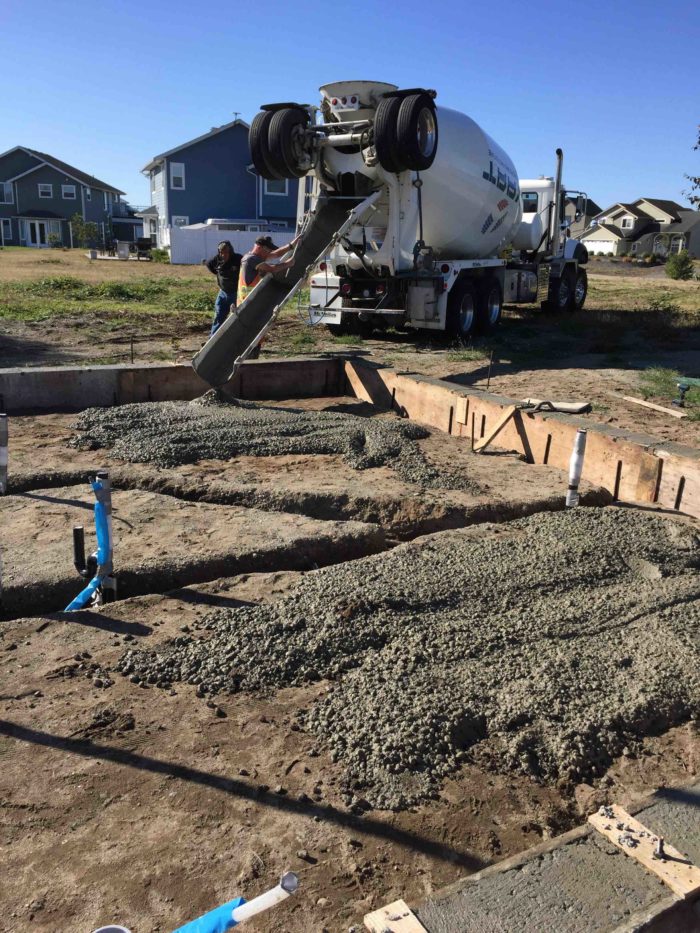
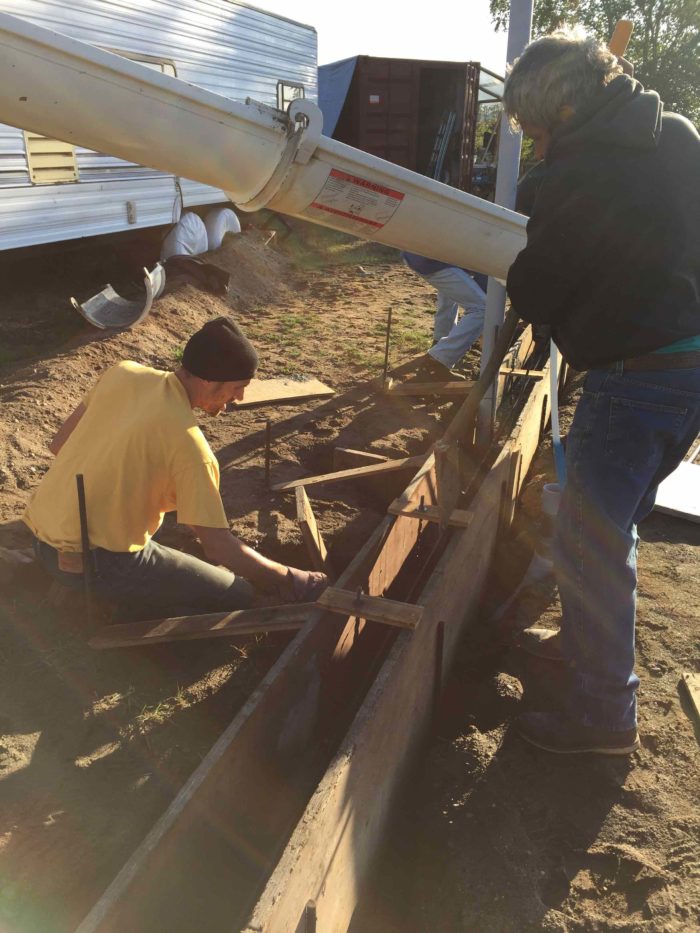
Today marked another milestone: the concrete was poured (see Image #6 below). As with almost every step in the build so far, there were definitely a few hiccups along the way. But at the end of the day I was pretty pleased with the results.
The major hiccup occurred when a couple of the pieces of wood I was using to hold the forms exactly 8 inches apart pulled away from the screws that were holding them in place (see Image #7 below). This wasn’t catastrophic because the bottoms of the forms were held in place by the nail stakes, but it is the top of the forms that is the most crucial, so it was important to figure out how to push them back in place and hold them there.
The easiest fix was a little costly, but it worked and in the grand scheme of the build it will be a minor cost. I had one of my friends (thank goodness I had some extra help!) run to the local building supply store and buy some steel spreaders and then we used some 2x4s to lever the tops of the forms back into place and lock them together with the spreaders. I measured it out and the entire pour ended up being less than a 1/2 inch off all the way around the top. Although the bottoms did bow out a little bit, they will be completely covered with dirt. Crisis averted!
Another minor hiccup during the pour was that the weight of the concrete inside the forms was so great that it pushed the concrete underneath and up around the outside of the forms. The concrete was supposed to level out as it reached the bottom of the forms and pressed into the dirt, creating an upside down “T.”
Structurally, this was not an issue, and again, this part of the pour will eventually be backfilled and completely covered. The problem was that I hadn’t accounted for the additional concrete in my calculations. I had ordered extra but started getting scared that the excess I had ordered wouldn’t be enough to cover it. We solved this problem by pouring the bottom part of the T (the footing) first and then pouring the top half (the stem walls) after the bottom half had cured for roughly a half-hour.
This incurred an additional hourly cost for the pump truck driver but running out of concrete would have been catastrophic. As it turned out, we would have had enough, but better safe than sorry. We poured the excess concrete in the area where the slab will go; it will result in needing less gravel in the next phase of the build.
Weekly Newsletter
Get building science and energy efficiency advice, plus special offers, in your inbox.


9 Comments
When should you call up a concrete contractor?
Matt,
When I was young, I made some of the same mistakes you made.
I built the forms for concrete foundations for two homes I built. The first pour had the usual surprises -- bulging forms and emergency deployment of bracing. The second pour went perfectly.
What can owner-builders learn from your experience?
1. Don't use the photos in this blog as a guide to best practice.
2. Remember that this experience is typical for first-time concrete pours by owner-builders. The forms usually bulge, or blow-outs occur.
3. Unless you plan to build many homes, and want to master this trade, it usually pays to hire a concrete contractor. And if you want to master the trade, the best approach is to find an experienced concrete contractor who is willing to hire you as a laborer, and work with that contractor for a year or two.
Since my experience building concrete forms for two foundations, I've been involved with many other construction jobs. In most cases, I hired a concrete contractor.
One final note: Using a dirt trench as a form is risky, and in some areas (and for some soil types) should never be done.
Dirt Trench
Martin,
Out here in Arizona they almost always use dirt trenches as a concrete form. They will water down the footing trench to keep the soil compacted and then the concrete pour comes. Since most footings are 18" below grade, the risk of collapsing is pretty rare.
Using a dirt trench as a concrete form
Peter,
I'm well aware that the practice of using a dirt trench as a concrete form is common in some areas -- that's why I wrote that it should never be done "in some areas." Whether it's advisable depends on the trench depth, the soil characteristics, the amount of rainfall, and the rockiness of the soil.
In my area of Vermont, soil is so rocky that you can't make a straight-lined trench with an excavator or a shovel. If you intersect the edge of a 3-foot-diameter boulder, the boulder has to come out. That interferes with the idea of creating a beautiful trench with vertical soil walls.
Rain will collapse a trench, depending on the soil characteristics and the volume of rain.
bracing
Wow Matt. I've never seen so little bracing for a form, I think you may have dodged a bullet. One question, was it a hassle stripping the form? Not much room to work there and it sounds like the bottom of the plywood got encased somewhat.
Marc re:bracing
It was absolutely a hassle stripping the forms! A great learning experience for me. The bottoms of the forms definitely weren't going anywhere with the nail stakes holding them but some more bracing up top would have been a smart idea. In any case it all worked out with no more than an inch of concrete in just a couple spots jutting out under the sill plate. With the exterior foam and rainscreen extending the wall it will not be noticeable. I had a blast and I may very well have dodged a cannonball but it isn't going to stop me from doing it all over again better on my next build. Thank you for the comments guys.
trench footings
Nice job, Matt! I am out of the contracting business for 30 years now, but may build another home some day so subscribe to GBA. The last home I built was for myself, 2002-2006( 9" double wall with isolated insulated slab as you're doing). I used a trench as well, 16", but lined it with heavy filter fabric and drain pipes in the bottom ( 4 feet down for Maine), then filled it with 2" crushed rock, tamping each foot with a rented mechanical tamper. Then formed and poured a concrete grade beam ( roughly 12 by 12 for my needs) on top of the tamped stone, heavily reinforced with rebar. Has withstood 16 Maine writers thus far without trouble. Thanks for sharing your efforts, and I promote your attitude. P.S. Oiling the form boards heavily with cheap vegetable oil sold by the grocery by the gallon helped a lot!
DIY savings
Great article! I'll be breaking ground soon and was wondering if you have any estimate of your savings going the DIY route versus hiring a contractor?
Savings
Michael, I do list all of my material costs on the blog. I never got an estimate from a contractor so I am unable to give you a really solid answer, but including the insulation and plumbing I would guess you are looking at $15k conservatively for a build my size (768 sqft footprint). I spent under $6500 and that's including rental of a mini excavator and plate compactor (although I found a rebar bender and form boards for free). So what I'm trying to say is that I can't really give you a good answer, but I would take a guess at $8k-$20k. Bearing in mind that this is some of the most physically demanding work in the build and literally sets the foundation for every other part of the build, I would advise reading the first comment in this section. My foundation was about as simple as you can get. I spent countless hours doing a boatload of research, I had previously assisted on a foundation that was very similar, and I still made mistakes. When it comes to foundation, I would recommend you DIY for the experience, not the savings.
Form Boards
Very similar to what I recently did. I'm building a second small home by myself and used 2 x 6" form boards with Simpson form ties that separate and hold the boards at 8". I reuse the form boards as studs. A trick I learned from watching contractors build commercial slabs is to use steel form stakes and cut a piece of 3/4" pvc pipe that gets set in the footing. Later, the form stakes come up up easily and the pvc remains in the footing. Also, this allowed me to do the footing and foundation in two pours.
Log in or create an account to post a comment.
Sign up Log in