
More Guest Blogs


Editor’s note: This is one in a series of blogs detailing the construction of a net-zero energy house in Point Roberts, Washington, by an owner-builder with relatively little building experience. A list of Matt Bath’s GBA articles can be found at the bottom of this page. You’ll find Matt Bath’s full blog, Saving Sustainably, here. If you want to follow project costs, you can keep an eye on a budget worksheet here.
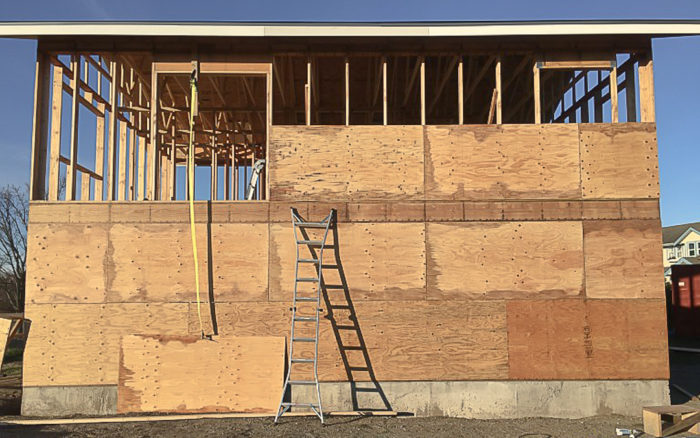
Once I had installed the roofing underlayment, the structure was safe from direct rain. But there is a ton of wind here in Point Roberts, thanks to the proximity to the ocean. Wind-blown rain is still a threat, and installing the wall sheathing will solve that problem, at least for the short term.
Many builders apply the wall sheathing to the studs before they stand the wall up. This would have required me to rent some heavy equipment, so I decided against it. Another good thing about installing the sheathing now as opposed to earlier in the build, is that I was able to wait until the interior of the structure was nice and dry. If I had attached it earlier, before the roof was on, rain would have soaked everything and the sheathing would have prevented the wind from drying everything out.
The wall sheathing serves several very important functions besides acting as a blocker of wind-blown rain. Most important, it provides the necessary wall bracing so the building meets code. Second, it functions as an integral part of the outer air barrier, which is crucial to achieving net-zero. Last, it will provide nailing support for the exterior rigid insulation.
Working alone has its challenges
Sheathing the walls solo required a few creative bits of ingenuity. The 4×8 sheets of plywood weigh a little more than 45 pounds each, and the top row of sheathing must be installed 20 feet up in the air. Just carrying one of these sheets is cumbersome, let alone figuring out how to hold it in place and nail it with only two hands. On top of that, I had to figure out how to apply a bead of caulk around the edges of the sheets and at window openings, and keep in mind that some of this would need to be done on a ladder.
The task at hand was quite daunting, but after thinking it over for a bit I was able to come up with some techniques that worked surprisingly well.
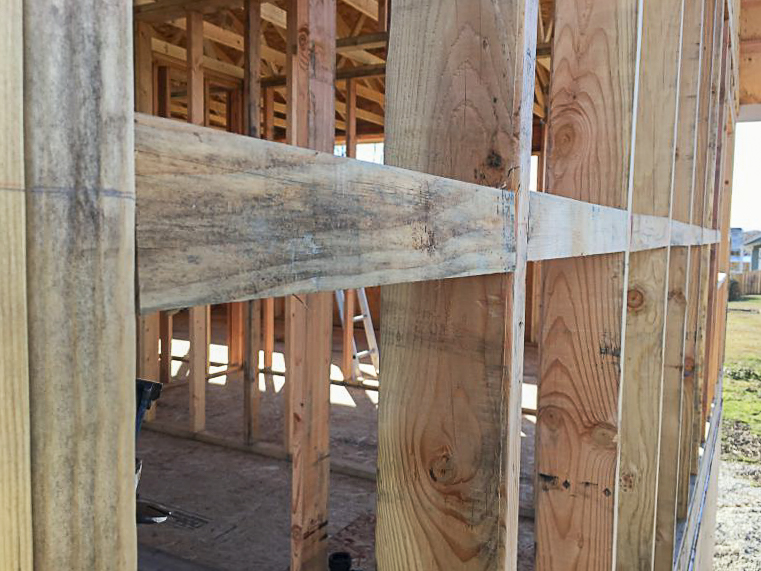
Before the sheets could be installed I had to attach some blocking halfway up each wall, in between all the studs (see the photo below). This is required for wall bracing to ensure the sheathing is fully attached to the structure. I had several extra 2×6 studs from a minor mistake I had made when ordering the framing lumber, so I ripped them in half and then cut them to fit between the studs. Each block was end-nailed to the stud on one side, and then toe-nailed on the other side.
Attaching the first row of sheathing was obviously the easiest. I snapped a chalk line halfway up the bottom plate and then sank a few 16d nails just below it so that if I rested the board on the nails, the bottom of the board would line up with the chalk line.
Next, I grabbed a sheet of plywood and drew a vertical line every 2 feet. The lines made it easy to know where the studs were when I nailed the panels on. I applied a bead of Dynaflex 230 caulk along the top of the bottom plate, the bottom of the blocking, and the two studs where the ends of the sheet would be.
I also caulked all the way around any window openings that would be under the sheet I was installing. After that it was a simple matter of lifting the sheet onto the nails at an angle so the top of the sheet wouldn’t smear the caulk, then positioning it precisely, and then pushing it into the wall and nailing it down. Each sheet was nailed every 6 inches along the edges and every 12 inches on the lines I had drawn.

Plenty of caulk along the edges of each board and around windows will ensure an airtight barrier.
Higher courses are more difficult
Installing the next row wasn’t a whole lot more difficult. I sank 16d nails on each stud just over the top of the previous row of sheathing. This will leave a small gap between the rows which will allow for expansion due to heat and moisture.
As before, I marked lines every 2 feet to line up with the studs and caulked just as I had with the sheets in the first row. Then I hoisted the sheet up on top of my homemade scaffolding and used a ladder to get myself up on the scaffolding as well. From here, I could install the sheet just like the first row by angling it onto the nails, positioning, and then pushing it to the wall and nailing it down.
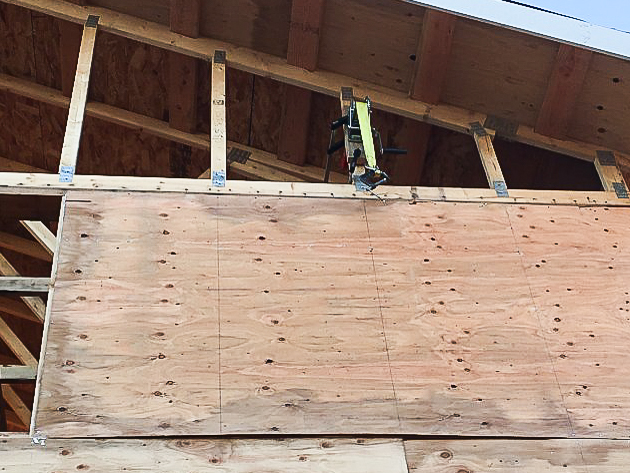
The third row got a little more tricky. I installed more blocking, snapped a line marking where the top row of sheathing should go, marked lines every 2 feet on the sheet, and caulked. Then, from the second floor inside the house, I clamped my winch to the top half of the stud that would lie in the middle of the sheet, and used a C-clamp to attach the belt to the sheet of plywood.
Then I cranked up the winch until the sheet was at the right height, positioned it from inside the house on the second floor, and reached around with my nail gun to tack it down. Then I removed the C-clamp, went downstairs, and climbed a ladder to finish nailing down the panel.
On the gable ends, I was able to install the final row just like the third row by simply moving the winch up to the gable end truss and attaching it there.
On the other two sides I had nothing to clamp the winch to. After trying in vain for quite some time to figure out how to do it on my own, I realized this might be one of the times I needed to call a friend. I drilled holes in a couple of scrap blocks of wood and nailed them to the frieze blocks, and ran one of my nail stakes left over from the foundation through the holes. Then I ran a rope around the nail stake so both ends dangled down at the bottom of the house. I attached one end of the rope to a C-clamp around the plywood, and left the other end dangling.
When my friend arrived, I caulked the area where the sheet would go. He stood on the second story and hoisted up on the rope while I simultaneously pulled in the slack at the bottom. Once the sheet had reached the top, I nailed a second stake into the ground and tied off the rope so we could both let go and the board would stay in place.
At that point I climbed the ladder with my nailgun and gave him instructions on which way to nudge it so it was perfectly positioned before nailing it in place.
A huge thank you to my friend PJ for his help, both with coming up with the idea on attaching the bar to the house and for his strength helping to hoist the sheets!
Now the inside stays dry
It may look pretty boring now, but the interior is protected from the elements! The exterior of the plywood sheathing will definitely still get wet, but the water won’t leak through and the inside will stay nice and dry. I will wait until it gets a little warmer in a couple months so I can be sure that the outside of the house is completely dried out before installing the exterior foam, water barrier, furring strips, and windows. In the meantime, I will be starting on the plumbing.
Other posts by Matt Bath:
Designing and Installing a Septic System
Weekly Newsletter
Get building science and energy efficiency advice, plus special offers, in your inbox.


26 Comments
> Plenty of caulk along the edges of each board and around windows will ensure an airtight barrier.
Quite likely not. Many experts have found tape better - and even that needs a blower door to verify..
Jon, good point. I actually did tape all the seams in the plywood but that wasn't included in that set of blog posts. The caulk was just a "belt and suspenders" approach (although it is the primary air barrier for the sill plate/foundation seam). I also taped the exterior insulation as well.
I second that motion. Studies show caulks do NOT last over the long term. Tapes are way better. After 10+ years the caulks fail and then you can't go back and rip open the wall to fix it. Tapes cover the entire seams and expand/contract and last the lifetime of the house. There are tapes put in the 1970's in Europe like SIGA that are still going strong 50 years later.
Jon and Peter, is there no place where caulk would be preferable to tape? For example, would you tape the bottom course of sheathing to the foundation?
Charles,
The tape is applied to the outside of all the seams in the sheathing. SIGA has a special tape that is applied to the wood bottom plate/sheathing and the concrete/CMU foundation or stem wall. It's waterproof and airtight but still breathable and stretchable to allow water vapor to escape and dry the wood behind it.
Caulk works in some areas but over time caulk dries and cracks. I would be surprised to see caulk still be elastic and holding it's grip after 50 years. Caulk is OK in places that can be accessed after construction. That way it can be removed and replaced with newer caulk. Inside of a wall or behind windows cannot be accessed later on and that is where tapes are better.
Siga tapes are terribly expensive from what I hear. Are there no durable alternatives?
Yes quite a few:
https://www.greenbuildingadvisor.com/article/return-to-the-backyard-tape-test
I added an attached 10 x 20' laundry/sewing room and 28 x 30' garage to my home, almost single-handedly. The exterior parapet walls were 20' high and sheathed with 1/2" OSB. I used Simpson Strong-Tie 1/2 Panel Sheathing clips to stabilize the sheets as I dropped them into place with a homemade winch. I handnailed in a few places and then came back with a nail gun to finish. I did all of this from a ladder (not recommended) without scaffolding. The air barrier was 2" rigid foam with taped joints and building paper under the stucco mesh (professionally applied by code).
Another fun job was installing the 28-foot long, 14" deep I-joists by myself.
Sheathing, especially in a high seismic area, acts as a diaphragm that ties the framing together and adds substantially to its structural integrity. By running the plywood from sill to top plate, and not overlapping at the floor framing or trusses, the continuity of this diaphragm is lost.
Malcolm,
That can still be addressed & fixed by attaching a SIMPSON strap from the lower level sheathing, over the 2nd floor framing, to the next level of sheathing. Then from the 2nd floor sheathing to the truss/top plate.
What Seismic Design Category? C or B or A?
That seems like a good project that could be performed during the "off season" for Mr. Bath, without impeding his timeline at all.
Given the seismic activity in the area, it seems like time and money well spent. https://www.homefacts.com/earthquakes/Washington/Whatcom-County/Point-Roberts.html
I caught that in the pictures also. And the house is built in a location that is near the Cascadia subduction zone with possible 9.0 earthquakes in the next 100+ years. Nail pattern in the plywood needs to also support the design for shear strength. I'm not fond of re-using lumber that may have gotten wet previously in which delamination may be starting (glue failure)...
It is possible to fix the racking problem of the structure with long diagonal straps (simpson), but that would need to be planned and installed ahead of time. He is staggering the plywood sheathing though... vertical joints not lining up.
Peter,
Yes, or by using two Simpson HTT4s with a threaded-rod in between them.
http://www.dhcsupplies.com/store/p/3680-HTT4-Tension-Tie.html
But given the small area of the openings in each wall, the plywood could have been designed as part of a shear-wall strategy using better overlaps and a much more aggressive nailing schedule. Then the hardware probably wouldn't have been necessary.
The lack of continuity can also be seen in other small details. The interior walls don't extend to the exterior framing to allow the drywall to be slid through, and the second floor joists are butted together at the centre span, rather than being overlapped and nailed. Advanced Framing also means single top-plates, and single studs at openings. None of these are big deals, but they add up to a less than ideal robustness of the underlying structure.
I did something similar to install ply sheathing solo on an upper story after framing. First installed a temporary horizontal 2x4 nailer on the exterior of the wall, upon which the bottom of the sheathing could rest. Then tied a rope around two studs on the exterior about 6' up the wall studs, so the 4'x8' vertically-oriented sheathing could be tucked in between the rope and the wall studs. (Would have tied the rope about 3' up the studs for horizontally oriented 4x8 sheathing.). Slid the sheathing up between the rope and wall studs, and rested it on the nailer. The sheathing could rest there without being held anymore. Then adjusted the sheathing and nailed in place. I used a ladder to help slide up the sheathing, then climbed up as the sheathing was raised in place. Agree this is not the safest practice, but not too bad for 1/2" ply, on a day with no wind.
The nailer could have been beveled, routed with a rabbet, or had a piece of ply or 1x lumber attached to make the outside edge of the nailer higher than the inside edge, for the ply to rest more securely on the inside edge of the nailer. Would make this a little safer by preventing the ply from slipping off the nailer. I didn't bother, and experienced no problems with sheathing slipping off the nailer. But would improve the safety and reliability of this method with the nailer modified to hold the sheathing more securely.
Isn't this all a bit like trying to figure out how to mix concrete is you don't own a wheelbarrow or shovel? Two storey houses need to sheathed before you stand up the walls. Similarly the gable trusses should be sheathed before they are put into place. If you don't have a big enough crew, rent a wall-jack. Those exterior walls shouldn't take more than two days.
Malcolm, agree that an experienced crew and the right equipment beats working solo with minimal tools and less experience. Not to mention safer with someone else on site. But if you can't afford premixed concrete delivered by a concrete company truck, you can use the shovel and wheelbarrow and do-it-yourself (DIY) more slowly. If you can't afford to hire labor, you can do the cheap solo DIY labor route when allowed. Or you might just prefer DIY. In 1982 I had US $15,000 and a couple years to build on a balloon mortgaged lot, wanted to do everything that I could myself, and "reckless" is my middle name! :-) I hired some labor to teach me plumbing and concrete work, and when two people were really necessary for some tasks (e.g., setting roof trusses, concrete pours). I managed to get a Certificate of Occupancy in about a year, tho much of the interior work had yet to be completed. Matt also appears to prefer this solo DIY route, and there's a DIY community many places. If I were younger and less beat up, I'd do it all again! Even if I could afford a pro like yourself.
Robert,
I agree, but with several caveats.
DIYing solo means having to work smarter. To me using a wall-jack, rather than sliding sheets around and having to nail off a ladder is smarter. (IIRC years ago Fine Homebuilding had plans for a site-built wall jack if you couldn't buy or rent one).
The initial premise of Matt's blog is you end up with a better built house if you DIY. That opens up his methods and results to some criticism I wouldn't generally bring to a DIY project. That scrutiny in no way should detract from what Matt has achieved. It just means being clear-eyed about what he has achieved.
Malcolm, personally I was somewhat apprehensive about tilting up and aligning a wall solo without experience at it, especially in windy Boulder CO. But agree its safer and more efficient than working off a ladder. Could have hired someone to help out some days, and rented jacks as you say.
However if you are spanning sheathing across two stories and joists for seismic reasons...you'd have sheathing extending over the top of the first floor walls before the joists and second floor is framed, or how do you proceed??
Robert,
You don't need to completely lap the differing framing components, just make sure the edges extend over the joints. So the first floor sheathing is extended above the top plates by several inches, and when the second floor walls are framed on the deck, the sheathing is kept down below the bottom plate by the same amount.
Similarly with the gables, we undo the truss package that has been delivered onto the second floor walls, lay the gable truss flat (bracing the peak) and sheath it leaving half the bottom chord. The sheathing on the walls below is extended up to tie things together. This also makes standing that truss easier.
There are a lot of techniques production builders use for expedience that lead to poor results, but experience also can mean understanding what you are trying to do, and benefitting from the trial and error that has lead to current ways of doing tasks.
Malcolm, thanks! Would be great if you could write an article illustrating various steps you take for improving seismic performance, or minimizing future water and vapor damage to the homes you build on the west coast.
Robert,
The interesting part of this is I didn't do it out of virtue. Like the rest of the builders here in BC I was forced to adopt the practices by building code changes. Once I'd built a couple of projects using the new building envelope and seismic requirements, the benefits were so obvious I became a convert. But I started out as a typical reactionary builder - much as I was about energy efficiency before I started reading GBA.
If you need a book http://www.shearwalls.com his first book titled "Wood-Framed Shear Wall Construction--an Illustrated Guide" is a 180 pages on shearwalls and how to do it correct and how to fix errors.
The APA at http://www.apawood.org has lots of free info on how to build houses with wood. They have testing reports on wood shearwall construction.
It is a valid point, Malcolm. I certainly wasn't planning on having my blog on green building advisor when I started writing. When I say a person with a ton of time and passion can build a house better than an average contractor, it definitely doesn't include any contractors who read green building advisor! I would take a guess that any contractor perusing this site is above average, if not at the top of their trade. I agree on the sheathing and wall jack. Will be sheathing before raising and using 9 foot sheets instead of 8 so I can span the joists on my next house. If only I had you as a resource while I was in the planning stages!
Matt,
Again - good on you. I'd think twice about blogging a house I'd built on GBA.
Right now you are living in a house you made with your own two hands, that is comfortable and you enjoy. That's the prize. The discussion around technique is something we need to have around here to further the profession. It in no way should lessen your sense of accomplishment.
Well, actually I'm still living in a trailer since I'm not done building yet ;) I've actually really enjoyed the experience of blogging. Having three older brothers has given me incredibly thick skin so I don't mind any of the comments and some of them have been extremely helpful. Who wouldn't want a pool of experienced green builders monitoring their work and suggesting improvements?
Matt, that shows incredible character and I applaud you for it.
"Positive criticism is a good friend. Insincere flattery is a fake friend."
Dr. T. P. Chia
I have enjoyed your posts and the knowledge being shared within them and the comments that follow. Thanks again.
Log in or create an account to post a comment.
Sign up Log in