

More Guest Blogs


Editor’s note: This is one in a series of blogs detailing the construction of a net-zero energy house in Point Roberts, Washington, by an owner-builder with relatively little building experience. A list of Matt Bath’s GBA articles can be found at the bottom of this page. You’ll find Matt Bath’s full blog, Saving Sustainably, here. If you want to follow project costs, you can keep an eye on a budget worksheet here.
I decided to use PEX-A for supplying potable water to the house. Copper is the longest-lasting material, but it’s also extremely susceptible to freezing, and it’s more difficult to install. Galvanized steel and cast iron also are difficult to install, and the most expensive options.
This leaves PEX (cross-linked polyethylene), which is relatively inexpensive, easy to install, and is better at withstanding freezing temperatures. Of over 20 different types of PEX on the market, PEX-A has been around the longest, and is by far the easiest to install. While it is more expensive than other types, it is still cheaper than the metal options.
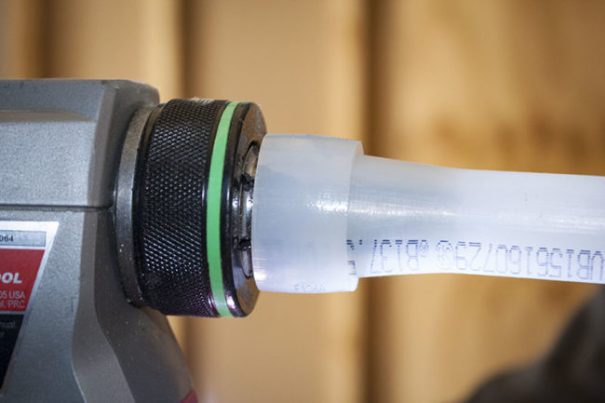
Most important, fittings are connected using an expansion ring rather than a crimp ring. To join the tubing to a fitting a ring is placed over the end of the PEX tubing and expanded with a specialized, and expensive, tool. The expanded PEX and ring are placed over the male end of a fitting, which is about the same size as the unexpanded PEX. Within a few minutes, the PEX contracts to its original size, forming an incredibly strong seal with the fitting. As an added benefit, the internal diameter of the fitting is the same size as the internal diameter of the PEX, so the flow of water is not restricted.
A crimp ring, on the other hand, works very differently. The fitting’s diameter is smaller than the PEX, so the PEX can simply slide over the fitting. A crimp ring is placed over the fitting and PEX, and a tool is used to fold the edges of the crimp ring, reducing its size so it seals the PEX to the fitting. Over time, the crimp ring will attempt to return to its original size, reducing the strength of the seal. Additionally, the internal diameter is reduced as the water enters the fitting, and then expands again as it exits. This reduces the flow rate of the water.
Although it isn’t the cheapest, I believe PEX-A has the best value, and that’s what “saving sustainably” is all about. The one major downside is that there have been a few scientific studies suggesting that PEX-A is more likely to leach chemicals from the plastic into the water supply.
You have to bear in mind, however, that PEX has been used in Europe for decades, and even California has completed extensive studies on PEX and approved it for use. Water comes into contact with hundreds and thousands of chemicals and particles on the way from its source to your tap, and no study has shown definitively that the amount of chemicals possibly leaching from PEX is more than a drop in the bucket.
As with many decisions that need to be made in the home building process, there is rarely a perfect, high-performing, inexpensive, and environmentally friendly option. Compromises have to be made and in this case, I feel PEX provides the most upside with the least downside. Having said that, I will be rigorously flushing the lines and installing filters before using the water.
Planning the system
Just as with the DWV system, the water supply system requires extensive planning. In my case, the incoming water supply splits into three lines: one for watering plants outside, one that goes to a manifold under a bathroom sink to feed fixtures downstairs, and a third for a manifold and a water heater upstairs.
Hot water from the water heater runs to two manifolds that distribute it to all fixtures. I will be using a Sanden Gen3 heat-pump water heater, which uses environmentally friendly CO2 refrigerant and an air-source heat pump. Although heat-pump water heaters are becoming quite common, the Sanden system is unusual in that the tank and heat pump are separate units.
Heat-pump water heaters are typically single units, which means you must choose to locate the system in either a heated space or, more commonly, an unheated space. Placing the unit in a heated, or conditioned, space means that it is pulling perfectly good hot air from your house to heat the water. If you live somewhere that is hot year-round, this is beneficial. But in most places this becomes highly inefficient in the winter.
Placing the unit in an unconditioned space means that both the hot water tank and piping must be heavily insulated to ensure that the water doesn’t cool off considerably before it reaches your fixtures. The Sanden system gives you the best of both worlds!
I had installed a decent portion of the cold water supply way back before I poured the concrete slab. I used enough mineral wool to insulate the slab to avoid any freezing issues with the PEX, and the plastic sleeves I used protect the line from the concrete and satisfy the building code. The hot water supply, on the other hand, needs to be well insulated, and should only run through the conditioned space of the house to maximize efficiency.
Distribution through manifolds
There are 12 fixtures that need cold water in the house: six upstairs and six downstairs. All of the downstairs fixtures are fed from a common manifold. I decided there would be plenty of extra room under the sink, so I placed the manifold there rather than inside a wall. If any of the expansion rings fail I’ll be able to replace them without tearing out a wall.
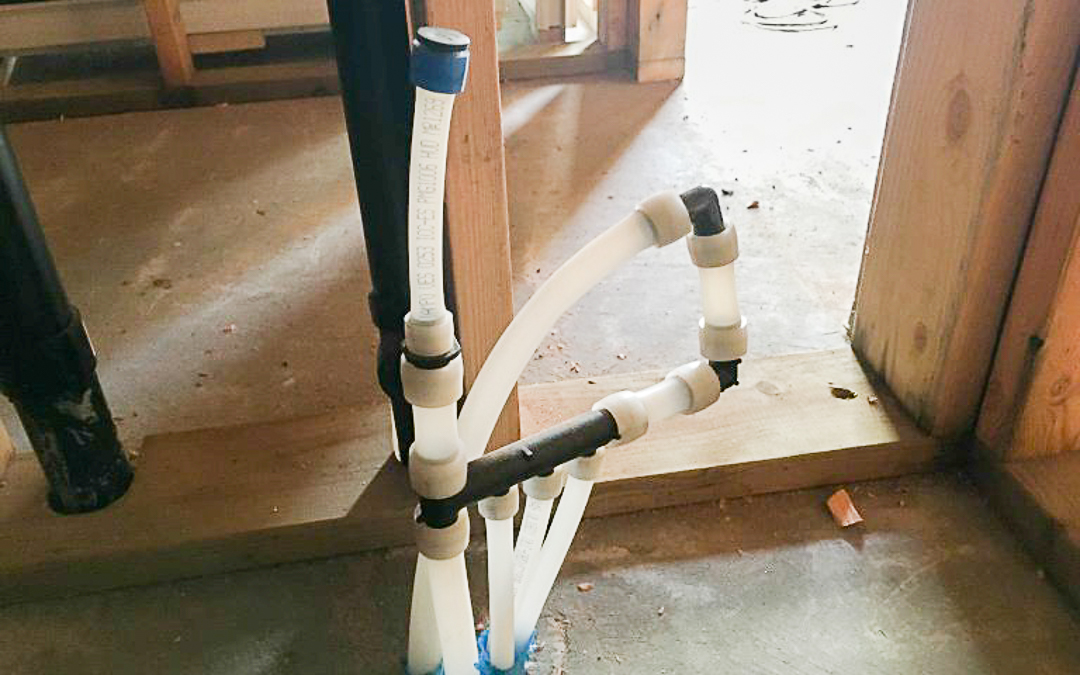
Water enters through the elbow at the top right of the photograph above, and then flows into the manifold where it is routed in five different directions. The first goes to the tub; the second to the toilet; and the third to the kitchen sink. The last two outlets move in opposing directions: one straight up to the sink, and the other to a pot filler and the drinking water supply in the kitchen.
The supply line for the tub feeds into the right side of a four-way mixing valve. The hot water will go in on left side, and the valve will mix the two as the shower temperature handle is rotated. The mixed water will exit at the top of the valve and go to the shower head. Most authorities advise that PEX shouldn’t be used for the stub-out for a bathtub spout. I will connect the plumbing for the tub last. It should be the final step before I am ready for the plumbing inspection.
For the toilets and sinks, I used metal drop-ear ells to support the PEX as it exits the wall, and then attached test plugs. For the pot filler and drinking water, I just capped the line for now. These lines will run inside the kitchen cabinets so it will be much easier to install them later. I’m hoping the inspector will understand.
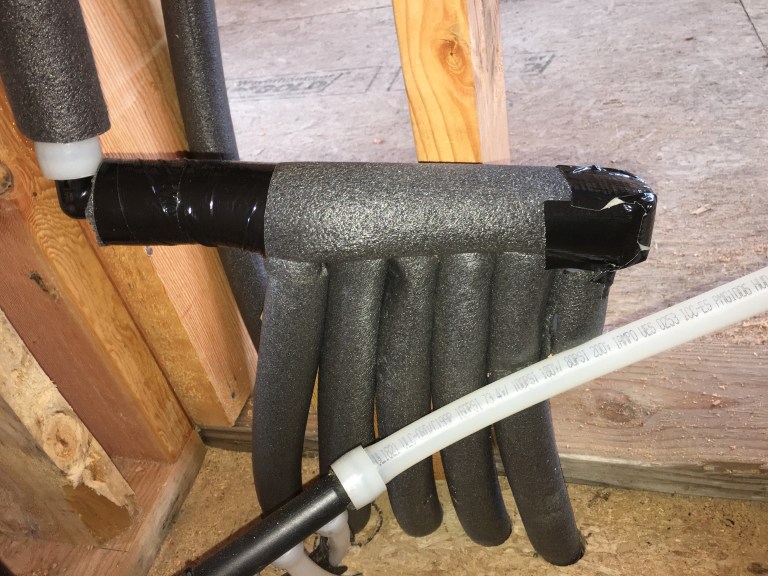
For the second floor, I have another manifold, this one with seven outlets. They supply the master shower, sinks in the master bath, the washing machine, an upstairs toilet, and the water heater. This manifold is installed in a utility closet next to the hot water tank. Again, I wanted to keep all of the manifolds accessible to ensure that any possible future leaks could be fixed. This closet will also be equipped with an emergency drain for added safety.
The same four-way mixing valves are used for the showers, but the bottom is capped off since there is no tub on the second floor. The toilets and sinks are plumbed just as they are downstairs. The washing machine is connected directly to an angled shut-off valve. After the drywall is installed, all of the capped lines for the sinks and toilets will get one of these attached as well.
Running the hot water lines
The hot water supplies are installed just like the cold water lines, except that it’s a good idea to insulate them to ensure that the hot water stays nice and hot as it travels from the tank to the fixture. There are fewer hot water lines than cold as the toilets, pot filler, and drinking water tap don’t need a hot line. On the other hand, the dishwasher and shower steamer require only a hot water line. All the other fixtures get one of each, so I needed a total of nine lines.
The water heater doesn’t need to be attached for the plumbing inspection, so I just created a little loop where the cold line will run into the tank and the hot line will come out. When I’m ready to install the tank I will cut the line and attach the lines to the tank.
The first of two hot water manifolds has a total of four runs and supplies mostly the upstairs fixtures. The hot line continues to a second manifold that supplies the master shower valves, the tub, the kitchen sink and dishwasher, and the washing machine. I capped the last line for possible use in the future.
My county building code doesn’t require the tub to be installed in order to pass the rough plumbing inspection, but many jurisdictions do. It’s a good practice because the more plumbing you can install before finish materials, the easier it will be to fix a leak.
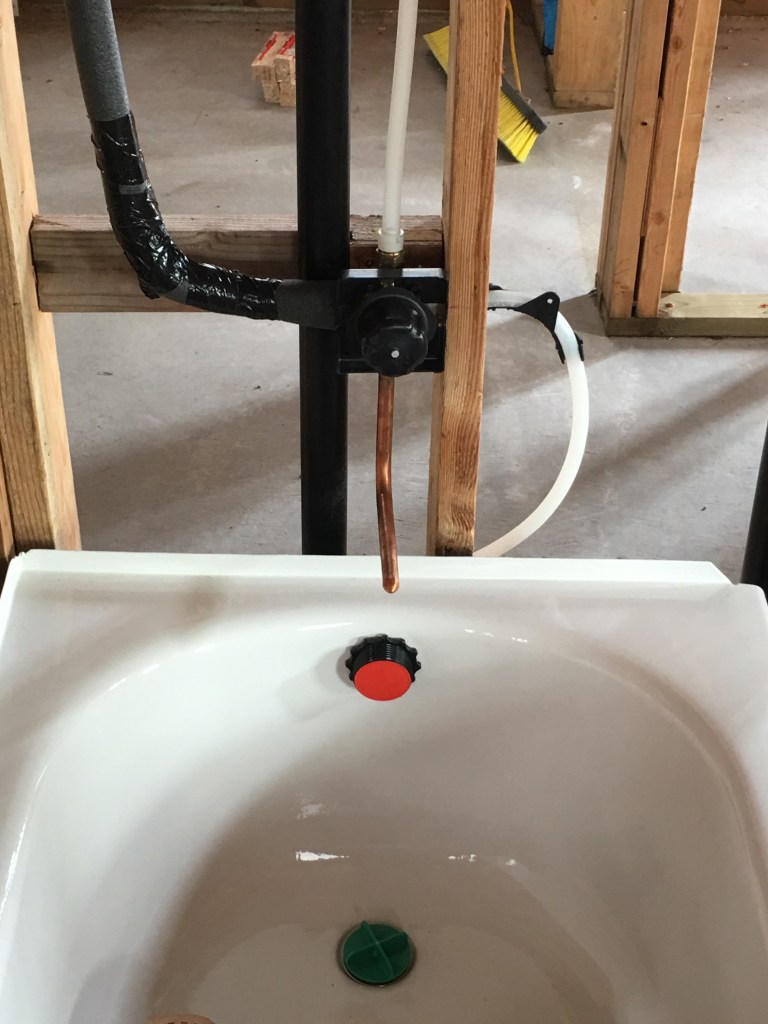
I decided that I might as well put the tub in sooner rather than later. The tub I chose for the house comes with a Styrofoam base so there was no need to pour mortar. I did put some construction adhesive under the foam just to make sure it really bonded and filled any small irregularities there might have been in the concrete. It is very important to ensure that the tub is level so that water will always flow towards the drain. I followed the instructions and attached a ledger to the wall to support the tub.
It’s important to use Teflon tape whenever connecting metal pipe fittings, as I did when installing the tub and shower connections. The tape lubricates the metal, allowing it to form a very tight seal, and also prevents the fittings from melding together over time. If it ever becomes necessary to disconnect the pieces it will be possible to do so. I used the tape for both the connection to the shower head and also the tub spout.
Installing the main supply plumbing
There are several key components of a well-installed plumbing system that I had yet to tackle, mainly a backflow preventer and a pressure-reducing valve. The backflow preventer ensures that water from my house has no chance of flowing upstream and entering the city water supply.
Pressure differences are incredibly powerful. If there is a break in the main water line, or a fire truck is using a considerable amount of water, there will be a massive drop in pressure in the main line which can have the effect of pulling water from my private line into the public line. I’m spending money on running my water heater, so I certainly don’t want any of that hot water to escape the house. The backflow preventer will ensure that doesn’t happen.
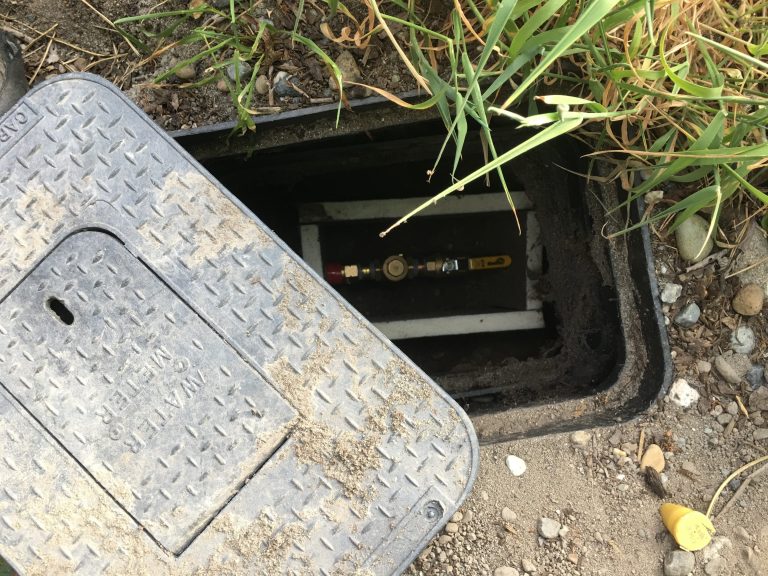
The pressure-reducing valve is equally as important. The public water supply in my town, like that in most other towns, is powered by gravity alone. The water reservoir is located on one of the highest lots in town, and gravity forces it down through the main line and into the homes. Being near the ocean at one of the lower lots in town, my water pressure is extremely high. I get an average of 120 pounds per square inch of water flowing out of my meter. Most plumbing pipes and fixtures are designed to operate with water pressure between 40 and 90 psi. Without the pressure-reducing valve, the high-pressure water can contribute to premature failure of the water supply pipes and fixtures.
I installed the backflow preventer right next to the water meter where the main public water line becomes my private line. It is actually a very simple device, with a metal flap that swings open to let water through in one direction but closes off if there is any pressure going in the wrong direction. I did install a shutoff valve between the backflow preventer and the meter so that if I ever need to change the backflow preventer I can do so. The water also can be shut off on the other side of the meter, but that shutoff valve belongs to the water company. I installed a box of polyiso foam around the shutoff to ensure that the pipes won’t freeze during the winter.
From there, I used PEX to pipe the water to a yard hydrant next to the house. Using yard hydrants instead of hose bibbs is yet another small way to save sustainably. Many houses have hose connections, called hose bibbs, which take up valuable space in the exterior walls. The yard hydrant is buried in the ground, leaving the walls available for energy and money saving insulation. As an added benefit, the yard hydrant is designed so that you don’t need to worry about water freezing inside of it and breaking the pipes on a cold winter night.
Once the PEX passes through the yard hydrant, it enters the house and the main manifold, which I located underneath a small bench in the foyer. It tees off to a line that goes to two other yard hydrants in the side yard and front yard, and then goes through another shutoff valve, and then the pressure-reducing valve. I put the yard hydrants upstream of the pressure-reducing valve since it’s a nice benefit to have powerful hoses for watering and cleaning. I installed the shutoff valve to allow me to turn off all the water to the interior of the house without going all the way out to the shutoff valve I installed near the meter.
The final step before the plumbing inspection was to pressure-test the water supply. The goal is to spot any leaks before the drywall is installed as it is a lot easier to fix now than later. To complete the pressure test, I simply hooked up the water and used the pressure-reducing valve to bring the pressure to 90 psi. The local building code only requires the lines to be tested to 50 psi for 15 minutes, but I wanted to be extra cautious.
Weekly Newsletter
Get building science and energy efficiency advice, plus special offers, in your inbox.


17 Comments
"the internal diameter of the fitting is the same size as the internal diameter of the PEX"
If you look at the specs you'll see that the fittings' ID is not as big as the pipe's ID. It's just closer to it than with PEX-B fittings.
"There are 12 fixtures that need cold water in the house".
Ye Gods, what a lot of fixtures! How many people will be living in this house? Remember when a family of 5 could live comfortably in a 1200 sq' house with one bathroom? Just reading through the labyrinth of plumbing details, products and accessories you need just to have water is mind-blowing.
Why so many fixtures?
I don't think anyone was ever comfortable with 5 people sharing one toilet. Just one round of food poisoning or stomach flu would be hell. It's pretty easy to get up to 10 or more fixtures. Even with just one bathroom, you could have:
Toilet
Bathroom faucet
Tub
Shower
Laundry sink
Clothes washer
Outside spigot
Kitchen sink
Pot filler
Refrigerator ice maker
That's ten, and you would probably have more than one outside spigot.
... dishwasher, water-heater.
Just two. Possibly a third in the future. I suppose there are a couple unnecessary upgrades like his and hers sinks, his and hers shower heads, a steamer for the shower, pot filler, etc. Like Trevor said, it adds up quick. These are the kinds of things that you can do relatively cheaply when you build on your own.
Matt,
Did you include an on-demand hot water recirc loop?
No. All of the runs are extremely short. I specifically designed the house so all the plumbing is near the center of the house.
Matt - thanks so much for sharing all this. Very helpful to see how someone in similar geography with similar challenges designed and built their home.
1 - did you go through Small Planet Supply for the Sanden unit?
2 - how did you decide against any drain water heat recovery?
Max
frasca - I have sadly decided to forgo the Sanden in lieu of a ducted hybrid Rheem. The system is simply too expensive. I don't mind paying top dollar for quality but at over twice the price, it just wasn't the right decision. It is an incredible machine though and I wish more companies would go for the CO2 refrigerant. I'm definitely interested in heat recovery but I simply haven't sat down and really taken a look at what a design would call for. I'm guessing clearances are the major issue. Absolutely something I'd like to look into on my next build.
Did you look at Nordic? They have the advantage of being able to do cooling as well. Have no idea on cost.
Trevor I'm confused. Are you talking about water heaters?
The Nordic unit I was thinking of is capable of providing the DHW, as well as all of the heating / cooling for the house. I've since learned though that it has a maximum water temp of 49C/120F, which I don't think is adequate. They have a high temperature booster, but that is just getting too cumbersome (and presumably expensive).
Due to a wet landscape, I'm building on piers. I have to bring the waterline up from the ground across about 18" of air. Being in the mid Hudson Valley, freezing is of concern.
I've seen a lot of seemingly home-brewed solutions relying mostly on heat tape, and insulation but does anyone have advise / links to how they've done it?
It's a common situation in trailers and modular homes with skirting.
Thanks in advance,
Scott
Scott,
You may find this link useful. It seems like a good solution, as long as you leave the inner core open to the heated house above. https://www.southmountain.com/wp-content/uploads/2019/02/19-Small-Home-Harmony-Article-PDF.pdf
Amazing as usual Malcolm!
I sent the above too soon but do I wish I'd had this 3 years ago when we built the attached 800SF. Used Bongfili (sp?) studs and 7" Rockwool, closed cell ceiling insulation. I did a lot of the work but all in for $150/SF. However, no bathroom or kitchen was needed.
Their floor system looks like the way to go. I did conventional floor framing on girders then did ply lay-ins onto cleats, sealed it , and filled with fiberglass.
Scott,
Nice project!
I've built a few insulated cores, but always from pt Lumber or concrete insulated with foam board.
The culvert seems like a much cleaner installation all round.
Log in or create an account to post a comment.
Sign up Log in