
Image Credit: Rob Wotzak
More Musings of an Energy Nerd


UPDATED on July 20, 2015
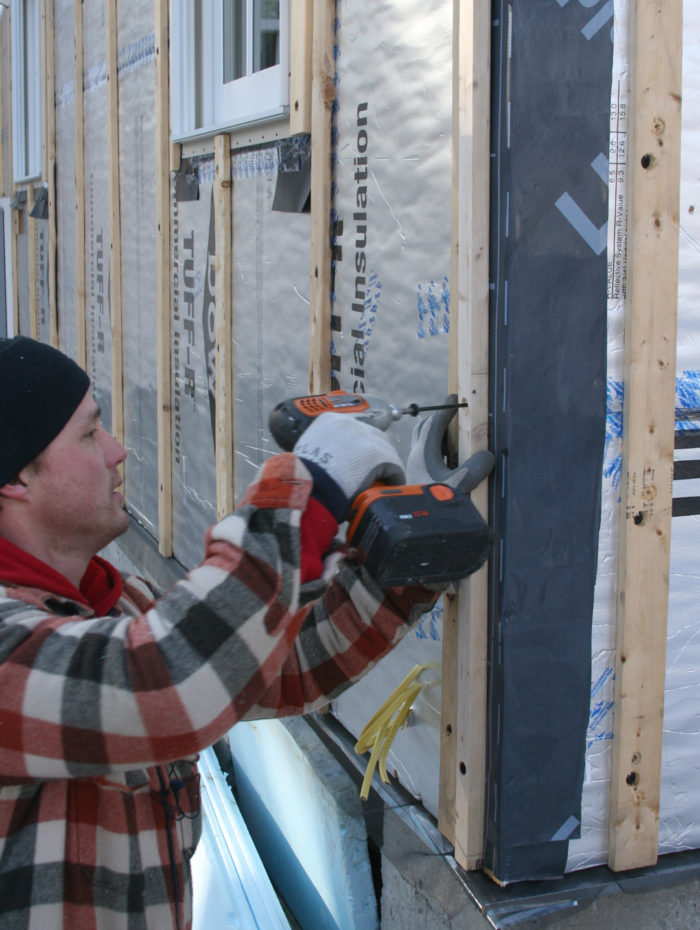
What’s the best way to install foam insulation on the outside of a wall?
Although GBA has published many articles and videos on the topic, we continue to receive frequent questions from readers asking how to install rigid foam sheathing on exterior walls — so it’s time to provide a primer on the topic.
Which type of foam should I use?
There are three major types of rigid foam: expanded polystyrene (EPS), extruded polystyrene (XPS), and polyisocyanurate. All brands of EPS and XPS sold in the U.S. include a brominated flame retardant — hexabromocyclododecane (HBCD) — that many environmentalists find worrisome.
Moreover, most green builders avoid using XPS because it is manufactured with a blowing agent with a very high global warming potential.
That leaves polyiso, which enjoys a reputation as the most environmentally friendly type of rigid foam insulation. However, polyiso doesn’t perform very well at cold temperatures. (For more information on this issue, see In Cold Climates, R-5 Foam Beats R-6.) The bottom line: green builders in hot climates tend to prefer polyiso, while green builders in cold climates tend to prefer EPS.
If you prefer not to use rigid foam, you can use mineral wool panels instead; for more information on this option, see Installing Mineral Wool Insulation Over Exterior Wall Sheathing.
Using rigid foam on the walls of a new home
If you are building a new home, there are two basic ways to install rigid foam on the exterior of a wall: The foam can either be attached directly to the studs, or the walls can be conventionally sheathed with OSB or plywood before the foam is installed.
If you decide to omit some or all of the OSB or plywood sheathing, you’ll need to come up with a plan to…
Weekly Newsletter
Get building science and energy efficiency advice, plus special offers, in your inbox.

This article is only available to GBA Prime Members
Sign up for a free trial and get instant access to this article as well as GBA’s complete library of premium articles and construction details.
Start Free TrialAlready a member? Log in


45 Comments
Where are the safety glasses?
I urge all tradesmen to use safety glasses when on the job and don't forget hearing protection.
Martin - Having done several
Martin - Having done several of these projects I think your summary is excellent and will be appreciated by many. I wish we had such a resource for our first job many years back...
All rigid foam insulations provide net environmental benefit
Thank you for the primer on installing rigid foam insulation. Great retrofit option for many structures.
EPS, XPS and Polyiso all deliver net environmental benefits when used to create the type of high performance structures needed if humans continue to demand a level of comfort from homes and buildings. If we need to condition our living and working spaces we must do so as efficiently as possible and rigid foam insulation is a great way to deliver those efficiencies in new construction or retrofit. Over 50% of our exisiting building stock will be in use as of 2050 so retrofit options are critical.
Although I recognize that the point of the article was not to make an environmental comparison between the different types of rigid foam, the environmental choice between these products and other insulation types is much more complicated than simply saying one enjoys a better reputation, warranted or not.
Distinctions can be made based upon an analysis of single attributes, but decisions as to which product to select should be based on an ana;ysis of facts and science, not reputation. All of these products deliver performance and all forms of rigid foam save energy over the useful life of the building. Another common threadbetween the different types of rigid foam is continual improvement of the environmental profile of these products. Every responsible manufactuer of resin and rigid foam continues to work hard to develop products with higher recycled content, increased end-of-life recycling opportunities, safer blowing agents and fire retardants and lower embodied energy. To report that a generic insulation type enjoys a better reputation is not helpful. That reputation certainly would not be warranted if the polyiso was manufactured with an outdated blowing agent, loaded up with tris and shipped halfway around the world compared to a high recycled content, recyclable EPS molded down the street in a factory with state-of-the-art recapture technology.
Keep up the good work.
Response to Walter
Walter,
Although your comments are accurate, many of your points are irrelevant to the question at hand. The fact remains that right now, polyiso is the most environmentally benign foam. That's why I recommend polyiso to anyone asking which foam to use on an above-grade wall. If manufacturers change the way they make their products, trust me -- I'll report that fact here. Until then, choose polyiso.
Attaching a Deck?
Martin,
I'm hoping to build / have built a new home in northeastern North Carolina. Part of the plans call for a walking-width deck (approx. 5 feet wide) on both sides of the house and for a large (12' x 24') screened porch on the back of the house overlooking a creek. I can't seem to find any discussion of how to attach the deck to the house when there is a layer of foam on the outside of the house other than supporting the decks/porch on separate posts. I've come up with two ideas: (1) Build the walls of the first floor a few inches in from the outer edge of the band board then bring the exterior foam down to the flooring so that the outside of the foam aligns with the outside of the band board; or (2) build the basement concrete block walls with exterior buttresses (see the illustrations at " http://en.wikipedia.org/wiki/Buttress ") or quoins being 8" (one block) thick with the buttresses/quoins supporting the weight of the deck with bolts going through the band boards to hold everything in place horizontally but not bearing any shear weight. In either case the WRB would run down the wall to the concrete blocks.
Do you have any comments on these approaches?
Thanks for all the articles you've written over the years.
Response to Dan Clark
Dan,
I don't recommend attaching a deck to the rim joist of a home, even when there is no foam sheathing. It's just a bad idea. Although a variety of flashing methods have been developed to try to keep rim joists dry, many of these details are poorly executed, and rim joist rot is the usual result.
I'm strongly in favor of supporting decks with independent footings. It's not that hard.
Deck attachments
Dan - Martin's link to the CCRHC provides a deck detail that I have used more than once.....
Martin is correct that most decks that fail, fail at the ledger / rim attachment. That said - with attention many decks can be just fine with being attached to the house.
Here it is quite expensive to unattached decks and unnecessary IMO....
Response to David Northup
David,
Thanks for the reminder about the deck ledger attachment detail in the CCHRC document (REMOTE: A Manual); I'm glad you pointed it out. The detail (copyright CCHCR) is reproduced below.
Is polyiso between studs and plywood sheathing appropriate?
Zip system R board has an inch of polyiso bonded to a structural OSB type sheathing with an attached green air/vapor barrier of sorts. It is not available yet in Vermont and I'm about to build. I was wondering if instead I can use an unbonded version by attaching one inch poly iso on the outside of a 2x6 stud wall, then cover with plywood on the exterior, then homeslicker +typar. This would provide the firm nailing base for cedar shingles siding needed. The popular and preferred wall option of 2x6 studs, sheathing, polyiso, then furring strips is not an option as the individual cedar shingles I'm using as siding have to match an existing pattern of curves, arches, etc and not regular horizontal rows attached to horizontal strapping. So would 2x6 wall with closed cell foam in the cavities, 1" polyiso on outside of studs, 1/2" plywood, homeslicker +typar, be the best option to attach the required individual cedar shingle siding that includes arches, curves and swirls ? If so what is the maximum thickness of the polyiso that could be used between the studs and sheathing?
Response to Carolyn
Carolyn,
Your plan might work, but I don't recommend it. For one thing, the OSB or plywood sheathing won't provide proper shear bracing unless it is installed directly to the studs.
You could overcome this problem by providing bracing with let-in 1x4s or steel L-profile bracing, I suppose. But you still have the problem that the polyiso will feel a little squishy when it is only supported every 16 in. or 24 in.
The standard solutions to your dilemma are to install horizontal furring strips or a second layer of OSB on top of the rigid foam.
Polyiso between studs and sheathing
Martin,
So instead of 2x6 studs an inch of polyiso then plywood sheathing, home slicker plus typar and then the swirly individual cedar shingle pattern matching the house a better option ( since furring strips won't work out due to the irregular siding pattern) would be
2x6 studs with closed cell foam between them, then 1/2 in OSB or Plywood , 2" polyiso, another layer of 1/2 " OSB or plywood , then home slicker+typar then cedar shingles. Correct? Any problem with moisture retention in Southern Vermont with this?
Whew! that's a lot of labor for many times
around the house installing each layer.
Response to Carolyn Mayo-Brown
Carolyn,
The solution you describe -- OSB sheathing, followed by rigid foam, followed by a second layer of OSB sheathing -- is one I call "site-built SIPs."
It's a surprisingly popular detail in Maine; when I visited Maine recently, I saw two builders using that method. Dan Kolbert was doing it for a deep-energy retrofit, and Wright-Ryan Construction was doing it for a new-construction job. In both cases, the reason for the detail was the same: to accommodate cedar shingle siding.
You're right: the detail is labor-intensive and expensive. You could use SIPs instead (that's what GO Logic, another Maine contractor, does), or OSB plus nailbase.
Rigid foam across foundation also?
Our house is 2x6 construction built in 1984 near Milwaukee, WI. The cavity is stuffed with fiberglass then expanded foam sheathing followed by cedar board and batten siding. I recently had some of the cedar off to reveal huge gaps where the foam has shrunk, I guess that explains last winter's (our first in the house) high heating bills. So I was planning on pulling the siding to put up some polyiso foam, 2 one inch layers. I was kinda thinking on tearing out the current eps to make sure there are no issues with anything else. Also, I have exposed foundation (house built on slab with radiant floor heat) which I'd like to cover. Could I cover the foundation and wall with 1 layer of XPS foam (same layer) then wall only with polyiso? Should I use an adhesive on both the foundation and stud walls? Currently there is no air gap in the board and batten siding, I was planning on creating one with 1x4's set horizontally outside the 2 layers of foam. I assume a air gap would help? How do I address some sort of insect protection? I'm not sure what is there now, it seems like nothing with some of that foam tubing stuff (forgot what it's called) here and there. Do I need some sort of flashing around the bottom edge of the polyiso?
Rigid foam over log walls?
I'm in the process of renovating a kit log cabin home, built in the early 90's. My wife and I are not a big fan of the "Lincoln Log" look, so I'm looking into covering over the exterior of the milled logs with a conventional siding. In order to boost the energy efficiency of the wall system, I'm strongly leaning towards installing rigid foam on the exterior.
Currently, I'm planning on:
1. installing the rigid foam directly over the logs (since it's a kit home and the logs are milled, the exterior surface is largely in plane and free from excessive bumps, warping and inconsistencies);
2. then installing furring strips;
3. and then the siding.
The windows/doors all need to be replace, so I'll look at installing them with nailing flanges/flashing outside of the foam.
Is this method acceptable, or do I need to first install OSB/plywood over the logs and then housewrap before applying the rigid foam?
Thanks for the great content!
Response to Jon Ackley-Jelinek
Jon,
As you probably know, the two weaknesses of most log homes are the low R-value of the walls and the fact that the walls leak a lot of air.
It's very important that you establish an exterior air barrier on your log home. You can do this with plywood, with housewrap, or with the rigid foam layer. No matter which approach you take, you have to aim for an airtight installation.
I don't know how bumpy or out-of-plumb your walls are. But if they really are both plumb and co-planar, you are lucky. In that case, you may be able to achieve an air barrier with a layer of rigid foam. I would advise that you use polyisocyanurate. Here is the controversy: rigid foam may shrink, so some builders are wary of depending on the rigid foam to be your air barrier.
In any case, the foam needs to be thick enough to keep the interior of the foam above the dew point in your climate, and the seams need to be carefully taped with a high quality compatible tape.
If you are leery of the dimensional stability of the rigid foam, you should establish your exterior air barrier with taped housewrap or taped plywood before proceeding to install the rigid foam.
Your final question is: what material will you use as your WRB? Your WRB may be the same as your air barrier, but in some cases you will have different materials for these two layers. Study up on GBA -- there are plenty of articles on these questions.
Exterior Siding Rerofit / EIFS
I am looking at the expensive proposition of replacing a well-installed and largely sound existing EIFS system on a residence in climate zone 5 (with 4 Marine attributes). This is a bit of a head scratcher in that there are several possible approaches. The EIFS is about 15 years old, looks to be a polymer based system, with 1" thick EPS and is glued directly to OSB which is installed over 2x4 insulated stud walls with interior painted drywall. I believe that a testing of the EIFS in place has yielded only a small area needing to be replaced/ fixed. The existing windows are in good shape, are aluminum clad wood windows, with insulated glazing. The EIFS is installed flush with the face frame of the window and door systems.
It is on the one hand a shame to remove a perfectly well-performing system - but it is not my choice. The home is comfortable and in removing the entire EIFS, installing new siding over a water control layer over the existing OSB, etc. (First Option) the thermal and acoustical resistance of this wall assembly would be dramatically decreased. To add to this, the removal of all of the EPS would be a mess and IMHO a wasteful proposition. Seems like a backwards step. Adding a thin layer of insulation is apparently not a good option as it reduces the ability of the wall to dry to the exterior - trapping moisture between layers.
It was suggested that keeping the polymer-based EIFS in place and simply applying a siding system would be an approach to consider. In doing so, the EIFS would be protected, the water control layer would be the polymer, and we might actually be capitalizing on an existing insulation system similar to those being promoted above for retrofit situations. The door and window conditions would become "innies" with the addition of a box frame (removal of perimeter EIFS, re-taping of window flanges, new insulation, etc.) to the existing windows.
There is another option, which would leave the existing EPS in place, removing only the outer mesh and PB plaster, allowing for a new water control layer, drain mat and siding.
Am I barking up the wrong tree here? My gut says that the absolute safest way would be to remove all EIFS, install housewrap, then come right back and install an R5 layer of rigid insulation, the new siding over rainscreen.
Any thoughts or examples on dealing with existing EIFS? A good retrofit example?
Response to Nicolaas Wilkens
Nicolaas,
You didn't explain why the EIFS is being replaced, but perhaps that factor is irrelevant to your questions.
I think it might be possible to leave the EIFS in place, adding vertical furring strips and new siding on top of the EIFS. There are two major challenges to this approach:
1. Defining your WRB. This would most easily be done by the addition of a new layer of housewrap on the exterior side of the EIFS, so that the location of the WRB was clear and unambiguous.
2. Making sure that every window opening, door opening, and penetration was properly flashed, and that the flashing was integrated with the new WRB. This is challenging but possible. If the window rough openings aren't carefully flashed, with the new window flashing integrated with the WRB, it's not worth taking this approach.
Exterior Siding Retrofit / EIFS
Thank you for your fast reply. In looking at either option 1 or 2, the existing windows would need to remain in place. Given this, and looking at Option 1 - the WRB in this scenario is to the outside of the rigid insulation plane, with Option 2 rethinking the assembly and having the WRB at the OSB plane? This would allow for that integration of the two. Thank you
Response to Nicolaas Wilkens
Nicolaas,
In my last response, I listed "two major challenges." These are not options. Both challenges must be met.
If you want to use the rigid foam sheathing as your WRB, you can. However, you still need to address the challenge of flashing each window opening so that the rough window opening has a sill pan under the window. This sill pan (or site-built sill flashing) must direct water to the WRB -- that is, the exterior of your rigid foam. The head of the window and the jambs of the rough opening must also be flashed in a way that is intergrated with your sill pan flashing and your choice of WRB.
Whether or not you can achieve these goals depends on the existing flashing details and your willingness to do a thorough job. In many houses, achieving this goal will require the removal of the windows.
You might want to read this article: Using Rigid Foam As a Water-Resistive Barrier.
Response to Martin Holloday
Martin - Many thanks for the great insights and follow-up.
Warm weather?
I am seeking information on insulating the exterior of a brick house, to block out the sun. So far, most everything I have found is in regards to insulating houses in colder climates.
The only information I have found for Southern Arizona and climates of that nature is a homeless man who told me to just glue the boards to the wall and stucco over them. I am pretty sure it should be slightly more complicated than that.
We do get quite a bit of rain, at times; but, it happens for maybe a week or two at a time during monsoon season, when we are lucky enough to get that much. During that time, it gets very muggy. Otherwise, no worry about moisture.
So, existing house, super hot weather with occasional bouts of wet and even more occasional bouts of slightly cold, need very thick insulation to block the sun (the thicker the better). House is pre-existing, and, while I would like to replace the windows, it probably isn't going to happen any time soon. And, the walls would have to be done in shifts /sections due to the fact that I am both poor and disabled.
Suggestions?
Response to Arletta Sloan
Arletta,
It's possible to install exterior insulation on a brick wall. The usual method is called EIFS (exterior insulation and finish system). This method consists of adding a layer of exterior foam, followed by a layer of synthetic stucco.
This is the type of work that is usually performed by an EIFS contractor, not a homeowner. Moreover, the cost may be beyond your budget.
There are probably several retrofit approaches that will lower your energy bills and make you more comfortable, but adding insulation to your walls is probably not on the list. I suggest that you contact your local weatherization agency; in most states, it's possible to receive weatherization services at no cost if your income is low. (Unfortunately, you may be put on a waiting list.) A weatherization crew may be able to visit your house, make recommendations, and perform the work for you at no cost.
Musings on my home renovation in 2A (Houston)
Martin:
I've been reading a plethora of articles here the last few days as I plan a major renovation of my 1970 2-story home (2500sf) here in Seabrook (SE Houston). The thermal envelope is a complete disaster from top to bottom. The vast majority of the first floor brick masonry and for this round at least it's going to have to stay. I'm quite sure the wall leaks like a sieve but I'm not sure what you can do to seal up the cavity of a veneer wall. I believe the walls are insulated with fiberglass batts but since I can't install cont. insulation on the outside is there anything to be done with the stud cavity?
Now the entirety of the 2nd floor is 12" Masonite lap siding attached directly to studs (yes...no sheathing)...again with the fiberglass batts. The roof is relatively new and not part of this renovation, so addressing the attic must be done from the inside. I want to take this opportunity to address the walls and attic as best as possible without killing myself financially. Considering as is my annual electrical bill is $2160 (based on my balanced billing rate of $180) I have to balance my desire to be green with the financial reality of payback. I'll start at the top and come down:
Attic: As is the case with every home in this area, the fancoil, furnace and ductwork are all sitting in the oven otherwise referred to as the attic. As if this isn't bad enough I can see the ceiling drywall from the attic access stair across the vast majority of the attic floor (iow...next to no insulation). It's no wonder it is almost impossible to keep the 2nd floor cool during the summer (having only one thermostat on the 1st floor certainly doesn't help either)
So here is my current Cadillac thinking. The attic is very shallow (6:12 pitched roof that is dropped 2' in the front with dormers) and there is an amazing array of completely haphazard kickers and braces holding up 2x6 rafters. It's all that crap that will no doubt complicate my plan. When they installed the roof (shortly before we bought the house) the stripped it to the rafters...spanned the rafters with 1x4 furring and attached OSB to the furring...no idea whats between OSB and asphalt shingles but likely just felt. On the upside a ridge vent was installed. Currently the soffits are not vented but attic ventilation is addressed with gable vents.
What I want to do...ignoring the random kickers and bracing...from the furring down-
*add 2x2 spacers to each side of rafters
*install 2" polyiso on the spacers leaving 1 1/2" clear venting channel) (R13)
*Install 2" closed cell icynene pro seal eco (closed cell spray foam) (R9.8) providing an excellent air barrier
*install 3" polyiso to bottom side of rafters (R19.5)
*install 2x6 insulated kneewall to match roof
*if at all possible I'd like to spray in a 2" layer of the closed cell foam to complete the air barrier the the exterior wall, then blow in the death triangle cellulose insulation leaving enough room for soffit ventilation to reach vent channel
Ideally I could get an engineer to evaluate the kickers and braces and clean up the remaining conditioned attic void. Since our HVAC system is way past it's life expectancy replacing that is in the plan as well...hopefully smaller and more efficient for not running in a 130deg attic. Also...as part of the hardie siding job my preference is to eliminate the gable vents and install cont. soffit vents to replace them.
Walls (with siding): Since there is no existing sheathing when I strip the siding, trim, soffit and fascia wood down to the frame I will have a unique opportunity to reconstruct all siding walls and the wall/roof intersection with thermal efficiency and weather tightness in mind. It is my hope that replacement windows make it under the budget as well (though that's not guaranteed atm). My biggest concerns are at the transitions from wall to roof and siding to brick veneer to maintain a cont. air barrier and avoiding thermal breaks. The other thing that worries me when incorporating insulation on both sides of a WRB is keeping the dew point outside.
There is some appeal to using the pro seal eco closed cell foam for it's natural air barrier qualities and it's global warming potential rating of 1 to help seal up all the hard to get to transitions and construction flaws...maybe easier said than done as I've never used or seen the spray foam installed.
Proposed Wall:
Stud cavity:
*Much internal debate...leave faced batts and start from sheathing out, install dense packed cellulose, or use the closed cell foam
*New sheathing...whether it's plywood with vapor permeable air barrier(self adhesive or fluid applied) or possibly zip sheathing with built in WRB
*Drainage mat such as homeslicker
*2" cont. Poyliso
*furring strips or DOW-Knight CI-SidingRail™: Engineered Rain Screen Solution for Lap and Sheet Siding (steel furring standoffs for siding designed for up to 4" of rigid
*Hardie Siding
The reality is the Standard Hardie siding replacement with hardie wrap and no sheathing is a budget strain but I'm determined to do this right. I want to make sure in this environment that I'm doing the right thing to keep moisture out of the walls and allergens in general out of the house. Since moving to Houston 9 years ago my wife has constantly battled allergies and asthma (conditions she never had before).
We have to deal with the foundation (edge settlement), underground plumbing (leaking under the house), and electrical system problems first...all big ticket items in their own right, but the siding is a close 4th. Any guidance on how to achieve optimal performance without breaking the bank would be appreciated.
Response to Jon Pippert
Jon,
Two suggestions:
1. You have written a book. I suggest that you compose a paragraph with limited questions. If you can compose one or two specific questions, they are more likely to be answered.
2. The best place to post your questions is on GBA's Q&A page, where the questions will be read (and potentially answered) by a higher number of readers than they will at the bottom of a months-old blog. Here is the link: GBA's Q&A page.
Furring strips on sheathing behind Rigid Foam
Would installing vertical furring strips next to the sheathing and behind the rigid foam help the wall to breathe and still maintain R values? I am in Zone 7 and considering adding foam to the exterior since I am residing. Or is this just over kill? Thanks for any replys.
My wall from the inside out would consist of:
Paint
1/2" Drywall
Poly Vapour barrier
2"x4" studs ( fiberglass batt insulation)
3/8" plywood
** 1/4" furring strips **
2" rigid foam
Tyvek building wrap
Hardie Plank siding
Response to David Bee
David,
1. Walls don't need to breathe. For more information on this topic, see ‘Walls Need to Breathe’ and 9 Other Green Building Myths.
2. You don't want to encourage air movement between the exterior insulation (the rigid foam) and the insulation between your studs, because this air flow makes the exterior insulation useless. You might as well hang the rigid foam on a clothesline in your yard with giant clothes pins. Once there is moving air between the insulation and your house, the insulation isn't doing anything.
3. Installing an interior polyethylene vapor barrier is usually a bad idea, unless you live in Alaska or northern Canada. For more information on this issue, see Do I Need a Vapor Retarder?.
Innie or Outie
Great site, enjoying all the info. I had a question maybe someone can help with. I'm replacing 2 old aluminum windows with some new casements, as REPLACEMENTS. The back side of the house is t1-11 nailed straight to the studs. Pulling this down and going with foam in wall, osb, 1 1/2" foam board, rainscreen, hardie board. I'm curious if you think I should housewrap to osb, or foam board.
Installing these windows as replacements because I am doing all of them and these 2 windows will get me some experience while allowing playing room, the rest of the windows are brick and will not afford this luxury.
Thanks for your input
Response to Joshua Hamiter
Joshua,
The information you need is in the article on this page (the page where you posted the comment) and in the articles linked to on this page.
You can install your replacement windows as innies or outies; the choice is yours. Whatever you do, it's important to flash the rough opening before installing the windows.
Your housewrap can be installed on the exterior side of the rigid foam, or between the rigid foam and the OSB. For more information on this issue, see Where Does the Housewrap Go?
Innie or Outie
Thanks Martin,
I did read the articles, which are great as instructional guides. The question I was particularly asking was...if it were you, innie or outie? I understand the choice is mine, but I'm not as experienced as you guys. What if the choice were yours? I'm unaware of any pros or cons regarding my decision, which is why I ask. Sorry I should have made that more clear in my first post.
Response to Joshua Hamiter
Joshua,
Are these new construction windows with nailing flanges, or replacement windows without flanges?
In general, installing windows as outies is usually easier. The most important step is to make sure that your rough openings are properly flashed before installing your windows. If you do that, and if you install housewrap on the exterior side of your rigid foam, and outie windows with all flashing integrated with the housewrap layer, you'll probably be fine.
Innie or Outie
Installing as replacements, no nailing flange. I know unusual decision, but I wanted to practice with these in easy spot before I move on to brick areas.
Not innie... not outie... but "middlie"
So I'm working with a ~12" wall, and understand that I can't cantilever a heavy window way out there, but I am concerned that my windows will feel like they are in tunnels...
So I'm looking at the REMOTE manual and I am thinking of creating what looks like an "outie" except that it uses Inline's 4 1./2" jamb extension so that the overall cantilever from the structural wall is "only" about 3.5 inches. Does this still seem outlandish?
When I look at the detail (attached)
Response to Ethan T
Ethan,
It looks like the above comment was accidentally posted before you finished writing it.
The detail seems to show an exterior window sill make of metal flashing. I'm wondering what supports this thin metal window sill. Is it just rigid foam? I would support the window sill with some type of lumber.
Martin,
I have always wondered about drying to the inside. In a few articles you say.
"GBA taught you that it’s a great idea to install rigid foam on the exterior side of your wall sheathing, as long as (a) the rigid foam is thick enough to keep your sheathing above the dew point during the winter, and (b) your walls don’t have any interior polyethylene."
I understand the idea that we want a thicker (code guidelines) foam to the outside to control sorption on the sheathing. I understand that the poly is risky b/c it won't allow drying to the interior. But what about if you are not using poly on the inside does that allow you more flexibility b/c you can dry to the inside?
Example: I could have R5 exterior rigid foam with an interior of R19 unfaced or kraft faced (variable perms) Here I would still have some sorption on my sheathing but wouldn't it be able to dry to the inside in the spring?
I guess I think of it in terms of wrong or right but is it more of an idea of risky vs no risk?
Azad,
Basically, your question is, "Can I cheat on the rules?" The answer is, "Probably." But you may be surprised to learn that interior poly actually reduces rather than increases the chance of moisture problems when rigid foam is too thin. For more information on this issue, see "The Exterior Rigid Foam is Too Thin!"
I advise builders to stick to the rules. It's the safest way to proceed.
I am an architect building a home in coastal Massachusetts (Zone 5 - 130 mph wind) were rain can drive its way into any wall on occasion so I am concerned about bulk rainwater creating wet sheathing. I am also a little confused about the codes descriptions for foam insulation on the exterior of a wall. An R13+R5 arrangement of insulation is described in one table of the code while another notes that exterior insulation must be R20 in order to keep the sheathing above the dew point. To achieve R20 with EPS would require a 5"+ layer of insulation which I don't think is worth the complications (potential fastener sagging among them). 1.5" of insulation seems like a terrific thermal break, is reasonably affordable, matches thickness nicely with 2x lumber, and adds 25% to the walls R value.
I believe that the WRB is present to protect the sheathing and not the exterior foam so I think its functionally best to put the WRB as close as possible to the face of sheathing. I am fond of the idea of Zip system because I like the fact that there is zero space between the the WRB and the face of sheathing. However, I prefer plywood to OSB (simply a personal preference)so I am becoming a fan of liquid applied WRBs like Sto Gold coat. With all that in mind, I am planning an exterior wall that looks like this (from interior face outward): latex paint, GWB, 2x6 studs with open cell foam insulation, plywood, liquid WRB, 1.5” EPS, 1x4 furring, and Hardie siding. Certainly, I exceed the R13+R5 code mandated arrangement BUT I do not have R20 beyond the sheathing. I presume that means that the wall section I described might foster condensation on the interior face of the sheathing under specific circumstances (in the winter?). I believe the wall described will have the ability to dry inward so should I really worry about keeping the sheathing temperature above the dew point?
Have I violated the code (by having less than R20 beyond the sheathing) AND created a wall that will rot or have I created a thermally broken wall that will keep driven rain off the plywood sheathing while allowing condensation to dry inward?
I am interested to hear if anyone has thoughts on my dilemma regarding the R20 code requirement and if I am correct to assume my wall will successfully dry to the interior. I lose sleep over this!
PS: I have considered adding a drainage layer (I.e. Obdyke slicker mesh) between the WRB and the insulation to assure bulk water from driven rain doesn’t linger but I suspect this might actually reduce the R value slightly by providing a path for heat to escape. However, a well applied liquid WRB should be able to keep the plywood dry even if the water lingers so I think the drainage layer is counter productive.
Sean,
Q. "I am also a little confused about the code's descriptions for foam insulation on the exterior of a wall. An R13+R5 arrangement of insulation is described in one table of the code."
A. Yes, R-13 insulation between the studs plus R-5 continuous rigid foam will work for walls in Climate Zone 5. But it won't work for roofs.
Q. "Another [section of the code] notes that exterior insulation must be R-20 in order to keep the sheathing above the dew point."
A. The section of the code that requires at least R-20 for continuous exterior rigid foam in Zone 5 refers to roof assemblies, not wall assemblies. For a thorough discussion of these issues, see this article: "Combining Exterior Rigid Foam With Fluffy Insulation."
Q. "I believe the wall described will have the ability to dry inward so should I really worry about keeping the sheathing temperature above the dew point?"
A. When a wall assembly has a continuous layer of exterior rigid foam, the ability of the sheathing to dry outward is greatly reduced, so it's certainly important to make sure that your exterior rigid foam is thick enough to keep the sheathing dry during the winter. That said, R-5 of continuous rigid foam is thick enough in your climate zone. For more information on these issues, see these two articles:
● "Calculating the Minimum Thickness of Rigid Foam Sheathing"
● "How to Design a Wall"
Thank you for the clarification Martin. Much appreciated.
Sean,
Just to follow up on a couple of the other questions you asked.
While some bulk water does make it through the rain-screen cavity to the front face of the insulation (or WRB depending what's where), not enough gets through to the sheathing to worry about.
A drainage gap between the sheathing and foam does provide some small amount of outward drying, and according to BSC gaps of 1/8" or less, open at the bottom, have a negligible reduction of the R-value of the wall.
Martin, I understand your position on not attaching decks to the house due to poor flashing details, failure, and rot. With that said, can you provide input on using Simpson Strong-Tie BVLZ?
BVLZ is a ledger fastener designed for use over brick veneer. In fact, when I asked someone at Simpson about using it over thick exterior foam, he told me it was designed to put no load on material between the ledger and rim joist. And it was tested with an air gap--no brick or material whatsoever. I see using the BVLZ as a way to install ledger board over exterior insulation and drainage space--per an engineer's blessing of course. This fastener would not only allow drainage behind a ledger, but also minimize thermal bridging because no solid blocking is fastened directly to the framing. Thoughts?
Alan,
There are two issues here: a structural issue and a flashing issue. Since I have no experience with the Simpson Stong-Tie BVLZ, I would defer to the engineers at Simpson on the structural issues. If you strictly follow the Simpson requirements, and if an engineer at Simpson gives you the green light for your plan, I have no doubt it would work.
That said, once you have figured out a way to support your rim joist structurally, you still need to pay attention to flashing details. You want to be sure that rain doesn't get behind the rim joist, so you've still got to think through the flashing details before you begin construction.
Martin, Thanks for such an informative article. I'm about to build a single story 12x20 tiny home (on permanent foundation) near Palmer Alaska (climate zone 7). In the setting of sky-high OSB prices, I am interested to build the walls using 2 inch ESP sheathing and no wood sheet goods. Detail would include 2x6 top and bottom plates with 2x4 studs to allow inset 2" of exterior foam board. Rather than 1x4 let in bracing, I would use a 2x6 diagonal brace by laying it across the foam board and letting it in to both the foam board and top and bottom plates. Foam board seams would be sealed with appropriate tape and the building would be finished with 1x4 upright furring strips and vinyl siding.
I realize you likely can't endorse the 2x6 angle brace in a seismic zone and I plan to consult an engineer. My primary question is if the let in 2x6 brace placed beside 2" of foam board raises any dew point / condensation concerns? The angle brace would have no foam board under it and only R13 fiberglass, but the surrounding wall would have the foam board plus R13 fiberglass. If this arrangement is problematic, I could consider having R10 closed-cell spray foam applied only to the inside surface of the angle brace. Thoughts?
I would be pleased if the current markets help in finding building methods that involve less OSB and more insulative products.
Daniel,
Your idea could work. A few points:
1. Your diagonal 2x6 is not the same thickness as 2-inch EPS. The 2x6 is 1.5 inch thick, while the EPS is 2 inches thick. If you want, you could buy some 1/2-inch EPS to pack out the thickness of the 2x6 to match the thickness of the EPS. (I'm not sure that it's worth the trouble -- but you could do it.)
2. Without OSB, you'll struggle to get the sheathing layer airtight. Of course tape is a first step, but EPS doesn't tape as well as other foams. You might want to use foil-faced polyiso instead of EPS -- it's easier to tape. Of course, taped housewrap on the outside of the EPS will help.
3. You might want to check with local sawmills to find out the cost of 1x6 rough sheathing boards. (One way to improve the airtightness of this option is with a peel-and-stick WRB -- but taped housewrap can also work if you are conscientious, especially for a tiny house.) These sheathing boards (usually installed diagonally) may well be cheaper than OSB if purchased from a local sawmill. An internet search shows several local businesses to check, including:
A & B Sawmill
(907) 746-1474
4905 N Slumber Dr
Palmer, AK 99645
Woody's Milling
(907) 841-9801
152 S Tatlow Dr
Palmer, AK 99645
Valley Sawmill
(907) 563-3436
Serving the Palmer Area
Martin, thanks for the perspectives and sawmill numbers. I was thrilled to find an older Woodmizer several months ago and have started making some rough-cut lumber. I plan to use rough-cut furring strips on the exterior to hang siding on.
I'm working to better understand dewpoint concerns in cold climates. If I "let-in" the 2x6 angle bracing (let-in" through the 2" EPS to secure to the 2x4 studs and top/bottom plates), will the 2x6 become a condensate point adjacent to the 2" foam board? I'm considering having the inside of the angle brace spray foamed with R10 to assure it doesn't condensate and rot the brace over time. The R-13 fiberglass would just compress a little where there is spray foam over the angle brace. Am I seeing the condensation risks correctly?
R-tech and a few versions of foil faced EPS seem most available in my area. With concerns over air and water proofing, I'm thinking to tape the EPS seams and add a carefully taped house wrap as you mentioned. I'm also headed over to read your links on proper insect and rodent screens because that seems to be an additional weakness to my "no wood sheathing" design.
Daniel,
The 2x6 brace won't be a condensation point, but the 2x6 brace may accumulate moisture during the winter. (That's what happens -- it isn't really condensation.) As long as the 2x6 can dry to the exterior, however, that shouldn't be a problem. The wall will dry out during the spring and summer, and the cycle will repeat the following year.
Your real potential problem is air sealing. Do the best you can to keep everything airtight, and stop worrying. After all, it's a tiny house -- it won't be hard to heat.
Log in or become a member to post a comment.
Sign up Log in