

More Building Science


I work in northern Minnesota, climate zone 7, where we can see delta Ts—the difference between inside and outside temperatures—reach more than 100°F. Many of the blower-door tests I conduct show leakage in the ceiling air-control layer. I wrestled with finding a solution that would not only improve the performance of the air-control layer but also provide vapor control. The latter is less of a concern but it is something I feel needs to be addressed in my climate—perhaps a discussion for another time.

Regional preference for control layers
Let’s start with what is common in my market. Polyethylene sheeting is the standard air/vapor control on both ceilings and walls. It is the product insulators in this area are accustomed to working with and what the building officials accept without any questions. Holes are cut through the poly to accommodate lighting, plumbing vents, and sometimes ductwork for forced-air heating and cooling systems, along with ductwork for heat-recovery ventilators (HRVs). Although contractors use airtight boxes and try to seal the poly around other penetrations, I still see air leaks in these areas during blower-door testing.
Strategies for keeping penetrations to a minimum
A couple years ago, I started designing my air-control layer so that almost all ceiling penetrations could be kept within the building envelope. This requires a few changes to how we typically frame and schedule the electrical, plumbing, HVAC, and insulating contractors.
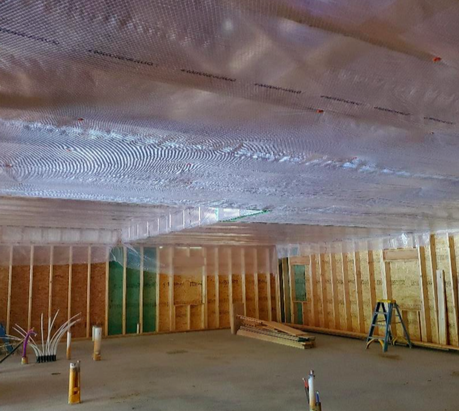
In terms of the framing, I try to design homes so the entire roof is self-supported on exterior walls. This allows for a continuous air-control layer at the ceiling without any breaks at interior partition walls. I also like having a plenum truss worked into the roof design. Ductwork, venting, and plumbing that would typically be installed in the attic—outside the air-control layer—remains inside.

The ceiling air-control layer (polyethylene sheeting) is continuous to the exterior wall air-control layer (standard OSB sheeting) by extending the connection with tape over the top wall plate and connecting to the exterior wall sheeting. The poly is acting as both the air-control and vapor-control layers.
When installing on a flat, vented roof assembly, I have little concern with polyethylene sheeting in my climate. That said, there are times I may choose to use a product other than poly. For instance, in an unvented cathedral ceiling, or a ventilated attic, or a room where ambient temperatures are below normal—such as a wine-storage room—I may choose to use a smart vapor retarder instead of polyethylene sheeting.
I prefer to build the shell and install the ceiling air control without cutting any of the window or door openings, so that an initial blower-door test can be conducted. The home pictured here achieved a .55 ACH50 rough-framing test result. Satisfied with that number, my crew could move onto the next phase—strapping the ceiling.
Variation on a Northeast detail
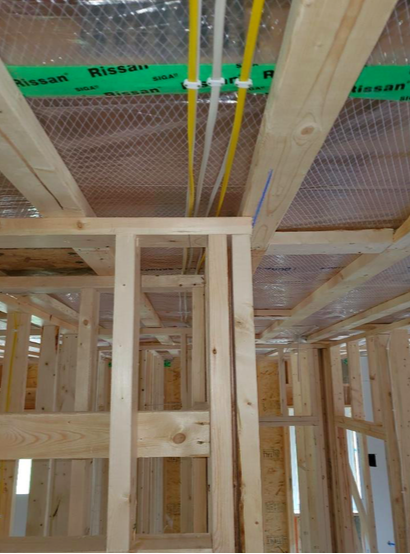
Ceiling strapping is common in some areas of North America, particularly in New England, but I have never seen this technique used in my area. The typical ceiling strapping detail includes 1X wood framing on 16-in. or 24-in. centers. I design my projects using 2X strapping. The main reason for doing so is to satisfy the electrical code. Inspectors in my area are stringent about maintaining clearance between framing and electrical wiring. The 2x strapping allows all the ceiling electrical to remain inside the envelope, but still meet the code requirements. Here, electricians use interior walls to chase the wires to the ceiling; because the wall air sealing is finished on the exterior, the exterior walls can be used only as horizontal chases for wires. No wires extend through the exterior wall top plate—that would create a penetration in the air-control layer. After ceiling strapping is complete, we move on to building the interior wall partitions.
Everyone on the same page
Once interior walls are up, the mechanical systems can be installed. In the project featured here, we were lucky that the electrician, plumber, and HVAC contractor were all from the same company—the tradespeople are used to working together and conflicts are kept to a minimum. They all know and understand the air-sealing details I have outlined here. The electrician, for example, knows it’s one hole/one wire for any penetration in the air-control layer. (It is much easier to air seal a hole with one wire, and the hole drilled can be much smaller.)
Similarly, the plumbers need to penetrate the ceiling poly for vent pipes that extend through the roof. So, after the pipes are installed, I come back through and air seal the holes. I prefer conducting my own air sealing after the mechanicals are installed—that way, the blame falls on me if something is missed.
Close-to-final steps
Lastly, in this current build, we had to penetrate the ceiling with a pair of ducts that could not be kept inside the plenum chase. These 4-in. insulated ducts were for the HRV system, which we decided to use as a replacement for bath fans in a pair of bathrooms. Bump switches in each bathroom increase the fan speed of the HRV, maintaining a balanced pressure inside this exceptionally tight home.
To date, the second blower-door test has been completed; windows and doors have been installed; most electrical, plumbing, and HVAC work is done; the insulation is in; and the drywall has been started. The second blower-door test came in at .47 ACH50, which means the home is below Passive House−level airtightness standards—scientific proof that the air-sealing details I designed for this house work.
_________________________________________________________________________
-Randy Williams is a builder and energy auditor in Grand Rapids, Minnesota. Photos courtesy of the author.
Weekly Newsletter
Get building science and energy efficiency advice, plus special offers, in your inbox.


30 Comments
Nice work, Randy
I used the same method for the ceiling air barrier in my first double wall house in the 1980's. The roof trusses were clear span and I used a continuous poly sheet and built the interior walls after. To eliminate all of the intersections of the interior walls related to the air barrier is a big step forward.
Thanks Doug. Double wall and air tight ceilings in the '80's, you were way ahead!
Good info here. I would be interested to see Randy's suggestions for a hot-roof spec in the same climate. We're going to finish our attic which is currently frame with dimensional 2x4s.
I'm actually working with a customer right now that turned the attic space of their 1920's Tudor into conditioned living space. The owner is acting as their own GC and hired a spray foam company to insulate the roof trusses, making it a hot or unvented roof assembly. They are now experiencing ice forming on their lap siding in the gable areas. I believe the house is balloon framed and has at least some vermiculite insulation present, I won't conduct a blower door test because of the vermiculite. Sometimes good intentions have unwanted consequences. Be aware that tightening the roof may move any stack effect pressures down to the wall assembly. I believe this is what is happening with the Tudor. I've heard of the pressure plane even moving down an entire floor to the rim joist between a first and second story. Not sure where you are with your project, my suggestion is after the roof is complete, you might want to conduct a blower door test. The test may also show any areas in the roof where the spray foam was missed.
Have you tried air sealing the ceiling the regular way with poly in individual rooms, more than a few times?
I just don't see how this is worth all the trouble, its not too difficult, probably the easiest part of air sealing, is air sealing an open attic on a new home.
In one of your pictures you can see light at the top of sheathing where you can see the green sheathing edge inside the wall cavity. From the blower door testing Ive done mid build the wall leakage between framing and sheathing seems to be the largest infiltration interface.
Most houses in my area are air sealed using poly around the individual rooms. It's hard to quantify the difference in this method compared to how it is traditionally done because there were several other air sealing details completed on this home that were not discussed in the article. Other than the cost for the strapping and a slight change in the way the electricians pull their wires, the rest of the construction is typical, just in a different order. Most homes I test in my area that use poly as the main air barrier end up a little over 2 ACH50. Not bad, this one should end up under .5 ACH50.
The light you can see is a taped seam where the OSB, which is the main air barrier in this build, is taped. The tape is extended from the OSB, over the top plate and connected to the interior poly. The area above the lower sheet of OSB is then filled with more OSB. All the OSB seams were also taped and the wall to slab connection sealed with both sill seal and acoustical caulking.
I would argue your changed order will have a decline in production without any real gained benefit with a typical attic.
Obviously it works for you, however you didn't achieve .5 solely because of this detail. I live in a .53 ACH50 in central WI with individual room ceiling poly, standard construction details except for optimized wall framing. It looks like you are slab building which takes out the basement leakage component. My house is over 40,000 cubic feet with a full basement, most everything I build is on a full basement. Im not trying to discount your work, I like seeing alternatives and options and looking at the results.
I test most everything I build and have been doing a bit of production building with same model homes which has allowed me to try a few things and test results. One thing I have learned is the ceiling plane isn't where the leaks get by you when you’re actively sealing. The other thing Ive learned is 2ACH50 is very easy to accomplish in your typical modern floorplan.
So the question remains, what it the value between the accepted low end passive leakage standard of .6 ACH50 and 2 ACH50 on a comfort level, a ROI level and an operating cost level? And what are the potential consequences of going from 2 ACH50 down to .6 ACH50 from a building operational standpoint?
These houses do not drive themselves.
I only used the ceiling method Randy describes one time (Energy House 1, 9343 HDD). I also put my poly air barrier on the outside of the inner wall on the same house. The ACH50 on (House 1) and (House 2) was almost identical, 1.25 ACH50. These homes had a full basement, I did not use any SPF. House 2 was done with all poly on the room side, room ceilings done individually. I had access to some vapor box enclosures with a flange from Canada that fit around the electrical device boxes allowing a good seal around the wires and to the poly air barrier. All of my interior air barrier work since House 1 has been on the room (warm side in a cold climate) side.
The calculation can be made for the payoff of a lower ACH50 by taking the house volume X ACH Natural X .018 X 24 X HDD if memory serves me. An airtight ceiling is very important, the most important element in building an energy efficient structure. The stack effect is negated and temperature stratification is minimized.
Doug,
1. Are you saying you build with air barrier plane at interior face of exterior walls? I prefer exterior plane to avoid exterior air movement within the cavity, that’s my personal rationale.
When I did a lot of deeper home performance work which included quite a bit of exterior wall dense packing retrofits I really learned firsthand how connected wall cavities were. Since then Ive taken the approach of cavities to be treated as individual sealed containers and it really has payed off in terms of reducing measured infiltration.
2. Can you elaborate on what your equation is outputting?
Unless something has changed, ACH natural was a pretty big guesstimate number.
Your asking very good questions. I conducted modeling on this house using BeOpt. Moving the air tightness from a code minimum of 3 ACH50 to 1 ACH50 saves 6% of the operational costs. My goal all along was to get to 1ACH50, we just ended up well under that. The home will be heated by a natural gas boiler and an air source heat pump. Both currently have a low operating cost, money saved isn't much, but neither were the air sealing details. Comfort is too subjective to quantify, but a low natural air leakage rate makes it easier to achieve comfort for a customer. Another benefit is this home can handle a higher interior moisture level. One thing I can't control after turning over the keys is how the homeowner will manage interior humidity and maintain the HRV system. Will they have a bunch of house plants or operate a humidifier in each bedroom. I sleep better not imagining moisture forming on a condensing surface inside some wall cavity or roof sheeting. I've gotten to know this homeowner well enough that I will have the opportunity to monitor the homeowner's impressions of the home, cost and comfort. Durability...hopefully the home gets to be over 100. One final comment, this home's original bid was $170/sq. ft. Low end cost in my market. My intent with this home was to show performance doesn't need to cost a lot.
When my house was being built (2010-11, double-wall), I had the framing crew hang a 12" strip of poly over the inner frame of the exterior and interior walls of the upper level, plus under all exterior walls. When MemBrain was added to each exterior wall and to the upper level ceiling room by room, the poly strips were taped to the MemBrain sheets. We used a lot of tape! But the first blower door test came in at 0.65 ACH50.
Dick,
2010-11! Has it really been that long? I remember your build and it feels like just a couple of years ago.
I prefer the primary air barrier to be on the warm side in a cold climate. With that in mind the exterior sheathing will be quite airtight with housewrap and a rain screen. Details on the exterior drainage plane are critical no matter what the climate.
For ACH Natural I use ACH50 divided by 17 for this part of the world, Minnesota. I believe Lawrence Berkeley Labs did a paper long ago on the appropriate divisor for a given area of the USA. .018 Btu per cubic foot per degree F is at sea level, I believe they use .015 for Denver.
I just flipped open my blower door manual, annual heating cost formula = 26xHDDx fuel price x CFM50 / N x seasonal efficiency
Where N equals the Energy Climate Factor, which is where your 17 number comes from.
For anyone interested open a model 3 manual ( you can look at online) and in appendix E is an older article they include detailing the climate factor which is a range based on a few variables. It still is a pretty shoot from the hip calculation.
>"I prefer the primary air barrier to be on the warm side in a cold climate. "
Why?
An interior side air barrier is far more likely to become compromised over time as occupants hang pictures, run cabling to their TV, make plumbing changes, etc. Wallboard isn't very rugged compared to OSB /plywood too- I've never seen anybody punch through OSB sheathing while roughhousing, but it's pretty common to find unintended holes in wallboard in a house full of rowdy kids.
Dana,
I don't know if you saw Martin's recent blog on revisiting Thorsten Chlupp's house in Alaska. A lot of the blog and comments revolved around the experimental heating and thermal storage strategies, but the other interesting feature of that house was that he located the sheathing and air-barrier midway through the walls. It's not often possible, but to me it gives you the best of both worlds.
I know some of the houses featured in the GBA blogs have done variants on that strategy. Stephan Sheehy's comes to mind. He substituted a smart membrane for the sheathing, and his house seems to have been pretty simple to build, and perform well.
Is not an interior air barrier (in cold climate) more robust in terms of condensation? Does it just become a debate on whether convective looping is an actual concern?
Tyler,
When the air-barrier in on the exterior, the interior finishes almost always provide a fairly effective secondary one. Especially as the primary exterior one has removed most of the drivers that would cause air to enter the wall cavity. I wonder how much of a convective loop actually occurs?
If the choice was a stark one - an exterior or interior air-barrier, with the opposite side being very air-open - then maybe the benefit of locating it at the inside would be more pronounced? People have been using the exterior as the air-sealing layer for quite a while now, and the monitoring by builders like Dan Kolbert seem to show it's an effective strategy.
Semantics, I say. Whether inside or out, a barrier should be detailed completely as if it were the primary. Then the question is simply which one (or both) should be vapor permeable.
A cold climate build should then (typically) have the permeable barrier on the outside and the vapor tight barrier on the inside (warm side) to keep moisture out of the walls when it’s cold outside. Air conditioned homes in hot humid climates then do the opposite to keep moisture from driving inwards and condensing on the cold side of the wall.
In an ideal build the vapor impermeable barrier would be in the middle of the insulated wall assembly (adjusted in or out slightly based on average climate) with permeable but airtight barriers on either side, but this can be far more complicated to build and is not possible with a conventional wall system. The theory here is the vapor impermeable middle barrier stays above the DewPoint of the air in the wall at all times.
Many argue that all layers should be permeable, but done correctly I don’t think this is necessary. We’ve been using poly vapor barriers in cold climates for decades without issue, and considering the horrific build quality of average production homes regarding air tightness, the fact that homes everywhere are not rotting is pretty solid proof the risk is low.
I’m not a builder, this is the culmination of a lot of my own research on the topic, including looking at my current poorly built house. I plan to use an interior poly vapor barrier in my own build on the cold side of CZ6A. An insulated interior service cavity will somewhat put that barrier inside the insulated assembly and reduce the risk of condensation during our short but fairly hot and humid summer season.
The old rule of thumb for cold climates was the primary air barrier should be on the warm side or the 1/3, 2/3 rule. 1/3 of the insulation would be on the warm side, then the air barrier, then the remaining 2/3. This was done with some double wall construction with the air barrier on the outbound side of the inner wall. All electrical would then be exclusive of the air barrier with regard to penetrations. I used this method on my first double wall house but the connecting intersections were tricky so I went with a warm side air barrier behind the drywall after that. The 1/3, 2/3 was used in Canada on some major energy retrofits. They would wrap the 2x4 wall house on the exterior with polyethylene and then build a thick, superinsulated wall on the outside of it. Harold Orr showed slides of this at the 2007 Passive House Conference.
A well sealed and highly insulated wall should not have much moisture moving through it on a seasonal basis. No wall design will withstand bulk water intrusion, the exterior drainage plane needs to be first rate. When building, I want to offer the occupants flexibility in interior finishes. The idea the wall will have to dry to the inside (warm side) and against the flow of heat in a cold climate does sit well with me. The inward drying through drywall and the mandatory latex paint is suspect and walls get painted many times over the life of the house.
People are doing all kinds of aftermarket interior finishes these days and many are not vapor permeable. We can't know what future owners of a home will do, best to build using conventional methods that are time proven. Make sure your new construction is well detailed, highly insulated, very airtight, the rest will fall into place.
Totally agree. In any climate, your outside barrier should always be water resistant and wind tight. On the inside, you should always have an air barrier to prevent condensation problems and stop convective air movements. In a cold climate, your inside air barrier should be semi vapor permeable while in a hot climate it should be the outside barrier.
Of course, you don't need the outside barrier if you are using insulation that is water resistant and wind tight (foam board, rockwool) but that kind of insulation get expensive really fast and is a pain to install in thick layers.
Reply to Doug, post #22
My approach will be similar, though it will be closer to 1/5 4/5, with a horizontally framed and insulated 2x4 service cavity inboard of a 12" thick dense-packed double stud wall (vapor barrier between service cavity and inside face of interior stud wall).
Even with relatively little inboard insulation (R10-R12) there would only be a risk of condensation during a handful of days/year. With cellulose insulation's excellent moisture accumulation/distribution properties and its borate treatment, I don't think there's any real risk of climate related moisture damage.
The house is two stories all around. Bulk water is mitigated by 3 foot overhangs at the roof trusses and a 3 foot deep awning roof that goes around the perimeter at half height to maintain sun/rain shading of the first floor windows. A full ventilated rain screen will be employed. A leak into the wall system won't be impossible, but it should be highly unlikely.
Interior finishes are another reason I like the idea of an interior impermeable vapor barrier. Tile shower walls, large mirrors, and kitchen backsplashes are all reasons I don't want to rely on interior drying. All of the above will be part of our floor plan on exterior walls. I'm not concerned about the number of coats of paint we will apply to the walls, but as you point out, who knows what will happen with future owners. Hopefully this house is still around for hundreds of years after we're done with it.
Doug,
I think the 1/3rd rule of thumb was used in Canada when the air and vapour barriers were assumed to the the same thing (poly). Now that a distinction is made between the two, the code allows the air-barrier to be located anywhere in the wall, but requires the vapour-barrier to be located close enough to the interior that it will not cause condensation.
I agree with you. Relying on drying to the interior, especially in our climate, is a suspect strategy.
Alex,
The question is whether if there is an interior vapour-barrier to limit moisture drive into the wall it, make any appreciable difference where the primary air-barrier is. I don't see much evidence it does.
To keep the warm, moist air out of the insulated wall cavity. It has worked very well in our cold climate for as long as we have using the warm side air barrier. Time will tell if the new wave (cold side air barrier) stands up in a heating dominated climate. I prefer using standard building materials (no foam), just building thicker and tighter. The idea of a bunch of holes being punched through the walls is weak. I can't remember putting any holes in the outside walls of my house in the 27 years I have been here.
I didn't talk a lot about the wall air control layer of this home in the article. We used taped OSB as the primary air control. Being in a very cold climate, we still are required to have a class I or II vapor control layer on the warm in winter side. Poly is typical, we used Membrain on the walls for this build. It was installed air tight to act as a secondary air control layer. I've also questioned the durability of interior only air control methods. I feel the way this ceiling was constructed is very durable. Remodeling interior walls in the future won't result in any damage to the ceiling air control layer.
I've seen new homes with damaged damaged interior air control layers because of change orders or mistakes during the build. A few weeks ago I watched an electrician cut away the drywall and poly at bottom of an exterior wall on a different home because an electrical wire was missed. The baseboard is covering the holes that were cut. I'll be blower door testing this home in a couple weeks, will pay attention to this area during the test.
Reply to Lance,
Sounds like an exciting build and very well thought out. What about truss design, glazing and HVAC . Please share the performance numbers once the house is built. I would say you will be approaching a Passive House level with the wall R-value you describe. The double wall was and still is the standard for residential building performance in my opinion. The idea of hanging a bunch of exterior foam on a standard wall to try and achieve the same efficiency as a double wall is a puzzle to me and is hard to execute.
Thanks Doug. Yes, I'm excited to see this get started! We were supposed to start this year but material availability here (and 2-3x the normal cost) is a real problem and I was told by many I would be crazy to start building right now.
I've come up with a wall system that will hopefully work very well while being relatively easy to build. It's a two-story 12" thick double-stud with interior load-bearing 2x6 wall and an exterior 2x4 wall that supports a perimeter awning roof as well as the insulation. It rests on a conventional 8" poured foundation wall and has been fully Engineered.
Roof trusses are based on a simple hip roof design, complicated slightly by front overhangs that vary from 3' to 7' to accommodate the varying profile of the front wall system. 8:12 pitch and long overhangs results in a raised heel profile that accommodates beyond 20" of blown-in insulation to the outer wall sheathing.
Glazing will be high performing triple-pane, and the house is oriented with the front facing due-south. I have not settled on a supplier yet as availability and pricing will need to be finalized closer to the time of build. One thing I'm still struggling with is whether to include high SHG IGUs in south-facing windows. Benefits in January are obvious, but by late February the issue of overheating becomes a concern. I need to get an updated BEopt model completed on my new computer (one year ago!) and get some more detailed simulations going.
The service cavity and continuity of the interior vapor barrier and exterior air barriers was a priority throughout my design, and in theory at least it should be a very airtight build. The procedure of installing the poly vapor barrier and strapping on the attic floor before erecting any interior walls is exactly my plan, very similar in execution to what the author has illustrated here.
Much of the design was shaped by guidance and research that happened here in GBA, and I definitely plan to share as the build comes together. It's my first time attempting a project of this scale, so it should be a fun/frustrating/intimidating but hopefully very rewarding project.
Malcolm,
You are correct, the 1/3, 2/3 rule did come from Canada. All of the information I had available to me in the early 1980's on superinsulation did come from Canada. In looking back, the 1/3, 2/3 rule was right on, very safe, this was long before any sophisticated energy modeling programs were available. Thank you for clarifying the new air barrier, vapor barrier requirements. Building methods and terminology has changed, the principle is the same.
Two questions- if you use i joists instead of trusses, how do you attach the furring strips ? Also would 2x2 furring strips be adequate? Certainly save some cost and less weight vs 2x4
Finally, why need to lean toward. Smart vapor barrier if using a ventilated attic/cold roof? You don’t need to dry to inside of a ventilated /unconditioned attic right ?
Log in or create an account to post a comment.
Sign up Log in