

More Best Practices


If you were to call Scott Rosenbaum, manager of technical support for WarmlyYours, to ask him how to get started buying and installing an electric radiant floor, he would ask two questions: What’s your subfloor, and what’s your finish floor?
When it comes to such an installation, room size matters less than the materials chosen. Rosenbaum may suggest an insulating layer on a concrete slab before installing the radiant system, as concrete slabs tend to function as cold sinks. On a wood-panel subfloor, he would follow up with the question: What’s underneath? A wood subfloor over a crawlspace or unfinished basement requires more wattage than a second-floor installation in a heated building. “It takes more wattage to heat a floor from 50°F to 82°F than a floor over a heated area that’s maintained at 72°F,” Rosenbaum explains. A cold floor in a room with exterior walls and several windows may require a 15-watt system. In contrast, a warmer floor in an interior room without windows may perform adequately with an 8-watt system.
The finish floor matters because wood floors, laminate, carpet, and tile floors have different tolerances to heat and daily temperature deviation. In general, ceramic tile works best because it more easily transmits heat and can tolerate temperatures higher than other materials. You can heat a tiled bathroom floor to 104°F, whereas other flooring types may only tolerate temperatures up to 82°F.
Some flooring selections have 24-hour temperature variations of only a few degrees, requiring the system to maintain the floor within a small temperature range throughout the heating season. Tiled floors will tolerate an on-off cycle, making the system more efficient because it is not consuming energy when not in use.
Avoid common installation mistakes
Seated at the front line of the technical support center, Rosenbaum troubleshoots installation issues daily and knows what trips up professional builders on their first installation. “Electric radiant systems generate heat through electrical resistance, which means we must respect Ohm’s law,” he says. In short, Ohm’s law describes the relationship between voltage, current, and resistance. In radiant systems, the current resistance comes from the length of the wire loop. “People will often buy the largest spool of wire, thinking, ‘This should cover it,’ and then discover they have wire left over, and ask, ‘Can I cut it?’ Unfortunately, the answer is no,” says Rosenbaum. Each system is designed precisely for the size of the floor and the room layout.
If you cut the wire, you reduce the resistance, and the system will overheat. The reverse is true too. If you splice the wire, making it longer, the resistance is reduced, and the system underperforms. Rosenbaum says: “A little too little is oaky, but a little too much wire is not.” It’s best to reduce the wire loop in areas where footfall is less likely.
To make sure the installer has the precise amount of wire required, Rosenbaum encourages customers to upload a floor plan showing accurate floor dimensions and the location and type of fixtures utilized. Building codes do not permit radiant heat elements under cabinets, toilets, and tubs, so the design must account for these and any floor registers. The company provides installers with a free wiring layout. However, this plan will work only if the room and fixtures follow the original scheme. “In new construction, we frequently run into issues due to plan revisions,” Rosenbaum notes, adding that he encourages builders to submit an as-built drawing with verified dimensions before ordering materials. If there were changes, the company revises the plans and sends them back to the installer within 24 hours.
Verify, verify, verify
The day an installer receives their roll of wire (or wiring mat), Rosenbaum recommends verifying the Ohms. With a non-self-ranging digital meter, compare the wire’s Ohm rating with the rating on the label (it is on the wire). The meter reading should vary no more than 15% from the rating on the label. This first reading reveals the wire meets specifications. If it does not, you can exchange it. As a fail-safe, it pays to run the same test before installing the system if several days have gone by. Better to test twice than replace once.
The system comes with a small continuity tester easily attached to the wire—to be used while installing the wiring. The tester will sound an alert tone if the wire is damaged during installation. After the layout is complete, test with the Ohm meter again. Reinstall the continuity tester while placing thinset mortar and tile or plank flooring to ensure no cuts occurred. After completing the installation, retest with the meter to verify all is well. If something goes wrong, WarmlyYours will supply you with a proprietary repair kit. “We will give a repair kit to anyone who needs one, regardless of what brand they bought,” Rosenbaum explains, noting the policy is in place because repairing the system beats replacing it and that helps the industry gain consumer confidence.
A few extra tips
The radiant systems come in two versions: 1. a cable spool with a dimpled mat to assist in warping the cable at the prescribed distance of three inches, and 2. a mat with wire already distributed in a loop.
The mat works well for large, square, or rectangular areas, whereas the wire spool offers flexibility to work around odd shapes and fixtures. It’s important to plan the layout because the installer must design the comfort area precisely. A square of radiant heat in the middle of the bathroom will not heat the entire floor. The heated zone is limited to 1-1/2 in. from the wire, hence the 3-in. grid. “Plan your installation based on where you’ll place your feet,” Rosenbaum advises. For example, it’s important to get under the toe kick, so when standing barefoot at the vanity, your toes do not feel a “bone-jarring” temperature difference. He encourages the installer to survey the walking surfaces carefully and heat all these areas.
When working over the wire, wear tennis shoes, not steel-toe boots. Don’t drop buckets on the grid or smack your trowel on the floor to clean off excess thinset mortar. Work carefully to avoid damaging the cable. Rosenbaum also recommends cleaning thinset out of grout lines as you go, so there is no need to come back later a dig out dried mortar, risking an inadvertent cut that goes too deep. Other hazards include errant trim nails and floor penetrations, such as partition anchors and doorstops installed atop the floor. The layout can accommodate all these, but only if you have included them in your plans.
Rosenbaum recommends a modified thinset and paying careful attention to the set time stated on the bag. Even if the mortar dries, it is necessary to wait for it to set. This can take anywhere from 5 to 14 days. Regardless, do not start up the system without waiting for the specified time prescribed by the mortar manufacturer.
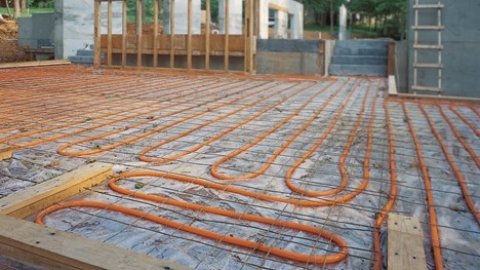
For wood floors that require nailing, the company offers “fixing strips,” or sleepers with floor-leveler between so you have a nailing surface. WarmlyYours designs this into the layout.
(This webinar covers the fundamentals of electric, radiant floor heating, from electrical requirements to cable composition.)
Wiring requirements
The WarmlyYours system includes a thermostat that mounts on the wall and a temperature regulator installed in the grid. Do not forget to install the regulator. The system runs off a 120 or 240 circuit (the larger circuit is only useful for larger areas). Although the national electrical code requires GFIC protection, WarmlyYours includes a built-in GFIC breaker in the thermostat. The system will trip it if you add a GFIC breaker at the panel.
The WarmlyYours thermostat is programable, so you can shut the system down when not in use. If you program the floors to 6 a.m., the thermostat learns how long it takes to achieve the desired temperature and anticipates this for a toasty floor when you get up, which is arguably top among the reasons people are enamored with in-floor heating.
________________________________________________________________________
Fernando Pagés Ruiz is a builder and an ICC-certified residential building inspector active in code development.
Weekly Newsletter
Get building science and energy efficiency advice, plus special offers, in your inbox.


2 Comments
When you have unconditioned space below, I would recommend insulation under than heated floor rather than upping the wattage.
These cables usually have multiple layers of insulation and shielding, so I really don't know how you'd shorten or lengthen one with completely compromising the cable integrity. The instructions I've seen all say you absolutely cannot do it.
Log in or create an account to post a comment.
Sign up Log in