
Image Credit: Matt Bath
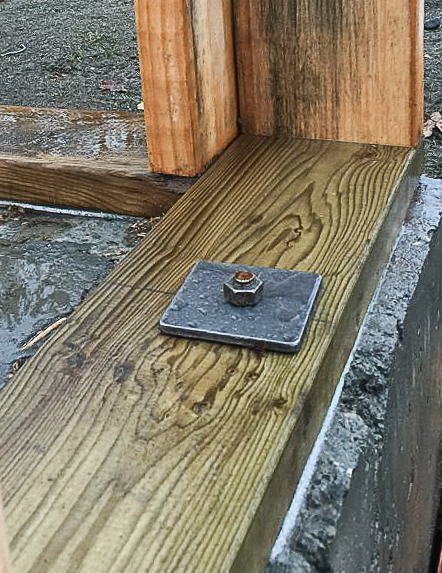
Image Credit: Matt Bath Although the slab came out as planned in most respects, there were some areas that were less than perfect. Ideally, the outside of the bottom plate would have been in line with the edge of the slab. Framing for the entry door includes a single 2x10 header and a jack studs on each side to carry the load. Traditional framing (top) uses more lumber and leaves less room for insulation that advanced framing techniques (below). Fewer joints mean a lower potential for air leaks. Rather than end drywall in a corner, enough room is left between the end of a partition wall and the exterior wall to slide a sheet of drywall behind the partition. A powder-actuated tool uses a .22-caliber blank to fire a nail through the bottom plate and into the concrete.
More Guest Blogs


Editor’s note: This is one in a series of blogs detailing the construction of a net-zero energy house in Point Roberts, Washington, by an owner/builder with relatively little building experience. You’ll find Matt Bath’s full blog, Saving Sustainably, here. If you want to follow project costs, you can keep an eye on a budget worksheet here.
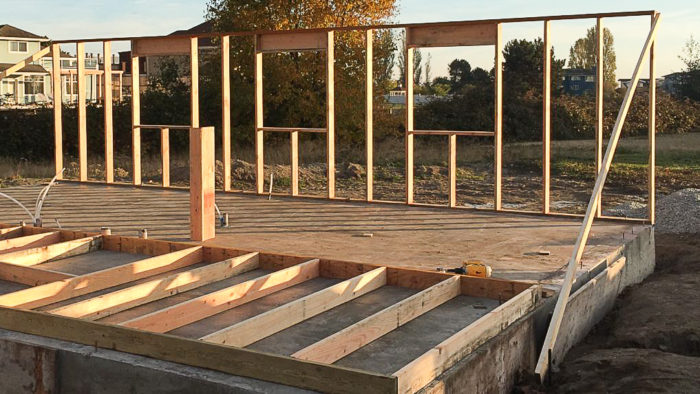
After spending the weekend spraying the new slab down with water every hour or so, I was finally ready to get the walls up. The process of “wet curing” concrete for three to seven days can add up to 50% in strength because it prevents the water inside the concrete from evaporating. While many contractors begin framing the house the day after the concrete is poured, without experiencing any problems, I played it safe and waited until the third day to get going.
The first step was to snap lines on the slab where the walls would go. This will help keep the bottoms of the walls straight and square to each other. I took several measurements of the concrete, including the diagonal measurements from corner to corner, to decide where to start.
The slab came out really well, but not perfectly. (This is my first solo build, after all!) There will be a few small areas of concrete that stick out a bit or don’t come out far enough (see Image #2 below). This is no problem at all structurally and visually it will be covered up by the siding, but in taking these measurements I was able to position the walls to minimize the problem as much as possible.
The exterior walls will be framed with 2x6s. The first lines I snapped marked the inside edges of the bottom plates — 5 1/2 inches in from the edge. Once I had marked all the exterior walls, I grabbed the first sill plate from my pile of lumber and cut it down to 20 feet (most lumber yards give you an extra 1/2 inch or so). I lined it up on my line and marked out the anchor bolt locations, and then drilled them out. (Remember, the bolts were embedded in the concrete so just the top part stuck out) Then I set the bottom plate over the bolts and made sure it lined up just right. I repeated the procedure all the way around each wall until I had all four plates done.
With the placement of the exterior walls now set, I was able to measure out the locations of the interior walls and snap those lines as well. It will be much easier to mark them now, and they will serve as a sort of map to where my interior walls will be going.
Laying out the walls
I had to call a friend to help me carry the 32-foot-long laminated veneer lumber (LVL) top plate from the lumber pile over to the slab, and we set it on edge next to the bottom plate, which I had also turned on edge. I used some clamps to hold them together, perfectly lined up, and then used a tape measure to mark out the stud locations every 2 feet.
I had ordered the studs precut so that saved me a lot of time. I just had to carry them from the lumber pile and then inspect and “crown” them. Lumber, being a product of nature, is never perfect. I set aside studs with significant bends or waves for later use. The straighter ones I will use now, but even the straighter ones have a bit of a curve or “crown” in them. I lined the crowns up all going in the same direction, which will make it easier to straighten them out later in the build.
Once all the studs were laid out on my marks, it was just a matter of nailing them together. Building codes offer several different ways to satisfy nailing requirements, and the one I chose will be three 16d nails, top and bottom, to connect each stud to the top and bottom plates. I took my time and carefully aligned each stud to ensure that it didn’t stick out on either side. It is situations like these where even with my lack of experience I can guarantee I put together a better wall than 90% of the framing crews since they are focused on speed over quality.
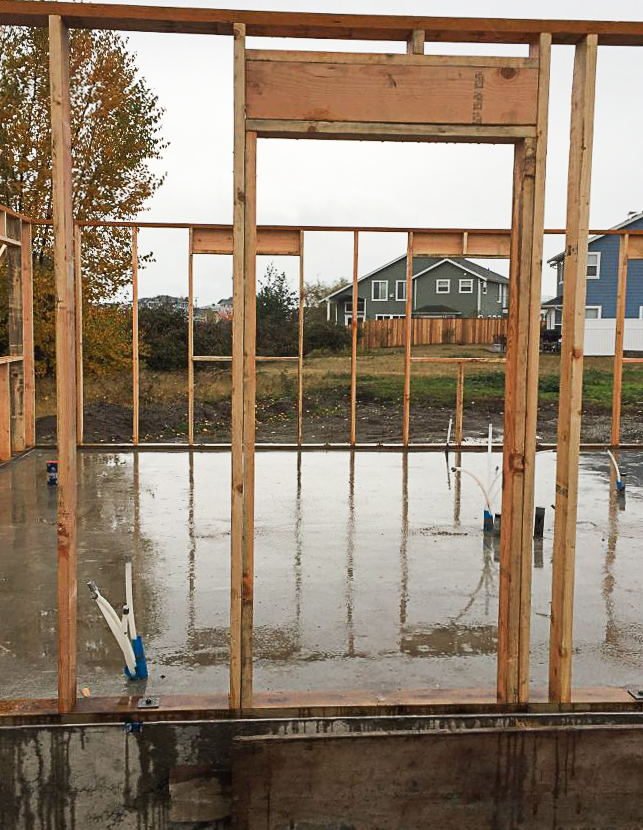
For the window openings, a larger piece of lumber must be used to carry the load around the opening to studs on either side. Again, building codes offer several ways to satisfy these header requirements, and for mine I chose a single 2×10. I will also be utilizing some metal hangers to carry the weight of the header instead of shorter studs called jack studs, although I did use jack studs for the entry door (see Image #3 below).
Once all the lumber was nailed together, I unrolled some sill gasket and placed it on the slab where the wall would be anchored. I also nailed some long 2x4s to the top of the wall. As we raise the wall, these boards will swing out and brace it. The wall was very heavy but with a few friends we were able to get it airborne with ease. Once it was vertical, I staked down the bracing boards and then screwed the nuts down over large square washers on the anchor bolts.
Using advanced framing techniques
To an experienced framer, the work I have completed over the last couple of days would seem wrong. It is quite possible they would never have seen a house framed the way that I am framing mine. A few might even claim that I am violating building codes by not following “standard practice.”
The fact is, I am utilizing a method of framing created in the 1970s in a collaboration between the U.S. Department of Housing and Urban Development and the National Association of Home Builders Research Foundation. It’s commonly called advanced framing. The goal was to reduce the amount of wood used in construction, not only to save the lumber, but more importantly, to create more space for insulation and save on energy use. All of these small changes work to ensure the house will be net-zero.
In traditional framing you have a single sill plate at the bottom of the wall connected to a series of studs spaced 16 inches on center, which are then connected to two top plates sandwiched together (see Image #4 below). Even more studs are used to anchor interior walls to the exterior. All of the wood used are 2x4s, leaving a stud cavity 3 1/2 inches deep for insulation.
In advanced framing, on the other hand, only a single top plate is used, studs are spaced 24 inches on center and metal hangers are used instead of jack studs. On gable end walls, no headers are needed at all. “Ladder framing” is used to anchor interior partition walls, and 2×6 lumber is used instead of 2x4s, leaving 5 1/2 inches for insulation.
The advanced framing system is cheaper because it uses 5% to 10% less lumber, and it is faster because it uses 30% fewer boards (although they are a bit bigger and heavier). More important, every single year more money is saved on energy costs because more insulation can be used.
Okay, so what’s the catch? If advanced framing was added to the building code over 40 years ago, is cheaper and faster, and reduces energy bills every single month, then why isn’t it standard operating procedure for builders? How could I possibly be telling you that most builders don’t even know about it?
Most houses are built by a massive team of contractors who under normal circumstances communicate very little with each other, if at all. These tradesman are managed by a general contractor who uses building plans that were probably drawn up by an architect and edited by an engineer.
The changes in advanced framing may seem small, but they ripple right on down the line and affect every single person that works on the house. As contractors are paid by the job and not by the hour, they aren’t too keen on taking time to learn this new technique. The fewer that learn it, the fewer that are available to teach it, and the cycle continues…
As I’m building solo, I have none of these issues. I designed the house myself from the very beginning with advanced framing in mind. Thanks to my mentor, who introduced me to advanced framing, I’ve never built any other way. I’m saving time, money, and materials. If you really want to save sustainably, advanced framing is the way to go.
Framing the interior walls
Advanced framing will help me lower my heating bill by creating more space for insulation. However, insulating a house is just one of the ways to reduce the amount of energy needed to heat (or cool) a house. No matter how much insulation I put in the house, if I don’t control the air that is allowed to flow through the walls, it will be impossible to control the temperature.
According to the U.S. Department of Energy, up to 30% of heating and cooling costs is due to lack of air sealing. One of the places where air can escape is in the tiny gap between the sill plates of the walls and the concrete foundation. While I did place sill gasket in that area, that was only to prevent water from wicking up the concrete and into the walls. The sill gasket is air-permeable, meaning air can pass through it. I needed to add an additional layer that was air-impermeable.
The best time to do that work is now. After I frame the interior walls it will be nearly impossible to caulk the spaces where they connect to the exteriors.
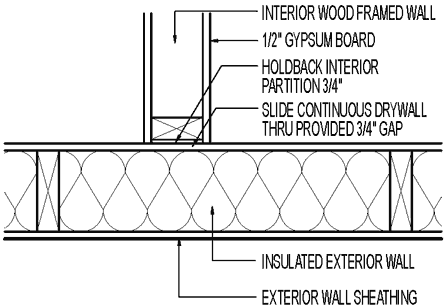
I also will be using a continuous layer of drywall to control air movement. This means that the drywall will slide in behind the wall framing for the interior partitions, resulting in fewer joints in the drywall and thus fewer opportunities for air infiltration (see Image #5 below). Drywall is installed later. For now, I cut small scrap pieces of 3/4-inch material and used them as spacers to ensure the gap was sufficient.
I used standard framing instead of advanced framing for the interior walls since they don’t require any extra room for insulation. This meant spacing the studs at 16 inches on center instead of 24 inches, and capping the studs with a double top plate instead of a single. Additionally, I used 2x4s to frame most of the interior walls instead of 2x6s. (An exception is walls that house large drain lines and vent pipes.)
Plumb and line the walls
With all of the first floor walls complete, it was neat to be able to navigate the rooms and get an idea of the feel of the dimensions of the house. Before moving on to the second floor, I needed to take some time to ensure that all of my framing so far is straight, level, square, plumb, and true. The subfloor on the second floor will tie everything together, so this was my last chance to make sure it was just right.

I started by double checking the lengths of the top and bottom plates and the lengths of the corner studs. Next, I used a plumb bob to ensure each of the corners was plumb. I used long 2x4s nailed diagonally and nail stakes in the ground to push or pull the end of each wall as needed to plumb the ends of the wall. I knew the foundation was level, so since the wall lengths were equal and plumb, I knew the walls were square and true as well.
To check the middle of the walls, I nailed a 2×4 block to the top corner on each end of the wall and stretched a string tightly between them. Using a third block, I checked all along the wall to ensure this block fit snugly between the wall and the string. Where necessary I used additional bracing to make the wall straight.
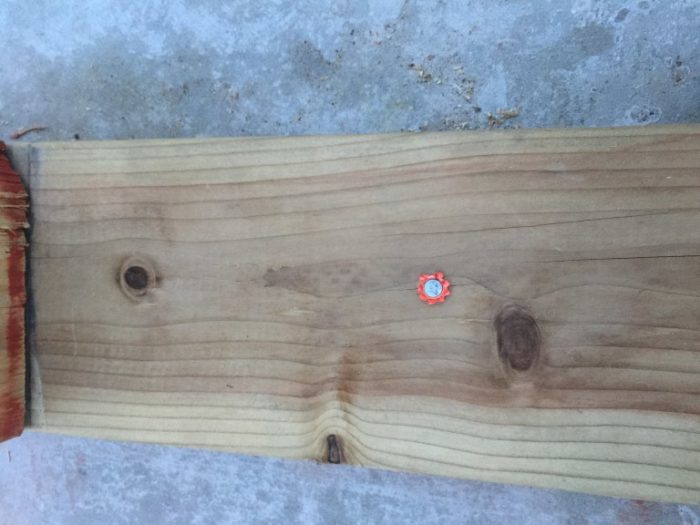
With the exterior walls (hopefully) perfect, it was time for the interior walls. I used a powder-actuated hammer tool to nail the bottom plates of the interior walls into place (see Image #6 below). This tool uses a .22-caliber explosive to drive the nail into the hard concrete.
With this crucial step of straightening done, I was now confident enough to get going on the joists.
Weekly Newsletter
Get building science and energy efficiency advice, plus special offers, in your inbox.


11 Comments
Comment on advanced framing
Matt,
I'm glad that the advanced framing approach worked for your project. Respectfully, however -- speaking as a former builder -- I think that you are tarring builders with too broad a brush when you write, "As contractors are paid by the job and not by the hour, they aren’t too keen on taking time to learn this new technique."
Most builders are eager to learn tricks that are genuinely useful, especially if these tricks save them time and money. But advanced framing has disadvantages as well as advantages. For a balanced discussion of advanced framing, see "The Pros and Cons of Advanced Framing."
Martin - you have way too much faith in the average builder.
Matt
I'm enjoying your blog. Your enthusiasm is infectious, and i admire your courage to tackle construction jobs you have no experience with. Where I lose you is when you start contrasting your work with that of experienced builders. We don't expect new construction to have uneven foundation walls, or slabs that haven't been power-trawelled smooth.
I'm also not sure you completely understand the implications of the framing you are using. Your diagram illustrates the point. The Advanced Framing works on the premiss that loads are vertically stacked, but are your floor joists on the same 2 ft centres as the studs below? There is a lot more wood in conventional framed walls than yours, but whether it is all redundant is debatable. Removing everything until the structure is that lean, especially in a high-seismic zone, is a bit like playing Jenga. You don't know how precarious it is until it is stressed. I don't see any hold-down hardware or indications of shear walls, but perhaps that is in a later blog?
Lack of testing
The single top plate seems like a good place to save lumber- HOWEVER the APA (www.apawood.org)has no full scale testing of single top plate shearwalls. Until they test & publish the have it stated in the code it seems sketchy to use.
Martin and Malcolm
Having been lurking on GBA for several years before building, I have the utmost respect for both of you. I apologize if my tone comes across as conciliatory. I realize that I have made some generalizations that could be offensive, such as the one Martin pointed out, and for that I am sorry. My comment was made to point out a flaw in the system, not a flaw with the contractor. I live in a state where you can be a contractor with nothing more than a few hundred dollars and much of my writing is shaped by that. I understand that is not the case in most states. At the end of the day I am just a beginner enjoying an adventure and sharing that experience with those interested in embarking on a similar one of their own. That having said, I will go head to head in a building code test against the average WA contractor and beat them because I have studied this stuff religiously over the last two years and they haven't even been tested on it. Malcolm, my floor joists are centered within 1.5 inches of my studs and trusses because that is what the code states. As I explained in one of the posts on my blog, I had to quote the code to the PE because he wasn't aware of the exception to the wall bracing code that I was using. I have made some mistakes due to my lack of experience, and it is due to that lack of experience that I would never consider myself a good builder regardless of my knowledge. That will take years and many more mistakes because experience is extremely important to being good at anything. I would like to point out, however, that continuing education and trying different methods are also important to being good at something, and I believe the construction field could benefit from more of them.
Matt
if i comment on some of your practices and workmanship please don't take it as personal criticism - much as I don't take your general comments about builders to heart - so no need to apologize. These blogs can end up as textbooks for others contemplating similar builds, so I think it's important to air any issues that come up.
Because high performance has traditionally been the weak point of the construction industry, and the shortcoming around that are evident in contemporary construction, there is a tendency in communities like GBA to dismiss other aspects of building as inadequate too - and to fixate on high performance at the expense of other important attributes of houses, such as the robustness of the structure. At some point in this discussion, perhaps when more of the framing is discussed we can go into further depth on this. To me it doesn't make much sense to say we need better building envelopes but poorer underlying support for them.
Comments on Advanced Framing
Strong work Matt, and kudos for taking the time to document your efforts. I'm a general contractor here in Washington and specialize in high performance building. I've built a Passive house and like yourself am currently working on a net zero project. I've used advanced framing whenever possible on my projects since about 2006. My experience has been that the optimal approach is to go with double top plates in order to avoid the hassles of stacking trusses and joists over studs, but more importantly, to provide the necessary meat for seismic hold downs like hurricane clips. A dbl top plate also makes it easier to fasten GWB (advanced framing requires 5/8" GWB on the ceiling to avoid sag, so the extra screw backing is appreciated.) We tend to go with dbl bottom plates as well, for easier layout but also to provide nailing for interior baseboard.The extra lumber associated with adding plates is marginal, as are the hits on thermal performance. As for your concerns about air leakage thru dbl top and bottom plates, a simple bead of caulk or Siga tape is much more effective than a foam gasket. Good luck on the rest of your project! -Ryanl
Malcolm and Ryan
Thank you both for the comments. I definitely hear you Malcolm and would love to learn more about structure. Ryan, good to hear there are GC's in the state that utilize OVE. I found that the biggest headache for me with my hurricane clips was that they aren't designed to be used with energy heel trusses. If anyone knows a method of attaching them to the gable trusses I would love to see it. Probably just going to go with some Simpson LS clips since truss engineer told me to just figure it out. LOL. I did caulk the bottom plates, the sill seal was just for capillary break. I will caulk the tops after installing ceiling GWB. I was planning on using 1/2" with 16 OC furring strips. Maybe 5/8 is better?
Matt
Two possible solutions:
- Move the hurricane clips to the inside of the wall.
- Use Truss screws instead.
https://www.strongtie.com/strongdrive_interiorwoodscrews/sdwc_screw/p/strong-drive-sdwc-truss-screw
Edit: I hadn't realized you used a 24" layout for your joists too - so disregard my earlier comments about load-paths. What did you use as a subfloor with that big a span?
Subfloor
Weyerhauser 23/32” T&G 48/24 OSB with PL400 to supplement nailing. I'm really happy with it so far. My mentor used the truss screws so I've installed them before. I really only need them for the four gable end connections so stinks to buy them all but it is small potatoes and I could always use them for a belt and suspenders approach.Thank you for the tip
Matt
23/32' OSB. Yeow! That stuff is hard on the back. Nice and solid though.
A lot of builders on the prairies are now going with 24" oc floor framing, and clear-spanning the whole house by using floor trusses. Makes a lot of sense to me as it means no interior bearing-walls, less foundation work, and large floor cavities for services. it does make for a deeper floor though. I haven't seen it adopted out here on the coast.
Log in or create an account to post a comment.
Sign up Log in