
Image Credit: James Steacy / Ben Foster
More Green Building Blog


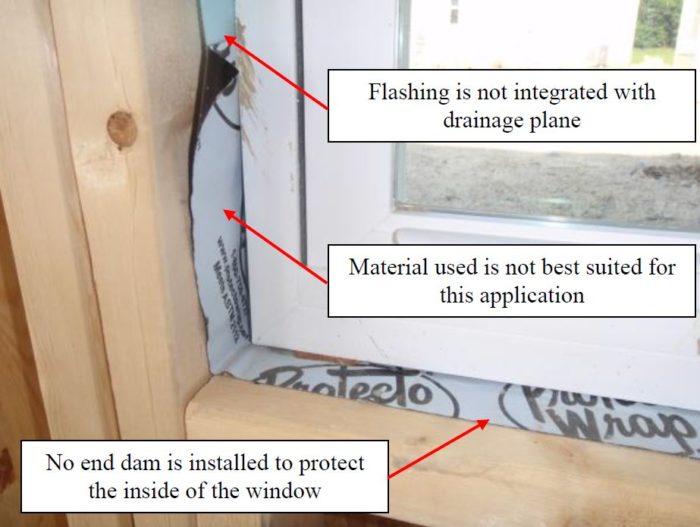
Last week, GBA published a photo of a recently installed window in an new house under the headline, “What’s Wrong With This Picture?”
The photo showed the window from the interior. Some of the flexible flashing material was visible on the rough sill and the rough jamb.
The list of problems outlined below was prepared by James Steacy of IBACOS.
Not quite right
Before a window is installed, the sill of the window should be flashed to help protect the sill and to move any water that seeps behind the window back outside to the water-resistive barrier (usually housewrap or asphalt felt). In this case, the builder attempted to integrate the wall drainage plane with the window and window sill flashing, but did so incorrectly.
This type of sloppy installation incurs risks. Possible problems include water intrusion around windows, mold and rot of window framing and exterior sheathing, staining of drywall or window trim, and drywall decomposition.
Issue 1: The flashing is not integrated with the WRB
Ideally, the flexible flashing visible on the rough jambs and the rough sill would be integrated with the water-resistive barrier (WRB). Since no housewrap is visible on the rough jambs or the rough sill, it’s hard to know whether the flashing was properly integrated and lapped.
Issue 2: The flashing material is not suitable for this application
To protect the rough will, installers have two choices: they can install a manufactured sill pan, or they can make a site-made sill pan.
This installer did not include a manufactured sill pan; yet the flashing product chosen for the site-made pan is the wrong type. The installer used straight peel-and-stick flashing tape instead of a product like DuPont FlexWrap that conforms to three-dimensional corners.
Straight flashing (like the product in the photo) requires a cut on the exterior to enable the flashing to make the bend at the sill-to-jamb location. This open cut and fold typically ends up with a hole in the corner that can be a potential leak point. Products like DuPont FlexWrap, on the other hand, can be pulled and wrapped around corners and don’t require any cutting.
Issue 3: The installer forgot to include an interior back dam at the sill
Without an interior back dam, water that reaches the sill can enter the house.
If you don’t want to install a back dam, the site-made sill pan must include a slope to direct the water outdoors. This can easily be done by installing a length of lap siding (clapboard) on the rough sill before making a site-made sill pan.
The right way to flash a window
Here is the usual installation sequence:
- Install the water-resistive barrier (WRB) on the wall over the window rough opening, with upper layers lapping over lower layers at least 6 inches.
- Cut the WRB to allow access to the window opening. Fold back the flaps on the sides and top of the window to expose the rough opening. Cut the WRB material at the edge of the sill rough opening.
- Install flexible sill flashing material or a preformed (manufactured) sill pan over the WRB on the rough sill and behind the WRB plane on the sides (jambs). Sill flashing should include an interior back dam (or should be sloped outward) and should extend up the sides of the rough opening to form end dams at the jambs, unless a preformed sill pan flashing with integral back and end dams is used.
- Lap the WRB material at the jambs (the vertical sides of the window opening) over the end dam of the sill flashing.
Weekly Newsletter
Get building science and energy efficiency advice, plus special offers, in your inbox.


5 Comments
Disagree with #2
I was a little surprised to see GBA discount Protecto-Wrap and only give one (mush more expensive) alternative; Dupont's flex wrap. Ironically, the rotating ads at the top happened to be one for DuPont. Careful about that, it might give readers the wrong impression.
The advantages of Protecto Wrap and the similar Forti-Flash is its low priced, readily available and is very thick which helps for heavy window installs that tend to damage site made sill dam flashing.
Using a straight flash product for window sill flashing takes a little practice but can be done successfully. Fold the bottom down first then the top of the side. Stretch the corner out and secure it with button cap nails or 1" wide crown staples (not set too deep). Get your technique going on eave walls or where windows are better protected by overhangs before moving on to gable wall windows.
Another option Ive used to slope the sill pan is planing a slope into the bottom 2x4. The corners are the tricky part with a flap disk or chainsaw type attachment on an angle grinder.
Response to Brian Knight
Brian,
This contribution by James Steacy of IBACOS does not represent an official view by GBA. Thanks for sharing your experience with Protecto-Wrap.
GBA regularly presents articles by a variety of contributors, and not all of our contributors agree. We welcome different viewpoints and posted comments from our readers.
Issue #3
I don’t know if the author is including sealing the window as part of the installation? I would suggest that an “interior” sealant that goes around the full parameter of the window is critical & not just at the sill. The sealant itself will provide an air seal and act a backdam at the sill. Certainly adding an L-angle or other type of backdam works too. Also, sloped drainage pans create a problem for bearing the weight of the windows when mounted onto the shims.
Author's intentions
James was not intending to discount Protectowrap's product he was just indicating that the use of any manufacturers straight flashing product cannot be applied in a way to ensure full coverage of the outside corner of the sill to ensure no pinhole penetrations. He was recommending that straight flash can be used in conjunction with a flexible flashing like Dupont's Flew wrap or any other prefabricated corner pieces that can protect the outside corner. Mike we agree with you sealant should be used around the window but it is most critical to use it at the base of the window especially if you don't have a sloped sill or end dam. These are my thoughts
Anthony Grisolia from IBACOS.
In Canada, you can find those corner guard from Resisto (Soprema):
https://www.resisto.ca/en/product/redzone-corner-guard-1934/
They are easy to install and insure a leak-proof corner. The only issue I found is they don't work that well with slopped sills, works better with a backdam.
Log in or create an account to post a comment.
Sign up Log in