
More Q&A Spotlight


Michael Sterner is ready to build a new house in northern Wisconsin: a simple, two-story box of about 2,000 square feet. After studying many possible wall assemblies, he has settled on the double-stud wall as proposed by the Building Science Corporation.
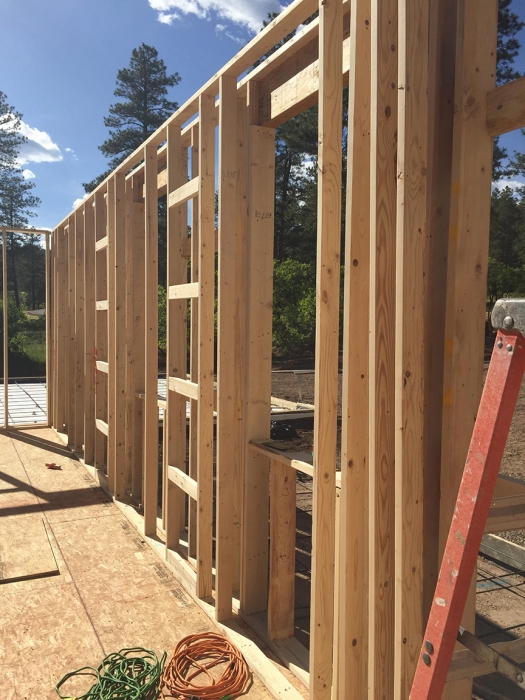
The assembly consists of an inner 2×4 structural wall sheathed (on the outside) with 1/2-inch plywood and an outer 2×3 stud wall. Between the two there is a 4 1/2-inch space. Both stud cavities and the space between the two walls are insulated with cellulose.
“We chose this wall for its high R-value to cost ratio,” Sterner writes in a recent Q&A post. “It seems to be the least expensive option for a high R-value wall. It is easy to build, finish on the exterior and seems very durable.”
But that’s not quite the end of it.
“As I’ve been receiving insulation quotes, some challenges have been brought up with the execution of this wall system,” he continues, “mainly that in order to dense pack properly we’ll have to divide up the bays so they can be dense-packed two stud bays at a time.”
Further, with all that cellulose going into the wall, there will have to be some way for the air to escape. Sterner sees two options:
- Install netting on the outside of the wall, insulate the wall, then add the fiberboard and water-resistive barrier.
- Finish the wall and use a hole saw to bore holes for both the insulation and the escaping air. Later, patch the holes.
“Does anyone have thoughts or experience on executing this wall system and best practice?” Sterner asks. “Does anyone want to try to talk me out of this wall system toward a different high R-value wall assembly?”
That’s where we start this Q&A Spotlight.
Weekly Newsletter
Get building science and energy efficiency advice, plus special offers, in your inbox.

This article is only available to GBA Prime Members
Sign up for a free trial and get instant access to this article as well as GBA’s complete library of premium articles and construction details.
Start Free TrialAlready a member? Log in


33 Comments
And...thats the problem. Cant find experienced dense pack installation contractors, so u call foam guys, they attemp TO RIP YOU OFF, so you end up back at batts!!! Stinks really! Whats a guy to do??
Also get quotes for damp sprayed cellulose (with glue). Completely inspectable and settling resistant, so much less reliance on "experienced".
Russell,
You're right: finding skilled contractors isn't easy, and the process can be frustrating. But there is no use insisting on dense-packed cellulose in a region of the country where the technique is unknown or rare. You have to be adaptable, and use methods that are typically used in your region.
Fiberglass batts can work well, if (a) they are installed according to the manufacturer's instructions, and (b) you have a plan for air sealing and air tightness testing (using a blower door). For more information, see "Installing Fiberglass Right."
I'm planning to divide my double stud wall with netting at every stud bay. This is probably about a 1 person-day job and should remove the most challenging aspect of successful blown-in cellulose; proper density across cavities.
Steve's suggested wall uses lots of foam, so while the lumber cost to increase depth may not be significant it still looks like a relatively expensive wall to build. Labor-intense as well, with three separate insulating operations. Also, with only the exterior foam insulating the rim joists you're very limited to how much interior side insulation you can use in colder climates. With 2" of exterior foam at R10 you might only be safe with 1-2" of open cell on the interior side of the rim board before condensation becomes an issue.
I looked at the BSC wall carefully before making the decision to go with a more traditional double-stud. The fact it requires blown-in from the outside makes it impractical for a two story house, in my opinion. If insulating from the inside, punching a minimum of two holes through the plywood air barrier in every stud bay then having to patch and seal them later is a lot of labor as well, and compromises the air barrier. Also, once filled there's no way to check the density of the outer cavity fill. Batts in the outer cavity are not practical unless you increase to a 2x4 outer wall and leave a 3.5" gap in between the walls.
I think the traditional double-stud has a lot going for it, provided the interior side vapor retarder is meticulously detailed. Keeping moisture out of the walls in the winter months should eliminate the risk of cold sheathing. A service cavity makes that a much easier thing to get right, and to keep the retarder free of damage long-term.
If a double stud has an interior load bearing wall like the BSC wall, insulating the rim joist area is not a problem.
Looks like Steve's go-to wall assembly (sheathing over foam) will have structural issues in some areas. Could omit the Zip sheathing (tape the foam) and use diagonal steel strapping. Guaranteed not to have sheathing rot :-).
> With 2" of exterior foam at R10 you might only be safe with 1-2" of open cell on the interior side
Agreed. Better to keep the perms to the exterior > 1 (eg, EPS and no Zip) and limit interior side perms (as much closed cell spray foam as you want).
Good catch. I didn't notice that assembly calls for sheathing over foam. Zip-R is the only real solution to that AFAIK. Another pricey option.
Some more double wall information, long live the double wall !!
Here is how we did double wall w cellulose about twenty years ago with no settling low labor very low cost.
Outside stud wall with osb sheathing. Tyvec optional, not needed.
Staggered stud inside wall. 12" space inside face to outside space. Also did all weather wood foundation and truss roof/cieling same basic way.
Use fiberglass cord reinforced polyethylene on the inside stud face staple down with strips of fiberglass strapping under Staples so they don't pull thru poly.
Blow in insulation thru slits in the poly till it is packed tight from top to bottom and the poly is bowed out uniformly. Tape slits w packing tape as you work.
You can see the fill coverage as you work and know it is full and tight.
Inspect for fill and density, then cover inside w drywall, with helper pushing it down flat, thus packing cellulose fill even more.
This will never settle, and it is too dense for moisture to go through it.
After 20 years there are no voids, no moisture issues, no pests.
Forget fiberglass Batts! You can never never never get 100% fill, and the density is so low air and moisture move through it like it was nothing. And Batts are labor intensive and expensive.
Adding expensive foam and special details like netting, etc destroy the economy and simplicity and renewable factor of 100% cellulose fill.
The use of reinforced poly film on the open inside studs is the key. You can see the fill as you fill it, you can feel the fill density by pushing on the poly, and you densify a little more than maximum blown density when you compress the bowed out poly as you install the interior wall covering.
You can never dense fill a wall cavity 100% uniformly when you cannot see what you are doing inside the wall!
You solve the "contractor or laborer just wants to blow it fluffy and be done" problem, because you can actually inspect it and KNOW that it is dense.
There generally are enough small cracks etc in the whole wall to vent the blowing air. Density builds more uniformly than you would expect. Using a positive shutoff valve/nozzle on the end of the blowing hose prevents pipe clogging as you move from area to area. You rapidly get the feel of the density rising and can shut off the valve before the insulation starts packing in the hose.
We never added panelling to some of the walls in service areas, and can actually -see- and feel that the fill is still 100%, settlement and void free!
Legend is that frost will form in the cellulose as moisture moves through it and the outside gets colder, ruining the r value. Pack it dense, air will not move through it, moisture will not move through it. Dense dense dense. Also very flame proof since hot air or flames will not move through it.
Current recommendations are to pack deep cavities (2x8 and deeper) with minimum 4.2 lbs/ft3. That's pretty dense. This is the result from age cycling temperature and humidity in test walls.
https://www.researchgate.net/publication/245382436_Verification_of_Density_Predicted_for_Prevention_of_Settling_of_Loose-fill_Cellulose_Insulation_in_Walls
Jim, in a climate like Georgia, might you consider with the high humidity could you put you 12" oc inter wall to the outside wall, with metal strap corner bracing then your 6 mill poly film with 3/4 " air spacer wood siding straps. Drywall install on inside walls you be able to judge your density from an outside fill. Would maybe work off of a concrete slab house . Thanks everyone for sharing.....Richard
Sure, if it makes sense in your climate, the vapor barrier, filament reinforced poly could go on the outside. The key is to be able to see and feel the pack as you blow it, and inspect the entire fill before you hide it away forever.
Be sure to reinforce plastic under Staples with plastic banding or such, and use fiber reinforced poly so it won't stretch too much.
We have been insulating high R-value wall systems for a long time. Over the years we have switched from dividing all the bays to "pre filling" the walls at one pressure and then going back and "tightening up" all the walls by going back in through the fabric multiple times. I hear it when folks complain about not being able to find a good, competent installer for this type of work but once found it's a great wall assembly, simple, cost effective and it just plain works. On a number of houses we have compromised for what we call the "poor man's double wall" 2X6 conventional framing with horizontal 2X4s to make for a thicker wall with a thermal break. It's not going to provide the same performance as a thicker wall with a better thermal break but it's pretty darn good.
If cellulose is installed properly it will never settle as it's installed past it's settled density to begin with. Cellulose settles in the first 24-48 hrs not over a longer time so for loose fill cellulose we always talk about settled amounts. 16" settled=R60. Cellulose is a great material for many reasons but it just works and if it's installed improperly or there is a wetting incident due to some flashing failing etc. it can be repaired. It doesn't burn, work support mold growth, the mice and insects don't like it, it has a high recycled content and you could eat it (although I wouldn't recommend it) as pound for pound it's less toxic than table salt.
We use higher R foam board or spray foam only where the framing will not support cellulose and we need the higher R values that it can supply or in a situation where the cellulose will never get a chance to dry out. Cellulose can help manage moisture inside a wall cavity as it is hygroscopic.
We also use Rock wool batts, cellulose batts and low expansion foam.
I would much rather see rockwool batts used instead of fiberglass batts. I have seen way too many problems with fiberglass in the real world, outside of the lab where it's R value is measured, I wish it were banned to be honest.
Ok, time to pack away my soap box and get back to work!
JT
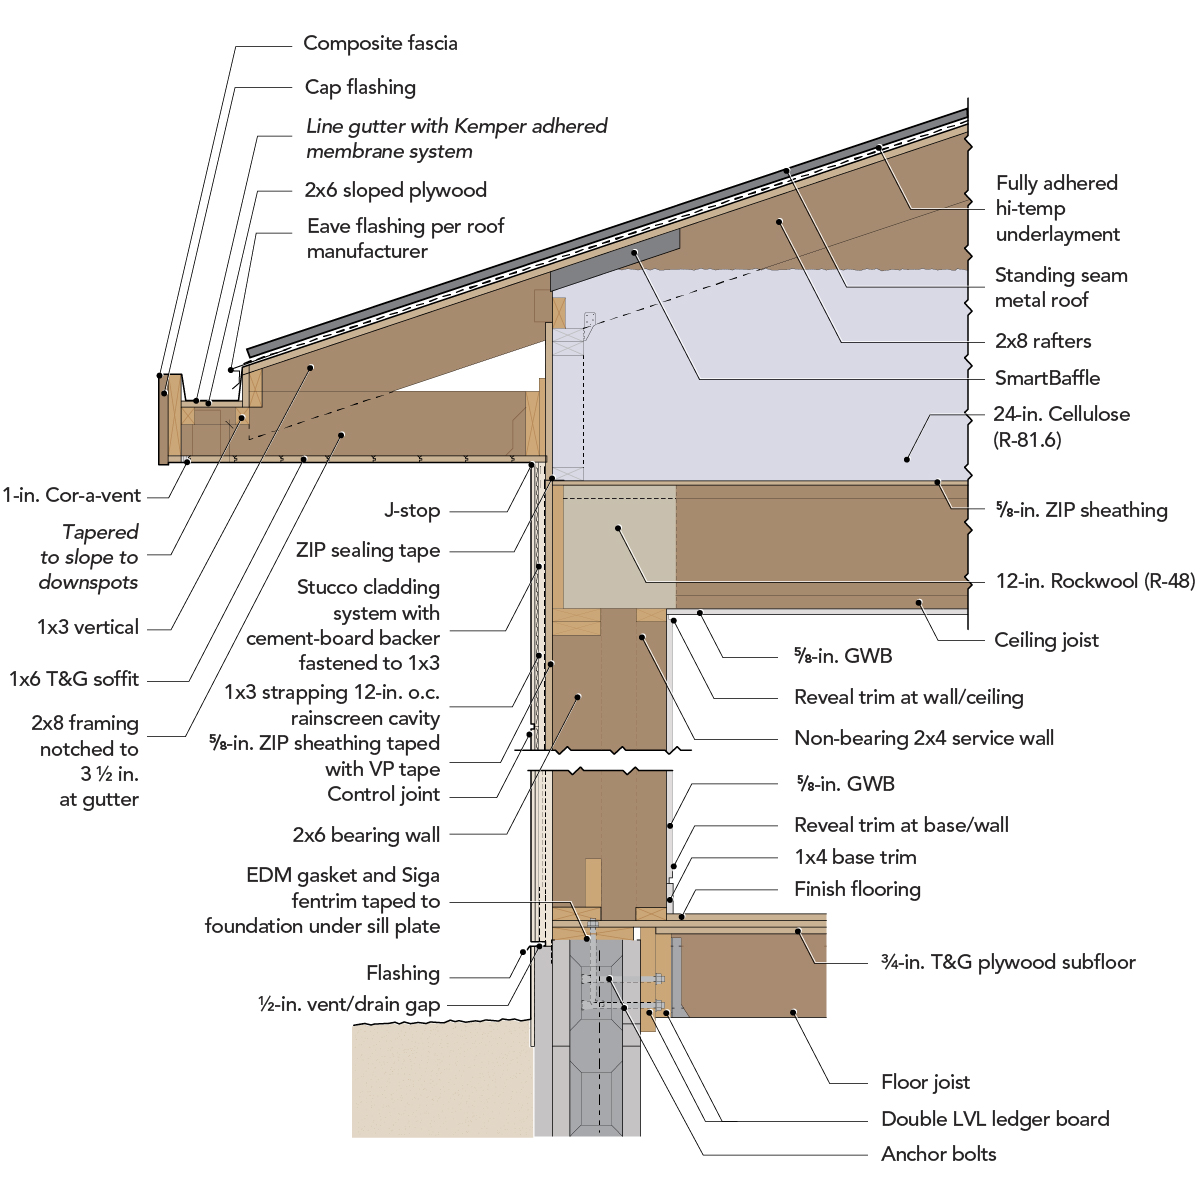
I am interested in the best interface between the double stud wall and the basement wall. Assuming we put 9 inches of rigid foam on the outside of the basement wall, how should we detail the area where the rim joist, the basement wall and the double stud wall exterior sheathing all meet?
Thanks for any insight.
Mr. Harding, Not sure if you have made a typo regarding how much insulation you plan to put on the outside of the basement wall. I am in CZ6 and I have found that 3" of recycled XPS over the full wall height has been quite effective at moderating the losses through the basement walls. I would have done 4" if a practical attachment method could be found. If for some reason you are planning on 9", it would be best to look carefully at the functional thermal value of such an extreme amount. Your basement wall will still be coupled to the ground temperature. The footing and rebar connections that tie wall and footing together make my basement hold at about 58F with no heat, which is about where I suspect the average annual soil temp falls. Having 3" of recycled XPS under the floor slab and a 1/2 break between wall and slab makes my slab temperature more moderate than the walls.
Still, where my basement walls are above grade line, they do not show much temperature difference from parts below grade thanks to having the insulation on the exterior face. I left behind a home with a "standard" foundation and wall insulation on the inside. The exposed wall above grade line would of course drop much closer to ambient outdoor temperatures and conduction would make the below grade parts much colder as well. While it may be argued that insulation on either side still faces the same Delta T profile, I feel the exterior insulation moderates the concrete in a way that makes the basement much more pleasant in this house.
As for how to detail the house above to the wall below, that will be very dependent on the thickness of the foam and how you plan to flash the house cladding and well as protect the foam where it is above grade (and below grade too). The cross section detail shown near the end of the article would allow for a similar thickness of foam on the foundation without much fuss. It would look odd to match the house cladding plane and not provide much thermal value to the foundation.
If you were to design and engineer the walls to use the inner wall as the load bearing wall, then you might be able to convince code people that a short cantilever of the entire floor deck that extended a few inches beyond the foam on the foundation is a good answer. That overhang would also be your between wall gap. The engineering considerations are way beyond my skills so look for others to chime in on this idea. It is sort of like a larsen wall and might fly. I suspect the rim board would need to be augmented with additional blocking between floor joists at the load bearing wall line. This much cut and paste work could make the idea very costly.
A few other things to consider when insulating on the outside of the foundation. Water primarily, then critters and insects. I chose to encapsulate the foam on my foundation with Grace bituminous adhesive material. Sticky, tricky to apply neatly, but pretty bomber once done. There has been much back and forth about water retention rates in XPS vs EPS which you can look up and think about. I just went with XPS for strength of panels and encapsulated to keep everything dry.
I delayed for a year before committing to finishing up the above grade portions with 1/2" steam shower rated Hardiboard, smooth face out. A convenient fluke of the flashing strips we folded up for the house to foundation transition, resulted in a nice lip to hang the board from. They hang close to the waterproofing material and the bottom edge rests in a bed of washed stone that forms the drain and splash band around the house. The thinking being that the Hardiboard will not sit in water and be at risk of freeze thaw cycling. So far, so good.
One of the alternatives suggested for protecting the Grace material was corrugated metal skirting which is popular in our area. I felt the profile would allow protected pockets for mice, bees and what not to establish residence. The flat Hardiboard sits pretty tight to the wall and has not shown any attempts by critters to dig behind it. Termites have only just begun to be seen near our altitude and climate conditions, so I am gambling that the rather thick goo holding the very tough plastic skin to our foundation foam will deter their activities. I did take the additional precaution of meticulously policing the cut-offs and trash around the house during construction to further deprive them of food sources. The Grace shield goes all the way to the footings which at the shallowest are down nearly five feet, so they will have a long dig to find an edge to sneak under.
I would recommend that you plan to go over the entire wall with foam to the footing for thermal reasons and for simplicity of detailing. I know some builders will suggest only going down a few feet below grade, but depending on your climate zone and the soil, below grade temperatures can drop much more than you think. Just imagine sleeping with the bottom half of your blanket cut off to get an idea of the thermal effect.
Attaching very thick foam will be a challenge. We used plastic shrouded nails, ram set with a powder charged gun. I will try to find the name, but the main trick will be limitations of depth options. Drilling and setting concrete screws is a very tedious option, but if you have the time and back for it, it may be viable.
Hope this helps in your thinking about details and the labor involved.
Have been considering what type of assembly to use for a possible addition and wondered if double 2x4 walls with 3-1/2" space in between and mineral wool batts might work well better than the fiberglass batt option mentioned -- presumably it would be much easier to install correctly and less prone to gaps.
Take at look at Lucas Durand's build here: http://ourhouseuponmoosehill.blogspot.com/
He's a contributor here and uses a double stud wall with mineral wool batts.
http://ourhouseuponmoosehill.blogspot.com/2012/10/the-joy-of-insulating.html
Timothy,
I vaguely recall having seen just such a wall arrangement. The batts between the two stud walls were laid in horizontally which I suspect would make the whole assembly pretty resistant to airflow. I have used the same arrangement of batts, but for sound proofing between a bedroom and bathroom. It does make things pretty quiet that way as the air gapping is minimized. Just be sure that using 2x4 studs for the bearing wall meets requirements for code and local conditions.
I have not used mineral wool batts, so I can't comment on how well they might support their own weight stacking edge to edge. The fiberglass varieties might prove too soft to stack unless you can set the two stud walls a bit under 3-1/2" apart. That way the studs will provide some grip. The studs I wove between were set "out of phase" so to speak which provide support every 8" overall. The batts in what for you would be the interior stud wall should provide additional friction between mid-batts and final batts.
Perhaps using R-15 material would enhance the friction effect over R-13. Listings show nominal thickness as 3-1/2" for both, but the R-15 might loft a bit oversize if you open the packs and let it "fluff" a bit before installing. If you get counter suggestions of just going with blown in cellulose, beware that finding a good installer that fills to proper density seems to be a country-wide challenge. Additionally, the membranes used to constrain the cellulose fill will typically be bowed out from the studs, so doing the drywall while fighting the bow can be a bit of a pain. I would not use less than 5/8" drywall to ensure flat walls, but that is just me speaking.
Timothy, that is exactly my plan for our upcoming build........Double 2x4 stud walls with 3 1/2" space in between the walls and using Roxul Batts to fill both of the stud bays and the cavity between the 2 walls. I am in CZ7 in NW Ontario and I am probably going to install a 1/2" plywood air and vapor control layer on the exterior side of the inside wall ( in that case center cavity will be 4" with the plywood layer taking up 1/2" and leaving 3 1/2" for the Roxul Batt layer.) I'm planning to erect the outer wall without the sheathing, and then erect the inner wall with the plywood air barrier installed. I will seal any remaining joints and gaps in the air barrier layer from the outside, since I will have access through my outer wall. I'll install my center cavity space insulation horizontally from the outside and then fill the stud bays of the outer wall and then install my exterior layer of 1/2" plywood sheathing, the house wrap and the rainscreen detail. My walls are just 10ft, so installing the exterior sheathing once the walls are up won't be that onerous. The bottom 2ft of the exterior wall could be sheathed I suppose before the exterior walls are stood up to help prevent racking of the wall before the remainder of the exterior sheathing is installed. Of course, if you build this wall without the air barrier in the middle of the wall, you can use other methods to get to the same end. The "inner wall" air barrier complicates the process.
John,
I don't know if you saw the links that Greg Houston posted (#18 above) to Lucas Durand's build using mineral wool batts. In later discussion Lucas said that in retrospect he would have sheathed the inner wall as you are proposing, rather than join the two with gussets.
Has anyone done a cost comparison for mineral wool Batts vs dense blown cellulose in s 12" wall?
Does mineral wool have less air convection/resistance to air circulation than fiberglass Batts?
Thanks for pointing that out Malcom. I'll read through Lucas' blog posts for a lot of pertinent, and I'm sure, extremely useful info for our situation. We are so close to him geographically here in the Kenora, Ontario area.
John,
Might be worth looking him up. he is a really nice guy and very generous with his time.
I wish he had kept his blog up. I'd love to see how the house turned out.
One of the biggest issues with fiberglass batt insulation seems to be convection currents. Even if fiberglass batts are installed meticulously with no air gaps, the relatively low density of fiberglass still allows air to move through it, allowing warm air on the interior side to rise as cooler air on the exterior side falls, creating a convective loop that increases energy loss through the structure. See attached image.
I'm curious if placing a higher density material like mineral wool in the middle would effectively limit this from taking place? Using the double 2x4 wall with 3.5" gap as an example, would placing 3.5" high density mineral wool in between two 2x4 walls filled with 3.5" low density fiberglass eliminate much of the convection currents?
Think about it; if the wall is filled with three layers of low density fiberglass, it's basically one large cavity through which air can move. Replacing the middle layer with high density mineral wool would drastically reduce air movement from the interior to exterior side of the cavity, essentially dividing the wall into three cavities. Now each 3.5" low density fiberglass "cavity' has only 1/3 of the wall assembly's temperature gradient across it, so only 1/3 of the convection energy with which to move air, and a much thinner cavity in which to do it.
Has anyone modeled this to test its effectiveness? Fiberglass is far cheaper than mineral wool, so a wall with mineral wool performance at near fiberglass cost would seem to me a pretty attractive proposition.
Lance,
Convective loops through properly installed fiberglass batts aren't as much of a problem as some spray-foam contractors claim -- especially if you choose to install high-density fiberglass batts (they exist). The main problem is that fiberglass batts are rarely installed properly.
Your scheme will certainly work, although the performance advantages are hard to quantify. The advantages may be small. But there is certainly nothing wrong with using mineral wool as you propose.
With any type of insulation, careful attention to installation quality makes all the difference.
Martin, of course the spray foam industry will exaggerate claims to their benefit, but that picture I attached is from Building Science Corp who state:
“Convective loops can form within highly air permeable insulation (low-density fibrous insulations) or small gaps around insulation (possible with rigid board insulation or improperly installed batts.”
https://www.buildingscience.com/documents/digests/bsd-011-thermal-control-in-buildings
The only common insulation that fits that description is fiberglass, as far as I know anyway.
By “high density” are you referring to higher R-value fiberglass batts? For a 2x6 wall we have three off-the-shelf choices around here; R20 (R19 installed), R22 and R24. R24 batts literally cost double what R20 batts do, with R22 not much cheaper. We also have R12 and R14 for 2x4 walls, and R14 costs almost as much as R20.
Lance,
Fiberglass insulation does, indeed, act more like an air filter than an air barrier. That's often problematic. But if you install fiberglass batts as recommended by the batt manufacturers, and if you have an adjacent air barrier, the batts will provide the R-value on the insulation label. (Among the many labs that have confirmed this fact are labs used by the Building Science Corporation. See, for example, this article: "Air Leakage Degrades the Thermal Performance of Walls." In that article -- a report of Building Science Corporation testing of wall assemblies with a variety of different insulation types -- I wrote, "If the walls were sealed and there was no air flow through the walls, all of the R-13 walls behaved the same. As Gertrude Stein might have put it, an R-13 wall is an R-13 wall is an R-13 wall. 'When the nominal R-13 walls are sealed and tested, they have the same heat flow, plus or minus 4%,” said Schumacher.'“They all perform roughly the same.'”)
On the question of high-density fiberglass batts, you guessed correctly: R-24 fiberglass batts for 2x6 walls have a higher density than R-19 fiberglass batts for 2x6 walls.
Thanks Martin! So I guess the key element then is eliminating air movement through the wall assembly to ensure the effectiveness of fiberglass. Fair enough, and makes perfect sense.
However, it must be pointed out that “plus or minus 4%” is still an 8% difference from best to worst. Not a huge difference, but a difference none the less.
I’m in the beginning stages of planning out my house build and I am very interested in building an energy efficient home. I’ve read on double stud walls, however I’m curious on thoughts of a product called Tstud?
https://www.tstud.com/
Wondering if anyone has heard of them as they are a new product. Wondering how something like this may stack up against a double stud wall?
Thanks in advance,
Dave
Dave,
They have come up a couple of times in discussions and Peter Yost did a blog on them:
https://www.greenbuildingadvisor.com/article/petes-products-tstuds
Malcolm, thanks for the link. Interesting discussion for sure. Several points brought up that I had not thought about.
I know this is an old thread but I’m just curious about how it effects moisture mitigation when you have 2 inches of exterior rigid foam and then 2” of closed cell foam on the other side. That’s essentially a double moisture barrier it would seem. If anyone doesn’t mind could you explain this detail of your go to wall for me.
As long as the sheathing is dry when you install it things should be fine. Moisture can make its way into the wall cavity, but will not condense as long as those exterior foam layers are thick enough to keep it over the dew point. There is no reason for moisture to accumulate in the wall, and as the inside is vapour-open, it can dry when the interior of the house is less humid.
Log in or become a member to post a comment.
Sign up Log in