
More Best Practices


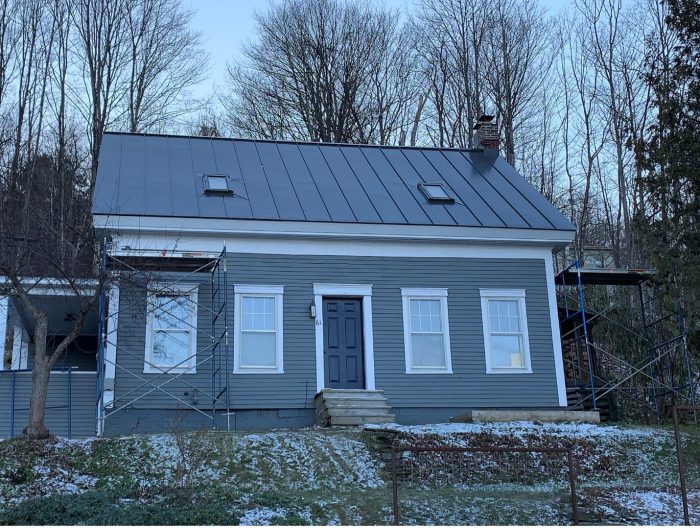
When it came time to replace the 30-year-old asphalt roof on my old Cape, I knew I wanted to address the ice dams and many icicles that formed every winter—sometimes nearly reaching the ground. When I bought the house back in 2007, I had done some basic weatherization and air-sealing (insulating the walls and rafter bays with dense-packed cellulose) but I knew the house was still leaky and we had only 5 in. of cellulose (R-17, at best) in the sloped sections of the roof, along with loose-fill cellulose in the flat of the attic.
To design a comprehensive roof retrofit solution I hired New Frameworks, a design/build firm located here in central/northern Vermont. I was interested in trying to retrofit the roof without using any foam, due to the embodied carbon and greenhouse gas emissions associated with foam, and I knew New Frameworks was experienced in working with a variety of carbon-storing materials. We landed on an approach using Steico wood-fiber board as continuous exterior insulation.
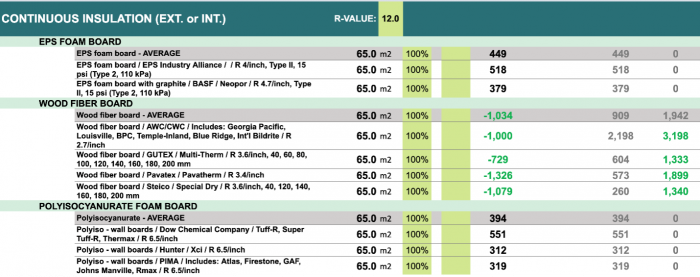
BEAM Calculator comparison of embodied carbon emissions of EPS foam board, wood-fiber board, and polyisocyanurate foam board
A rundown of the work
To start, they removed the existing shingles down to the sheathing (a plywood layer had been added above the original board sheathing back in the 1990s, when they last replaced the roof) and removed the existing soffit and fascia. A mason arrived to add 18 in. to the two chimneys, since once the ridge of the roof was raised, more clearance was needed to meet code. Once the demo was done, the crew focused on air-sealing—adding a layer of Solitex Mento 3000, a vapor-open water-resistive barrier (WRB).
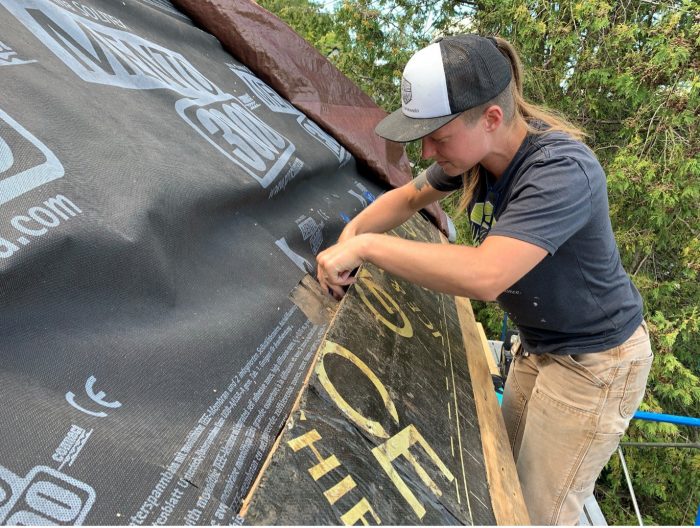
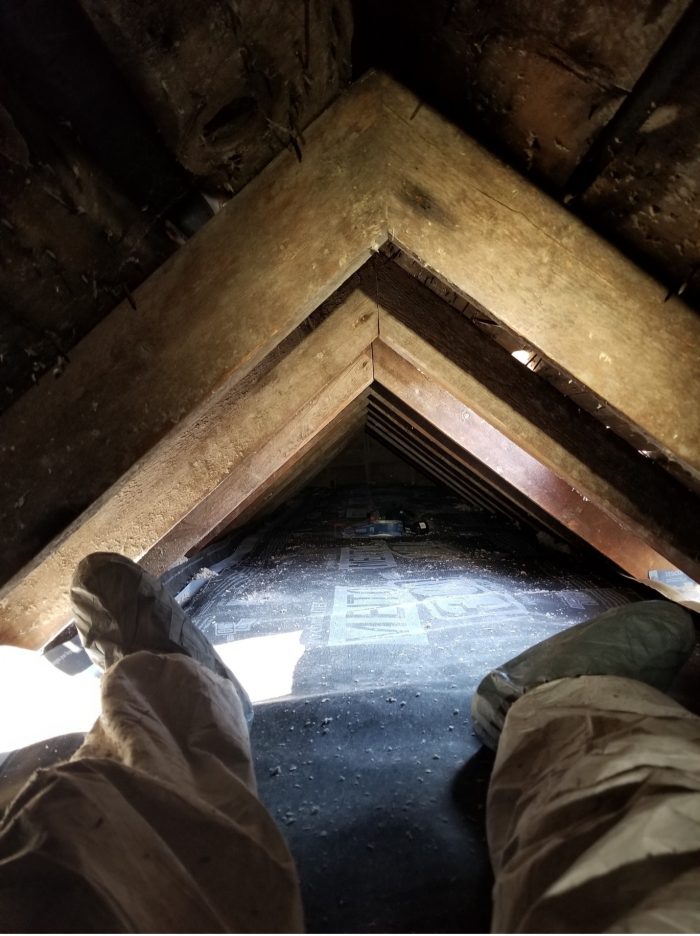
The Mento is taped to the top plate and the top of the wall’s exterior frieze board and in between the rafter bays, and is sealed to the frieze and sheathing on the gable ends. The Mento is fastened to the top of the sheathing; a horizontal slit was cut in the sheathing across the width of the roof on both sides and the Mento runs through the attic, above the loose-fill cellulose. Before taping together the two sides of Mento in the middle of the attic, the crew blew in an additional 10 in. of loose-fill cellulose and built a catwalk for working in the attic.
With the Mento in place, they added two layers of Steico Universal Dry wood-fiber board to the lower two-thirds of the roof slope. (It wasn’t necessary to insulate the section above the attic plane because there was cellulose there.) With two layers (40 mm and 60 mm, respectively—just under 4 in.), the Steico added approximately R-12 in continuous exterior insulation. On top of the wood-fiber board the crew added 2x4s on the flat to create a vent plane. They also had to furr out the 2x4s as much as 2 in. in places to even out a bow in the roof and ensure the new roof was level all the way across.
This was an opportunity to replace two 30-year-old skylights with new operable triple-pane units from Fakro, a Polish manufacturer distributed in the US by 475 High Performance Building Supply. This involved building out a new plywood buck above the sheathing and new interior trim since the skylight well inside ended up about 6 in. deeper than before.
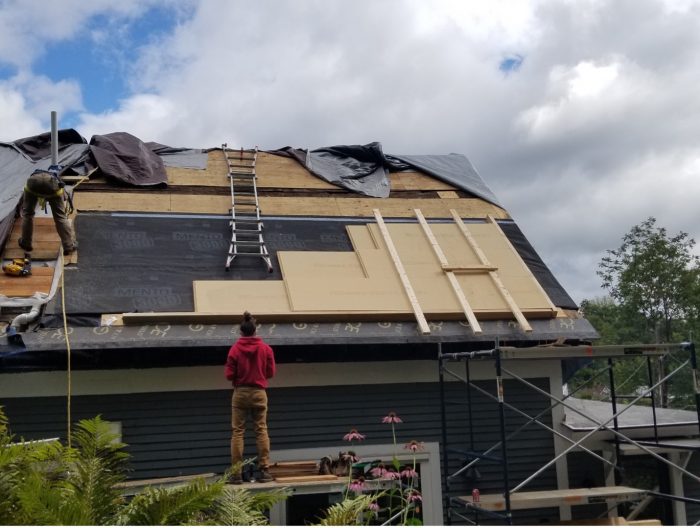
The new thickness of the roof also required a 6-in. thicker fascia profile, and they replaced the soffit and added a soffit vent.
Once the insulation was installed, they added a second sheathing layer of 1/2-in. plywood over the 2×4 sleepers with a layer of roofing felt. Then the new skylights went in, and the roofers could finally install the standing-seam metal roof.
The results
Once all the trim was complete, we ran a blower-door test and learned the work had resulted in a 10% reduction in air leakage. The project finished up just as the first snowfall of the year arrived. After the first winter with a nice thick roof, I can happily report there were no ice dams.
Additionally, choosing wood-fiber board over EPS or polyiso proved effective in terms of keeping the project’s embodied carbon down. The continuous insulation covered approximately 700 sq. ft. Using the BEAM Calculator, I found that the wood-fiber board stored 1079 kg CO2e compared to polyiso, which would have emitted 394 kg CO2e, or EPS, which would have emitted 449 kg CO2e.
That one choice in materials saved close to 1500 kilos of carbon, in addition to reducing the heat load of the house, and its associated operational carbon emissions. Objectives met.
_______________________________________________________________________
Kate Stephenson is CFO/COO at Helm Construction Solutions. Photos courtesy of the author.
Weekly Newsletter
Get building science and energy efficiency advice, plus special offers, in your inbox.


16 Comments
Great project, Kate! Any chance you would be willing to share the construction details? I'm a big fan of foam-free retrofits and this one turned out looking great!
Hi Josh,
I'm hopeful the nitty-gritty details of this project will be fleshed out in the print pages of FHB. Fingers crossed.
Thanks, Kiley. In that case I shall wait patiently and look forward to it!
Hi Josh,
Yes, we are happy to share, and when I looked back at the CDs I realized there are a few aspects that we tweaked along the way so the drawings don’t exactly represent what was built. Mainly the difference was that we didn’t cover all the roof sheathing with Steico wood fiberboard, we only insulated the sections where it would actually make a difference, the bottom two thirds, and not over the overhangs. But this detail should at least give you a sense of the layers. Hopefully if it goes to print in FHB we can tune up the drawings.
Thanks, Kate. Fingers crossed this will make it to print!
Thanks for sharing Kate! The final product looks great. We too are fans of reducing the foam wherever we can. Getting into the details a bit more, were the roof cathedral cavities already insulated, empty or did you add insulation? Also is there any vapor control in the roof assembly or did you go with a vapor open approach? Finally, are the BEAM calculations you shared comparing the insulation only or the total assemblies? Thanks for sharing your project, it prompts great discussions.
Hi Jesse,
The rafter bays were already insulated with dense pack cellulose from our 2008 weatherization work. We topped up some of the bays around the skylights where there were voids. The rafters are only about 5" deep and there was no venting.
The Mento is vapor open and is the only really continuous control layer. The BEAM calculation was just looking at Steico vs polyiso but we did not look at the other materials in the assembly. Once BEAM is fully live (soon!) I will be curious to play around with it a bit and look at things like the carbon impact of standing seam vs. asphalt shingles.
To end up with something effective that also looks that good is a great result all round.
Hey Kate!
where did you get the Steico fiber board? I'm looking to do something like this before I put solar on our house
BEAM tool looks great too! nice Embodied Carbon improvement.
Andy
Hi Andy!
They sourced the Steico through Global Wholesale in Maine.
We're looking forward to GOlabs plant in Maine which will be producing wood fiberboard, maybe starting sometime in 2023...
Is it possible to include a "before" photo? The photo that's in this article was when the work was already underway. Thanks.
Hi Ben,
Here are a few before photos. If there's a particular detail you'd like to see let me know. I have a TON more photos.
Kate
Hi Kate-
Thanks for sharing this, great project, sounds like its performing well and still looks historical appropriate.
I’m curious, what was condition was the existing cellulose in when you opened up the roof?
Do you have a cost comparison of the wood fiber vs. foam? Sad to say that for most homeowners I deal with that is their first question.
- Jud
Hi Jud,
I was not up on the roof to see the condition of the cellulose first-hand in the couple of spots where they pulled the sheathing. I didn't hear about any issues other than some gaps where there wasn't any cellulose (below the skylights in the bottom of those two rafter bays since they originally blew the cellulose from above in the attic) and there was some evidence of condensation on the interior of the sheathing, but not wet cellulose. (We did also end up putting in an HRV this winter to try to mitigate the high humidity inside).
I don't have good numbers for the cost comparison between the Steico and foam. I can try to dig that up.
Glad to hear no damp cellulose, I guess its pretty resilient stuff. Ive got a roof with 10" of dense pack and 3" of foam on top, it has worried me for the last 12 years, but hearing the condition of yours I think I can stop worrying.
What do you think is or was causing the high humidity inside?
How are you heating the house?
Just curious as to what year it was originally built?
Hi Jud,
The house was built in 1876. We have a wood stove which is our primary heat and an oil fired furnace which we try to use as little as possible (we burn about 3 cords of wood and 100 gallons of oil a year). The high humidity I haven't totally figured out. We have a lot of houseplants. We cook a lot (but are pretty religious about using the range hood). Our basement has never been dry (it's built directly on sloping rock ledge and when it's raining water definitely flows through but doesn't stick around). A few years ago I retrofit Stego wrap (15 mil plastic) on top of the ledge and up the dry stone foundation walls to try to reduce the humidity (now that's a whole other GBA article waiting to be written...). It has helped somewhat but we still run a dehumidifier pretty much 24/7 in the basement. Ahh, the fun puzzles of old houses...
Log in or create an account to post a comment.
Sign up Log in