
Image Credit: All photos: Kent Earle
More Guest Blogs


Editor’s note: Kent Earle and his wife, Darcie, write a blog called Blue Heron EcoHaus, documenting their journey “from urbanites to ruralites” and the construction of a superinsulated house on the Canadian prairies. Their previous blog on GBA was called Let Construction Begin. The blog below was originally published in June 2015. (A complete list of Kent Earle’s GBA blogs is provided in the “Related articles” sidebar below.)
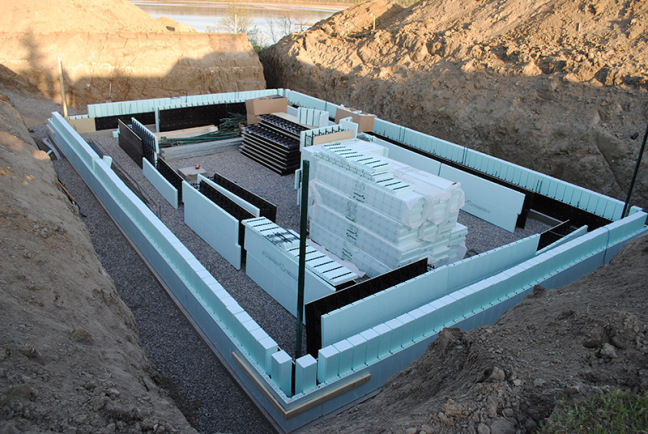
While we attempted to work out the problems with site work, the foundation work continued to move forward. I wrote earlier about our decision to use the Nudura One Series of insulated concrete forms (ICFs). We were quite excited about this product for a number of reasons.
First, basements are generally boring. By using this system of ICFs we could have a finished interior wall of concrete immediately, which would look aesthetically pleasing and be something of interest, something unique, for our basement. No need for any extra framing and drywall.
Second, in terms of energy efficiency, this system should perform better than conventional ICFs. With this system, you are not insulating the walls of the basement from the house itself. (Standard ICFs and standard poured-concrete basement walls have insulation on the inside and cannot get any benefit from the thermal mass of the basement walls.) Since we have a huge thermal mass in the walls and floor of the basement, the concrete can store a lot of heat (heat collected from sunlight or simply added by the in-floor hydronic heating system) to radiate to the rest of the house — essentially functioning like a giant battery.
The forms were delivered about a week before they were needed. There was an incredible amount of insulation that was stacked in the shop. And the day following our stresses with the septic system, Taylor and Curtis got to work building the basement forms. They had budgeted about four days to get the forms up and one day to pour. “ICFs go fast,” they said.
Nudura forms are slow going
But not these ICFs. This basement was a massive pain in the ass. After one day, the guys only had one of seven rows done. There was no simple way to attach the forms and keep them locked in place. You see, with standard ICFs, the blocks are basically like Legos. There are little grooves on the inside and outside that line up and attach to the corresponding little plugs on the other block. Snap snap snap — it goes together. Easy.
Assembling Nudura forms was not easy. The little Lego grooves and plugs were only on the outside of the blocks, not the inside, as the plywood slabs simply butted together, creating big seams and gaps. (Wouldn’t tongue-and-groove plywood have made sense, Nudura!?)
Frustrated at the lack of progress, Taylor called the Nudura sales rep, who came out to the site. Amazingly, he had never seen the Nudura One series before. Like, never ever. As they all worked together to try to troubleshoot this problem, they eventually decided to call the technical support team at the head office in Ontario, Canada.

They suggested making 2×4 L-brackets to support and anchor the forms. (Uh, that’s part of the plan?) Oh, and as for the gaps in the plywood — where concrete would completely burst from when pouring? Well, just use Tuck tape, they said. Tuck tape!?? (I suppose it’s slightly more classy than using duct tape.) Jeez Louise.
Unfortunately, after building a bunch of the 2×4 L-brackets and bolting them onto the forms, the carpenters realized that this was not going to work at all. These brackets did nothing. If anything, they made the problem worse by pulling the forms further inwards, causing even greater warping of the walls. Thanks for the “technical support”!
(You’d think they’d never sold this product before. We later found out that they had never actually used these forms in a residential application.)
Over the following four days, Taylor and Curtis grudgingly put the forms together and stacked them higher and higher, eventually reaching the top, at 10’6″. They put an absolute ton (perhaps 2 tons) of rebar in the ICFs, both vertically and horizontally, to reinforce the high walls and provide the structural support for the beams, joists, and double walls that would sit upon the foundation.
Seeing the forms go up was pretty exciting, but just don’t look too closely or right down the line of the wall…
Because that ain’t straight.

I have to admit, I was more than a bit worried. I wondered, how the hell were they going to straighten these walls?
Taylor and Curtis had also eaten through their projected timeline and still had to try to straighten the walls. After four days, the walls were not even stacked, let alone straight and ready for concrete. Over another three days, all they did was straighten and adjust the walls, using large bracing and strapping to make them level, straight, and even. When Taylor finally told me they would be pouring concrete the next day, I had to run over and make sure.
Praise the Lord! (This whole process is making me become very religious, it seems.)
The following day, the pumper truck arrived, pumping a buttload of concrete into the basement walls. Now was the real test of the untested Nudura One walls and the MacGyver skills of the build team.
I was nervous that day at work, just waiting for the phone call from Taylor explaining that there had been a catastrophic failure, when the walls of the forms burst under the pressure of the concrete, causing the walls to break apart and concrete to fill our basement.
But that call didn’t come. Relieved, we drove home at the end of the day. The walls were still standing and they were filled to the brim with concrete!
The next day we would pull the plywood off and see what magic laid beneath.
P.S. Nudura has offered to cover at least some of the extra time of the build team for Research and Development of the Nudura One series.
Concrete wall reveal
The day following the placing of the concrete, we were ready to pull off the plywood forms and see what lay beneath. Leaving the plywood on for more than a day would cause the plywood to adhere too firmly to the concrete and make the sheets extremely difficult to remove. We were a bit nervous. We had been pegging a lot on how these walls would turn out — they would be, after all, our finished interior walls — so I really hoped they wouldn’t look like crap.
First we had to remove all of the exterior bracing that the builders had spent four days installing, tweaking, leveling, and straightening.

They had done a great job. The walls were perfectly straight and square.
We started unscrewing the plywood forms, and — cha-ching!
They looked frickin’ awesome!
As we removed the forms, I had to chuckle, because the builders, who had for the previous week been cursing the Nudura One system, said (as they saw the finished look) that they would “use it again.” I guess that, from time to time, looks do make up for a bad personality.
We spent about two hours removing all of the forms. As we got towards the base of the floor, we crossed our fingers, hoping that it had all settled nicely to the bottom without any “honeycombing” of the concrete that would need to be parged. Impressively, it looked excellent all the way from top to bottom.
Weekly Newsletter
Get building science and energy efficiency advice, plus special offers, in your inbox.


12 Comments
Blue EPS
When I first saw the thumbnail photo I thought all the blue was Dow XPS, but I'm relieved to learn that it's really EPS (which has a much lower environmental impact than XPS, with the current products in the US).
I like the concept of one-sided ICF and am glad to see that it worked well. It does make better use of the thermal mass than splitting the insulation equally between both sides. But it's not quite true that "standard ICFs and standard poured-concrete basement walls [that] have insulation on the inside ... cannot get any benefit from the thermal mass of the basement walls." They get less benefit but it's not zero. How much less depends on what you are using the thermal mass for.
Charlie - I had the same
Charlie - I had the same concern.
Kent - congrats on preserving. How much EPS is in the outside and what have you calculated your R value to be? Also, is there a thermal break under the footer and what are you planning for under the slab?
Ants?
I'm now obsessed with the idea of ants eating through buried foam. Has this been a problem as this idea been addressed? Now that we know more about ants, would the foam be installed in the smae way today as shown here?
More efficient than ICFs with foam on both sides?
I'm not following the reasoning that supposes that the bare concrete wall interior will outperform an ICF with foam on both sides. The concrete will conduct the heat right into the ground at the bottom will it not? Double-foam sided concrete would at least slow this heat conduction somewhat. No?
Traditional ICF Performs Better
Traditional ICF will perform better than the interior concrete exposed version on display here. The Nudura One forms have 2 5/8" of exterior EPS foam and that's it. That equates to R-11 while the traditional ICF forms have 2 5/8" exterior EPS and then 2 5/8" interior EPS foam. That equates to R-21. So R-11 is R-11 and R-21 is R-21. That's the truth and reality of it. The basement here is R-11 and that's a lower R-Value than R-21 if he had gone with the traditional ICF forms.
In addition, as clearly noted here, the Nudura One forms are RARELY used as their application is basically 99% commercial use and very limited use even in commercial use. They use it for elevator shafts and commercial projects like that. Even Nudura doesn't sell that many of them, as noted in the article, if they do it's 99% commercial.
The traditional ICF would have performed better here. It would have been easier to install, less labor costs, it would have insulated better (basically double the R-Value @ R-21), allowed for easier drywall finishing due to the attachment strips, provided a chase for electrical and plumbing and cost would be a lot less .
Response to Peter L
Peter,
I agree with your analysis. I wonder whether Kent Earle has plans to install any additional exterior rigid foam on these basement walls, since the walls have a low R-value.
[P.S. It turns out that I was wrong. These foundation walls have a much higher R-value than I thought. See Kent Earle's clarification in Comment #8, below.]
According the the 2012 IRC, a basement wall insulated with a continuous layer of rigid foam must have a minimum of R-15 of continuous insulation in Climate Zones 5, 6, 7, and 8.
Martin Holladay
Martin,
I believe the homeowner is in Climate Zone 6 maybe Zone 7. So I am not sure how he got away with just R-11 basement walls? In the end it wouldn't surprise me that they decided to frame out the basement walls and install more insulation and then drywall. All of which adds more expense but traditional ICF would have just been easier and better to do upfront.
Like I mentioned, Nudura and their reps all state that Nudura One forms are meant for commercial use where the exposed concrete is warranted and extra insulation is not needed. I've seen them used for elevator shafts since the inside of the shaft can be raw concrete and doesn't need insulation while the outside EPS rigid foam provides a conduit chase and drywall can be easily attached to it.
With raw exposed concrete you can't run electrical or plumbing without furring out the walls with framing. You also don't have an easy finished surface to work with.
Photos and under slab
Here are a couple photos that show the 8" of EPS a bit better.
Jonathan:
We installed a void form under the footer as a thermal break. The under-slab insulation is 7.5" of EPS, which is about R29.
Below-Grade R-value is 30.8
Peter and Martin:
The Nudura One series offers all levels of thickness EPS. We went with the maximum available which was 8" - this is an R-value of 30.8 for the below-grade walls. The last two pictures in the post only show the one layer of outer foam (which I believe is what Peter is referring to) that the racking system of the plywood attaches to. However there is an another interior layer of EPS that is about 6" thick throughout - if you look closely at the first photo this is shown (the other photos don't show this so I can see where the confusion and concern occurred!).
The walls are 16" thick both below-grade (8" of concrete and 8" of EPS) and 16" thick above grade (R56 with dense packed cellulose, as noted in our previous post on GBA).
Ethan:
I have not considered ants before! However the foam is entirely wrapped afterwards with a "blue skin" moisture barrier... That would take some seriously resourceful ants to get through it I think.
Response to Kent Earle
Kent,
Thanks very much for your clarifying comments and further photos. I'm glad to hear about the 8-inch-thick rigid foam.
what is a void form?
what is a void form?
Void forms
Void forms are cardboard boxes placed under concrete when you have expansive soils. They eventually rot out, leaving the concrete suspended above the dirt so that the expansive soil can't crack things when it gets wet (or dries out). Kent's house sits on ~ 24 micro piles so he doesn't really have footings as much as he has structural concrete beams that sit on the piles and, spanning the gap between piles, hold up the walls above. Search with Google "void forms"! Kent's floor isn't on the void forms as far as I can tell, so they could move, but the foundation won't crack if they do. You can also check out his blog - more pictures.
What I worry about is the ~ 1" gap between the 6" blocks of foam. Does the concrete get in there making a thermal bridge?
Log in or create an account to post a comment.
Sign up Log in