
Image Credit: Carri Beer and Michael Hindle
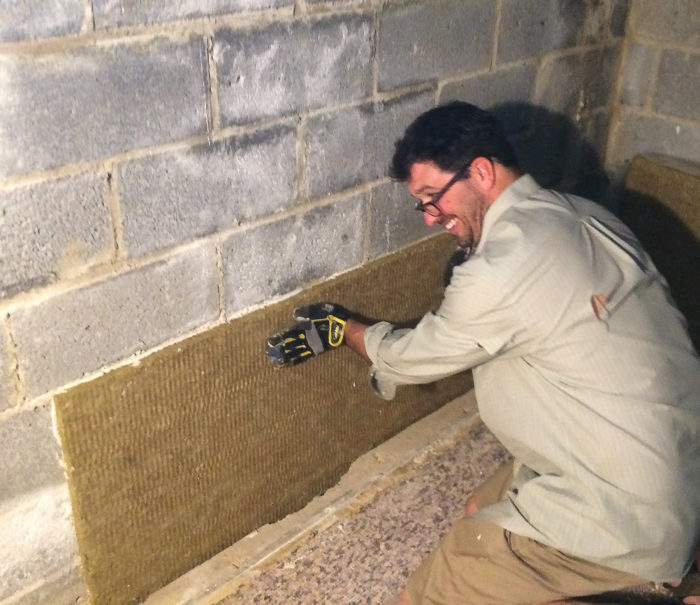
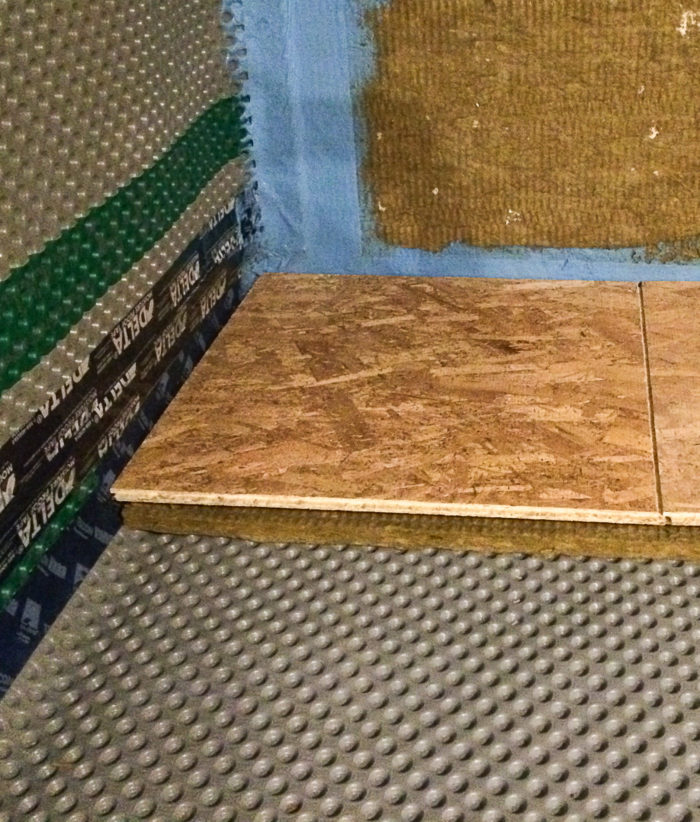
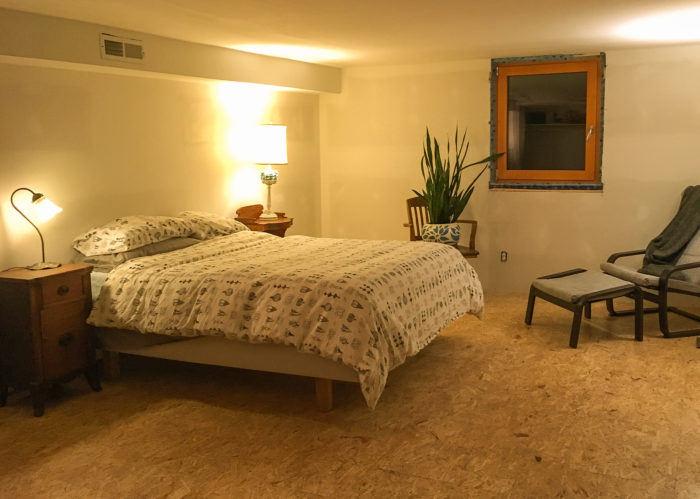
Image Credit: Carri Beer and Michael Hindle Sealing the band joist without using spray foam was a challenge. We used one of two types of a liquid-applied sealant over mineral wool. Tile mortar proved to be a successful way of bonding RockBoard mineral wool to block foundation walls. To seal the basement slab, start with a layer of dimpled Delta membrane, add 1 inch of RockBoard mineral wool insulation, and finish with DriCore subfloor panels. When sanded and sealed, the OSB top layer of the DriCore becomes the finish floor. What once was a damp and unappetizing space is now warm and comfortable, with high air quality and no insects.
More Guest Blogs


Editor’s note: Carri Beer and Michael Hindle are renovating a 1954 house in Catonsville, Maryland. Hindle is a Certified Passive House Consultant and owner of Passive to Positive. Beer is a registered architect who has been practicing sustainable architecture for 18 years. She is an associate principal with Brennan+Company Architects. For a list of the couple’s posts, see the “Related Articles” sidebar below. This post was written by Carri Beer.
As we noted in our earlier blogs, we’re not fans of finished basements. However, because our newly purchased home came with a fully finished one, including two bedrooms and a full bathroom that were necessary for our family, we had to take it on.
Our daughter refused to sleep in her room after the first few months of moving in. She had chosen the downstairs (basement) so she could have her own bathroom. We captured about six house centipedes on average in her room every night. The last straw was when she found one on her toothbrush.
She was 12 at the time and needed her room to be bug-free. Heck, I needed it to be bug free.
We set out to make the basement a healthy, water-tight, comfortable, bug-free, and, yes, foam-free Garden Level. To say it was a challenge is an understatement. How many times did we look at each other and say, “Oh my god, why are we doing this the hard way?” A lot. Like, really, a whole lot.
Deconstruction and planning
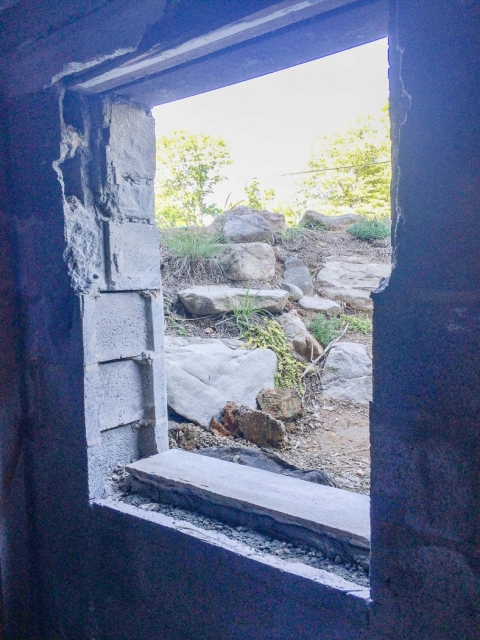
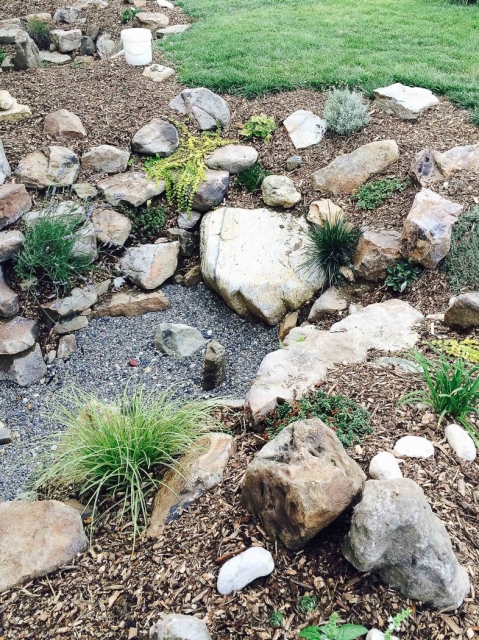
Bugs were not the only reason for the retrofit. The bedrooms lacked legal egress and daylight and were not at all comfortable. Enlarging the windows was the easy, straightforward part. Or could have been. We didn’t want just any old plastic window well, we wanted a natural boulder garden that emerged out of the ground and flowed into the landscape.
We hired a landscape contractor to dig the holes and set the boulders. We learned how hard it is to express to contractors that you want them to do something that is expressly not like everything they have been asked to do on a typical suburban residential project. Zen boulder placement was not specifically written into the scope of work or on construction drawings, and we’re not sure it would have mattered if it had been.
Once the holes were well underway, we discovered the drainage we expected to tie in to was not functioning, at which point we were hit with one of the worst downpours of the year, lasting for several days solid. Buckets. Flashlights. At night. We had to supervise the crew to be sure they sloped the window well bases away from the house and had them dig dry wells and trench drainage to lead water away. The contractor was incredibly diligent and worked through the rain to ensure we would not end up with a catastrophe.
When it came time to create the boulder gardens, the sun broke through. We discussed the intention and showed lots of pictures. Ultimately the contractor set, and reset, the boulders and ultimately we reset most of the boulders again. (Thank goodness for that old VW TDI Golf and some rope.) Ultimately it’s beautiful and unique, and looking out from the downstairs bedroom is like looking in to a mini Zen garden.
Enlarging the basement windows
We found a mason who did a quick job of enlarging the tiny basement windows into 36-inch by 42-inch openings for our new windows (keeping the existing width and steel lintels in place). He also busted a large opening from the laundry room into the main, central family space, allowing light to spill in from the southern, walk-out exposure.
The window openings remained plywood-covered holes for nine months while we placed and then waited for our new window order (that’s another fun story) to arrive from Europe. During that summer we experienced two major floods caused by improper grading around the house and the lack of proper water management from the roof dumping several inches of water directly into the window wells and spilling through the plywood openings, dumping several inches of water into the basement. These floods guided our exterior grading and interior waterproofing decisions (and sped up the deconstruction process).
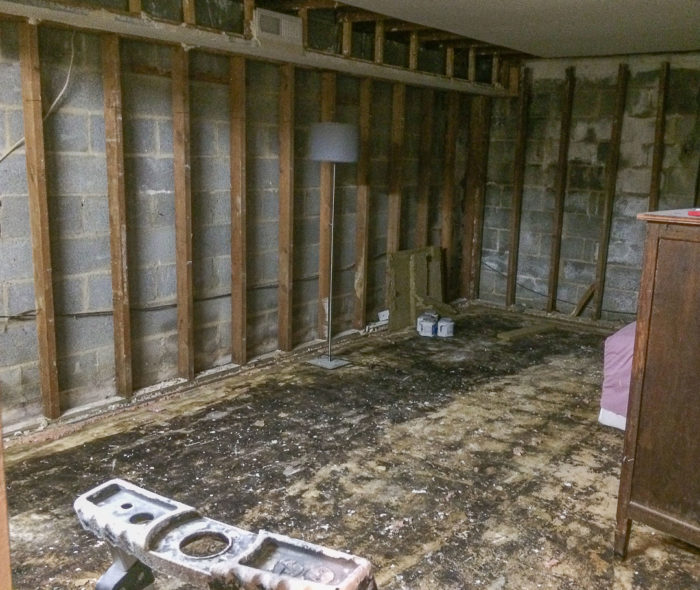
During deconstruction (even before the floods) we verified what we had assumed: what we were doing was necessary to protect the health of our family. Behind the drywall, at the base of the stud wall, we discovered mold, dampness, and rotting sill plates. There was mold on the baseboards (hidden by carpet); the interior surfaces of the concrete wall were damp and showing efflorescence. There was just a general nasty smell in the air. You could see the air infiltration blowing the spider webs. We also found a 3½-foot-long snakeskin inside one wall, and a smaller, but very much alive, rat snake.
The two bedrooms and bathroom were the focus of the first phase of the retrofit. We have four different exterior wall conditions that we had to resolve in four different ways. The bathroom/laundry was a fully exposed, south-facing block and stone wall; in the southeast bedroom, one wall was a concrete block wall adjacent to an unconditioned crawl space; the east wall of both bedrooms is partially exposed and partially below grade; the north wall of the northeast bedroom is fully below grade.
We also had to come up with a solution for the uninsulated slab that had carpet directly on it. Whenever I picked the cotton beanbag chair up from the floor, it would be wet from moisture diffusing up through the slab — never a good sign of healthy indoor air quality. The floor-to-ceiling height is only 7’0″, so we had to be judicious with our floor insulating and finishing decision.
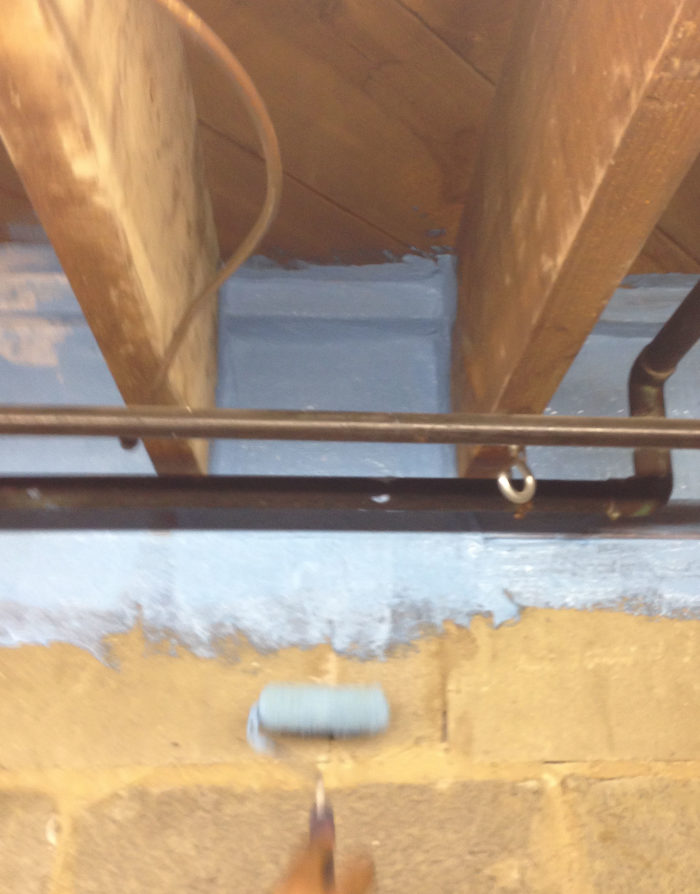
And air sealing: How do you seal that darn rim board area without using foam?
The solutions
Michael calculated condensation plane temperatures to inform the appropriate use and location of materials within the new wall assemblies. Ultimately, we applied a lot of gut intuition. One goal was not only to do this foam-free, but also to use readily available materials in a straightforward manner.
We discussed opportunities with manufacturers to test their products in new ways and find new foam-free methods. We had to shelve those plans, mainly because they didn’t seem to be leading toward affordable, replicable solutions. So we set about using materials that were familiar to us.
All existing, uninsulated interior stud walls were demolished to expose the concrete block surface. On all concrete surfaces, our rigid insulation of choice was Roxul RockBoard 60 or 80; and we used a combination of Knauf EcoBatt and CertainTeed and Owens Corning’s version of EcoBatt for the furred-out stud walls.
Our impermeable drainage material was Cosella-Dorken Delta-MS. We used both SIGA and Pro Clima membranes. Despite the use of various tapes for testing purposes, our tapes of choice in all applications have been the Pro Clima family of tapes.
Fully exposed solution
On the exterior wall in the bathroom/laundry room we installed 2 inches of RockBoard and a layer of taped Intello, followed by batt insulation in a 2×4 frame wall. How did we adhere the RockBoard to the concrete block, you ask? We used acrylic modified tile mortar — we even found one that had a cute little green leaf on it, marking it as eligible for LEED credits. It was like icing a cake: It took some time, but even the kids could do it, and ultimately it felt like a pretty good solution.
Crawl space solution
This setup is a little confusing and we often wonder what, if any, purpose this space served in the house. It is essentially an above-grade concrete box that is below the concrete walkway to the side entry of the main level. At one point in its history there was a sump pit and a wall vent. Now, it’s just wet and scary.
The walkway above is cracked so water leaks into this space, making it damp. We lined the walls with 4 inches of Roxul and we will insulate the concrete ceiling and slab once we’ve resolved the water issues from the exterior. Eventually, we would like to plaster the wall and ceiling insulation and put a subfloor down. Our end goal is to make this a survivalist pantry, or maybe a cozy reading place for the kids.
Partially exposed solution
This is probably the most critical wall as it is exposed to outdoor temperature fluctuations and is more susceptible to ground water and stormwater. We applied 2 inches of RockBoard, then hung the Delta-MS dimple board over that, taping all the seams. We then rebuilt our 2×4 frame wall (using salvaged wood from the original construction) set off 1 inch and filled the bays with 5 1/2 inches of EcoBatt insulation.
In this sequence, the Delta-MS becomes the first condensation plane in the assembly. If it were placed against the concrete, as might be considered a more conventional approach, this membrane would be below the dew point of the interior air during the winter. Since this is a retrofit and we did not do a full gut, achieving anything like Passive House levels of airtightness is very unlikely. Therefore, we cannot rule out air exfiltration carrying warmer humid air into the interstitial spaces, which could lead to condensation within the wall if our condensation plane temperatures are not managed.
The 2 inches of Roxul raise the surface temperature of the Delta drainage layer to safe levels, avoiding condensation of interior air. Of course, one could rightly point out that for the below grade portion of these walls, there will be a perpetual inward vapor drive, and we have now moved the condensation plane for inward drive towards the middle of our wall. Correct! However, mineral wool is vapor-open, and is not harmed by water vapor, so the water will pass through as vapor without saturating the rigid insulation, at which point it could condense against the HDPE of the Delta.
Since the surface of the Delta is dimpled, droplets of condensation can safely drain away without saturating the mineral wool. The durability and the R-value of the mineral wool should not be affected at all. But now one might say, there is liquid water collecting at the base of our wall. Correct again, but it just so happens that there is a gap between the slab and the foundation walls, just wide enough and deep enough to safely drain away any such condensate to the gravel below the finished slab.
We are guessing when the house was originally built in 1954 someone was perhaps thinking along the same lines and created this perimeter trench. On the west side of the basement, a perimeter drain was installed by the previous owner. We tucked the Delta into this gap, directing the water away from the wood structure (which was built on top of horizontal insulation and its own layer of drainage mat. (See the “Slab solution” paragraphs below.)
Fully below-grade solution
This wall was probably the easiest to resolve as its outside conditions are relatively constant and it showed very little evidence of moisture. It is fully protected by a 5-foot-deep, concrete porch covered by a deep cantilever along the front of the house. This wall has 1 inch of RockBoard, a layer of taped SIGA Majpel, and the reconstructed 2×4 wall insulated with EcoBatt.
Slab solution
We removed the stinky, damp, cat-pee carpet and pad that were only four years old, and laid taped Delta over the slab. We tied this layer of Delta into the layer of Delta on the wall to create a completely sealed watertight inverted bathtub. We then laid 1 inch of RockBoard 80 and finished it with 24-inch-square DriCore subfloor panels.
Perhaps we didn’t necessarily need the extra Delta below the DriCore, but for the DriCore to be truly watertight we would have needed to seal all the joints, which sounded even crazier than what we are willing to take on. With the two major floods we had suffered in the course of the project, we figured this extra layer wouldn’t hurt.
The DriCore panels are a bit pricey, but the OSB that is used in the panels has a pretty cool look. We sanded and sealed the OSB panels with ECOS wood varnish to serve as the finish floor. After installing the floor panels in the first room, we decided to add furring strips at the insulation layer to stabilize this floating floor system a bit more. Ultimately, we lost 1 1/4 inches in ceiling height. We gained only R-6 or so, but the improvement to comfort is very noticeable. And no more wet beanbag chairs.
Air-sealing solution
This is one of those places where spraying some foam between the floor joists at the band-board would have been a quick and easy solution. But we are sticking to our guns on a no-foam deep-energy retrofit. We don’t want the stuff in our house and this allowed us to find alternatives. We had CivicWorks Baltimore Center for Green Careers, a local green job training company for Baltimore residents, come in and do all of our air sealing (and get some unique training). The method we developed for insulating and air sealing the band-boards, as well as the top plates of the walls in the attic, was a true collaboration.
Our initial idea was to block between the joists with mineral wool and apply Delta Liqquixx , a blue acrylic and gauze product to seal the mineral wool and thereby creating an insulated and airtight band-board. Liquixx, however had not yet launched in the U.S. market, so our supplies were limited.
CivicWorks is well-known for their cool-roof applications on rowhouses in Baltimore. They use fabric and white acrylic in multiple layers to achieve watertight cool roofs to cut down on the heat island effect and save cooling energy. One of their guys suggested using their cool roof material to seal the mineral wool in the band-board. It was something they were familiar with and could obtain easily — and at a lower cost than Delta Liqquixx.
We were totally thrilled by this idea! One, for its affordability and accessibility to our market; and two, because it was the idea of one of the trainees who was really excited by the opportunity and genuinely on board with what we were trying to accomplish.
Results
We finished just in time for our parents to stay with us over Thanksgiving. With the addition of an ERV fresh-air port in each room and a beautiful, egress-friendly, triple-glazed window overlooking the Zen boulder gardens, Mom and Dad could breathe comfortably. They raved about how the space smelled and felt fresher, cleaner, and safer. Last year, when our daughter was sleeping down there, we had a space heater running every night to keep her warm. Now, in the middle of winter, we don’t even have the diffuser all the way open to heat her room.
The laundry, bathroom, and playroom are now flooded with southern light. With the new full-lite door and enlarged interior opening, it has become more of a welcoming garden entrance than a back door to a utility space.
One of our more insane projects coming up this spring is to cut up and remove the concrete driveway outside this entrance and install a Japanese-style courtyard garden to reduce the dreadful heat island effect of our driveway and south-facing stone walls. The new garden will absorb and process more rainwater and connect the backyard with this part of the house.
Conclusions
So was it worth it? We could have just sprayed foam behind the existing drywall like everybody else and walked away — been done in two days. The answer is, absolutely. We have more at stake than just renovating our basement. We are convinced there are better ways to deliver low-impact designs with more sustainable, healthy materials.
We have had fairly disappointing experiences getting builders to do anything differently at all — never mind being mindful of our sustainability goals and basic principles of building science. We also recognize that it is one thing to draw a solution and quite another to implement it. We want to test design ideas in order to make recommendations to clients with confidence that they can be implemented by mere mortals, and will work as planned.
We can command a little more credibility with contractors when we say that we have built this way with our own hands. We also have come to realize there can be a steep learning curve and cost implications for contractors and clients for anything but pure vanilla designs. We do not enjoy imposing those frustrations and losses on anyone.
So we did it ourselves and learned a lot. The reality is there is no integrated continuous thermal protection, air-sealable, vapor-controlling product available for every condition that meets our material requirements. We are forced to combine materials, which in some cases imposes an added cost and additional labor, to get the results that we require. Our goal here, with this blog, is to share what we’ve learned and experimented with in order to propagate healthy, high-performance, foam-free details and design. We design for our health, our planet and our resiliency.
Oh, and the house centipedes and snakes? Not a one.
Weekly Newsletter
Get building science and energy efficiency advice, plus special offers, in your inbox.


11 Comments
A bit of wishful thinking
"Since the surface of the Delta is dimpled, droplets of condensation can safely drain away without saturating the mineral wool."
The wicking nature of mineral wool fibers will prevent liquids from forming on the Delta and draining until it's fairly saturated. The only real hope for keeping the exterior rock wool board dry enough to perform at it's rated-R is to have sufficient drying capacity toward the exterior at the above-grade portion of the foundation to keep up with the ground moisture drive. (If you have 18" of exterior exposure on the CMU that might in fact be the case.)
Interesting but confusing
I'm intrigued by the suggestion that there's a possibility both to have a water tight flooding-proof bathtub like lining, and a mechanism to allow condensation to drain out. Those sound contradictory, but I'm not sure I'm following exactly what the order of the layers is. The third picture over makes it look like condensation draining down the inside of the dimple mat ends up in the floor insulation. Maybe a diagram would help show how all of this can work.
I like the band-joist sealing strategy. That seems like it would work very well.
Thanks for all the discussion of the challenges in communicating novel ideas to excavators, etc. For an amateur who has worked through similar challenges, it's reassuring to know that things like that can be challenging even for expert professionals. And it's a good heads up for people heading into a project like that as to what kinds of challenges there might be.
Roxul says:
Mineral wool
Roxul says:
Rockwool durability
Is it possible that rockwool is more durable than rigid foam in this case?
Bulk water is different from condensate/adsorb (@ JonR)
Yes, bulk water beads up and drains off rock wool, wicking very little.
But I have seen several existence proofs (including one in my own house) that extended contact with surfaces cool enough for condensation results in noticeably wet (and way more than 1% heavier) rock wool.
@Russell
I think it depends on what you mean by durability. Rockwool, structurally, isn't very durable in the sense that it can be torn or crumbled relatively easily.
IIRC the author's decision to use rockwool instead of rigid foam stems from an allergy issue. IMO using rigid foam would've been significantly easier.
I wouldn't want to make any
I wouldn't want to make any bets about mold growing in moist wall rockwool (as it does in moist fiberglass). Or about the air sealing being perfect enough that it doesn't matter.
http://homeguides.sfgate.com/insulation-avoiding-house-mold-30297.html
from a website about indoor
from a website about indoor gardening: "Rockwool is a fantastic hydroponic growth media offering excellent water and air holding capacities"
So I'm trying to wrap my head around how it's a also a good product for application on a damp wall, where they aren't looking for a wet medium? Why wouldn't you want a water-resistant material such as the dimple board against the wall to stop moisture infiltration and drain water, rather than absorb it, and use the rock wool on the inside where it would stay dry and insulate the space? Surely the insulation value of the rockwool must be lessened by it's moisture absorption?
Dimple membrane against the foundation wall. (@ Bob Irving)
Dimple board against the foundation is a fairly standard solution, which mitigtes against bulk water incursions and ground moisture as water vapor, but it should stop at grade, to alllow drying toward the exterior. There still needs to be a secondary vapor retarder to avoid wintertime moisture accumulation at the near-grade portion of the dimple board.
Response to Bob Irving
My understanding is that if you put the dimple board against the foundation wall followed by insulation it would indeed "stop moisture infiltration and drain water" from the foundation wall side, but it would also lower the temperature of the dimple board, since it would then be separated from the warm room by insulation. If the dimple board is colder than the interior dew point, condensation will form on the interior side of the dimple board, leading to dampness and mold problems in the wall.
Right; especially if floor
Right; especially if floor has no vapor barrier. Perhaps the dimples would allow the moisture to drain so the Roxul would be less likely to absorb water. Interesting conundrum; I'll stick with the polyiso we're using on the interior of concrete walls; it lets very little moisture through, and insulates very well. It possibly also creates dampness on the exterior side, but we've never seen signs of that and since there would be no organics present, probably doesn't cause mold.
Log in or create an account to post a comment.
Sign up Log in