
In the first post of this two-part series, I talked about a method for tying a foundation to the wall of a house built on a concrete-free slab. The result is an energy-efficient connection at the rim joist—an area notorious for air leakage. Here, I’ll explain detailing the transition from the wall to the roof system. As previously mentioned, both assemblies come from a certified Passive House build and they meet the zero-energy objective.
Starting with the wall
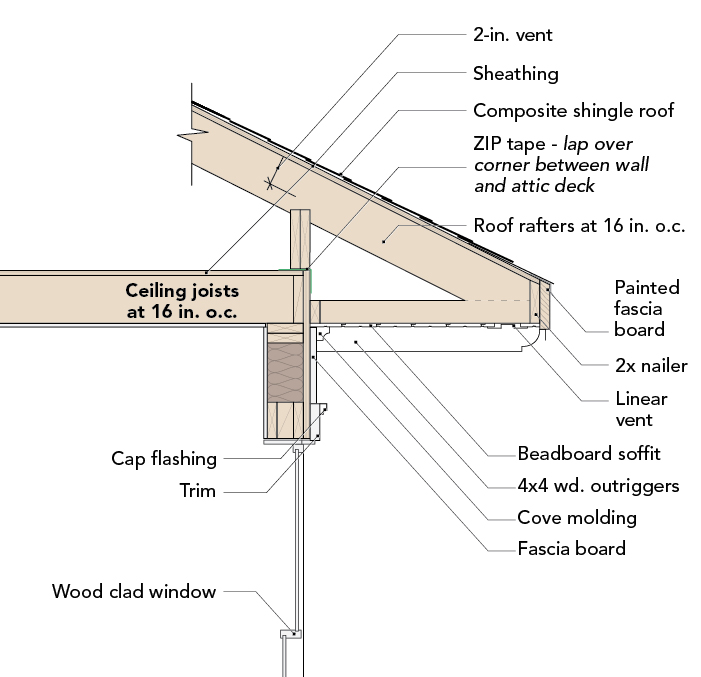
The wall itself is a 2×6 stud wall with intermediate framing with studs at 24 in. o.c. We sheath the wall with 1/2-in. CDX plywood with the seams taped using Siga Wigluv to continue the air barrier up the wall. The stud bays are insulated with dense-packed cellulose, blown in and tested to a density of 3-1/2 lb. per sq. in. to prevent any future settling. This makes the CDX plywood the least permeable part of our assembly at approximately 10 perms, therefore making it the vapor control layer. This is the layer we are most concerned about seeing condensation on the coldest stretches of the year and therefore we want to keep it warm enough to keep it safe.
To keep the sheathing warm, on the exterior of the wall we install 1-3/8-in. Steico wood-fiber rigid insulation board. We like this product because of its low embodied carbon and ease of installation with the tongue-and-groove profile that can be installed “off layout,” meaning the seams don’t need to line up with the studs to install it. Because this is a wood product being installed in a climate that sees 42 inches of rain on average per year, we install a mechanically attached water-resistive barrier (WRB) to…
Weekly Newsletter
Get building science and energy efficiency advice, plus special offers, in your inbox.

This article is only available to GBA Prime Members
Sign up for a free trial and get instant access to this article as well as GBA’s complete library of premium articles and construction details.
Start Free TrialAlready a member? Log in


19 Comments
Having done it both ways (if I'm following your articles correctly), what determines whether you use plywood or use a membrane like Siga Majrex as the air barrier on the underside of the trusses?
Good question and thanks for paying such close attention! Our team went back and forth on this detail for this particular home. Due to the need to hit a perfect trim reveal between the sloped vaulted areas and the window trim it made more sense to go with the thinner of the two options. Since the Majrex requires a 2x4 strapping it is actually thicker than the plywood. This is in the weeds, for sure. Plywood acts similar to a variable permeability membrane as it will change permeability based on the absolute moisture it is experiencing. Although it won't throttle quite as much as an Intello or Membrain product it will still control vapor entering into the assembly. We simply made this decision based on a design constraint.
Interestingly, the carpentry team prefers to install the membranes as they go up quicker and are less hassle to hang on a tall sloped ceiling. This decision was made after the plans had been submitted for permit so we didn't have an easy path to make adjustments to the building height to switch to the plywood so we stuck with it.
I would feel comfortable recommending either the membranes or the plywood for a vented roof assembly and would tell folks to go with what is either the most available, cost effective, easy to install or works best within any particular circumstances.
14" of loose blown cellulose will not yield R60. It will be closer to R49. Not that this will result in a substantial difference to energy loss, but worth double checking calcs if targeting a PHIUS cert or current IECC.
You caught a typo. We have 16" of cellulose in the attic. From the Greenfiber 'Santuary' cellulose spec: R-Value at 75 degrees Mean Temp at a settled thickness of 16.1" is R-60. This information along with the spec sheets have been uploaded to the Phius worksheet and approved.
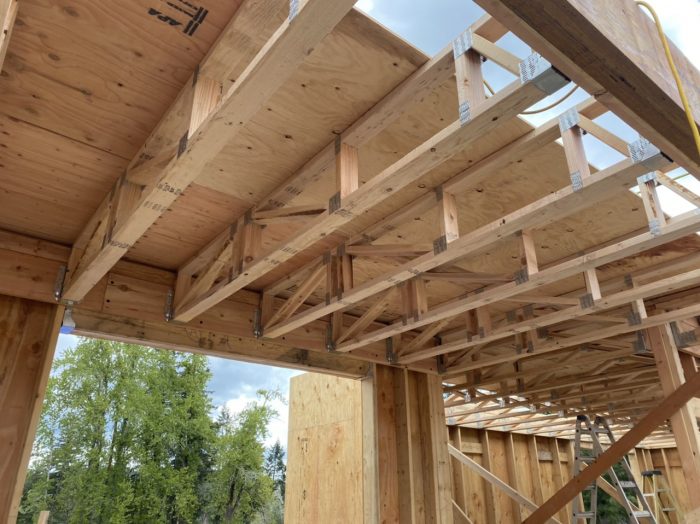
How are you sealing the area around the vented blocking/truss heels from water? I'm having trouble seeing how it's continuous above the taped cdx corner with the wrb outside on the insulation and what looks like tricky tight spaces between the blocking, strip of sheathing, and roof structure.
I'm trying to follow your question. I think the problem may be that the pic you are referring to isn't yet complete. There is a front porch roof that is attached in that location that continues the slope of the roof down. Once this was installed, sheathing went over the tops of the trusses and over the vented porch framing. If you look deeper into the photo on the adjacent side wall you see how the trusses have tails that will create the overhangs that house the vented soffits. The vented blocking is protected by the installed overhangs, and in the case of the pic, the porch roof.
I hope this clarifies things...
Josh, when you go to that much effort and cost to air seal the ceiling, will you still install an attic hatch through that ceiling?
I used a similar detail recently. We put the attic access outside. I may open the door and climb around on the trusses once a year to inspect things, but otherwise, there's no reason to go up there; there's nothing to see but a pile of insulation. The building official thought it was a great idea.
Good idea. So you mean through one of the gable ends?
tbarker,
I put them on the gable ends whenever I can. Make them look like decorative vents. You do have to tell the truss supplier thr0ugh as there is often a chord mid-span on the gable end truss, which mean you can't center the opening.
There are other advantages apart from air-sealing.
- If later you do renos up there or want to add insulation, you don't have to take it all through the house.
- It keeps the occupants from using the attic as storage.
Good tip about the end truss when ordering!
Right now, our door is a painted piece of scrap plywood, which was quick and easy during construction with the intention of making something nicer down the road, decisions you can make when it's your own house. I like the idea of disguising it as a vent when I get to making a new door. Thanks!
Just catching up to this now. Brian and Malcom took the words from my mouth! We put the attic access in the gable ends and in this case, made the access hatch look like a hay loft door to mimic the farmhouse look the clients are going for. Code requires a hatch if there is more than 30" of height from the floor to the sheathing. In some cases where there is less than this no hatch would be required.
Thanks for the tip about the gable end truss. It's exactly what we did in this situation. The client peered into this space from a ladder once. I imagine this will be the last time he ever looks in there. It's just a sea of cellulose...
Exactly!
Says the guy with the cool new house :)
I think this ceiling detail is a good idea, but there are a few other disadvantages in my opinion:
1.) Difficult if you want to use scissor trusses for the roof. We will often use scissor trusses to get some "vaulting" in the ceilings, yet being able to keep the roof vented. I really try and stay away from unvented roofs in northern climates.
2.) The way the parallel chord ceiling trusses are configured in this example, you will lose probably 14" of ceiling height in the conditioned floor.
3.) If you're designing for clear spans (no load bearing walls inside the house), the parallel chord ceiling/floor trusses can often be 16" or 18" (so potentially losing +18" of ceiling height. And relatively expensive.
We used a scissor truss in this project. Why do you say it would be difficult? This is a vented roof assembly, even at the scissor truss areas of the roof assembly.
We designed the PCT's in from the schematic design stage so we were able to set the client's desired ceiling heights. I suppose if one did this after the fact one could lose ceiling height, but it's not an issue if it is considered strategically in design.
IRT the pricing, the PCT's were significantly cheaper in our area than TJI's which were also considered. The PCT's were much easier to run mechanicals through. Again, see my comment above in regards to the ceiling height issue.
If you use scissor trusses to create a vaulted ceiling, you can't add a horizontal drop ceiling structure below it.
Log in or become a member to post a comment.
Sign up Log in