

More Guest Blogs


Editor’s Note: This is one of a series of blog posts by David Goodyear describing the construction of his new home in Flatrock, Newfoundland, the first in the province built to the Passive House standard. You’ll find his complete blog here.
It is now May. The weather is shaping up, and after a long, cold winter the ground is starting to thaw. Old Man Winter did give me one thing this year: a lot of time to think.
I have been thinking mainly about food security and accessing more locally grown food. We had a successful harvest last year and a cellar to store all of our garden goodies to eat during the winter. It’s hard to believe that we are still eating crisp and sweet Newfoundland carrots that were pulled from the earth last November!
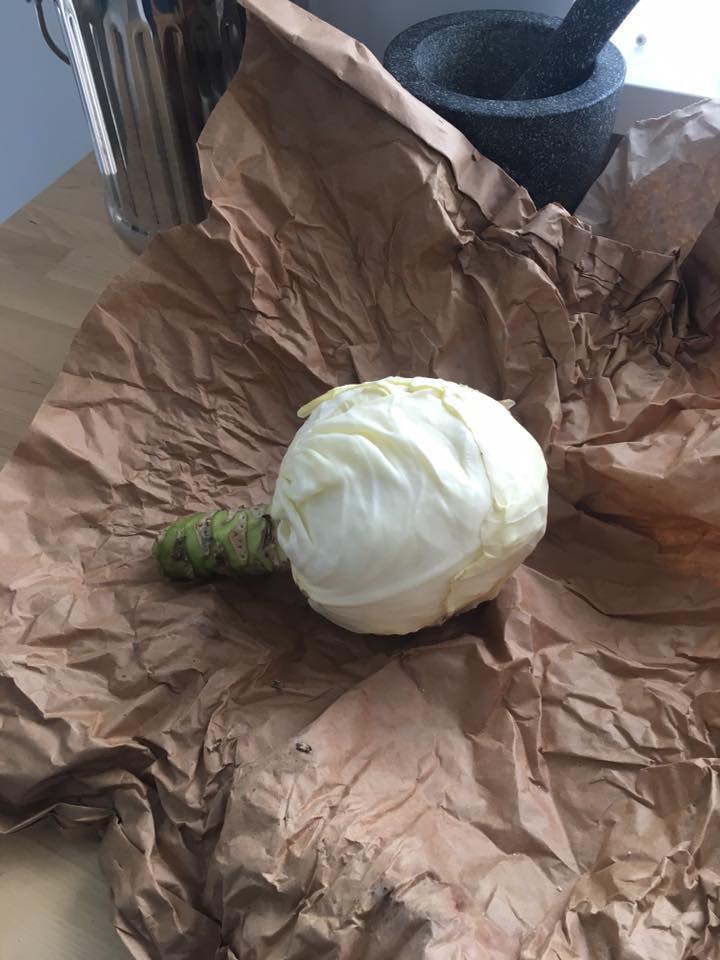
The wonders of having a root cellar have really amazed me. Did you know that you can store a cabbage (with its roots attached) in an underground root cellar for a really long time? I didn’t. The last cabbage that I pulled out of our underground lair was 3 1/2 months old (see the photo below). A few leaves had dried a bit and formed a protective layer around the cabbage. After peeling, it emerged as a perfectly clean, crisp garden-grown cabbage waiting for the perfect slaw on a pulled pork sandwich!
Storage in the cellar at high humidity and low temperature (but above freezing) is really about creating a space where vegetables can stay barely alive by passively using energy from the massive heat sink of the earth. After the last harvest I realized that I now have the infrastructure in place to grow and store even more than I previously thought. It would be great if I could grow more–more varieties of cold climate vegetables that have good storage characteristics, short season vegetables that lend themselves well to canning, and greens–lots and lots of greens!
So, greens are a problem. We have a short growing season. The growing season can be extended by using conventional greenhouses and cold frames. However, green vegetables are hard to store for long periods of time. They won’t last in a root cellar. However, plants like radicchio and Belgian endive (chicory family) grow as a root, similar to a carrot, which can be harvested, stored in a cellar, and then forced to grow tightly packed heads months later. Cabbages are easy and versatile and a regular part of traditional Newfoundland cooking.
These are great options, and nutritious ones, but not really that green. To obtain greens you need a longer growing season, or some way to extend it. A root cellar effectively extends growing to four seasons by keeping subterranean vegetables alive, but greens need light. So the answer is obvious: A greenhouse is in order.
Insulation is the key to performance
A greenhouse can have have many forms depending on how it will be used and where it is located. A simple polyethylene hoop house could extend the season here for a few weeks in spring and fall. However, I want to minimize the gap in our growing seasons significantly.
Glazings and air leakage are where most heat is lost here. So a structure with decent glazing R-values (for a greenhouse) and good air tightness is a must. The structure needs thermal mass in order to cruise through significant temperature swings in both winter and summer. Passive solar greenhouse design is just using a lot of common sense. Insulate where the sun is not able to enter.
Insulation is key to performance. North, east, and west walls all should be highly insulated. To Passive House standards? Obviously not. This article was compact and informative and provided some basic design criteria for an extended season greenhouse. The sweet spot appears to be somewhere around R-20 walls and R-2 glazings. R-2 glazings are expensive, so I would opt for locally available R-1.5 double-panes but use a homemade insulated curtain (R-1) at night to increase energy savings.
I am looking at about 220 square feet of glazing. A couple of quick calculations can easily show that going beyond R-20 and decreasing thermal bridging is a waste of time and money. Sinking money into a heat source is probably a better investment. Since this kind of greenhouse really only needs to keep vegetables alive through the cold months, a low-grade heat source such as a climate battery (ground source heat exchanger), or a point source heater, such as a compost pile could produce all the energy necessary to maintain temperatures above 0ºC, or freezing.
Location: A south-facing hillside
The location for our greenhouse is absolutely perfect–a south-facing hillside. This will allow us to put a foundation into the hill and use the natural shape to berm the north wall to between 4 and 5 feet. The east wall will be mostly bermed while the west and south walls will only be partially buried. This works out great because I can build a knee wall on the south side with anywhere from 2 to 4 feet of vertical glazing and also have glazing on the roof.
Vertical glazing works well in the winter because the sun is low in the sky (about 20º above the horizon). A variety of glazing angles could work but ideally one would try to set the glazing angle to be perpendicular to the incident sunlight in the winter. Of course, this is also a matter of design, aesthetics, and whether it can be easily built.
Our frost depth here is about 30 inches, so the foundation will need some insulation. There is no doubt about that, but with the earth-bermed walls, R-8 may be enough. Ideally it would be best if our design was easily constructed so I could do most of the work without needing too much help. This is a major driving factor here. Making headway is much easier when you can be self sufficient.
Each design under consideration has been modeled in HOT2000 and is showing anywhere from 700 to 1000 kWh to heat during the winter in order to maintain 5ºC. It is less than 500 kWh if I just want to keep it above freezing. All of this being said, the foundation for each design is the same. Onwards and upwards!
Extending the growing season
Placing a greenhouse on top of the ground is like changing the climate above the ground where it sits, which in turn affects the average yearly ground temperature at the greenhouse location. I seem to recall reading somewhere that the length of the growing season in an uninsulated greenhouse is similar to the length of the outdoor growing season one climate zone south.
For us, the length of our growing season in Climate Zone 6a in a greenhouse would be about the same as the length of the outdoor growing season in Climate Zone 5. The effect is a combination of things. First, the temperature of the greenhouse will typically be greater than outside, and second, some of the heat collected by the greenhouse is conducted into the ground inside the greenhouse, providing thermal mass that resists freezing.
Below grade, R-8 wing insulation will extend out from the structure about 8 feet all the way around. The thermal resistance of the ground is highly variable and dependent on its many individual components. In our case, R-8 insulation will be equivalent to about 2 1/2 feet of earth. Once the earth is bermed on the north side, the bottom of the greenhouse will effectively be at about 8 feet. The south side will effectively be at between 4 and 5 feet, so the thermal mass below the greenhouse is definitely protected from the winter frost and will provide a huge thermal mass for cruising through the winter months. As a protective measure, a vapor barrier around the foundation will run out to the perimeter drain like an umbrella, preventing water from stripping away heat from the thermal mass.
Making an underground heat battery
Storing heat for use at a later time is not easy. Heat moves–always from hot to cold. But this can be used to our advantage. The greenhouse is really just a large solar collector. Most people who own a greenhouse know that it can get so hot that plants will die, so the heat must be vented.
Although our greenhouse will have vents for use as needed, I want to increase the sphere of influence of the underground thermal bubble by charging the ground like a climate battery.
A climate battery is really just a system of ducts below ground. You use a fan to push hot air from the peak of the greenhouse underground. The air loses heat to the ground and cools before it exits back into the greenhouse. My plan is to insulate the ground partially above the battery so that the heat conducts mainly downwards into the cool earth rather than back into the greenhouse.
As the greenhouse begins to cool in the winter, it becomes a heat sink and heat from the ground will move towards it and keep it from freezing inside. This idea is not new and has many names: climate battery, GAHT, SHCS, etc. These are a little different than what people call annualized geo-solar. Once the system is up and running it will behave like a combination of a climate battery and an annualized geo-solar system.
Site work was a grueling task. I spent my spare time in April clearing trees, windfall, stumps, twigs, and brush, and then chipping all the piles of debris. Luckily I have several cubic meters of wood chips that I can use for composting later. So the hard work paid off with a clear site and lots of chips.
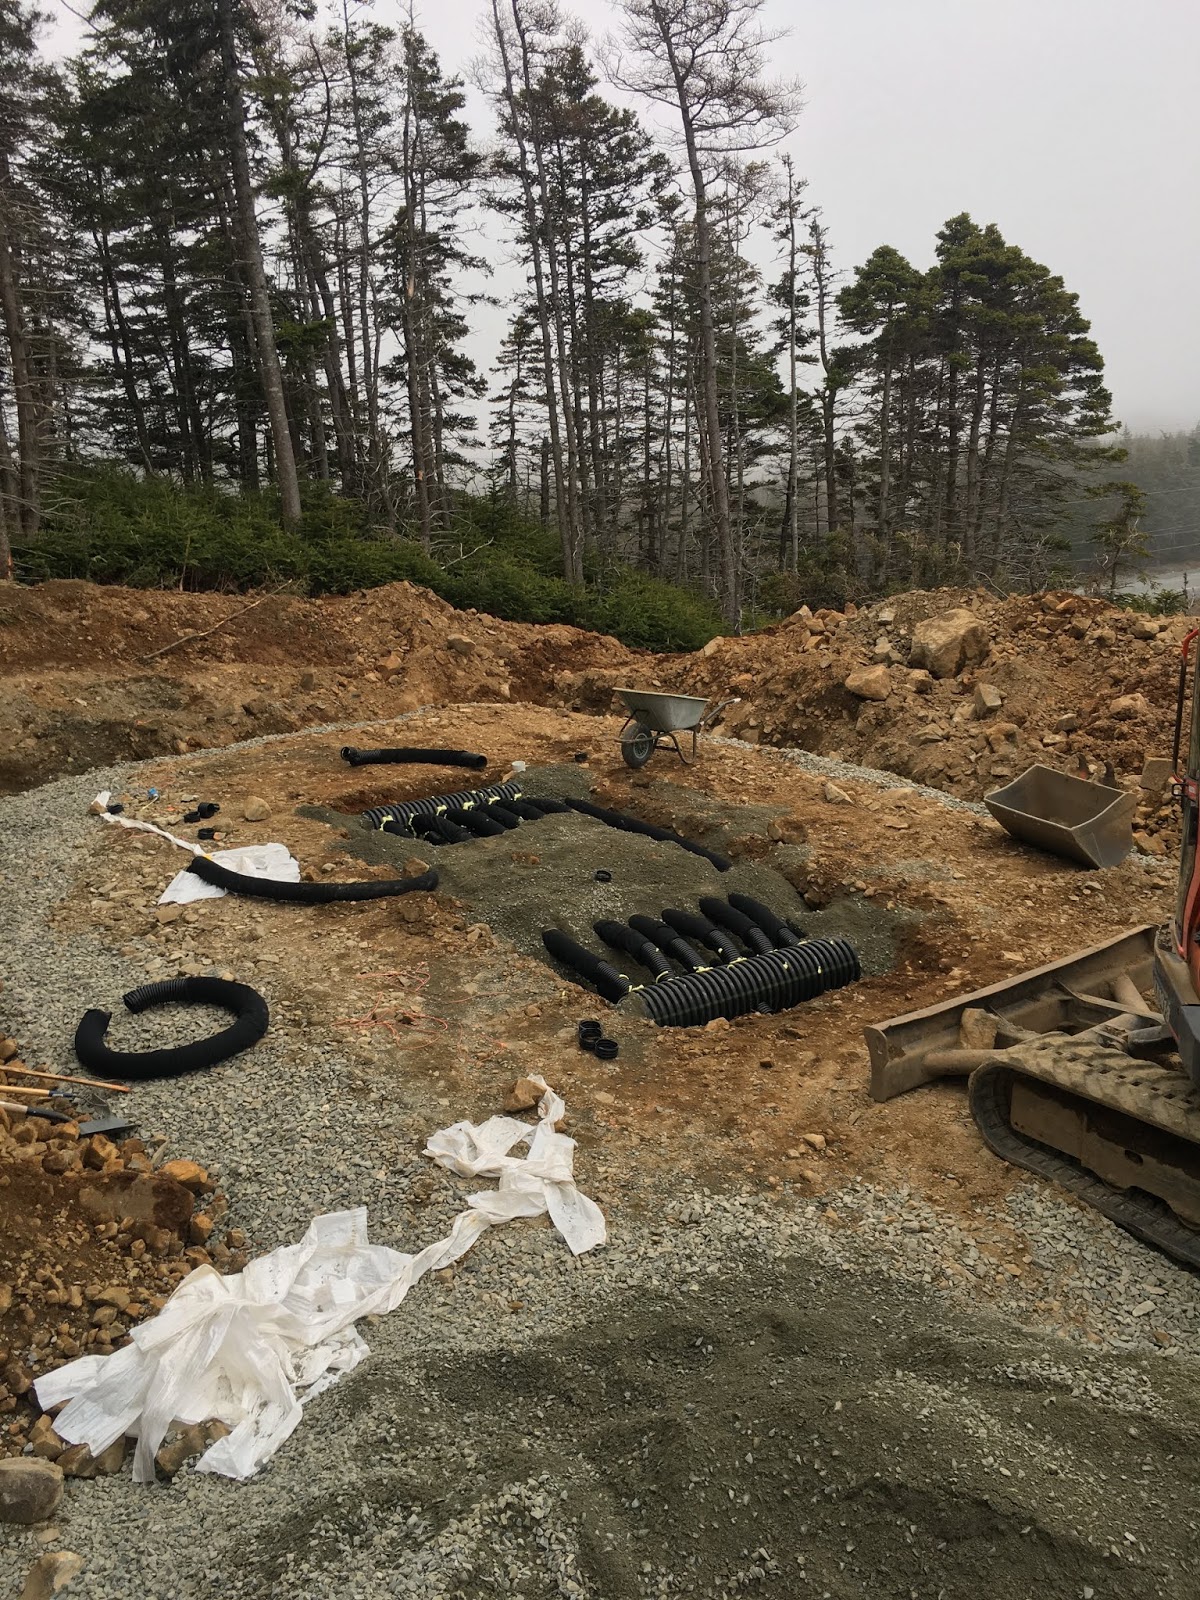
Once the site was ready I marked out the foundation, perimeter drain, and the location of the climate battery. It took about a day to install all the components (see the photo above), and another day to tamp the area for the concrete footing. Ready for footings!
BLOGS BY DAVID GOODYEAR
Blower Door Test Comes Up Roses
Laying Out the Mechanical System
Framing and Insulating an Interior Service Wall
Foam Sheathing and Window Details
A Final Design and Energy Modeling
An Introduction to the Flatrock Passive House
Weekly Newsletter
Get building science and energy efficiency advice, plus special offers, in your inbox.


8 Comments
I've harvested fresh greens and root crops all winter long here in the mountains of Virginia (climate zone 4A, hardiness zone 6B), using just unheated cold frames, agricultural row cover, and/or unheated hoop houses. Many cold hardy greens can tolerate repeated freezing and thawing over many weeks, as long as they have decent protection against the wind. Some greens can tolerate temps as low as 0-10 F, and still survive. These cold hardy plants create their own natural anti-freeze - natural sugars! That's why winter vegetables taste much sweeter than identical ones grown in warmer weather.
This reminds me of Citrus in the Snow, which has changed it's name to Greenhouse in the Snow.
https://www.npr.org/sections/thesalt/2016/02/11/466050766/citrus-in-the-snow-geothermal-greenhouses-grow-local-produce-in-winter
https://greenhouseinthesnow.com/
I already start plants inside, in a basement, with fluorescent shop lights to provide light and a bit of extra heat. If I wanted more space, I think I would build an insulated box with more shop lights.
I have read a lot about attempted passive greenhouses, but don't know if it is ever accomplished in cold climates, in deep winter, with things other than lettuce greens.
An easier and sure fire approach to being environmentally responsible is to stop eating animal products.
Let us know when the sauerkraut is ready. I'll bring the brats!
"Storing heat for use at a later time is not easy. "
Actually it is! Here in cold NE WI, we just bury pex tubing in 2' of sand or copper tubing in a 2500 gallon tank (2nds are cheap with free delivery) and use a few thermal water heating panels (lots found on Craig's list for next to nothing; I just got 4 for $300) and you can keep a green house at 32F all winter which is perfect for spinach growing. If you do a submerged or well insulated greenhouse you could sit in shorts all winter with this method and eat lemons/limes that grow here - yes, believe it or not. And we don't even have sun Nov - Jan 15th!
Some people use livestock as the heat source. Ie. a structure where chickens live on one side separated from the plants by a wire fence. Plants and a meat source from one building.
Hey David,
Love the Blog. Thanks so much for putting the effort into this - Early Adopters like yourself work out all the bugs in the emerging technologies. Then when the knowledge bank becomes widespread, we Late Adopters get to ride on your coattails. So thank you.
Thought: what about storing your firewood in an insulated/heated/greenhouse outbuilding?
Suppose it really does need to be piled outside for initial seasoning from Green.
But then, could you store it in an insulated woodshed - sorta get some Kiln effect - and really dry it out.
I do have an old wood stove - toying with the idea of building a woodshed. But then I get tired of the dirt, and smoke, and creosote, and overheating, etc, etc - tough to find really good quality dried fuel, ... can never commit to staying with firewood long-term.
Pellet stove, Oil stove (canola, soy ??), Masonry/Rocket heater ??
Nice to get some DHW out of it though, as you do.
Do you store firewood indoors ?
Thank you.
Hey, sorry for the delayed response! I didn’t realize my blog would be continued on gba! Had no real idea until today!
Log in or create an account to post a comment.
Sign up Log in