

More Best Practices


When I designed and built my net-zero home in 2020, my goal was to keep it small, simple, and economical. I was willing to spend more upfront on quality materials and extra insulation if it saved on future maintenance, replacement, and utility bills.
I knew that a two-story square-shaped house would be more resource-efficient, but I had my heart set on a stretched-out ranch. So, from the beginning I was punching up on the material and operational costs. How could I rein in my remaining options and build a comfortable home within my budget?
My home is in Southern Wisconsin, a heating-dominated, cool-humid climate (zone 5A) with occasional need for summertime air conditioning. Here I will share what worked for me to reach my objectives, key among them net-zero energy use. Maybe the steps I followed can serve as something of a roadmap to net zero.
7 steps for reaching net-zero energy
1. Think in 3-D
The most valuable tool you have is a tape measure. Become curious about the space around you and the shape of the objects that furnish your life. With enough practice (and multiple iterations), you can draft a workable floor plan and basic section showing the components of the structure, including ceiling heights, stairs, and roof slope. To reduce material waste, stick to 2-ft. increments. Don’t forget to include wall thicknesses, and don’t get hung up on learning a drawing program; graph paper is fine.
The International Residential Code is a daunting document for the uninitiated, but there are just a few sections you need to read and understand to prepare a decent working draft. They pertain to exits, stairways, daylighting, and prescriptive R-values.
If you want to level up, I recommend the online 3D-modeling tool SketchUp Free to create your home’s basic shape and features, including roof overhangs and window openings. Once your model is created, you can select for area, length, perimeter, and volume. This avoids all the tedious (and mistake prone) manual calculations that you will need to do a heat loss calculation or to get an airtightness rating from a blower door test.
Use SketchUp Free to place rooftop PV solar panels in your model to make sure they fit and are arranged in a way pleasing to you. Note that the free version can geolocate your model, rotate it, and cast shadows, but only Sketchup Pro (paid) allows you to select for time of day. This feature is necessary to visualize and calculate optimal roof overhang depth (or the effect of other shading devices like bump-outs, awnings, or pergolas) for seasonal sun control.
I used the Pro version to create the illustrations for this article and also for all the assembly details and construction documents needed to pull a building permit.
2. Know the budget
Want to know how much your dream home will cost? Hop on Zillow for a quick and dirty guesstimate. Search for recently sold (newish) homes in your area. Find some comparables, deduct the cost of the lot, and divide the sum by the finished square footage. Assume the price includes a decent profit for the developer and was built to code minimum. If the comp has a garage, then you get a garage but don’t kid yourself; bump up if you want nicer finishes, appliances, PV solar, and/or your design is quirky. Your future builder will hate you for going by square foot costs, but it’s a reasonable placeholder while you’re still playing with Monopoly money.
3. Account for the site
A flat subdivision lot with utility hook ups at the street is the easiest and probably cheapest place to build. An infill lot in the city or undeveloped land in the country come with more unknowns. Go to your jurisdiction’s website and find out everything you can about your lot: property lines, easements, setbacks, building size and height maximums and minimums, utilities, topography, parking and driveway requirements, covenants. You can ask officials but follow up on your own (and always bookmark the information).
Map out a potential house placement that accounts for vehicle access, views, utility hookups, and privacy. You don’t need to face directly south to take advantage of passive solar heat gain or for solar PV placement.
4. Perform a heat loss calculation
The only way to know how much insulation to install above code minimum is by doing a heat loss calculation. I use REM/Design, which is energy modeling software that offers a free 14-day download and online tutorial (there is a learning curve). Do at least two models: one to code-minimum and one with your proposed upgrades. Input the geometry of your proposed design and the R-values of the material assemblies that define your thermal barrier. You will be prompted to dial in a potential blower door result. REM/Design really opened my eyes to the energy savings possible with a well-executed air barrier.
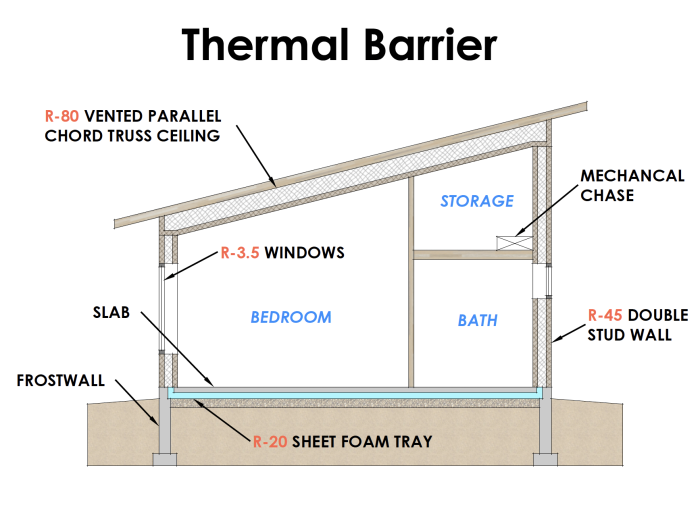
More insulation, better windows, and an above-code blower door number directly impact operational costs, which are broken down by component in REM/Design’s Action Report. You may find that the foundation walls lose more heat than the ceiling does. If the material and labor cost to upgrade the foundation wall insulation is equivalent to adding more insulation at the ceiling, then this is what you should consider doing. Worried that a large window faces north toward the view and not south like it “should”? Face your guilt head-on and model the difference: it’s probably not as big as you think.

I installed Marvin windows and considered an upgrade from their standard dual-pane option to their triple-pane glazing. REM/Design showed me that the upgrade would save me $48/year in heat costs. The quote from the window supplier was an upcharge of $2785. That’s not a lot of money when you’re building a new house, but the simple math isn’t compelling. It would take 58 years for the triple-pane windows to pay for themselves.
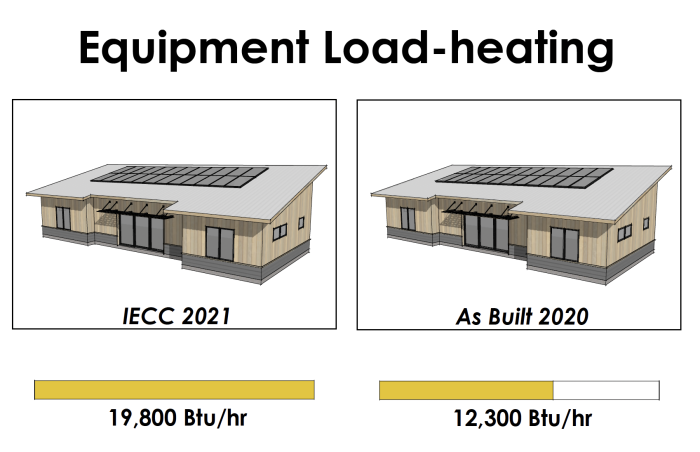
Your REM/Design model will give you a kBtu/hr design load (also known as a peak load) in the Equipment Sizing Report, which you can then match to a potential HVAC selection. Ideally, you can get pricing and compare your code-minimum house with your super-insulated house. If your home is small and the rooms are open to each other like mine, a single ductless air-source heat pump will probably be all you need. Wouldn’t it be cool if the difference in price could pay for your extra insulation and better-than-code windows?
The software’s Equipment Sizing Report meets permitting requirements in my jurisdiction. However, the program can’t produce a room-by-room heat loss calculation, which is essential if you want to condition two or more zones with ductwork or separate equipment.
It’s fun to iterate and get your numbers way down, but keep in mind that what you’re looking for is the sweet spot where cost and value are optimized. You want a comfortable, durable home with low operating costs for a reasonable initial investment and carbon debt (carbon footprint). There’s a point where more insulation or better windows is less effective than more solar PV panels paired with a larger HVAC system.
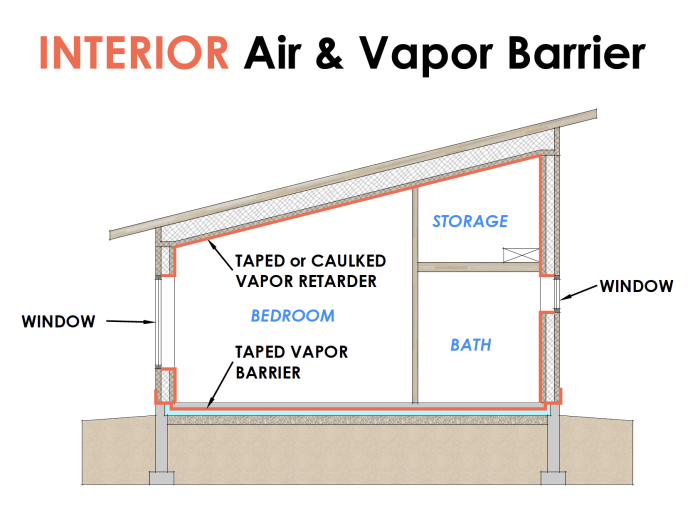
5. Do a blower door test
It’s a good idea to hire a Building Performance Institute (BPI)–certified energy rater or a HERS rater to conduct at least one blower door test during construction and a final test when the house is completed. The point of a blower door test is to find and seal leaks before it’s too late.
A blower door fan works hard to pull makeup air through all the small holes or cracks in the building shell. It’s effectively simulating a 20 mile per hour wind bearing down on all sides of the house, a good proxy for stormy weather. Leaks that you never noticed before can suddenly be felt by hand or detected with a smoke wand.
Gauges measure the CFM (cubic feet per minute) of air passing through the fan, and when this number is divided by the exterior volume of the house, an ACH (air change per hour) rate is found. This number is literally the number of times an hour the entire volume of indoor air is changed out with exterior (fresh) air. If the CFM number is divided by the shell area (the surface area of the exterior volume of the house), a more meaningful number results. This number can be compared to any other tested home, regardless of how much bigger or smaller they are, and is an accurate representation of the quality or effectiveness of the air-sealing that was performed.
Many states have mandated blower door tests for new homes prior to occupancy or have adopted the 2021 IECC (International Energy Conservation Code), which allows a maximum test result of 3.00 ACH50Pa. If you and your workers do a good job with air-sealing, I think it’s reasonable to hit 1.00 ACH50Pa.
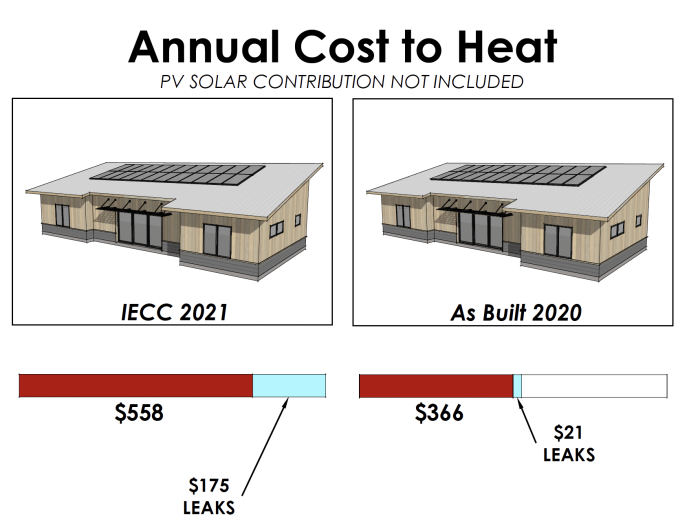
My final blower door test far exceeded my goal: 0.38 ACH50Pa or 0.02 CFM50/sf. REM/Design estimates that this infiltration rate costs me $21 each heating season. What if I had done a sloppy job of taping and caulking and just met the 2021 IECC requirement of 3.00 ACH50Pa? The infiltration would cost me $175/heating season, about the same as the heat loss attributed to my windows.
Air-sealing is the low-hanging fruit. I can save $154/heating season just for doing a good job with my air barrier work I should do anyway if I care about the indoor air
quality and long-term durability of my house. Tape and caulk are cheap. Upgrading windows is expensive. Here’s my advice: Do all the air-sealing yourself. Don’t expect your contractor or subs to fully appreciate how important it is to you. You will need the correct materials and a practiced technique, but it’s well within your ability.
6. Get a good sense of your HVAC equipment
If you want to understand heat pumps and make some preliminary selections, the Cold Climate Air Source Heat Pump Product List and Specifications from Northeast Energy Efficiency Partnerships (NEEP) is an excellent resource. It can’t take the place of working closely with a qualified HVAC contractor, but it does help narrow the field. The online tutorial explains how to use the calculator and interpret the results.
As it turns out, the air source heat pump (ASHP) I selected when planning my house is oversized. The specs aren’t bad, but I could have gone two sizes down and saved money. The equipment could be smaller and run more efficiently. The wild card for me was the blower door test. If I had met the 2021 IECC requirement of 3.00 ACH50Pa, the heat pump I installed would be just right.
7. Size a solar photovoltaics system
To size your solar array, go to PV Watts, an online calculator from National Renewable Energy Lab (NREL). It’s simple to use and spits out an estimate for electricity production based on your inputs including location, tilt (roof pitch or angle of ground mount), building orientation, and panel capacity. The prediction is based on historical weather data, but it doesn’t automatically include snow cover on the panels, which is of course highly variable.
If your roof pitch or house orientation isn’t ideal and that bothers you, just fiddle with the parameters until you find out what the maximum production could be if you changed your design. It may not be as much as you think.
My design called for a 3:12 roof pitch. The quote from my solar installer gave me the panel capacity, number of proposed panels, and cost of the installation. I found out that at my latitude, a 9:12 roof pitch would produce 7% more electricity. This is equivalent to the amount of electricity two of my panels produce in a year. In other words, if I built a steeper roof, I could install two fewer panels and have the same production that I have now. Two panels (installed), cost $1412 (before tax credits). I think it’s safe to say that building a steeper roof would cost that much or more. And a rack system installed on a 3:12 roof to bring the panels up to optimal pitch would cost considerably more (and not be as attractive as without).
Achieving net zero
My home produces more electricity than I use each year. It’s comfortable and beautiful. Besides raising kids, building my own house has been the most satisfying and engaging thing I’ve done. If you’re budget-minded and an incurable DIYer like me, I hope you found this article helpful. Of course, there are other, far more sophisticated modeling tools and approaches than what I’ve outlined here. This is just what worked for me. I’m eager to learn how you do things.
_________________________________________________________________________
Amber Westerman is founder of Poem Homes, a design-build company focused on reducing resource use in new home construction, based in Spring Green, Wisconsin. Images courtesy of author.
Weekly Newsletter
Get building science and energy efficiency advice, plus special offers, in your inbox.


2 Comments
Great article. You are a gifted communicatorusing words, pictures and illustrations. This article is a great help to those of us contemplating building something similar.
One point to remember: when you are considering the length of time needed for economic "pay back" of any particular item or decision, you should now include "cost of money" (if you finance an item) or, if paid in cash, "lost investment return". Now that mortgage rates are over 7% and you can buy riskless treasuries at 5% with your cash, the cost of money and lost returns are much higher than they were just a year or two ago when they were the lowest in decades. Thus, these factors should be included in the calculation. This will change a lot of decisions that are solely based on economics. For instance, you mentioned that it would take 58 years for the triple-pane windows to pay for themselves. But if you include a 5% lost return on the intital cost of the windows; or a 7% borrowing cost if you finance them, the windows will never pay for themselves using the estimate of energy cost savings you started with. Thus, a purely economic approach might suggest that this would never work.
Of course, when you are talking about the "savings" aspect of any decision, you are forced to make a difficult guess as to what energy pricies will do in the future over the life of a system. One can assume they will go up fairly significantly over the years., but by how much. Nonetheless, there is an economic benifit in capping costs by installing an energy efficient alternative now. You will just have to make some reasoned assumptions about energy cost escalation.
Thanks Nick for your kind words. And for expanding this discussion by putting a finer point on how to calculate "pay back".
Log in or create an account to post a comment.
Sign up Log in