
Image Credit: Eric Whetzel
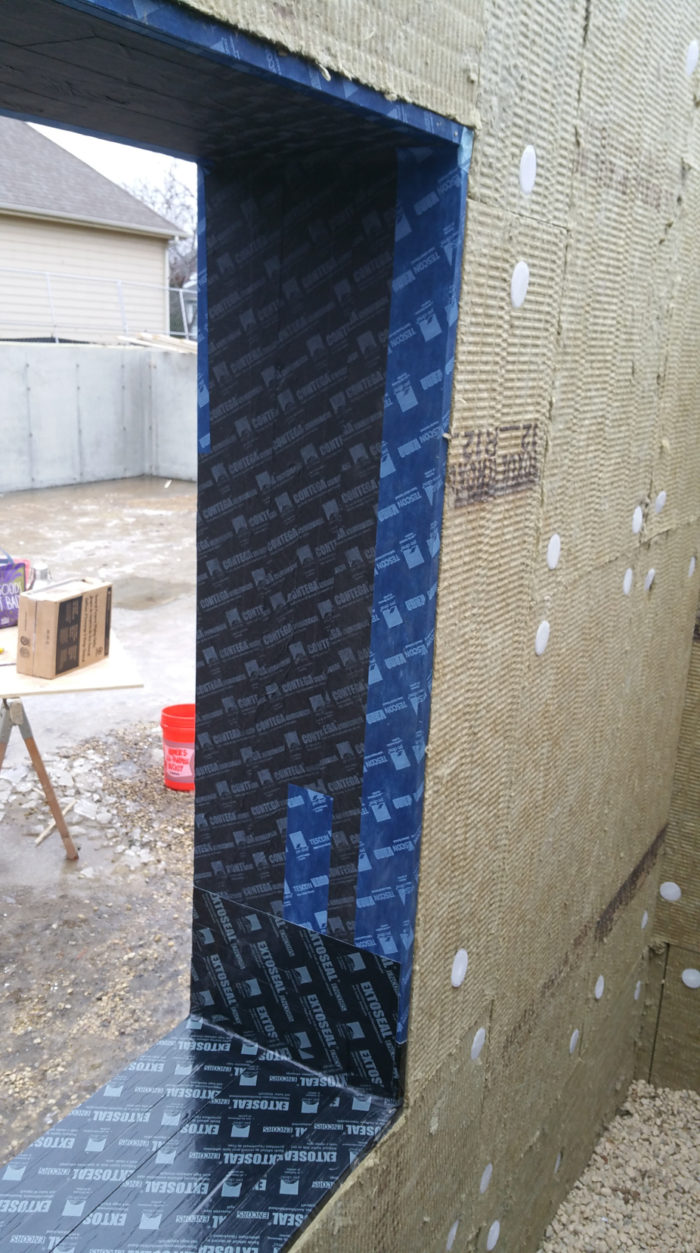
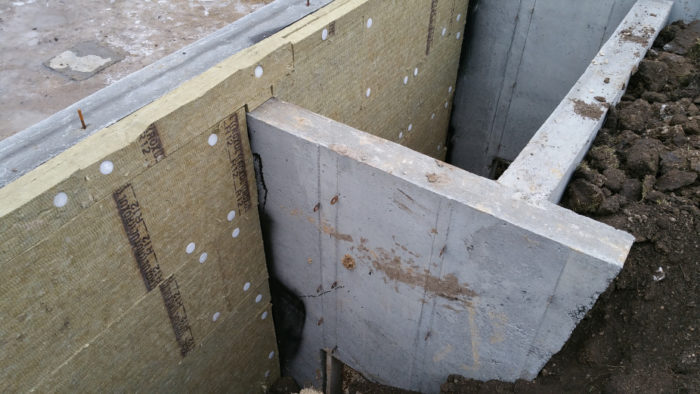
Image Credit: Eric Whetzel The red arrow shows a thermal bridge and gap in the vapor barrier that would have occurred had Delta membrane not been used. A corner of the footing with the Delta membrane “keyed” into the surface. The Rodenhouse fastener proved easy to install: drill a hole with a 5/16-inch bit in a hammer drill, and tap the fastener home with a hammer. Where the outside corner of the front porch meets the foundation wall is one example of an unwanted thermal bridge. Wing walls that will support a porch stoop are wrapped with Roxul to reduce thermal bridging. The outside edge of the plywood window bucks are flush with the outside face of the mineral wool on the foundation wall.
More Guest Blogs


Editor’s note: This post is one of a series by Eric Whetzel about the design and construction of his house in Palatine, Illinois, a suburb of Chicago. The first blog in his series was called An Introduction to a New Passive House Project. For more details, see Eric’s blog, Kimchi & Kraut.
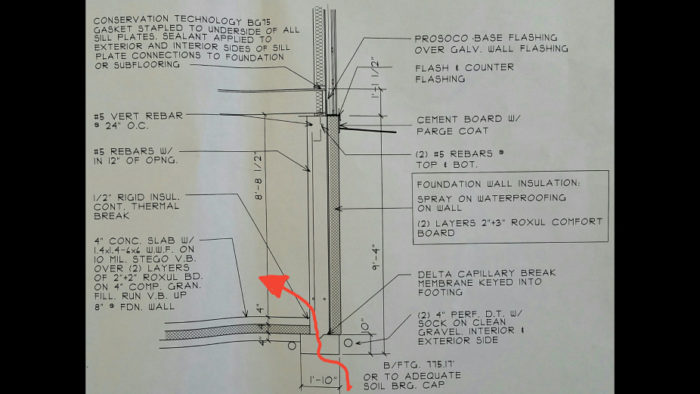
For the top of the footings we used a product from Cosella Dörken called Delta Footing Barrier. Acting as a capillary break, the membrane is supposed to help prevent moisture from wicking up from below the footing, where it could then migrate into the foundation wall and into the basement, or even the wall assembly above (worst-case scenario), causing mold or other moisture-related damage.
It should help make the basement a very livable space, especially when combined with significant amounts of insulation on the exterior walls and under the slab (see Image #2 in the Photo Gallery at the top of the page).
In other words, this junction represents a weak point in our thermal envelope and vapor barrier. Passive House proponents often talk about using a red pen on a construction drawing to follow the air barrier and thermal envelope (the goal: no gaps in air sealing or the layers of insulation). In theory, you should be able to do this all the way around the structure without once lifting your pen. If you can lift your pen (meaning there’s a gap in your air barrier or thermal envelope — which would be the case without the Delta membrane on top of our footing) — then it’s a weak point that should be addressed, if at all possible.
Even with significant insulation on the exterior wall of the foundation (Roxul Comfortboard 80: 2 inches plus 3 inches), along with a sprayed-on waterproofing membrane, as well as a vapor barrier (Stego Wrap) and insulation (Roxul Comfortboard 80: 2 inches plus 2 inches) under the basement slab, this junction where the three elements meet — slab, footing, wall — is a weak point. Although it doesn’t address the weakness in R-value, at least the membrane should keep the moisture at bay.
With a 9-foot basement, we’re hoping the temperatures at this depth are consistently mild enough to avoid any kind of significant energy penalty. I’m confident this will be the case because in our last home, a typical suburban tract house without much insulation, the basement always stayed cool in the summer and warm in the winter, even though the ducts to the basement had been closed off so the space never saw any direct benefit from the HVAC system.
For minimal cost in materials, the Delta membrane seems well worth it for the added peace of mind (see Image #3 in the Photo Gallery at the top of the page). I couldn’t find any local suppliers who carried the Delta membrane, so I ordered online from Spycor Building Products.
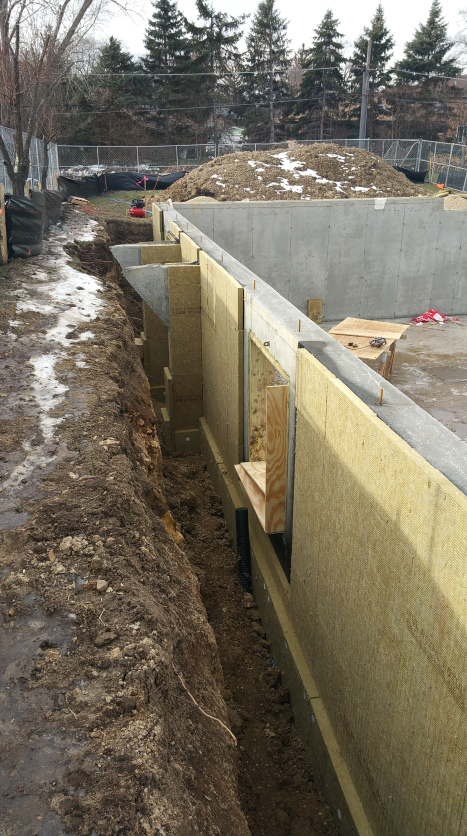
Insulating and waterproofing foundation walls
For the walls, first we used a spray-on waterproofing membrane from Tremco. After the waterproofing was complete, we began installing the two layers of Roxul Comfortboard 80, a dense, rigid form of insulation that can be used below grade. It will give the basement foundation walls R-20 of insulation value.
Roxul is showing up in the big box stores here in the Chicago area, so it’s becoming easier to order. When questions came up about how to install Roxul, or which product to use where, their technical help via email was great. In our case, Fiona Schofield gave us a lot of useful information, including information on the long-term performance of Roxul (a.k.a. stone wool, rock wool, or mineral wool) in a below-grade application.
In addition, after finding a video online, in which what looks to be a European version of Roxul is attached to a cinder-block wall with an adhesive or a thinset mortar, I contacted Fiona and learned it was OK to use an adhesive for our first layer (PL Premium, or similar polyurethane adhesive caulk) as long as we used a mechanical fastener for the second layer. In effect, the first layer just needs to stay on long enough for us to get the second layer up and attached with a mechanical fastener. This really saved us some time since the guys didn’t have to drill two full sets of holes.
Liquid Nails worked really well at keeping the Roxul in place, even when the foundation was damp in certain areas. The guys also didn’t seem to mind cutting or otherwise working with the Roxul. We used serrated knives we purchased from Home Depot, made especially for cutting rock wool.

After some experimenting, the guys also began using a small reciprocating saw, and even a table saw, to cut the insulation to size. I had my doubts about the table saw, but Phil said the Roxul cut easily, and it really didn’t seem to kick up a lot of dust (although he did wear a dust mask for protection).
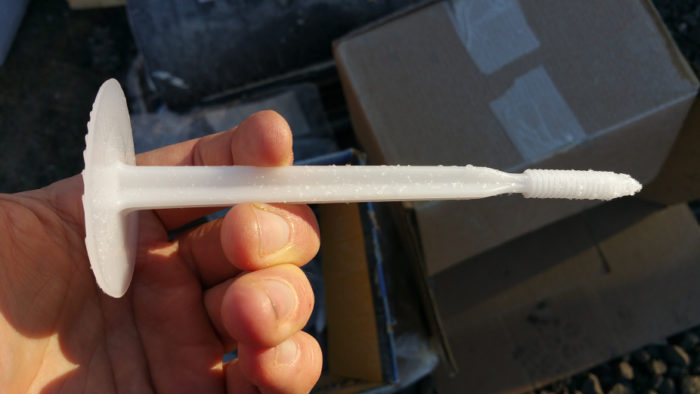
Once the first layer of Roxul (2 inches thick) was in place, we could then install a second, 3-inch layer on the top of it. After a lot of research, and even posting a question on Green Building Advisor, we decided to go with the Rodenhouse fastener (Plasti-Grip PMF) shown in Image #4 in the Photo Gallery at the top of the page.
These really are easy to install. Using a hammer drill with a 5/16-inch masonry bit, the guys drilled a hole to the depth of the fastener, then tapped the PMF fastener home with a hammer. It’s a genuinely straightforward process. Sometimes a fastener wouldn’t sit perfectly, but as long as a majority of the fasteners on each board did, it didn’t seem to be a problem. Based on what I read online, they were much easier to work with than Tapcon or similar concrete screws.
They weren’t cheap, but they were well worth the cost in materials for the savings in labor (and frustration). And Mitch Mahler from Rodenhouse was easy to work with via email in terms of ordering or getting answers to technical questions.
Roxul normally recommends five fasteners per piece (one at each corner and one in the middle), but we found that four on a normal piece, and three for a long, narrow piece of insulation, worked fine — at least for the foundation where the backfill will help to keep the Roxul in place over the long haul.
Thermal bridging in the foundation
Following Passive House science principles, we tried to remove as many points of thermal bridging in the structure as we could. One area where this was addressed in the construction drawings was a 7-inch thermal break between the basement foundation and the attached garage foundation. In other words, there would be no physical connection between the garage and house foundations at all. The only connection would occur above, at the level of framing, where they would be tied structurally together.
The idea was that we could place our two layers of Roxul (5 inches total) in that gap, thus maintaining our layer of Roxul on the exterior of the foundation, uninterrupted (the key point here) around the perimeter of the basement foundation.
On the day the footings were installed, however, our concrete subcontractor expressed serious reservations about the long-term structural stability of the framed house and garage above this gap. He was worried that over time the two foundations might settle and move apart, wreaking havoc with the framed structures above.
So I was back to post another question on Green Building Advisor: How important is a thermal break between a house foundation and an attached garage foundation? (Here is the link to the Q&A thread.) Unfortunately, there just doesn’t seem to be a lot of information available as to how to proceed. In the end, we decided to ignore these connections, hoping that the thermal bridging at these two points (garage-house, garage-front porch-house) won’t be all that significant to our heating and air conditioning costs.
I assumed that Passive House builders would incorporate rigid foam insulation into the concrete forms at these points, but I couldn’t find any pictures or descriptions showing or talking about this in books, magazines, or anywhere online. Either Passive House builders ignore these kind of connections, or I just missed the information somehow.
We did our best to cover these thermal bridges, but clearly it’s imperfect, so all we can do is hope there won’t be a significant energy penalty associated with these connections.
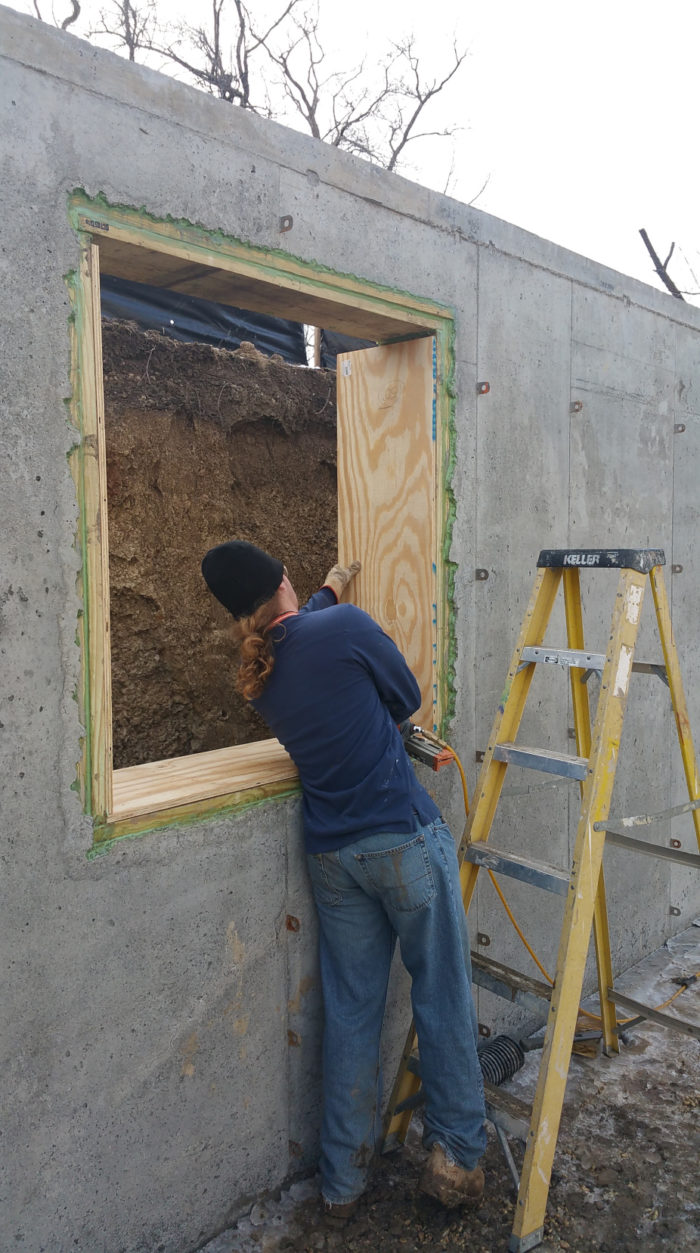
Installing basement windows
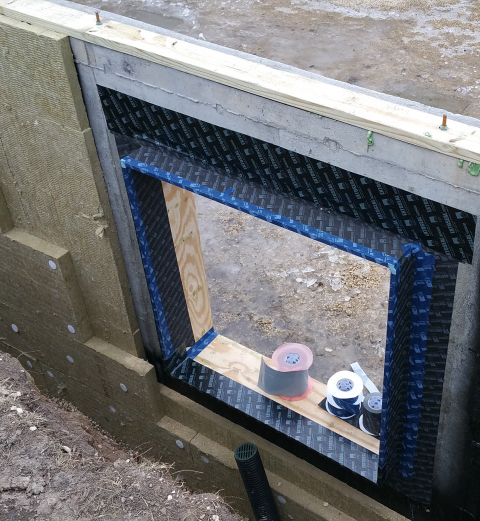
As the Roxul was going on the foundation, Phil and Nils installed window bucks for the two basement windows (see Image #7 in the Photo Gallery at the top of the page). The bucks were sized so they meet up flush with the two layers of Roxul. Eventually, a layer of HardieBacker cement board and two coats of Tuff II (the product we’ll be using for the parge coat) will cover the window bucks, and also the transition between the top of the foundation walls and grade around the perimeter of the house.
I initially intended to use the R-Guard line of liquid membranes by Prosoco for air sealing and waterproofing all seams and window/door openings, but cold temperatures made this impossible (they require 40°F and rising, which would be the exception rather than the rule here in Chicago for December and January).
Our Plan B was the series of Pro Clima products sold by 475 High Performance Building Supply. Most of them, including the sealant, can be used down to 14°F without issues. Another option would’ve been the line of Siga tapes, another popular choice used in Europe, available from Small Planet Supply.
So as the window bucks went in, I followed, applying Contega HF sealant to all the seams and gaps. The sealant is acting as our first layer of air blockage. It’s super sticky, so I don’t doubt that it’s permanently flexible. I did a mock-up of our wall assembly months ago, and the HF on the seams is still tacky to the touch. It goes on light green, then slightly darkens as it dries.
Here are some tips for using the sealant:
- I’ve found that completely snipping off the metal clip on the end of the sausage (as opposed to just cutting a couple of small slits around it) prevents it from getting jammed in the front end of the gun.
- If I have a half-finished sausage of HF at the end of the day, I put it in a tightly wrapped plastic bag overnight, which allows me to use it within a day or two without any problems.
- Use a tiny spatula to tool the HF into place rather than your finger, as you normally would with a caulk — it’s just too sticky to work by hand.
- Because the HF is so sticky, I wear nitrile gloves, so when it starts to get everywhere — and it will get everywhere if you let it — I just simply change to a new pair of gloves.
- For clean up, the Citrus Solvent we’ve been using with the tung oil works great.
- The Newborn brand of sausage gun we’re using for the HF sealant, found on Amazon, is a really well-made tool.
Getting window details right
It’s easy to forget the realities of a construction site when planning details, like the use of the Pro Clima tapes. I pictured it being a pretty straightforward process, not a winter day in the 20s, fingers numb, propped up on an unbalanced ladder in the hole, while the other guys are cutting wood and Roxul around me — a case of adapt or die, I guess, and a reminder not to be too overconfident about the products you’ll be using, or the installation process that inevitably goes with them.
It was important that the connection between the window bucks and the concrete of the foundation be air-sealed and made watertight before it was completely covered by the two layers of Roxul.
It was in the 20s and 30s, so the HF sealant took a couple of days to firm up before I could apply the series of Pro Clima tapes. I used a combination of tapes, including the Tescon Vana (the bright blue), Profil (light blue — great for making inside and outside corners), Contega Solido Exo (black, 6 inches wide), and the Extoseal Encors for our sills (475 has a great series of videos showing how to use each tape).
We knew the bucks would be sitting for some time, exposed to the elements, before the windows actually show up, so we decided to completely cover the openings just to be safe. This gave me extra practice using the tapes, which definitely helped, and it meant not stressing out every time the forecast called for rain or snow.
The only tape that gave me fits was the black Contega Solido Exo. It’s thinner than the other tapes, so it wants to stick to itself (wrinkles are more difficult to avoid), and I find it much harder to pull it away from its peel-and-stick backing than the other tapes. I worried that the Extoseal Encors might be difficult to get right, but it — along with the Tescon Vana and Profil tapes — was surprisingly easy to work with.
In lieu of on-site training from someone who’s used a specific product consistently, videos are invaluable when using new products and you want to get the details right. Without them, you’d be in for a frustrating process of trial and error. This one was my Bible for installing Extoseal Encors:
Extoseal Encors window flashing demonstration with Chris Corson of Ecocor
Because the Extoseal Encors can stretch around corners it’s easy to stretch it too much, thereby inadvertently thinning it out. I’ve found that when I get to a corner it’s better to just fold it around the edge rather quickly, without overthinking it too much, which helps to maintain the thickness of the material at and around the corners.
I can’t recommend enough doing a mock wall assembly, or practicing on scraps, to get a feel for using these products, before you find yourself on-site doing it for real.
We’re almost ready to climb out of the hole. It will be exciting to watch the guys start framing so we can see the basic form of the house begin to take shape.
Weekly Newsletter
Get building science and energy efficiency advice, plus special offers, in your inbox.


10 Comments
'If I Had A Million Dollars' by Barenaked Ladies
I'm just saying.
Eric
Your attention to detail is really apparent in the photos.
One small thing: I think you have conflated a couple of concepts in your description of the capillary break. The "red pen test" is usually used to show a continuous air barrier. I guess you could alternately do something similar to show the same continuity in the thermal envelope. But the capillary break is to stop moisture migration through concrete. It isn't an air barrier, nor does it provide any appreciable insulation. With exterior mineral wool you still end up with a thermal bridge at the footings.
John --- I wish I could
John --- I wish I could disagree, but you're right, building "green" definitely isn't cheap. Nevertheless, it comes down to priorities: an initial (significant) investment in air sealing and insulation, or building more conventionally and accepting higher energy bills. We knew we were staying put for quite awhile, so we decided to build as "green" as possible. We're also hoping the air sealing/insulation pays off in terms of overall comfort.
Until more production builders take on Zero Net Energy, Passive House, or something similar for whole subdivisions, building "green" is going to remain cost prohibitive for most homeowners --- unless they're able to take on the role of GC and a significant chunk of the work themselves, or they have the means to afford a custom built home.
Malcolm --- Thank you for the compliment!
We knew the Delta footing membrane would only keep the moisture at bay, rather than offering any thermal protection or air sealing benefit. I just wanted to bring this area to the attention of others --- the basement slab/foundation wall connection --- in case they were in the design phase and wanted to tackle it directly, i.e. insulating below the footings. I thought it was interesting that even though the basement walls and slab were thermally protected by the layers of Roxul, this connection where they meet still ended up being a weak point.
And you're right, the "red pen test" is typically thought of as a search for air leaks, but why not go hunting for air leaks and thermal bridges separately or simultaneously --- they show up in the damnedest places once you start looking, and either one can undermine the integrity of a structure.
Eric
"I can’t recommend enough doing a mock wall assembly, or practicing on scrap"
That's very good advice. Last summer though, I mocked-up a small version of the interior trim for the windows on a job, but when I returned the next day to see how they were doing, I found they had picked it up upside-down and the first two windows they had completed had sills on the top!
Eric,
Did you consider
Eric,
Did you consider insulating from the inside? That would have provided the thermal break between the footing and the bottom of the foundation wall that you are looking for.
I too have an attached garage and we are insulating the inside of the shared walls with EPS and the top of the shared sill plates with OCSF. We are going to use a high PSI foam beneath the door to break the bridge that otherwise would have occurred between the cold garage slab and the insulated basement slab.
Malcolm --- That's funny.
Malcolm --- That's funny. Hope you got pictures of it!
Jonathan --- No, we were always going to go with the insulation on the exterior side of the foundation, mainly because all the Passive House sources I could find suggested that was the way to go. We also have a high water table, so we thought having the Roxul on the outside, in combination with a spray-on waterproofer, would be our best bet for keeping water away from the foundation and the basement.
Did you start your blog yet? How is your build going?
Delta Footing Barrier
Does rebar penetrate the Delta Footing Barrier? How is this sealed?
Thomas
It looks to me like Eric has used a keyway instead of tying the foundation to the footing with rebar. The installation guide suggests cutting a small X in the membrane if rebar is used. Capillary barriers function in the same way vapour barriers do - that is the amount of moisture they stop is proportionate to the area they cover, so sealing any perforations isn't important in the way it would be if we were talking about, say, membrane used as flashing or an air barrier.
Hi Eric,
Thanks for your thorough explanation and guidance. I notice in the photos that the spray-on damp proofing was left shy of the window openings. Was the concrete left exposed in those areas so the tapes used to seal the window bucks would adhere to the concrete instead of the damp-proofing? Are the tapes unable to adhere to the damp-proofing? How did you damp-proof the portion of concrete that was still exposed after the window bucks were completely taped?
Did you consider placing foam under the footings to mitigate the "weak point" in the thermal envelope?
Fred Williams
Fred, around the 2 basement windows was left exposed so I could use the tapes in those areas (a liquid membrane like Prosoco's Joint and Seam and Fast Flash could've worked too). I would check with Pro Clima, Siga, or 3M before applying their tapes over damp proofing. I'm guessing the Prosoco wouldn't have any issues, but even in that case I would check with the manufacturer to make sure there won't be any adhesion issues.
Even after the tapes were complete there remained some small areas without damp proofing, but the concrete and Rockwool in this area was eventually covered in stucco, so we weren't that worried about moisture penetration for these small areas. With substantial roof overhangs these areas around the basement windows see little rain, but even when they do they have ample time and ability to dry out.
We thought about using insulation under the footings, but decided it wasn't worth the cost and effort.
Log in or create an account to post a comment.
Sign up Log in