
Image Credit: All photos: Eric Whetzel
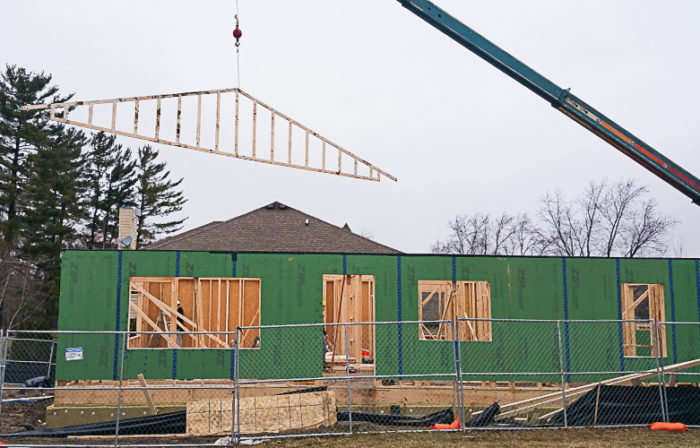
Image Credit: All photos: Eric Whetzel Roof trusses go up quickly. They are straight, uniform and use less material than a roof built with conventional rafters made from dimensional lumber.
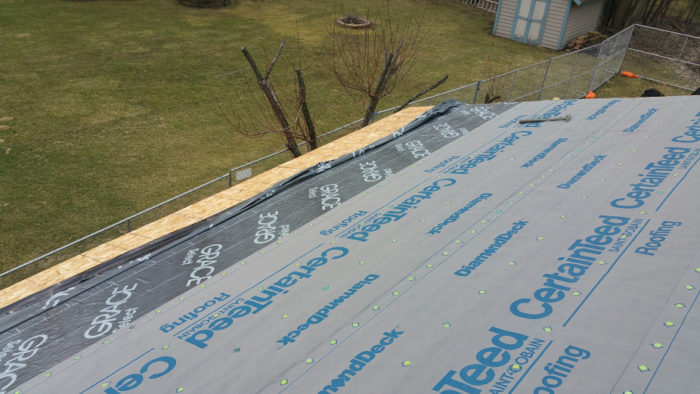
A strip of sheathing extends above the top plate and is attached to the outside of the raised-heel roof trusses. The perimeter of the assembly is then sealed inside and out to maintain the air barrier. Wind and cold temperatures conspired to make a mess of the Ice & Water Shield along the eaves. A simple roof shape allowed asphalt shingles to go on quickly.
More Guest Blogs


Editor’s note: This post is one of a series by Eric Whetzel about the design and construction of his house in Palatine, Illinois, a suburb of Chicago. The first blog in his series was called An Introduction to a New Passive House Project; a list of Eric’s previous posts appears below. For more details, see Eric’s blog, Kimchi & Kraut.
Once the wall assembly details were figured out, and our ceiling setup detailed, the transition between the two became the next challenge. In other words, how to carry the air barrier over the top of our exterior walls.
I found an article by Chris Corson published by The Journal of Light Construction to be very helpful.
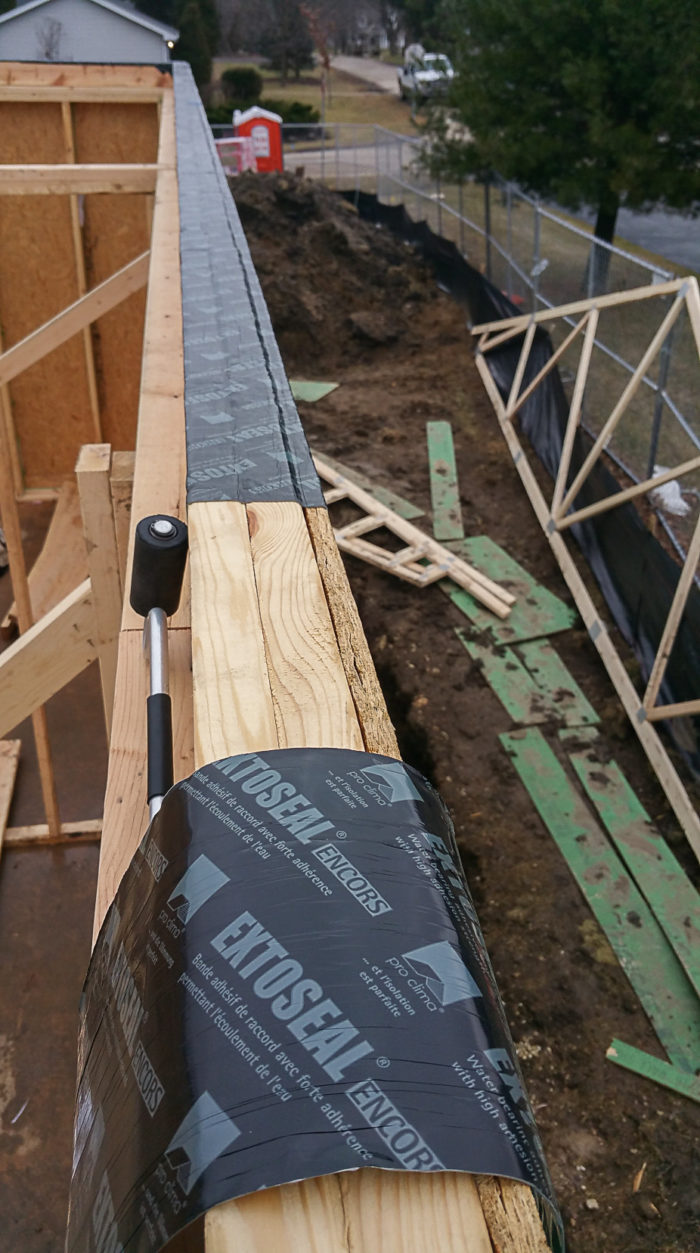
Using a waterproof peel-and-stick membrane to wrap over the top of the wall (going from exterior sheathing — in our case 7/16-inch Zip sheathing — to the interior side of the top plates) seemed like the easiest way to maintain a continuous air barrier at the wall-to-roof junction. The membrane would also have a nice air sealing gasket effect after the trusses were set in place.
I also found this excellent Hammer & Hand video on YouTube (one of their many helpful videos).
By being able to carry the Zip sheathing up above the top plate of the wall, hugging the bottom of the trusses, meant our 4 inches of Roxul Comfortboard 80 over the Zip sheathing would rise above the top of our walls, so that thermally we would be protected from the exterior walls to the attic, which will be filled with 24 inches of blown-in cellulose.
That makes our thermal envelope continuous for the whole house: under the basement slab to the exterior of foundation, to the exterior walls, to the attic (except for one small gap at the footing-slab-foundation wall connection, which I talk about in a separate post).
A high R-value wall meets up with a high R-value attic, with no thermal bridging, making our thermal layers continuous. When this is combined with an equally airtight structure, conditioned air cannot easily escape, resulting in a significantly lower energy demand for heating and cooling (and therefore lower utility bills), and added comfort for the occupants.
Finding the right flashing tape
I tried using rolls of conventional peel-and-stick window flashing membrane, purchased from Home Depot and Mendards, but it performed poorly, even in unseasonably warm temperatures for February in Chicago.
I switched to Grace Ice & Water Shield, normally used as a roofing underlayment along the first few feet of roof edge. Because it came on a long roll about 4 feet wide, my wife and I cut it down to a series of strips that could more easily be applied to the wall-top plate connection. While the sun was out, the Grace membrane worked fairly well, especially when I applied pressure with a J-roller.
Unfortunately, the sun and warmer temperatures didn’t stick around long enough for me to finish. Within hours, it was back to rainy, gray, and cold — typical Chicago winter weather for February. When the weather went gray and cold again, we started to use a heat gun to warm up the Grace membrane, which had turned stiff and nearly useless in the cold.
After wasting a lot of time and effort trying to preheat the Grace membrane before installing it, I finally relented and switched to the much more expensive (but also much more effective) Extoseal Encors tape from Pro Clima. Where the Grace membrane lost virtually all of its stickiness, the Extoseal Encors stuck easily and consistently, with the J-roller just helping it to lay flatter and more securely.
It was a case of trying to be penny wise but ending up pound foolish. Looking back, I would gladly pay an extra $300 in materials to have those hours of frustration back (including the time it took to run to the store and buy the heat gun, which turned out to be ineffective anyway).
After finishing sealing the Zip sheathing-top plate connection on all the outside perimeter walls over the weekend, it was time for the trusses to be installed.
Installing the trusses
Zach let me stand by the front door rough opening and give the crane operator hand signals. It was a fun way to watch the roof take shape. Once the trusses neared the front door, Zach could signal the crane operator himself, so I was able to get some shots from just outside the construction fence (see Image #2, below).
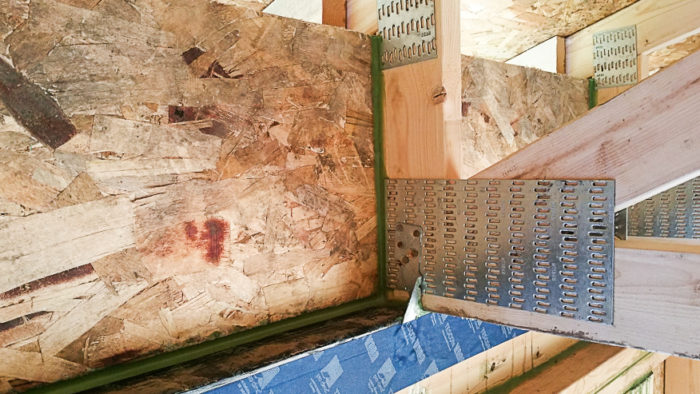
Once the trusses were on, and the guys had a chance to install the final top row of Zip sheathing (up to the bottom of the trusses on the exterior side of the wall), I could move inside to seal all the connections from the interior (see Image #3, below).
Because of the cold, the Grace membrane was beginning to lift at the edges in certain spots, so just to make sure it had a nice long-term seal, I went around the perimeter of the house and used a layer of Tescon Vana (3 inches wide) tape to seal the edge of the Grace membrane.
Installing shingles
We had to wait for shingles for quite some time. First we had to fire our GCs, and then I had to find a roofer and a plumber (to make penetrations through the roof before the shingles went on). But before the plumber could even start, I had to get the Intello installed on the ceiling. And even before that, I had to figure out the insulation baffles, which I’ll talk about in a separate post.
It took a while to find a roofer, since they would have to make three separate trips for a relatively small job. The first trip was just to set down the Grace Ice & Water Shield at the edges of the roof, along with a synthetic roofing underlayment (the consensus was that typical roofing felt wouldn’t hold up to long-term exposure). As it turned out, it took weeks before the plumbers made their penetrations through the roof sheathing (literally the day the roofers showed up — a long, horrible story in and of itself that I’ll save for later).
The second trip out for the roofer was to install the shingles on the roof of the house. The third trip was to install shingles on the garage roof, but that could only happen after the Roxul had been installed on the exterior of our Zip sheathing (in order to make a proper sealed connection between the wall of the house and the garage roof).
There weren’t many roofers willing to work with our unique Passive House sequencing, but Peterson Roofing was kind enough to take it on.
Unfortunately, the day after the guys installed the Grace membrane and the synthetic underlayment, we had a cold, blustery day. Once the wind grabbed the Grace membrane, the membrane rolled up on itself, turning it into a real mess (see Image #4, below).
Because of our recent past bad experiences with general contractors, I just assumed I was on my own, so I spent a couple of hours putting down new layers of the Grace membrane. When Peterson roofing found out, they were shocked I did it myself, and assured me I could’ve called them and they would’ve come back out. We were so used to people not following through, that my low expectations meant it didn’t even occur to me to call them.
Saving a few bucks on roofing
We initially were going to use CertainTeed’s Landmark TL shingles, which mimic a cedar shake shingle profile, but Armando from Midwest Roofing Supply in Schaumburg, Illinois, was kind enough to walk me through the options available. Because our roof isn’t steep, only the neighbors from their second-story windows would get to appreciate the effect. He recommended we save some money, while not giving up on quality or durability, and go with the Landmark Pro product.
The shingles went on quickly since we have a relatively small and simple roof (see Image #5, below). In addition to the aesthetic leap that the shingles contributed to the appearance of the structure, it also meant I didn’t have to go around cleaning up the subfloor every time it rained.
Although the synthetic underlayment worked pretty well at keeping the rain out, if there was significant wind combined with rain, the water easily found its way under the underlayment where it could then drip and fall on the subflooring below. It was pretty depressing to show up to the job site after a hard rain knowing I was going to spend the first hour just cleaning up and looking for leaks.
Weekly Newsletter
Get building science and energy efficiency advice, plus special offers, in your inbox.


10 Comments
top plate details
can you provide further details of your top plate framing? It appears as if there are double 2x4 on edge, above the framed double top plate? How will the 3.5" depth between the bottom of truss chord and the top plate be finished? service cavity?
air barrier
Eric, how are you detailing the connection between the top plate peal and stick to an air barrier at the bottom chord of the trusses? Are you using another applied membrane or going with the drywall air barrier approach?
top plate - air barrier
Ryan, there are actually 2 - 2x6's on their sides above the framed top plate. And yes, that gap is being used for a service cavity, mainly for ceiling lights.
Steven, we used the Intello smart vapor retarder membrane on the ceiling, attaching it to the underside of the 2x6 that was itself attached to the roof truss to create the service cavity. We then carried the Intello down, part way, onto the wall, basically ending at the double top plate.
Late reader to this series (actually read it on your blog first). We are working on a very similar project also in Zone 5. I am curious why you did not use any exterior insulation on your roof? It seems that you followed many of the PGH and Passive House type models, but did not insulate on the exterior of the roof. I am asking as we are potentially looking at doing the same thing.
Any specific reasons why you chose to go this route?
We will be running Rockwool Comfortboard 80 on our exterior walls as well.
Dan,
Eric has a ventilated attic, so there would be no reason to use rigid insulation on exterior of the roof.
Malcolm,
Thank your reply to my question. Your answer makes sense to me. With my roof (see attached plans) assembly, we are also going to have be vented. But with it being vaulted I was trying to decide how best to insulate and ventilate it. Suggestions?
Dan,
I would lean towards assembly #1 in this article.
https://www.greenbuildingadvisor.com/article/five-cathedral-ceilings-that-work
Sorry, Dan, I didn't receive the typical email letting me know that a new question had been posted.
Malcolm beat me to a proper response.
Thanks, Malcolm!
No problem Eric, thank you.
Any updates or changes you'd make after the time has elapsed between finishing and today?
Thanks for the blogs Eric. They are a great resource.
Log in or create an account to post a comment.
Sign up Log in