More Guest Blogs


Editor’s note: This post is one of a series by Eric Whetzel about the design and construction of his house in Palatine, Illinois, a suburb of Chicago. The first blog in his series was called An Introduction to a New Passive House Project; a list of Eric’s previous posts appears below. For more details, see Eric’s blog, Kimchi & Kraut.
Continuous insulation and double-stud walls both are options for high-performance walls, but we decided continuous insulation (CI, for short) made the most sense to us. Continuous insulation has its own challenges, especially in terms of air and water sealing details around windows and doors. Still, it intuitively seemed the way to go.
For anyone interested in the performance of various wall assemblies, this paper from the Building Science Corp. is an excellent place to start. Or you can check out Hammer and Hand’s evolving wall assembly strategies. And here’s a mock-up wall assembly by Hammer and Hand showing many of the details we incorporated into our own house:
While many believe a double stud wall simplifies much of the framing, we decided that a continuous insulation approach, which in theory should better manage seasonal moisture changes inside the walls, was worth the extra effort.
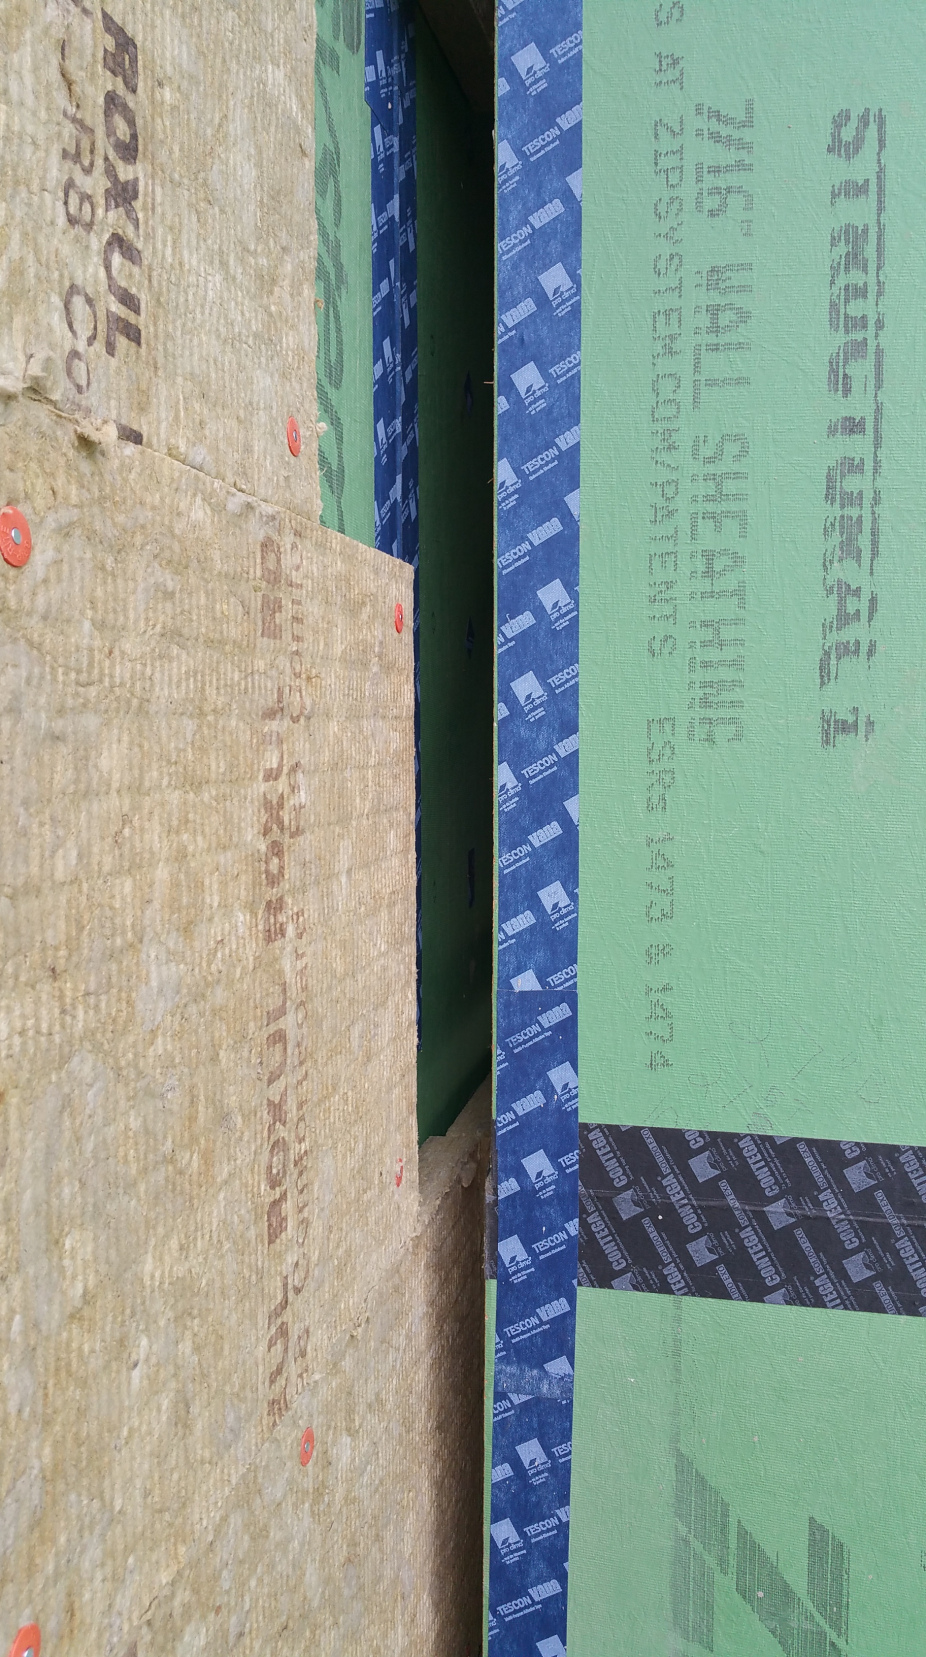
Two continuous layers of mineral wool
Based on the drawings from our original builder, Evolutionary Home Builders, which recommended 3 3/4 inches of rigid foam, and the recommendations of both PHIUS and Green Building Advisor for our Climate Zone 5 location, we decided to go with 4 inches of Rockwool Comfortboard 80 on top of our Zip System sheathing.
In the Chicagoland area it’s still a struggle to find builders or subcontractors who are knowledgeable about, or even interested in, “green building.” Even though PHIUS has dozens of certified builders and consultants listed for Illinois and the larger Midwest region, it’s unclear just how many of them have worked directly on an actual Passive House project.
Until there’s more demand from consumers, or the building codes change significantly, it’s difficult to imagine the situation improving much in the near future. This is unfortunate since particularly here in the Chicago area, or the Midwest more broadly, homes could really benefit from the Passive House model (or something close to it, e.g. The Pretty Good House concept) to cope with our weather extremes.
Many lookers, few takers
In our own case, when I think of all the individual trades we had to hire, a siding contractor was far and away the most difficult to secure. Because of the level of detail involved before the siding itself could be installed, it was a real challenge even to get quotes. As things turned out, we had nearly 20 contractors (a mix of dedicated siding contractors and carpenters) visit the job site before we received an actual estimate.
Many of those who visited the job site expressed genuine interest, most going so far as to acknowledge that this kind of wall assembly made sense and would probably be mandated by the residential code at some point in the future. But almost without exception they would disappear after leaving the job site—no bid forthcoming, and no response to my follow-up phone calls or emails.
Clearly they were terrified, not without justification, to tackle something so new, viewing our project through a lens of risk rather than as an opportunity to learn something new. From their point of view, why not stick with the type of jobs they’ve successfully completed hundreds of times in the past? It also didn’t help that I was a first-time homeowner/GC, rather than a GC with a long track record of previously built homes in the area.
In addition, not only is continuous insulation over sheathing a novel concept in the Chicago area, especially in residential builds, including a ventilated rainscreen gap behind siding is almost unheard of. Typically, fiber cement lap siding is installed directly over housewrap (this can be observed directly on hundreds of job sites across the city and suburbs).
While there are any number of certified LEED projects in our area, and even some Passive House projects (both residential and commercial), for the most part consumers are still largely unaware of Passive House or other “green” building standards like Living Building Challenge. Clearly “green” building, let alone Passive House, has its work cut out for it here in the Midwest if it ever hopes to have a meaningful impact on the construction industry.
Installing the Rockwool insulation
Mike Conners, from Kenwood Passivhaus, was nice enough to recommend Siding and Window Group, which definitely got us out of a jam. Thankfully, Greg, the owner, was up for the challenge and was nice enough to let us work with two of his best guys, Wojtek and Mark.
Wojtek and Mark dropped off some of their equipment at the site the day before they were to start work on the house. This gave me a chance to go through many of the details with them directly. Although a little apprehensive, they were also curious, asking a lot of questions as they tried to picture how all the elements of the assembly would come together. In addition to the construction drawings, the series of videos from Hammer and Hand on its Madrona Passive House were incredibly helpful.
Also, this video from Pro Trade Craft helped to answer some of the “How do you…?” questions that came up during the design and build phases:
As sophisticated and intricate as some architectural drawings may be, in my experience nothing beats a good job site demonstration video that shows how some newfangled product or process should be properly installed or executed.
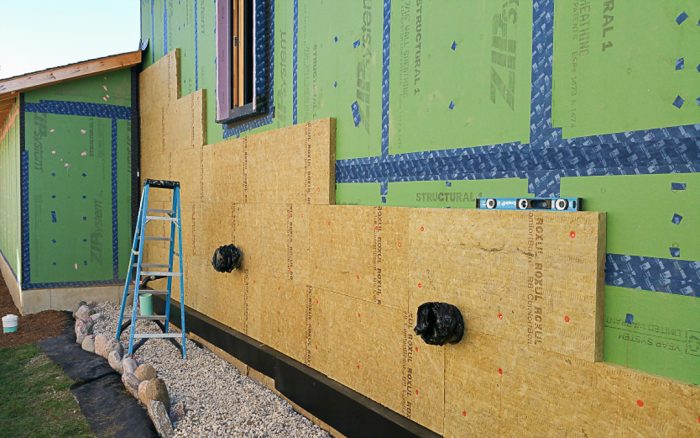
On the first day, while Wojtek and Mark installed the Z-flashing between the Zip sheathing and the foundation, along with head flashings above the windows and doors, I started putting up the first pieces of Rockwool over the Zip sheathing.
We installed the first layer of Rockwool horizontally. The second would be oriented vertically. This alternating pattern helps ensure that seams are overlapped.
We didn’t worry too much about the orange plastic cap nails missing studs since they were sized to mostly end up in the Zip sheathing. In the end, only a couple of them made it completely through the Zip without hitting a stud.
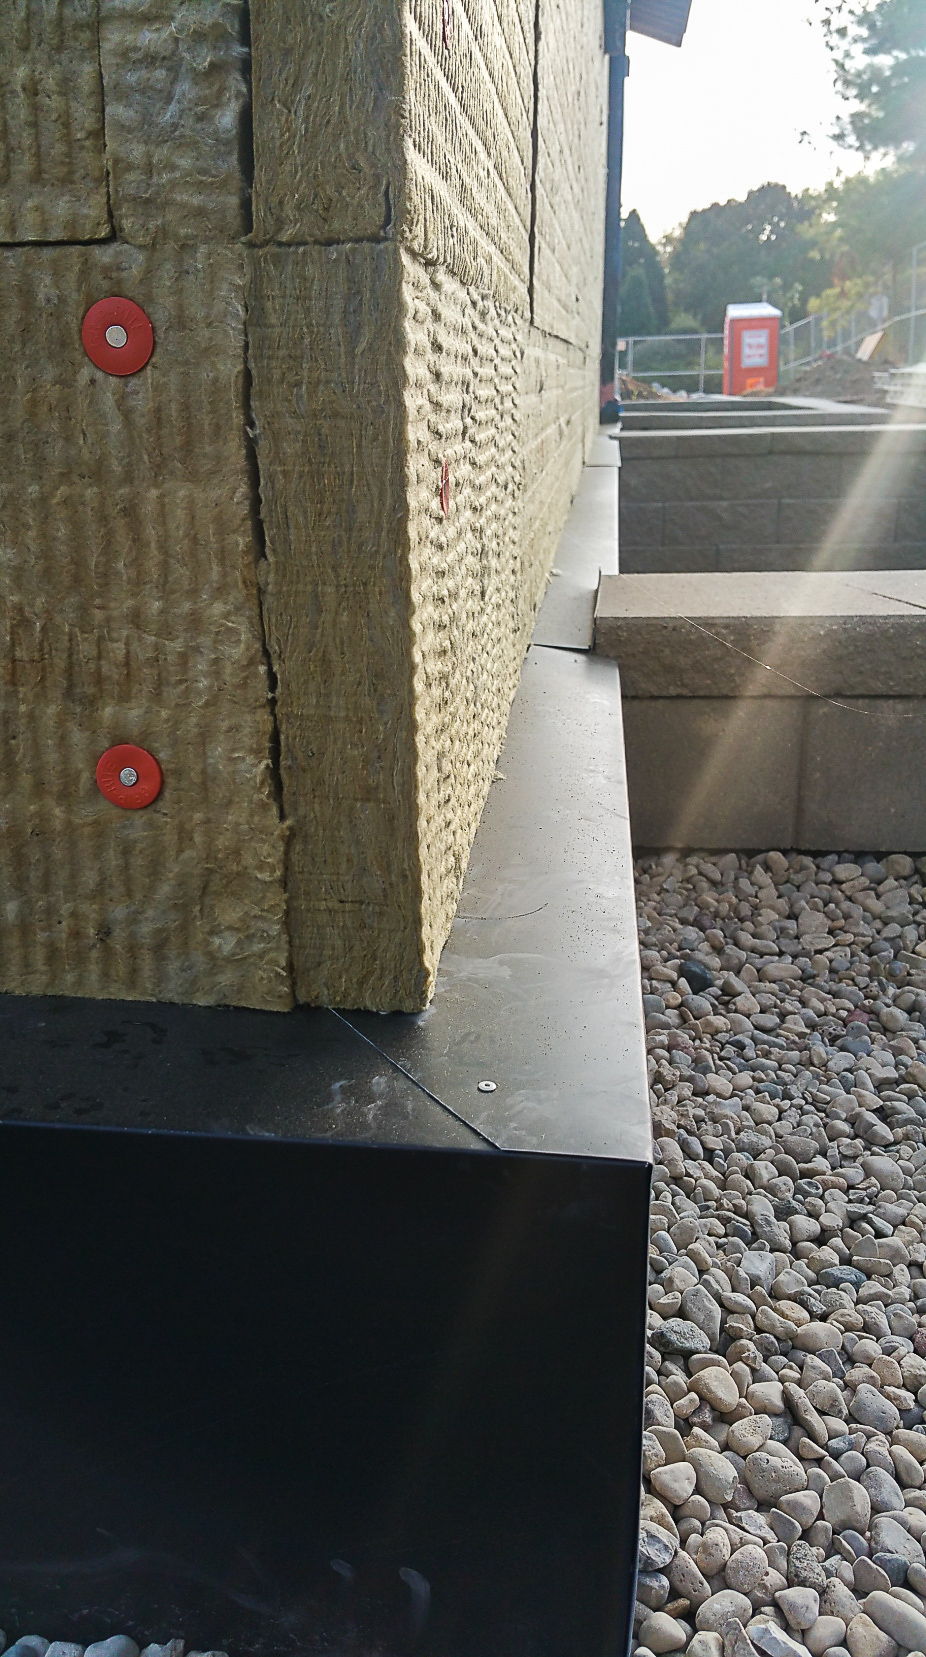
Before installing the bottom row of Rockwool we used shims to create a slight gap between the Rockwool and the metal Z-flashing on the foundation insulation. This will give any water that ever reaches the Zip sheathing a clear pathway out.
In a pattern that would repeat itself with each layer of the remaining wall assembly, Wojtek and Mark would carefully think through the details as they progressed slowly at first, asking questions as issues arose, before getting the feel for what they were doing and eventually picking up speed as they progressed around each side of the house.
Dealing with door and window openings
Working through the many details with Wojtek and Mark — the majority of which occur at junctions like windows and doors, the top and bottom of the walls, along with mainly outside corners — was both collaborative and deeply gratifying. They demonstrated curiosity and an ability to problem-solve on the fly, and they clearly wanted to do things right, both for me as a customer and for the house as a completed structure (it felt like both aesthetically and in building science terms).
They never hurried over specific problem areas, arrogantly suggesting they knew better, instead they patiently considered unanticipated consequences, potential long-term issues, and actively questioned my assumptions in a positive way that improved the overall quality of the installation. This mixture of curiosity, intelligence, and craftsmanship was a real pleasure to observe and work with.
If a GC built this level of rapport with each subcontractor, I can certainly understand a refusal to work with anyone outside of their core team—it just makes life so much easier, and it makes being on the job site a real pleasure.

For the second layer of Rockwool, Wojtek and Mark tried to hit only studs with the 3-inch Trufast MP-3000 screws. Screwing into the studs with these fasteners, in effect, became a guide for accurately hitting studs with the first layer of strapping.
If our lot had been larger, we would’ve gone with a completely detached garage, but unfortunately it just wasn’t an option. We left a gap between the garage and the house so both layers of mineral wool could slip between the two, keeping the thermal layer on the house unbroken.
Installing battens to create a rainscreen
Initially we were going to use two layers of 1×4 furring strips (also referred to as strapping or battens). The first layer would be installed vertically, attaching directly over the 2×6 framing members through the two layers of Rockwool and the Zip sheathing. The second layer would be installed horizontally, anticipating that the charred cedar siding would be oriented vertically on the house.
But as the second layer of Rockwool went up, Wojtek and Mark pointed out that putting the siding in the same plane as the Rockwool/metal flashing on the basement foundation would be needlessly tricky. Maintaining a 1/8-inch horizontal gap between the bottom edge of the vertical siding and the metal flashing on the foundation around the house would be nearly impossible, and any variation might prove unsightly.
As a solution, we decided to use 2×4s for the first layer of strapping. This allowed the siding to be pushed slightly out and farther away from the Z-flashing covering the face of the Rockwool on the foundation. The bottom edge of the siding could be lowered. Wojtek and Mark also found that the 2×4s were easier to install than the 1×4 furring strips so that they didn’t overly compress the insulation (an easy thing to do).
Unfortunately, increasing the overall wall thickness with 2×4s meant having to use longer Fastenmaster Headlok screws (it would also cost us later when it came to the siding on the north side of the house—more on this later). Apart from this change, the additional overall wall thickness mostly just increased the air gap in our rainscreen, which arguably just increased potential air flow while also expanding the drainage plane behind the eventual siding.
In one of the Hammer and Hand videos Sam Hagerman mentions that at least 1 1/2 inch of screw should be embedded into the framing (excluding the thickness of the sheathing). But when I asked a Fastenmaster engineer about this directly he recommended a full 2 inches of the screw should be embedded into the framing in order to avoid any significant deflection over time.
As a result, we ended up using 8 1/2-inch screws. The screws work incredibly well, requiring no pre-drilling. They’re fun to use with an impact driver (keep your battery charger nearby). Along with the plastic cap nails and Trufast screws, I think we ended up with less than a dozen fasteners that missed the mark for the entire house—a testament to Wojtek and Mark’s skill. I was able to seal around these errant fasteners from the inside with a dab of HF Sealant.
During the design stage, using these longer screws prompted concerns regarding deflection, but based on this GBA article, data provided by Fastenmaster, along with some fun on-site testing, the lattice network of strapping (whether all 1×4s or our mix of 2×4s and 1×4s) proved to be incredibly strong, especially when the siding material is going to be relatively light tongue and groove cedar.
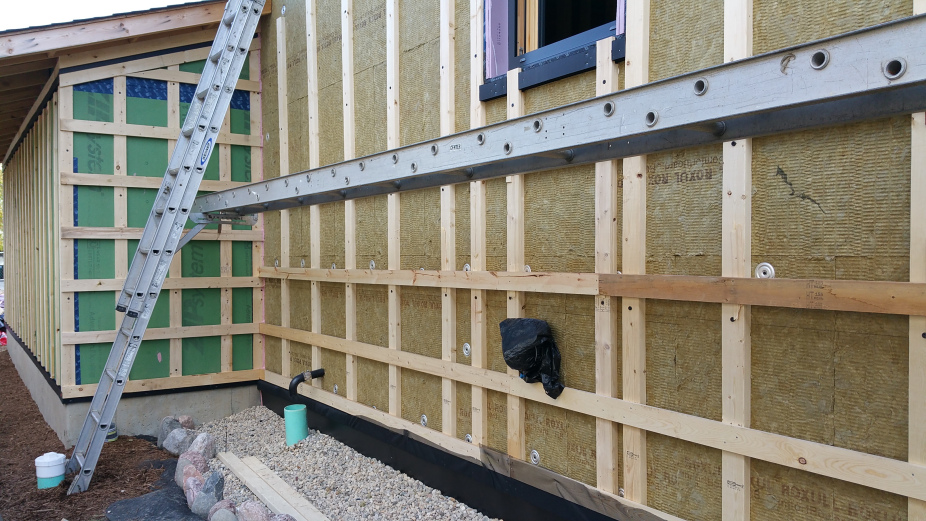
Once the 2×4s were all installed vertically through the structural 2×6s as our first layer of strapping, Wojtek and Mark could install the components of the rainscreen, including the Cor-A-Vent strips at the top and bottom of the walls, as well as above and below windows and doors. In combination with the 2×4s and the 1×4s, this system creates a drainage plane for any water that makes its way behind the siding, while also providing a space for significant air flow, speeding up the drying time for the siding when it does get wet.
In addition to the Cor-A-Vent strips, we also added window screening at the bottom of the walls just as added insurance against insects. We noticed that on the garage, even without any insulation, the Cor-A-Vent didn’t sit perfectly flat in some areas on the sheathing. Since the Rockwool on the foundation, now covered by the metal flashing, was unlikely to be perfectly level, or otherwise true, along any stretch of wall, it made sense to us to double up our protection in this way against insects getting into the bottom of our walls at this juncture.
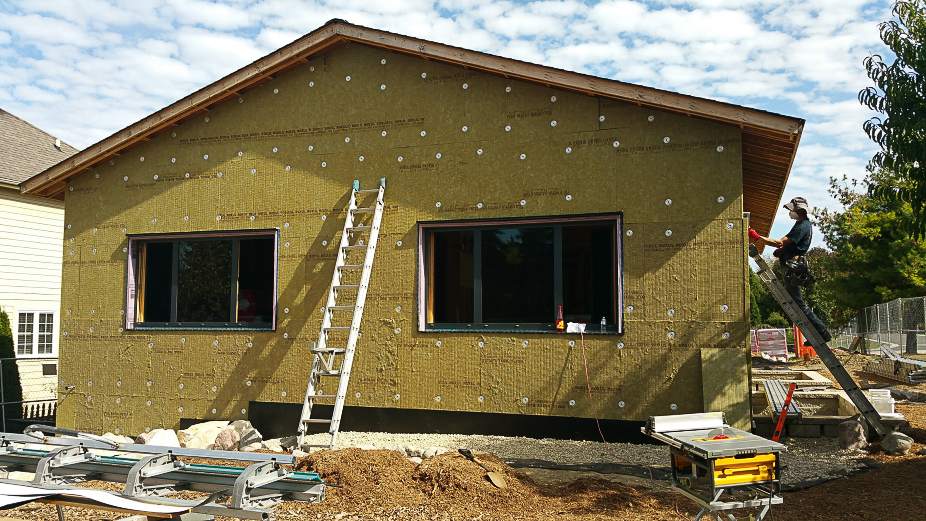
Wojtek and Mark also did a nice job of taking their time to shim the 1×4 layer of furring strips, thus ensuring a flat installation of the charred cedar. This really paid off, not only making their lives easier when installing the tongue and groove cedar, but also providing aesthetic benefits in the overall look of the siding.
This was especially true on the north side of the house, which has the largest area of charred siding with almost no interruptions, apart from a single window. It’s also the tallest part of the house, so without proper shimming the outcome could’ve been really ugly. Instead, once the cedar siding was installed it was impossible to tell there was 4 inches of Rockwool and two layers of strapping between it and the Zip sheathing.
Detailing around windows and doors
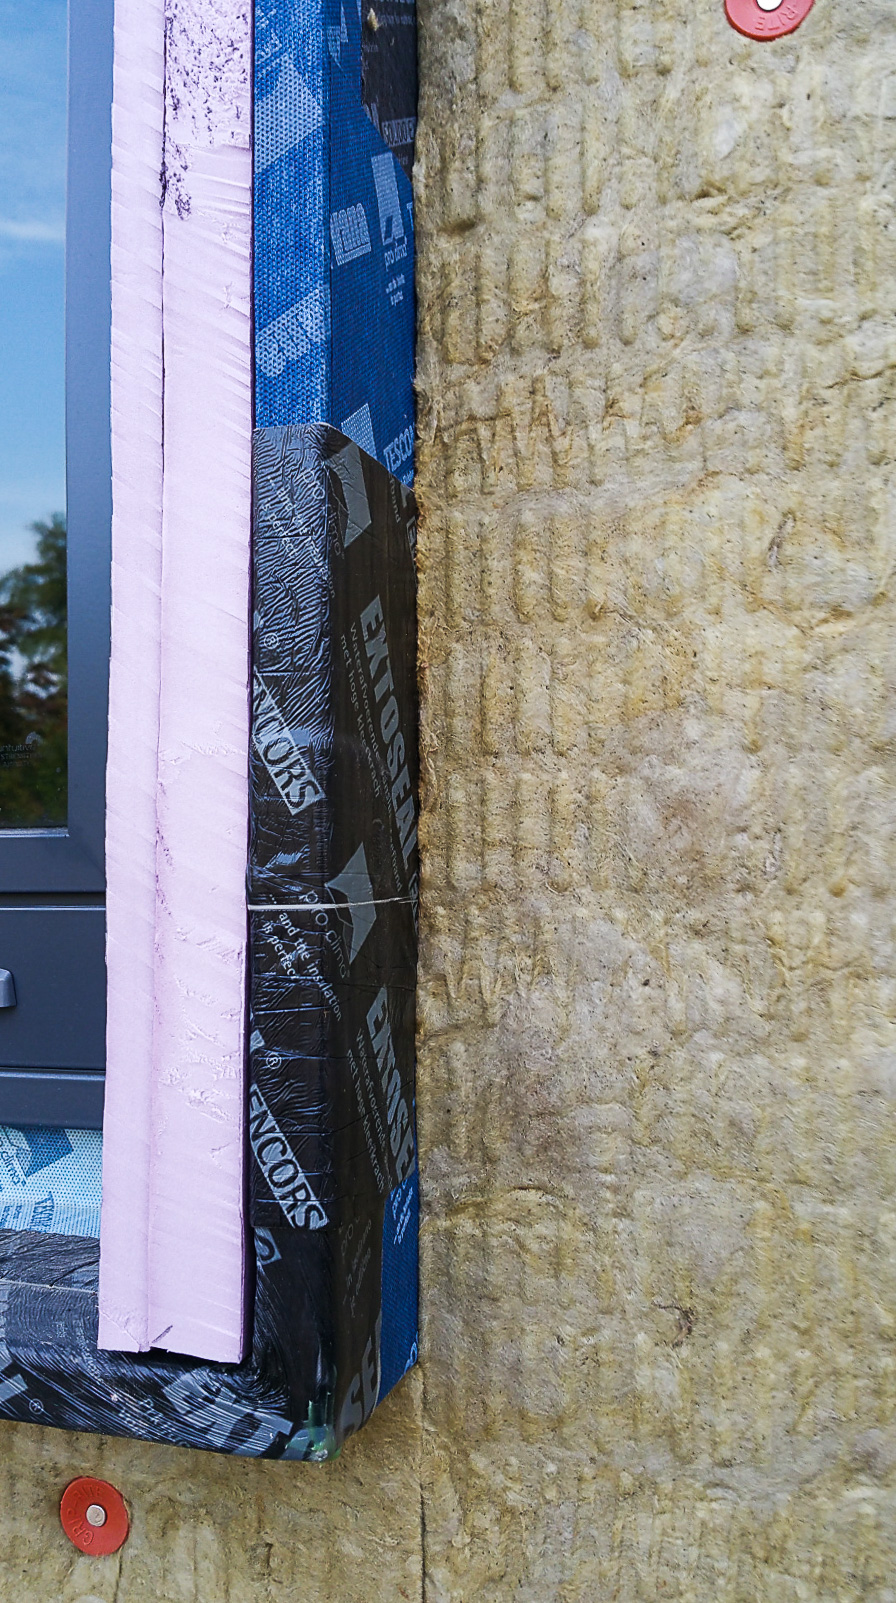
Things got somewhat complicated around windows and doors, but once we worked through all the details for one window it made the remaining windows and doors relatively straightforward.
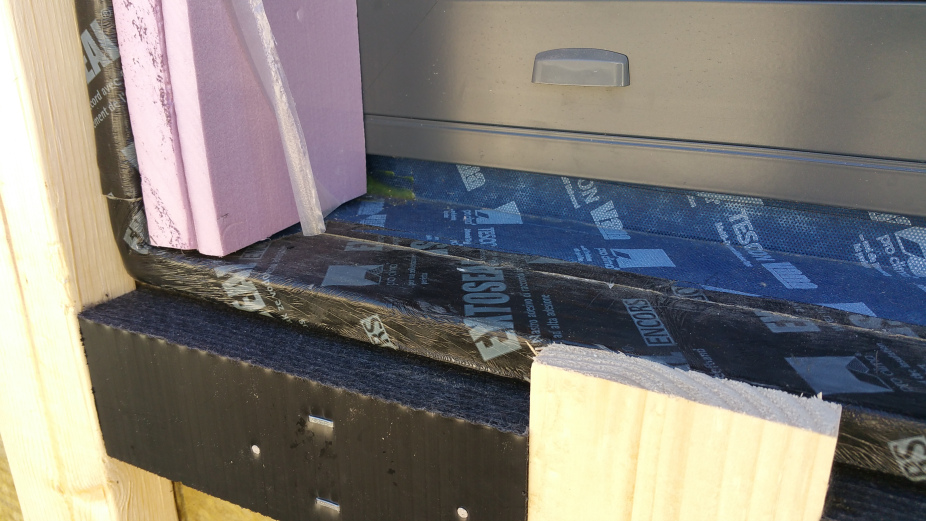
In the photo below you can see all the elements coming together: the window itself, the window buck covered with tapes for air and water sealing, the over-insulation for the window frame, the Cor-A-Vent strip to establish air flow below the window and behind the cedar siding, along with the strapping that both establishes the air gap for the rainscreen while also providing a nailing surface for the siding.
Once most of the siding was complete around each window, but before the 1×6 returns to the window frames went in, we installed a metal sill pan at each window. The pan slid underneath the bottom edge of the aluminum clad window frame and then extended out just past the edge of the siding (I’ll post photos of this detail in the next blog post about installing the charred cedar).
Here’s an article from the Journal of Light Construction discussing a couple of options for trim details. And here’s a detailed slide presentation by Bronwyn Barry regarding details like these for a Passive House wall assembly: Sills and Thresholds – Installation Details.

Many of the same details were repeated at the top and bottom of our two doorways. Once a dedicated metal sill pan was installed (after most of the siding was installed), it felt like we did everything we could to keep water out.
In the next blog post I’ll go through the details for the top of the ventilated rainscreen when discussing how the charred cedar siding was installed.
Other posts by Eric Whetzel
- The Blower Door Test
- Choosing and Installing a Ductless Minisplit
- Installing an ERV
- Choosing Windows
- Attic Insulation
- Installing an Airtight Attic Hatch
- Air Sealing the Exterior Sheathing
- Installing a Solar Electric System
- Prepping for a Basement Slab
- Building a Service Core
- Air Sealing the Attic Floor
- Ventilation Baffles
- Up on the Roof
- A Light Down Below
- Kneewalls, Subfloor and Exterior Walls
- Let the Framing Begin
- Details for an Insulated Foundation
- The Cedar Siding is Here — Let’s Burn It
- An Introduction to a New Passive House Project
Weekly Newsletter
Get building science and energy efficiency advice, plus special offers, in your inbox.


27 Comments
Why not use a layer of ZIP-R, then add rockwool on top in not enough R value?
What would the advantage of that be?
$$$$$$
Due to the significant up-charge for ZIP-R over ZIP, you'll get better bang for your money by adding the extra depth of insulation on the exterior side of the ZIP sheathing.
That's not to say that the OP could've used ZIP-R only, but the required thickness for the foam layer requires additional expense for bracing the structure due to the inherently impaired racking resistance.
One of the goals for our house was to be as "foam-free" as possible, mainly for environmental reasons, so the Zip-R was never a real option for us.
475 HPBS has plenty of info regarding how to achieve "foam-free" assemblies for anyone who might be thinking about pursuing this way of building:
https://foursevenfive.com/blog/a-declaration-of-independence-from-foam-plastic-insulation-49c47d/
By not differentiating between vastly different types of foam, much of the 475 article is lies.
Jon, they could use a few more qualifiers, but they do differentiate where it matters. Are there specific lines you take issue with?
The lack of distinction by foam type would be just the tip of the fear-mongering iceberg of that article. 100% of the evidentiary links to the flammability issue was about flame spread in high-rise buildings (very different from 1-2 story houses), or site-sprayed installation methods in violation of the manufacturer's recommendations.
The toxic smoke, MDI & fire retarder outgassing issues can be arguments for avoiding spray foam as cavity fill, but has far less relevance relative to insulating sheathing sheathing, even ZIP-R, but even less for insulating sheathing on the exterior side of the sheathing.
Quality controlled factory manufactured foam board located on the exterior of the primary air barrier of the house poses zero MDI or fire retardent outgassing threats to the occupants, and on a 1 story building by the time the foam is hot enough to catch fire and burn through the wall the fire would already be too intense. This isn't a 15+ story building where flames could reach upper floors quickly from a fire at some lower floor, with the flames arriving before the occupants could evacuate. On a 1 story house bailing out the window if other routes are blocked by flame doesn't have the same consequences as on the 21st floor. It takes a pretty intense or persistent fire to get polyurethane or polyisocyanurate to light off, and when it does it chars in place.
With ZIP-R any outgassing is contained by a facer, and would normally have both insulation and wallboard between it and an internal house fire. With even 3.5" of rock wool cavity fill the interior of the house would already be engulfed by the time the polyiso would light off.
Dana, I agree that they use high-rise examples that may not apply to typical residential projects. They are in Brooklyn and supply materials for buildings in cities, so why assume they are only talking about 1 and 2 story homes? As for improper installation causing fires, they literally say "Its improper installation has started fires..." What is incorrect about that statement?
According to the spray foam industry, the smoke from burning wood is similar in composition to that of foam. I've looked into it a bit and don't dispute their claim. It's not healthy to breathe either one.
Fire retardant issues involve groundwater and the environment, not just occupants.
According to Huber's safety data sheets, the facers on Zip-R are fiberglass and felt, not foil. They don't publish permeance numbers for the facers but I don't believe they are gas-retarding. Have you found otherwise?
Beautiful job! Inspiring for sure. We were forced into reclaimed polyiso on this last deal of our own. Rockwool is completing a plant nearby so, im hoping and have been told that we will have direct access to "sheet goods", of the rockwool type.
Thanks Russell!
Even here in the Chicago suburbs the Rockwool Comfortboard is still a special order item, and it's strictly by the pallet.
For a GC or company that's constantly using Comfortboard it's not a big deal, but for a self-build it definitely makes you think twice --- especially when rigid foam is so readily available.
Hopefully Rockwool, and even products like Gutex, can earn more market share in the future, making the rigid foam less tempting, especially if the prices can come down as well.
Eric, I always enjoy your blog.
Given the difficulties associated with some of your earlier contractors, it must have felt as though Wojtek and Mark were sent to you from heaven!
Meticulous contractors are hard to find. Your appreciation for them really came through in your blog.
Thanks Rick! It's always nice to hear that people are enjoying the blog.
Working with Wojtek and Mark on all the details was definitely a highlight of the build --- I'm glad that comes through in the writing.
On being your own GC
Yup, this is how it is.
'Real' GCs have a group of subs who are talented and loyal. You find that if something comes up during a project, they can pick up the phone and suddenly an electrician, or plumber is standing their like magic. When you spend hundreds of thousands over a period of time with a contractor, it builds this kind of service.
You and I do not have that relationship and never will.
You can only make up for it the way you have, by knowing stuff.
Having a firm handle on the details. Allow them to practice their trade with supervision but without hovering[I have certainly failed there in the past]
I have had one plumber stop showing up, had to fire one finish carpenter, and have some crazy stories about roofers, so I tend to do my own roofs, for better or worse.....
I have nothing but admiration for what Eric has achieved against some daunting circumstances, but I also think his blog is a cautionary tale. Many of the problems he has encountered are because the approach to building he chose relies on complex details done well.
For owner/builders or those GCing their own houses it's risky to include things sub-trades are unfamiliar with and don't commonly do. If I were in those circumstances I'd be more inclined to do what Stephen Sheehy did and build what was in many ways just a souped-up version of standard construction, not requiring much of a leaning curve for anyone involved, that still yielded great results.
Eric got things done by force of character, and luckily having a personality that seems to thrive on the details. That may be asking a bit too much for most others.
Thanks Malcolm! And I couldn't agree more:
The ideal situation would be the subcontractors showing up and doing their job without even knowing it's a Passive House. In theory, with the right wall assembly and air barrier details this is possible.
For example, limit the number of penetrations through the air barrier as much as possible (make sure to get this in the drawings), and if the homeowner is able and willing to be on site to take care of all the air sealing details, it makes things much more straightforward and easier to achieve.
The reality is, with few exceptions, you as the homeowner will sweat the air sealing details much more than your subs will --- arguably the most important aspect of a high-performance build.
In response to #14:
>" They are in Brooklyn and supply materials for buildings in cities, so why assume they are only talking about 1 and 2 story homes?"
I wasn't making that assumption at all- only pointing out that it's completely irrelevant for homes such as Eric Whetzel's. It's also true that being a nationwide supplier, a large fraction (probably the vast majority ) of their customer-base homes are 3 stories or fewer (probably even most of their local customers in Brooklyn.)
>"As for improper installation causing fires, they literally say "Its improper installation has started fires..." What is incorrect about that statement?"
Nothing incorrect about it- but it's fear mongering about relatively rare events (usually covered by insurance) that can be headed off with a prior discussion with the installers. Forewarned is forearmed.
>"According to Huber's safety data sheets, the facers on Zip-R are fiberglass and felt, not foil. They don't publish permeance numbers for the facers but I don't believe they are gas-retarding. Have you found otherwise?"
Water vapor permeance numbers wouldn't be relevant in any case. Water molecules are tiny, unlike the isocyanates and fire retardents, which are large and much more easily blocked.
methylene diphenyl diisocyanate : https://en.wikipedia.org/wiki/Methylene_diphenyl_diisocyanate
H2O: https://upload.wikimedia.org/wikipedia/commons/a/ab/Water_skeleton_with_no_lone_pairs.png
The methylene diphenyl diisocyanate (MDI) risk from polyiso on a ZIP-R panel is primarily at the facture during the manufacturing process, not the house. It's only an issue at the house for site-applied goods, primarily when the mixtures and temperatures are out of spec. (Again, an argument for not using it as cavity fill, not manufactured board foam applied to the exterior.)
But no, I haven't seen gas retardency or water vapor retardency specs for Huber ZIP-R facers. In homes with spray foam that have measurable quantities of the fire retardents or isocyanates in the indoor air it's more important to look at the air leakage of the wallboard for mitigation more than the vapor/gas diffusion issues of the wallboard & paint. The biggest risk would likely be from foam that has nothing but intumescent paint between the foam and the indoor air, not cavity fill covered with painted wallboard, an even LESS from a ZIP-R facer + air tight wallboard with rock wool as the cavity fill.
>"Fire retardant issues involve groundwater and the environment, not just occupants."
The foam would have to be super-drenched on a regular basis to leach out of the foam and end up with measureable levels in the local groundwater. Groundwater at the foam manufacturer's site or fire retardent manufacturer's site could become contaminates, I suppose, but that's what the EPA regs & enforcement are for (or at least used do be.)
Don't construe any of this as my being "pro foam". To the contrary- in general I prefer to design it out of the assemblies (particularly spray foams), but when the cost of alternative methods is a multiple of the foam solution there can be a good financial rationale to use it, and there aren't many good reasons to be afraid of it, particularly on the exterior smaller buildings such as single family houses such as Eric's.
IMHO the only really GOOD foam is reclaimed foam, since the enviro hit has already been taken, and re-use it's piling on to the benefit side of the environmental cost ^ benefit balance. From an environmental point of view reclaimed rigid foam is far greener than rigid rock wool, since no NEW material inputs are required and at most only modestly higher transport energy cost (and it's not always higher.) It's usually quite a bit cheaper performance than almost any other solution, piling on the the benefit side of the financial cost^benefit balance too.
Dana and Michael, thank you for the comments and info.
I just want to point out, we knew going "foam-free" was an idealistic goal. We're well aware of a whole host of market realties that encourage people to use foam in countless ways (much like plastic more generally).
And even for us, foam still made its way into the build with some insulated headers, the basement slab-wall connection, and over-insulated window frames. It wasn't just Passive House details that we had to fight for, almost everything in our build was a grind, so in these instances foam was a concession made on the fly. If I could do it over, I'd have an alternative in place ahead of time.
And I agree, one of the best ways to use rigid foam is by utilizing reclaimed foam that would otherwise be destined for a landfill.
Hi Eric,
I'm considering using the Cor A Vent strips for a rainscreen project. I'm curious if you found them easy to install and would recommend them if you could do it over, since you mentioned you also added an extra bug screen on top of that in some places.
I also find your experience in your area with siding contractors interesting ( and maybe telling.) Thanks for sharing that. I would also wonder how much of that had to do with the prospect of working for an owner-builder vs doing a 4" Roxul + rainscreen detail specifically. My guess is that the density of contractors willing to roll with that increases the colder the climate zone you get into.
Leigha --- yes, we would use the SV-5 product again for the top and bottom of our walls. It was easy to install, and the additional window screen was just a "belt and suspenders" approach --- maybe we didn't need it, but for little additional cost and time to install it I felt it was well worth it.
On a side note, we were also going to use their S-400 product for the soffits, but once we had it on site and opened the box and got to see it in person we decided to use a metal mesh product instead. The S-400 is probably fine, but seeing it in person didn't instill much confidence --- it just seemed really flimsy and cheap --- you should've seen Wojtek's stink face as he held the product in his hands.
Whether you're doing the work yourself, or a contractor is involved, I can't recommend enough doing even a small mock-up of the wall assembly (if you can include a penetration like a window opening it's even better). It not only allows you to see how the individual components will all fit together (and thereby allow you to identify potential problem areas), it also allows you to quickly make changes to any one component that doesn't measure up for any reason, long before you're on site under the pressures of an actual build.
In the Chicago area there isn't much consumer demand for "green" building techniques, so most contractors, even if they know about Passive House (which is rare), are free to ignore much of what's been learned in building science over the last 20 years. There aren't any real penalties for continuing with conventional building techniques (e.g. siding directly installed over Tyvek with no rain screen, and certainly no continuous insulation with furring strips). In fact, you could argue building "green" adds a layer of difficulty --- it's now your responsibility to educate your client about why it matters and how it will benefit them without inadvertently planting the seed that you're just out to get more money from them.
And being a homeowner/GC undoubtedly didn't help my cause at all.
There are some Passive House, Pretty Good House, and LEED projects in the area, but they remain the exception --- and they still come with a stigma for most consumers: "Nice, I guess, but how much did that cost?"
Thanks for your input Eric! (Sorry for delay in getting back to you.)
You know, I gotta really second the mock-up idea. I don't think there's a single tool out there that's as useful as that.
> continuous insulation approach, which in theory should better manage seasonal moisture changes:
A lot of money is being spent on this theory and I suggest that there are less expensive approaches that are even MORE effective at preventing sheathing rot. For example, unlike with most exterior foam/mineral-wool, structural sheathing in b) and c) below can experience ZERO hours below condensation temp.
Alternatives to mixed cavity/external insulation:
a) use a 1:5 interior:exterior perm ratio + good interior side air sealing (cold climate) or
b) move the moisture sensitive structural sheathing to the interior side or
c) don't use any structural sheathing and use diagonal steel straps instead
Jon, your comment reminded me of a project I'd seen featured on the 475HPBS website:
https://foursevenfive.com/blog/project-spotlight-three-tree-builds-high-performance-house-without-sheathing/
Chris Corson had a JLC article a few years ago, "An Affordable Passive House", which used Larsen trusses, and it appears he's continued with something similar for his new company:
http://www.ecocor.us
I think either approach is well worth pursuing, but both might face strong resistance from contractors and even a local building department. I naively thought continuous insulation was fairly straightforward, but I clearly underestimated just how far behind we are here in the Midwest when it comes to "green" building, let alone Passive House. Contractors around here, with some exceptions, don't seem interested, and those that are struggle to find clients who are willing to pursue "green" building techniques.
For someone in the Midwest who wants to pursue Passive House, or the Pretty Good House concept, ideally it would be a self-build, but if that's not possible then finding a designer, architect, or GC who can match your enthusiasm for change and innovation would be your best bet --- not an easy thing to find in my experience. We initially went with local Passive House "experts" and ended up badly burned financially. Without mandated change via residential codes, I don't see the situation improving much here in the Midwest in the short term.
> but both might face strong resistance
I agree. On the other hand, something like DensGlass or fiberboard on the exterior (replacing the familiar OSB) and adding some steel straps should cause little resistance. But it will require a thicker wall to achieve the same R value.
https://www.icc-es.org/wp-content/uploads/report-directory/ESR-2608.pdf
Most inspectors would still want to see the engineer's stamp on any steel strap sheer bracing detail using DensGlass sheathing (which isn't very structural).
Fiberboard can meet structural standards for most locations if the fastener spacing & type meet the manufacturers' specs, but even that is unusual enough to give inspectors pause. Making fiberboard fully air tight over the longer term can be tough too. Despite the air sealing issue I'm still a fan of fiberboard sheathing for its R-value, permeance & water tolerance, and thermal mass.
There are several vendors of thicker fiberboard sheathing in Europe, but essentially none in the US. In Canada there is SonoClimat ECO4, but it's a bit hard to find outside of Quebec.
https://www.mslfibre.com/Produits/Fiche/13/SONOclimatECO4
I used to work with Chris Corson at Ecocor when we were developing their panelized product and I don't recall any issues with building inspectors, maybe because the structural part of the system is code compliant and visible at installation.
You can order SonoClimat ECO4 fiberboard sheathing from Performance Building Supply in Portland, Maine: https://performancebuildingsupply.com/
My hat off to you Eric and the sheer willpower required to pull off the build.
Reading through this plus my experience with rigid mineral wool, I'm getting more convinced that it is the wrong product for exterior insulation on residential.
4" of Comfortboard 80 has the same amount of mineral wool as 16" Comfortbatt. You get only R16 performance where for the same amount of material you could get R64.
If one doesn't want foam, go with one of the double studs walls or Larsen truss setups with regular batts. Not only is the material way cheaper, most builders can build it.
Thanks Akos!
Although installing and detailing the 2 layers of Rockwool turned out well, and Wojtek and Mark are now in a position to easily repeat this type of set-up, or something very much like it, point taken --- the wall assembly details are one of many aspects of the build that I would reconsider if I could do it all over again.
Log in or create an account to post a comment.
Sign up Log in