Image Credit: Eric Whetzel
Image Credit: Eric Whetzel Installing a 2x6 in the same plane as the bottom of the roof trusses provided an anchor at the perimeter for the Intello membrane. We used this staple gun. It worked well, after I figured out how to load the staples. A dotted line on the Intello membrane helped keep the seam between rows straight, and was a guide for applying the sealing tape.
More Guest Blogs


Editor’s note: This post is one of a series by Eric Whetzel about the design and construction of his house in Palatine, Illinois, a suburb of Chicago. The first blog in his series was called An Introduction to a New Passive House Project; a list of Eric’s previous posts appears below. For more details, see Eric’s blog, Kimchi & Kraut.
Floris Keverling Buisman, from 475 High Performance Building Supply, did our WUFI analysis and suggested the Intello would be a better fit for our project than Zip sheathing. Intello is a smart vapor retarder, so it can expand and contract as needed, and it’s obviously less physically demanding to install than Zip sheathing.
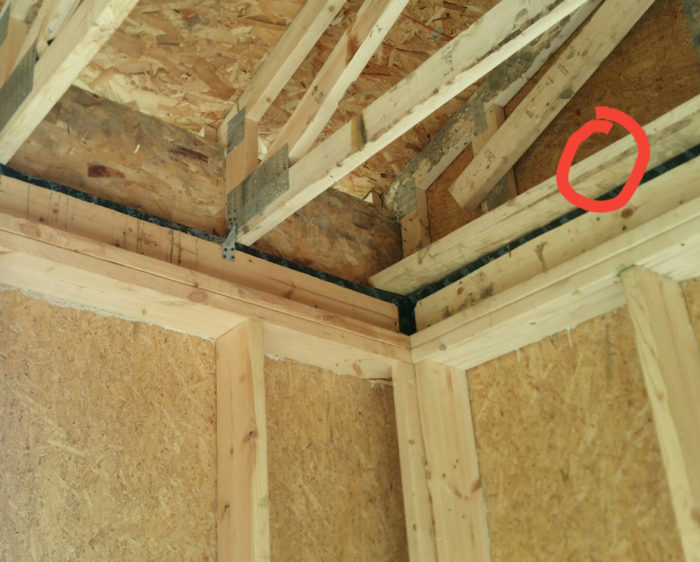
Once the air sealing was complete around the top of our outside perimeter walls, and the insulation chutes had been installed, we were almost ready for the Intello. At the gable ends of the house, one last detail needed to be put in place (circled in red in Image #2 at the bottom of the page).
Adding this 2×6 on the flat, which is in the same plane as the bottom of the roof trusses, makes it possible to carry the Intello over the transition from the ceiling (under the roof trusses) to the walls (top plates). This is one of those details that is hard to “see” when in the planning, more abstract, and two-dimensional phase of designing a structure.
Once the trusses were placed on the top of the walls and you start imagining how the Intello will be attached to the ceiling, it becomes much more obvious that something in this space at the gable ends of the house is needed in order to accomplish the transition from the ceiling to the walls.
Installation is easy — with some help
After reading about so many other projects that utilized Intello, it was exciting to unwrap the first box. The directions are pretty straightforward, and the product is relatively easy to install, as long as you don’t have to do it alone.
I didn’t get a chance to touch and feel the product before ordering (always fun to do with any new product). The front side, the side facing the living space, is shiny. The back has a matte finish. I was curious about its strength and tried to tear it with various objects, including the cut ends of 2x4s and the brackets we eventually used to help establish our service core. The material is surprisingly tear-resistant, but a utility knife, or a stray sharp edge will cut through it (as our first plumber proved to me with his careless actions — a story for another post).
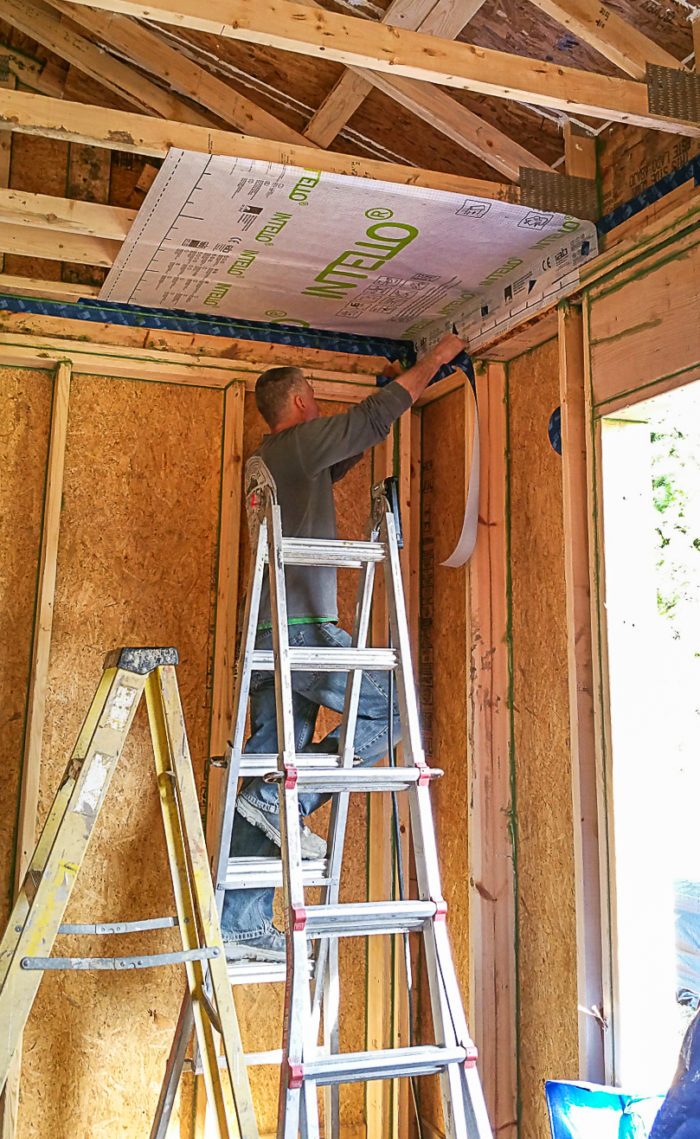
Having never used the Intello before, I decided to start small and began by experimenting with it in a corner (see the image posted at the top of this blog). Getting the corners fully covered while getting the material to sit flat before applying the blue Tescon Vana tape proved to be the most challenging part of using the Intello.
In order to attach the Intello to the bottom of the roof trusses, we used the staple gun shown in Image #3 below. Loading it is kind of counterintuitive. (Online reviews complain about it not working out of the box, but my guess is — like me — they were trying to load it improperly.) Once I figured it out, it ended up working really well, almost never jamming, and it’s very comfortable to hold because it’s so light. It should work with any standard air compressor. It was available on Amazon and in Menards, a local big box store here in the Chicago suburbs.
Instead of loading from the bottom, like all the finish nailers I’ve ever used, the staples load higher up, where the staples exit. And yes, there was quite a bit of swearing as I made the transition from “What the…” to “Ohhhh, now I get it…”. It didn’t help that there were virtually no instructions on its use, apart from a tiny black sticker with an arrow pointing to where to load it (which, of course, I only noticed after figuring this out).
The heavy duty Arrow staples we ended up with seemed to grab better (presumably the sharp ends make a difference), and they sit flatter on a more consistent basis (less time having to go back, or stop, to hammer home proud staples flat).
Getting the hang of it right on time
As we rolled out the Intello, it took some practice to get it to sit taut and flat before stapling.
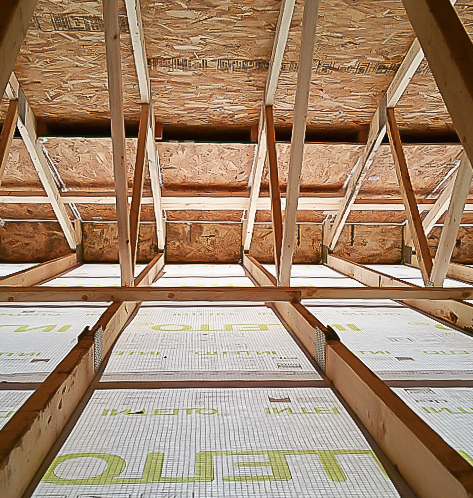
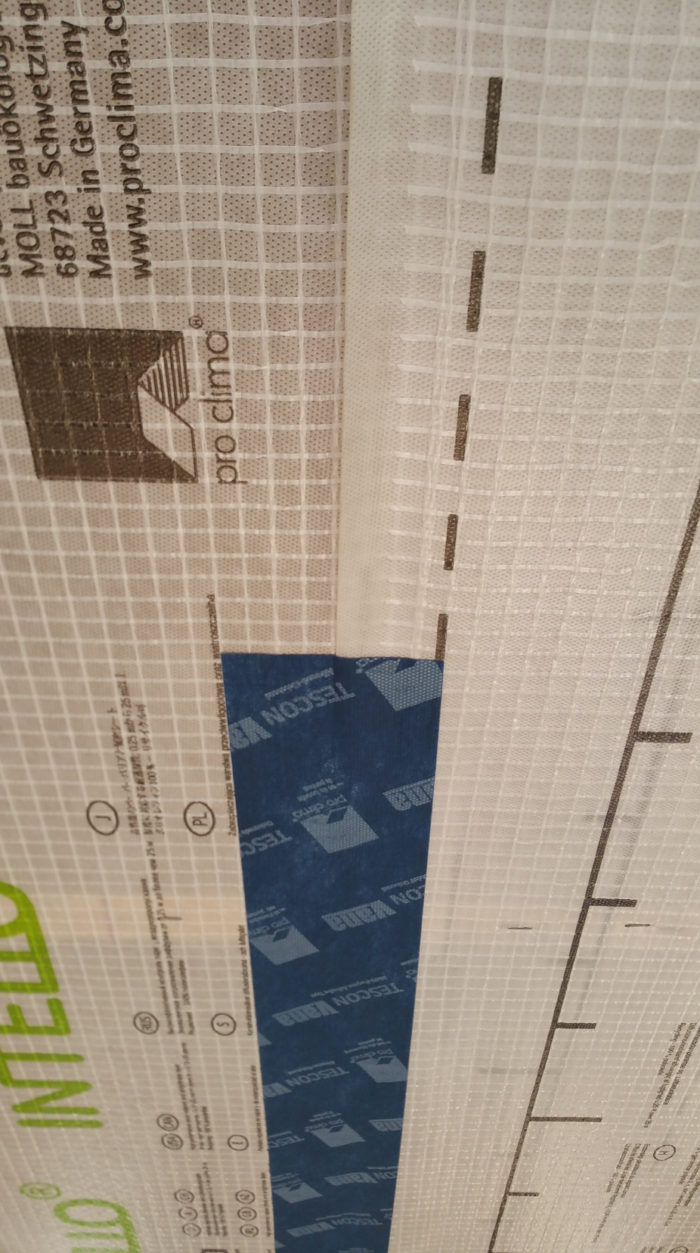
The dotted lines near the edges of the Intello (see Image #4 below) help you keep the rows straight as you overlap two sheets and progress from one row to the next. The lines also make it easier to maintain a straight line with the Tescon Vana tape (don’t ask me when I realized this latter detail — too embarrassing to admit).
Working our way through the interior walls, especially the bathrooms, was more time-consuming and took more effort. (I grew to hate those interior bathroom walls — first the Intello, then the service core details described below.) But once we were out in the open, the Intello was fairly easy to install.
As Eduardo and Jesus rolled out sections of the Intello, I followed, pulling on the Intello a little to help make it sit tight and flat, before stapling. There were a couple of sections, some of the first ones we installed, that I managed to wrinkle (one, in particular, became problematic during our first blower door test — and, of course, it was in a tight spot around the bathroom shower area), but overall, the installation of the Intello went pretty well. Like most things you do for the first time, we got comfortable and good at it just as we were finishing up.
We decided to use Tescon Vana tape to cover the staples, as well as all the seams, in the Intello. I have no idea what actual impact covering the staples has on airtightness, but visually as you tape over the staples you can see how, if nothing else, it will help the staples resist pulling out under pressure from the eventual blown-in cellulose in the attic.
Even as the build progresses, it’s interesting how details like this pop up, making building “green” a never-ending process of learning something new — someone’s always coming up with a new product or a new way to do things better, faster, or less complicated — which makes the process itself very exciting.
Weekly Newsletter
Get building science and energy efficiency advice, plus special offers, in your inbox.


15 Comments
A ceiling below a vented
A ceiling below a vented attic is not a challenging moisture situation. Why not use Typar house wrap at 1/4 the cost?
Eric
Maybe you covered it in earlier blogs and I've just forgotten: Why is there a 2"x6" above the top plates on the walls? Is this a service space, or is the ceiling at the level of the bottom chord of the trusses?
Intello and the 2x6's
Jon R. --- One of the frustrations associated with building an energy efficient home, in my experience anyway, is trying to figure out who has the most accurate information. Resources like Building Science Corporation, Hammer and Hand, 475 HPBS, and Fine Homebuilding/GBA have been invaluable --- there's no way we could have gotten as far as we have without vast amounts of help from all of them.
Nevertheless, it's not uncommon, for example, to ask a question here on GBA and end up with a range of answers, or even contradictory answers:
https://www.greenbuildingadvisor.com/community/forum/green-building-techniques/98624/zip-board-sheathingwrb-any-danger-intello-plus-behin
Rather than interpret this situation cynically, as a case of "no one seems to know what they're talking about", it seems like the field of "green building" is very alive, meaning there is always new research and products becoming available, and there's a (sometimes painful) process of evaluating assumptions, some of which must inevitably change. I can only assume this makes the field very exciting to work in, but for outsiders it can spell confusion as you try to reach some conclusions and make decisions that have financial and even structural/durability implications. This is a long-winded way of saying, in the end, Intello seemed like the safest bet to us.
Malcolm --- Yes, the 2x6's serve as a service core.
Air Tight Drywall
Hello Eric, I was wondering if you considered using the Airtight Drywall Approach. And, if you did, why did you choose the Intello over that? Thanks.
Use strapping
Our ceiling trusses were 24" on center. We stapled Siga Majpel to the underside and nailed 1x4 strapping at 16" on center, then hung drywall, then blew 24" of cellulose in top, because we were concerned about the weight of all that insulation. While the Majpel or Intello probably would hold the weight, it would probably sag some and maybe hinder drywall installation. Strapping is cheap.
Since we did all that before any interior partitions were installed, it was pretty easy.
Great Information!
Thanks Stephen and Michael; Great information!
Michael, love the calculations- 57 cubic feet/hr of air leakage seems significant for the Typar option. This probably doesn't help the vapor situation in the attic either.
Quick question as I attempt to keep up: If the Typar allows more air leakage, why does it have a lower ACH@75 than the Intello? Did you intend to write 0.01 ACH75 for Intello?
Tyvek over intello
Jon R- I have often thought of using a lower perm wrb-like Typar- as the ceiling airbarrier as well. So long as the insulation is adequate and located above the air barrier (which should be air tight) I cant think of any issues with this. I presume this might work for double stud walls too so long as you treat the interior typar layer as an air barrier.
The only issue may be whether or not a wrb would support the weight of dozens of inches of cellulose. Floris, at 475 has stated that intello can hold R-100 loose fill cellulose with seems stitch-taped. Tyvek might pop. Membrane would keep me up at night...
Otherwise I like the idea! Any other thoughts from community?
Rick
You caught a mistake, which I've corrected (thanks) but it's not very dramatic--4.5 cubic feet per hour vs. 57 cubic feet per hour doesn't make a big difference when you're talking about 12,000 cubic feet--a difference of less than half a percent of the total volume moved per hour. I'm still a fan of Intello, but in theory at least its air tightness relative to Typar is not really a factor.
Intello Plus lists 0.00005
Intello Plus is rated at 0.00005 cfm/ft² per ASTM E2178, the test for air flow resistance, at 75 Pa. Typar is 0.00063 cfm/ft², an order of magnitude more open to air.
If we were just looking at using one material vs. the other on the ceiling as the only air barrier, the difference (at 75 Pa) in a 1500 ft² house with an 8' ceiling would be 56.7 ft³/hr vs. 4.5 ft³/hr. Since the total volume would be 12,000 ft³, though, the difference is virtually impossible to measure. If Typar provided 1.0 ACH75, Intello would provide 0.996 ACH75. And since ACH numbers are typically measured at 50 Pa, the difference would be even less.
Looking at it another way, PHIUS+ sets a standard of 0.08 CFM75/ft² of envelope. Both products beat this by several orders of magnitude.
As for durability, I can vouch that Intello is extremely durable, and literally made for this application. Typar, in my experience, tends to tear at fasteners, and I would not trust it without another means of supporting the insulation. But I have not tested it in this application in person. Further, while it's true that a vented attic is pretty safe in terms of moisture movement, I don't see a reason to allow more moisture to diffuse into the attic than necessary; Intello is much more vapor-closed (0.13 Perms) than Typar or painted drywall when the relative humidity is low.
I know Martin prefers to just use an airtight drywall approach. That's fine if you have few or no ceiling penetrations, but it's pretty tedious to have to make multiple penetrations airtight. It also means that you probably have to install the ceiling drywall out of sequence. Not impossible, but a wrench in the schedule at best.
Thanks Michael
Very helpful, Michael- thank you!
Filing grievance
Eric, great job taking a role in building your own house!
I have noticed a running theme in the homeowner written blogs about their experiences building or general contracting their own home. Complaints about subcontractors! I understand finances play a major role for someone deciding to take a hands on approach in these situations so it really comes as no surprise the struggle relayed about subs, material acquisition, and design-on-the-fly. Professionals in the trades struggle with these things as well but for the most part a true professional has long since past the times of these struggles. Which leads me to my point, hiring experience pays for itself many times over. An experienced architect will work through most of the design details that cause delays once construction starts and drastically reduces time spent troubleshooting in the field. Experienced excavation, concrete, and framing contractors save money even when their numbers come in significantly higher than the dude with a truck and trailer. Meetings prior to breaking ground with each trade who will work on the project will set the project up for success. Letting everyone know the goals of the project and the expectations you have of them, again set it up for success. This can be a mult-year process, especially when undertaking high performance build.
A blog series, or feature articles by GBA and FHB, on this process would be a great resource for anyone aspiring to build better than code. It could even spark great discussions in the comments, which are always a good read after the original post/article.
Response to Mark Pollard
Mark,
Thanks for your comments. I agree that most owner-builders vastly underestimate the value of hiring an experienced general contractor.
GBA is always on the lookout for guest blogs. If an architect or GC wants to take on the topic suggested by Mark Pollard, feel free to contact me: martin [at] greenbuildingadvisor [dot] com.
We took on the role of GC out of desperation
Thanks Mark!
I couldn't agree more: a competent professional --- architect, GC, or subcontractor --- is worth every penny. The problem is finding one.
We tried to go the "expert" route when we hired our first GC. On paper they were great --- previous Passive House projects, they had all the familiar "green" building certifications, and yet things still went poorly. Our big mistake was believing the hype --- their marketing, and published stories about their projects --- without contacting their former clients directly to find out exactly what their experience was really like. One client who sat down with us after things went south on our project put it succinctly: "They (meaning builders/GC's) are all the same."
After having to fire our second pair of GC's, it's difficult to avoid such cynicism. You can read about our experience here:
https://kimchiandkraut.net/2016/05/05/when-building-a-passive-house-goes-horribly-wrong/
When you hear about someone building new, or renovating, the common story is stress, frustration, blown budgets, poor workmanship, and broken promises regarding project completion dates. A successful project is almost unheard of --- at least among consumers.
Based on our own experience (which I don't believe is all that unique), there are two main reasons for this:
One, the industry (much like Joel Salatin argues regarding farming in the US) is filled with too many former D students. They ended up in the trades not because they love to work with their hands, or because they're pursuing expertise as skilled craftsman, rather it was a lack of other options.
In our own case, our subcontractors have been one extreme or the other: Either we would recommend them to family and friends, and we wish them all the best (and they are real professionals), or we think they should be in jail. There hasn't been much in-between.
Secondly, there aren't any real consequences for being a lousy GC or contractor. If things go poorly, if your client even pursues legal action against you, your "get out of jail card" is to close up shop and, in a legal sense, cease to exist. And then, of course, you're allowed to open up a new business, under a new name, and you can start the process all over again. Meanwhile, for their clients it's a very different story: bankruptcy, a half-finished mess, paying twice for the same work, etc.
It doesn't help that as a society we don't seem to give those in the trades much respect (yet when the toilet backs up we all --- doctors, lawyers, fill in the college educated profession --- call a plumber), or that we get the balance between cost and quality wrong (i.e. too much price shopping without understanding the potential consequences --- both for the individual tradesman and the industry at large).
There's a reason experienced builders use the same subcontractors over and over --- to do otherwise would mean banging your head against a wall as you encounter countless problems. Matt Risinger has a video where he talks about not doing bids and dealing with only architects, while using the same team of subcontractors on every job. This is totally understandable.
Unfortunately for consumers, even with online reviews or the recommendations of family or friends, finding competent architects, builders, or tradesmen is no easy task.
Until there are real consequences for screwing up --- both in terms of budget and workmanship --- as a contractor or builder (meaning you're held personally responsible for your actions), and until we treat the trades as professions worthy of the kind of social status we associate with a college educated professional, it's hard to imagine things changing.
Eric
I agree. Being able to use a stable group of sub-trades over time is one of the main advantages pros have over owner/builders. Knowing who you can trust is knowledge you acquire over time, and usually at some cost.
Like any other skills, designing and building are things that get better with experience. The disadvantage owner/builders face is that they have to live with the inevitable mistakes you make as you learn. Of course mitigating that is the immense satisfaction that comes from building your own home.
Response to Eric, #13
Eric,
Sorry to hear of your troubles! I want to clarify that my original post was in no way being critical of you or of the other guest blogs, I am pretty sure you picked up on that judging by your great response!
You hit the nail right on the head talking about finding competent subs and general contractors. It ain't easy, as they say. As a project lead for a GC for the past 15 years, we have gone through a laundry list of subs to find our core go-to group. I do not hesitate to recommend any of these professionals should someone ask, such as another GC or a homeowner. I am sad to say that some of my recommendations have come back with very negative experiences. This is due to a variety of reasons but mostly because of unrealistic expectations for completion of work. I do not envy the trades whose role is a mere percentage of time on the total project. Electricians and plumbers in particular expend too much effort juggling their schedules. As a GC, if my framing schedule is delayed by a week or two due to bad weather, sicknesses, etc, it pushes everyone following out as well. On a large scale project, such as a new home, it is nearly impossible to catch up. Company owner's do not like to pay overtime because it heavily cuts into profits, crew members with families really don't like to work much over 40-45 hrs/wk, it is really only the single 20-35 year olds who love the OT and working 50-60 hrs/wk! Pulling crew from other projects to help on the delayed job is not a good business practice, and hiring short term, quality employees is impossible. The compounding of these delays can sometimes add up to months, which is the single hardest aspect of project management, in my opinion. The only way of mitigating this disappointment and frustration of the homeowner is to be very timely with communication. Weekly updates and transparency with the schedule are key. Before a customer signs the contract, an open and honest conversation about the completion date should be had. If it means the exterior of the house lags behind so the homeowner can move in to a completed interior, so be it. They are usually happy knowing this a possibility rather than wondering how they are going to extend a lease or delay the sale of their current home.
So long story short. Completing projects on time, producing quality results, and satisfying the customer is nearly impossible, if not completely impossible. I would be very wary of the GC openly admitting to delays but promising to be done on time. As far as resources to find quality GCs and professional tradespeople, it still comes down to asking around. Horrible answer but it really is the only way. Until we have certified trade programs (apprentice, journey, master) in this country, mandated licensing with consequences AND merits, we are going to be reading about and hearing stories like Eric's for a long time.
Log in or create an account to post a comment.
Sign up Log in