Image Credit: Eric Whetzel
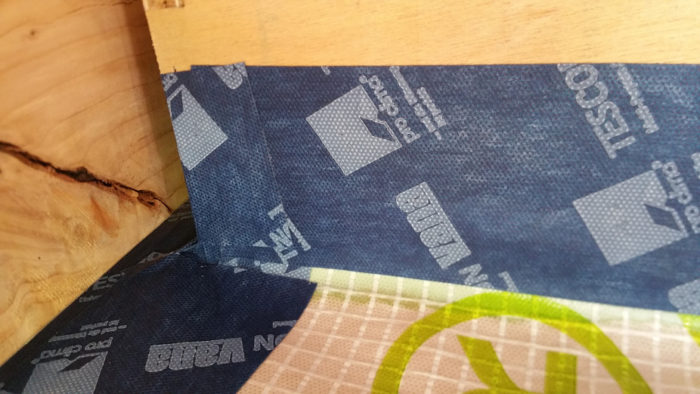
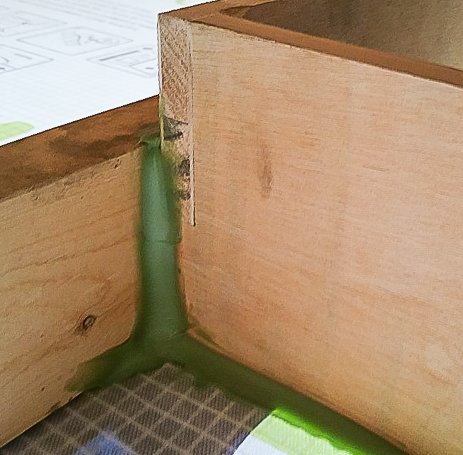
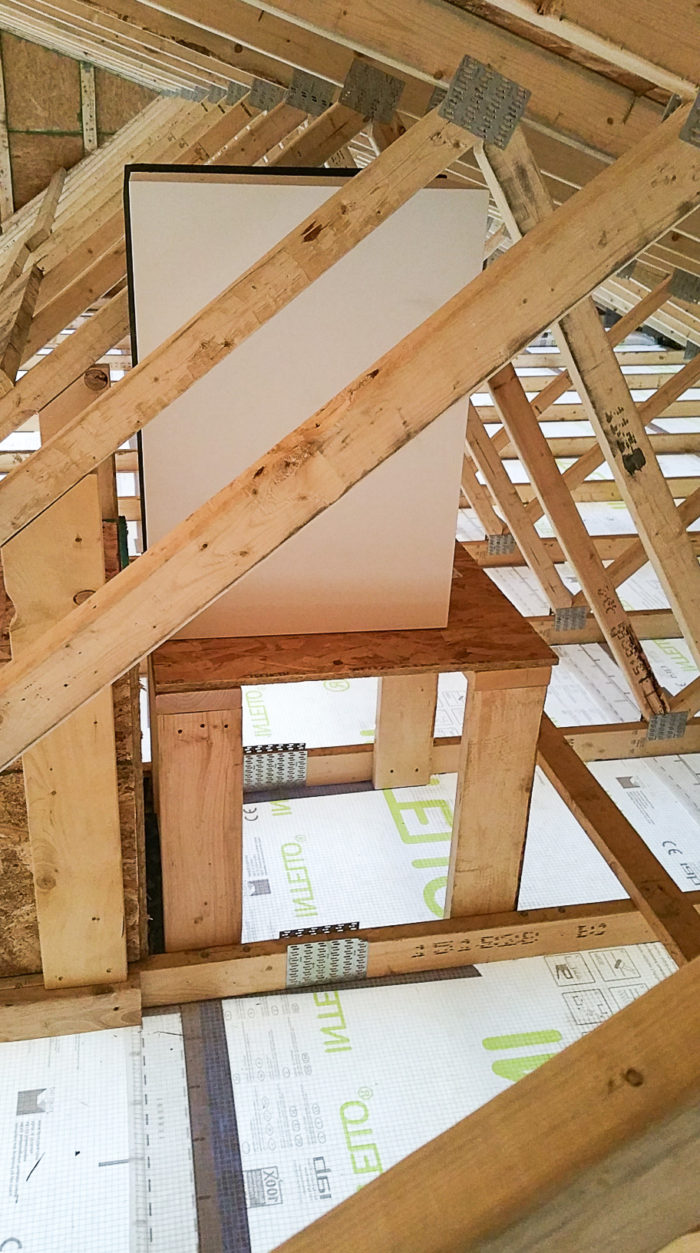
Image Credit: Eric Whetzel Tescon Vana tape seals the Intello membrane to the sides of the hatch. Contega HF sealant is another line of defense against air leaks around the attic hatch. The sides of the hatch were extended with pieces of OSB sheathing to accommodate the blown-in cellulose attic insulation. The fourth and final side was installed just prior to blowing in the insulation — in the interim, the missing side made it much easier to get in and out of the attic. When using the hatch, the lid can be stowed on this platform.
More Guest Blogs


Editor’s note: This post is one of a series by Eric Whetzel about the design and construction of his house in Palatine, Illinois, a suburb of Chicago. A list of Eric’s previous posts appears below. For more details, see Eric’s blog, Kimchi & Kraut.
Our attic is designed mainly to hold our blown-in insulation (a future post will go over the details), as opposed to a place for running HVAC equipment, conduit for electric, or as a potential area for carving out additional storage space.
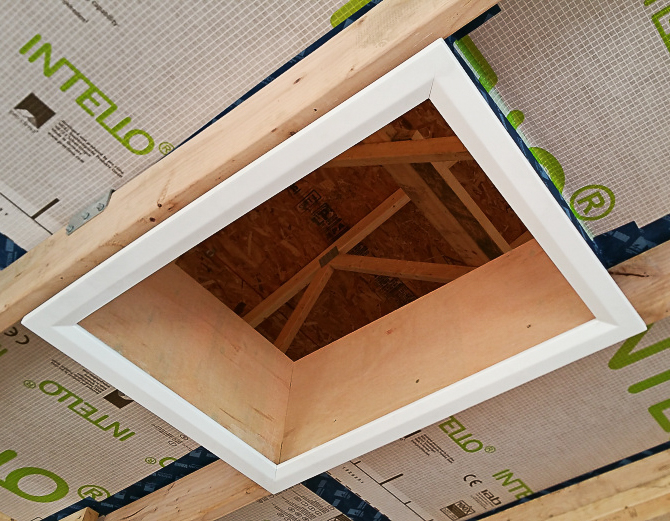
Nevertheless, in order to have access to our attic for future maintenance or repairs, I installed a well-insulated attic hatch in a closet ceiling in our master bedroom.
In keeping with Passive House and Pretty Good House principles, I tried to protect the thermal envelope, even in this relatively small area, and avoid what can be a notorious point of air leakage and heat loss (i.e., the stack effect).
There were two main products I considered using for this. One was the Battic Door (R-50 / without ladder). The company also has a product called the Battic Stair Cover that allows for a built-in ladder for easier access to the attic (you won’t need to drag your ladder in from the garage) while also maintaining a high R-value.
The other product I considered using was from ESS Energy Products, the Energy Guardian Push Up Hatch Cover. We ended up going with the Battic Door hatch, which I purchased through the Home Depot website (this saved me a trip to the store since it was delivered to site).
An Austrian company, Wippro, makes a Passive House certified pull-down hatch and ladder called the Klimatec 160. It had been carried by 475 High Performance Building Supply but is no longer available.
Another possibility is an attic ladder sold by Conservation Technology.
I thought the Battic hatch was the better choice since it seemed like it would be a little sturdier and more durable. To be honest, once the product arrived and I unpacked it, I realized it was something I, or anyone with basic carpentry skills, could put together themselves (assuming you have the time).
Installation
Following the directions, I cut an “X” in the Intello on the ceiling between two roof trusses (and our 2×6 service core below each truss) in order to establish the opening for the Battic frame.
I folded the cut edges of Intello up into the attic for the two long sides of the Battic frame. For the two shorter sides of the Battic frame it was easier for air sealing to push the Intello down into the living area. Then I screwed the Battic frame into place.
Once it was in place, I used a mix of Contega HF Sealant and Tescon Vana tape to seal the Intello to the Battic frame (see Images #2 and #3 below).
Once the outside perimeter of the Battic frame had been sealed to the Intello, the only place left for air infiltration was where the lid would meet the frame of the Battic hatch once it was installed (more on this later when I discuss my first blower door test).
There was some additional framing required, but it was just a couple of headers between the roof trusses to add structural integrity to the two shorter sides of the Battic frame.
Since we were using a significant amount of blown-in insulation in the attic, it made it necessary to build up the sides of the Battic frame in the attic with some OSB to get the top of the opening above where the insulation would eventually stop (see Image #4 below).
After a couple of practice attempts, it quickly became apparent that raising and removing the lid once in place, and fighting to get it back down into the master bedroom closet, wasn’t worth the trouble. Instead, I built a small bench in the attic next to the Battic frame so I could push the lid up above the level of blown-in insulation (see Image #5 below). This way, the lid was safely stowed while I dealt with any issue in the attic.
It’s very easy to grab the lid off the bench and bring it back down into position while slowly walking down the ladder in the master bedroom closet to make the final connection/seal.
Consider access from a gable end
Although the installation process was fairly straightforward and headache-free for the Battic product, if I had it to do over, I think I would locate the attic access point on the exterior of the structure — for example, on the gable end of the house in the backyard.
Putting the access point above the air barrier would make meticulously air sealing the entry point for the attic less important, so keeping water out of the attic would be the main goal. An additional plywood buck would’ve been necessary, replicating what I did for our windows and doors (more on this later), but I think it still would’ve been the better option overall.
Putting the attic access on the exterior of the house also would mean avoiding an ugly hole somewhere in our drywalled ceiling. No matter how nicely trimmed out, these attic access points on the interior of a home never look right to me. We’ve tried to hide ours as much as possible by sticking it in our master bedroom closet, which has worked out well, but not having one at all on the interior of the house would make for a cleaner, better solution in my opinion.
If granted a do-over, I would also add a catwalk in the attic, through the roof trusses, in order to make getting to any point in the attic much easier to navigate, when necessary in the future, while also avoiding disturbing the blown-in insulation too much.
Weekly Newsletter
Get building science and energy efficiency advice, plus special offers, in your inbox.


7 Comments
Great Work
It looks like you did the best you could, when going up through a ceiling. We are trying to plan to go through a gable-end but, with a dutch gable roof, the available area will be tight. There is a minimum access hatch area required by code.
Has anyone tried to go up under a wide overhang and then through the gap made by a raised heel truss? My sketches don't seem to make this work, but it seems possible in principle if the heel is high enough.
Exterior access definitely seems to be the best option, where possible.
John
I'm not sure the raised-heel helps much, as it will be covered by insulation leaving you about the same amount of free area as with conventional trusses. If the floor plan has a recess in the exterior walls that the trusses extend over you might fit one in. it depends on the roof pitch, but you are probably looking at a six foot (or more) overhang to make it work.
I agree - if you are going to put the hatch in the ceiling Eric has done a great job.
great job
Looks like a great air sealing job. Eric, keep and eye on this one when you do your blower door test. It will tell you whether or not your hatch is nice and tight. I made my own hatch. Did the blower door test and thermal imaging. There is a cool rim around the hatch way but just from thermal loss and there was no air leakage. The cool rim wasn't that surprising. its a couple of degrees cooler than room temperature but not cool enough to cause any condensation.
A catwalk is definitely a welcome addition to the attic from an acccessibility point of view. I've been up there several times now and without it would make it impossible to move around. My insulator was also quite happy. He spent most of his time on the catwalk while blowing insulation into the attic space.
I tossed around the idea of an exterior access to the attic. But gave up for several reasons including the fact that it would be hard to get a good weather tight seal at my location (high wind, lots of rain) and accessing from the gable end on a 2 storey would make attic inspection impossible for me...I'm afraid of heights!
Thanks Malcolm
Malcolm, your point about the insulation is a good one. I contemplated having a spot where the insulation was a bit thinner, since it wouldn't be as big a compromise as a ceiling hatch. However, the heel would still have needed to be very tall (and overhang wide) or the roof pitch steep, as you say.
David, I happen to like the "Dutch" gable (or "Japanese" gable) since it provides better overhang on the end walls. The other upside is that it gives a place to stand when opening the gable hatch. I admit that heights don't bother me much, though. This is a nice article showing a dutch hip roof, although for a very different climate application:
http://www.thisiscarpentry.com/2015/01/09/the-dutch-hip/
My only concern with this design is nesting birds in the small gable ends - a location that is harder to clean.
I also like catwalks. I really wished I had one when I had to run wire for a security system through a large attic a few years ago and had to balance on truss bottom chords buried beneath blown-in fibreglass insulation.
David
Whenever I can I locate the attic access on a gable end. I had never thought of the location discouraging inspections, but of course you are right. Even if you aren't worried about heights, dragging out a ladder and unscrewing the door makes the job less appealing than poking your head through a hatch - although if the hatch were situated in my wife's closet, it would involve a fair amount of work to get to.
This is a very informative and useful article. I'm planning to do this, but I have found attic access doors that can be useful as well. I've tried one of these and they're very easy to use to reach your attic.
Found them here: https://www.bestaccessdoors.com/ceiling-attic-access-doors/
I built mine on site using a piece of OSB, taping 8" of XPS to it, and installing weatherstrip on the lip and two large eye hooks to hold it in place. My air seal is Zip sheathing on top of the ceiling joists, so everything it taped with Zip tape. Works fine with minimal leakage. Also have no systems in the attic so I never go up there. We framed a short wall to retain the insulation and the hatch sits on top of the wall if I need access to the space.
Log in or create an account to post a comment.
Sign up Log in