Image Credit: Eric Whetzel
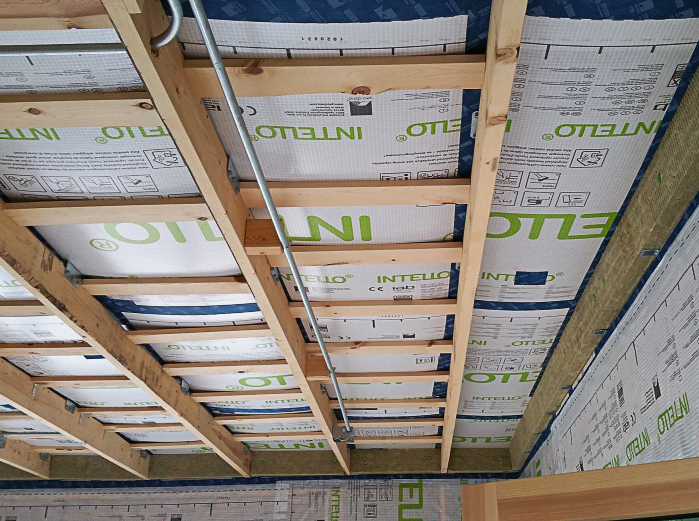
Image Credit: Eric Whetzel Keeping the cellulose out of the ventilation chutes (and, consequently, out of the soffits) was important. At its deepest, the cellulose probably totaled about 30 inches. Even where the cellulose was at its deepest, the sag in the Intello air barrier in the ceiling below was insignificant.
More Guest Blogs


Editor’s note: This post is one of a series by Eric Whetzel about the design and construction of his house in Palatine, Illinois, a suburb of Chicago. A list of Eric’s previous posts appears below. For more details, see Eric’s blog, Kimchi & Kraut.
For high-performance structures, relatively high R-values for insulation (at least when compared to current building code requirements) are required from the foundation all the way up to the attic.
After some initial research and product pricing, we knew we were going to predominantly use Roxul (with its recent name change, it’s now known as Rockwool) for our insulation needs. But after realizing that blown-in rock wool wasn’t available, and that batts didn’t make much sense for this application (too costly, and they’re considered more difficult to install properly), we knew we wanted some kind of blown-in insulation. The main options, currently, are fiberglass and cellulose.
We wanted to avoid foam as much as possible throughout the build, both because of its environmental impact and the fire risk associated with its use, so we didn’t consider spray foam as a real potential option. After evaluating blown-in fiberglass and cellulose, we decided that cellulose made the most sense for us.
The next decision was to figure out how much, meaning how many inches did we want to blow into the attic. Our first builder was going to do R-49, which is the current code minimum standard here in Illinois. At the time, even before things went horribly wrong with this builder, this felt like too little. I had read stories about other Passive House projects using significantly more, but many of these were in even colder climates than ours. (We’re Climate Zone 5 here in the suburbs of Chicago.)
We decided that rather than settle on a hard R-value as our goal, we would just do a solid 2 feet of cellulose since we would be doing the installation of the material ourselves (it came out to less out near the 12-inch raised heel trusses on the north and south sides of the house). There wasn’t a significantly greater cost in materials to go from an R-49 (just under 15 inches) to the approximately 24 inches we blew into the attic.
After doing a little research, and speaking with a Passive House consultant and a local general contractor who consulted with us on various issues as they arose, the consensus seemed to be that attic insulation was an easy, relatively inexpensive place to sneak in more R-value, which is particularly beneficial in our predominantly cold weather climate. The blown-in cellulose, like the Rockwool, also has some nice sound deadening qualities as an additional benefit.
Rent the machine and do it yourself
The cellulose brand in our local Home Depot is GreenFiber, so that was the product we ended up using. Their product is DIY-friendly, even allowing homeowners to rent machines for the actual installation. (For more information on DIY cellulose, see “Borrowing a Cellulose Blower From a Big Box Store.”)
We started with 200 bags delivered to the job site. We assumed we were going to need more (the GreenFiber insulation calculator suggested we would need 250 bags to reach 2 feet throughout the attic), but I thought it might be easier to estimate a final total once the first 200 bags were installed.
The boys who helped us with various grunt work chores throughout the project were nice enough to return and help us bring the bags of insulation indoors the night before we started the installation in the attic. We set up a bucket brigade between the driveway and the kitchen, so it went pretty quickly.
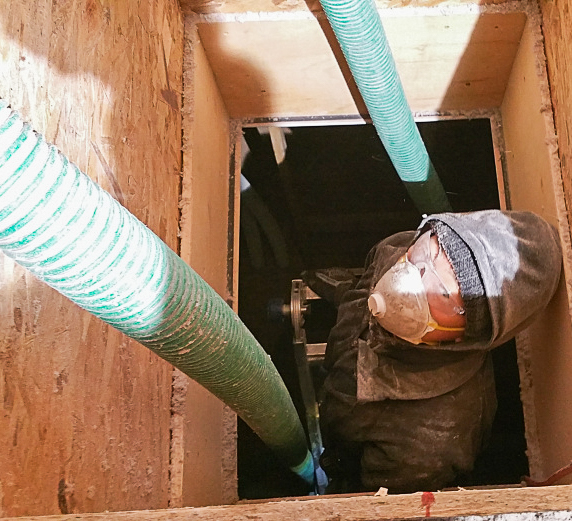
On the day of installation, getting everything set up and started was fairly straightforward. Apart from a loose hose connection at the machine, which a small strip of Tescon Vana tape rectified, we had no issues with the blower. While my wife fed the bags of cellulose into the blower, I was up in the attic directing it into place.
The first couple of hours were actually kind of fun, but getting a consistent two feet of insulation throughout the attic was time-consuming and eventually mind-numbingly boring. The first 12 to 18 inches weren’t so bad; it was having to wait in each section of the attic for that last foot or so to be blown in place that began to feel like real drudgery.
It also didn’t help that I had a fever and a cold on the day of installation, so being up in the attic surrounded and covered in dust didn’t improve my mood. The process, although very DIY-friendly, does require patience and a willingness to cover up — eyes, mouth, and nose — for adequate protection against all the dust floating around.
The day before we blew in the cellulose, I went through the attic and marked my goal of 24 inches of insulation on various roof trusses so I would have a good visual goal to shoot for. In fact, had I known just how dusty and challenging visibility was going to be during the blowing process, I would have marked every single roof truss at the 24-inch level to make the job a little easier.
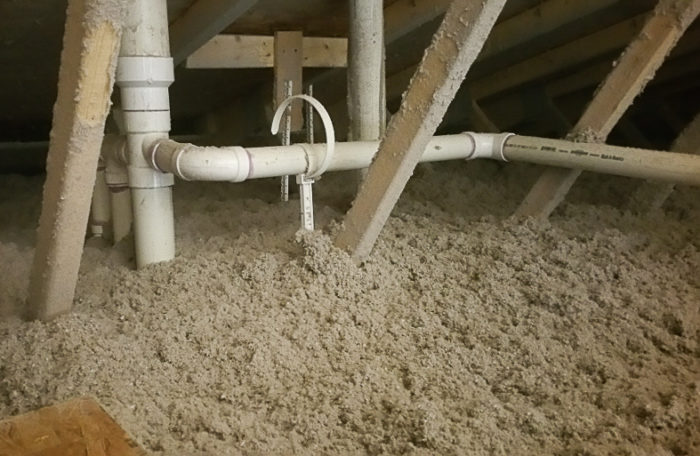
We didn’t have much in the way in terms of obstacles from various services, other than a few pipe vents for plumbing and radon, along with a small amount of electrical conduit for solar on the roof and a single light in the attic (we kept the majority of all services in our ceiling service core and our walls). This made for a fairly straightforward install of the cellulose.
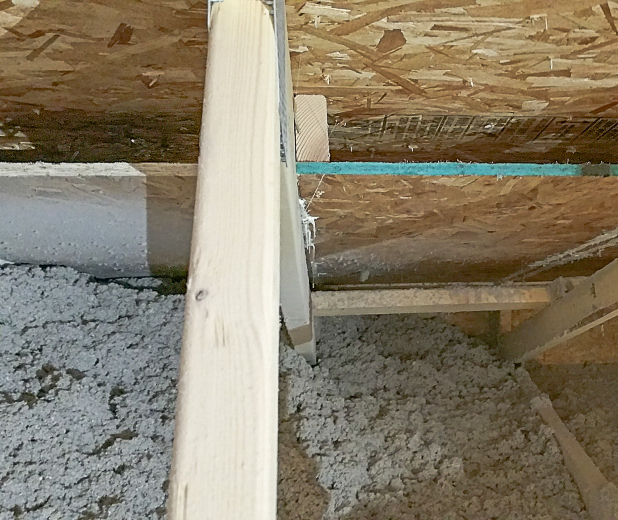
Avoiding the ventilation chutes
Thankfully I was able to keep the cellulose out of the insulation chutes, instead slowly piling it up just below each chute (see Image #2 below). The siding guys already had most of the soffits installed (this was the end of October, 2017), including a channel for air flow for our vented roof assembly, so any cellulose that found its way into the chutes and down into the soffits would’ve been a real pain to remove. (I’ll have a separate post about the siding installation, including the many details of our rainscreen and 4 inches of Rockwool on the exterior side of the Zip sheathing.)
By the end of the first day, it was clear we weren’t going to have enough cellulose to finish the whole attic. We started with 200 bags, but we finished up the second day at just under 300 bags total (288 was the final number of bags installed, so a little more than the 250 recommended by the GreenFiber calculator). What we didn’t use we were able to return to Home Depot for a refund.
Apart from the north and south sides of the attic around the raised-heel trusses, we had a solid 24 inches throughout the attic — in fact, a little more in the center of the attic where it was easiest to pile it up and let it accumulate (closer to 28-30 inches in some areas). This probably explains, too, the additional 38 bags we used that exceeded the initial estimate by the GreenFiber calculator (see Image #3 below).
On a side note, there was also some concern about the weight of the cellulose on the Intello (our ceiling air barrier), but in the end, even where the cellulose was at its deepest, there was thankfully very little sagging evident (see Image #4 below). Even if it had been worse, the 1x4s were in place to help support the Intello and the cellulose for the long term. (The 1x4s were spaced roughly 16 inches apart).
It’s worth keeping in mind that the cellulose will settle a bit, especially during the first few months. This is obviously very important when it comes to establishing what depth you’re initially going to blow in and your expectations about long-term R-value after settling has occurred (something to consider before signing a contract if you’re going to be hiring someone to do the work — both parties should agree and understand what the final R-value will be before the work commences).
Cellulose shows some settling
I was back up in the attic recently as I finished up painting the master bedroom and closet. Since I already had drop cloths down, I thought I should take what will hopefully be one last look at the attic.
On average, the cellulose looks like it has settled about 2 to 4 inches below its original depth, depending on where I looked. Even with this settling, the attic probably still comes in close to R-70 on average —significantly less out at the north and south ends of the roof with the raised-heel trusses, but a little more in spots towards the middle of the attic where some red lines are still hidden below the cellulose.
Just under or over R-70 in the attic is in tune with both the Pretty Good House and Passive House metrics for attic insulation for my climate region.
While I was up in the attic I also noted that there was no evidence of any water or moisture damage on the OSB roof sheathing, or any indication of wind-washing of the cellulose, so the attic seems to be performing as designed, which is a great relief.
Weekly Newsletter
Get building science and energy efficiency advice, plus special offers, in your inbox.


5 Comments
Final R Value
According to Green Fiber's data sheet:
https://goo.gl/De5aKx
If your installed depth is 24.5" and settled is 22.3", you would have an R80 attic. In your case with an average depth quite a bit higher than that, you could be at R92 (26.8" installed and 24.4" settled), a little less when you take your 12" heel areas into account. Should be plenty!
Thanks for sharing. I am planning a cellulose attic with Intello as well. Nice to see sagging was not an issue.
Word of caution with the GreenFiber cellulose. There are several different variations of GreenFiber cellulose. The version our local Home Depot carries is the one in the green bags (INS541LD Blended blow in). This version has up to 11% Ammonium Sulfate and up to 10% Boric Acid. The All Borate Treated blow in version (INS765LD) is special order and has up to 15% Boric Acid, up to 7.5% Sodium Polyborate, and up to 7.5% Sodium Tetraborate Pentahydrate.
I would not want the ammonium sulfate version in my house. If it got wet it becomes a respiratory ailment and stinks.
When wet ammonium sulfate also corrodes things like wiring and nails, metal electrical boxes, etc. It's been banned for use in insulation products in some countries.
Did you also DIY dense pack the walls?
Hi Ethan --- sorry for the delay in responding.
For the walls I installed Roxul (now Rockwool) Batts. I'll be discussing the details in a future blog post.
Log in or create an account to post a comment.
Sign up Log in